I just want to put it out there that this review is for the Hellvape Dead Rabbit V2 RTA, there is also a Dead Rabbit V2 RDA and you shouldn’t confused them, no matter how similar they are RTAs and RDA always perform differently.
If you don’t know who Hellvape are, you must be fairly new to RBAs. Since their launch in 2016, Hellvape have made a huge impact across the DIY vape industry.
Quite interestingly the ‘about us’ page on there website doesn’t brag about anything… at all, it’s a very modestest compared to a lot of other companies websites… Although I do like that there website isn’t very boastful, it does make writing an introduction for such a popular company much harder.
Apart from the Trishul Mechanical Mod and the recently released Grimm Pod Kit; which is a product of a collaboration between Grimm Green, Ohm Boy and Hellvape, their catalogue consists of entirely Tanks and RBAs (2x Sub ohm Tanks, 14 x RDAs, 6 x RTAs and 1 x RDTA).
To name just a few of HellVapes most popular devices there is the;
- Drop Dead RDA
- Destiny RTA
- Dead Rabbit and Dead Rabbit V2 (RDAs and RTAs)
- Rebirth RTA & Rebirth RDA
I have tried most of the above and although I think they are all decent, some of them are really good. Hope’s hope the Dead Rabbit V2 RTA is as good or maybe even better!
What Can We Expect From The HellVape Dead Rabbit V2?
Hellvape Dead Rabbit V2 RTA is obviously the upgraded version of original Dead Rabbit RTA, which begs the question, what has been changed and has it changed for the better?
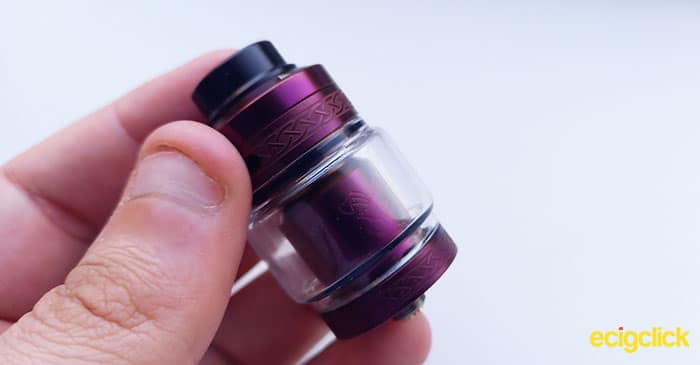
Let’s start from the outside, the first thing I noticed to be different is the top fill. The original Dead Rabbit RTA did have a top fill system, where you had to remove the top cap, the V2 has a push/slide out top fill cap; definitely an upgrade in my opinion.
It still has knurled grip where it’s needed but is has been upgraded to a more aesthetically pleasing and unique pattern.
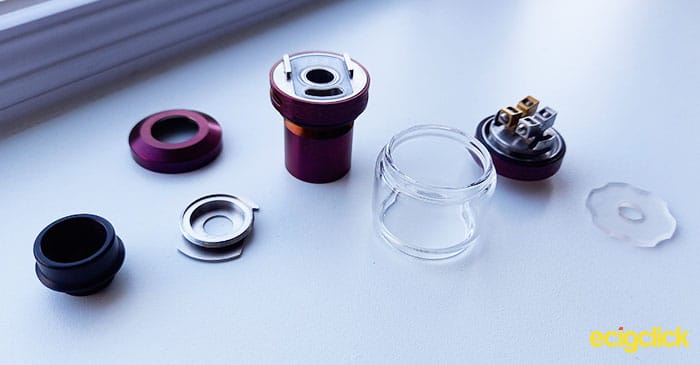
On the bottom there is this strange looking cog thing, this is a PC insulation plate to prevent heat transfer to your mod.
Going inside, the top side adjustable airflow is upgraded to diagonal honeycomb airflow to focus on flavor and to minimize leaking.
The Dead Rabbit V2 RTA has similar ‘Rabbit Ear’ style posts to its predecessor but like the Dead Rabbit V2 RDA these posts are angled in a “Y” shape, making it easier to trim the coil legs. The holes are also bigger, allowing the use of thicker coils to fit the clamp.
Integrated deck with anti rotation, this is basically a system then ensures the coils are always positioned in the right place in accordance to the airflow direction.
I’m an RDA or RDTA person, I don’t think many RTAs are capable of producing flavour like RDAs and RDTA’s can, so that’s something I’m going to be looking for. Also Hellvape claim this beast can handle single and dual coils… we’ll see about that!
I’m a simple guy, all I really want is great performance (good whole mouth flavour and thick clouds) from different types of coils, with different build styles without leaking while been easy to build on, with a good meaningful adjustable airflow. See I don’t want much!
HellVape Dead Rabbit V2 RTA Review | Fast Build Demo
Inside the Box
- 1 x 25mm Dead Rabbit V2 RTA
- 1 x Dead Rabbit Sticker
- 1 x User Manual
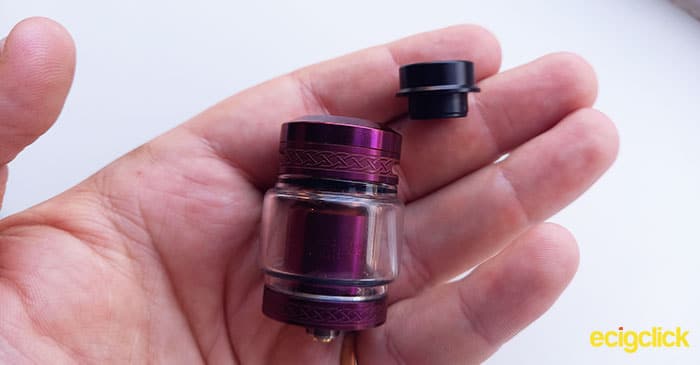
- 1 x Bubble Glass Tube
- 1 x Accessory Bag (screw driver, allen key, spare rubbers and screws)
Specs & Features
- Size: 25 x 50.5mm
- Connection: 510 Pin (Gold Plated)
- Coils: Dual or Single
- E-liquid Capacity: 2ml (5ml bubble glass)
- 810 Drip Tip – Changeable
- Adjustable top airflow
- Sliding Top Fill
- Internal Honeycomb airflow
- PC Thermal Insulation Plate
- Y Shaped Rabbit Ear Deck
Design & Build Quality
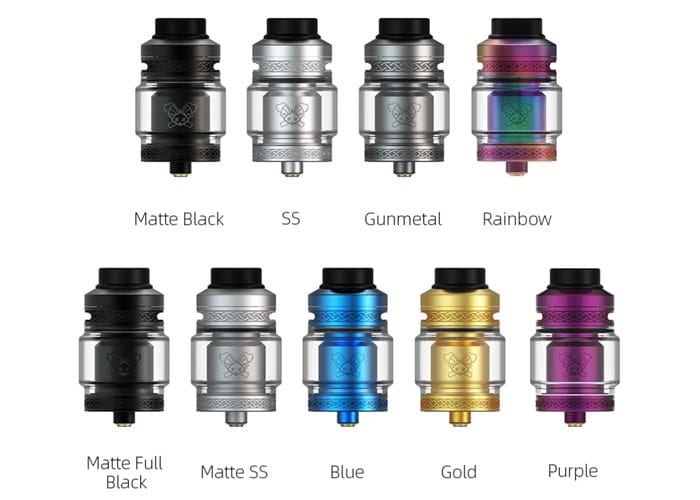
Hellvape produce the Dead Rabbit V2 RTA in 9 different colours.
 I want to point out, that because of the position of the airflow bands on the picture above, it looks like the airflow band is curved in / thinner than the rest of the tank, that’s not the case, it is just because of the holes that it looks like that.
Although that might be obvious, it did confuse me for a moment…
The HellVape Dead Rabbit V2 RTA Assembly
Lets take it to bits and look at it from bottom to top…
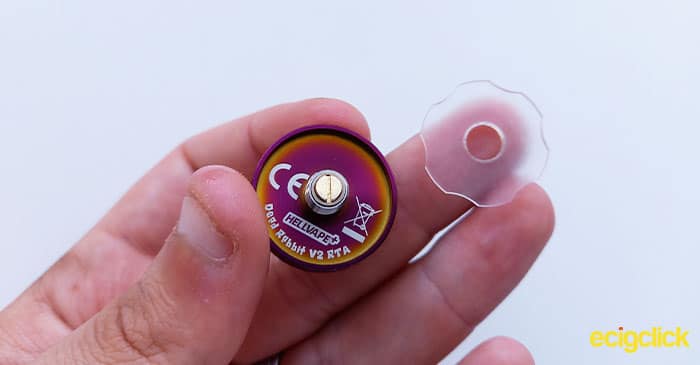
Connection and Insulation Plate
The Dead Rabbit V2 RTA has a 510 connection with a gold plated pin, the threads are nice and everything is well.
The interesting thing is the thermal insulation plate, underneath the tank there is a ‘well’ that’s about 1.5mm deep, inside that well is a 1.75mm thick PC (Polycarbonate) thermal insulator, in the shape of a cog.
That insulator is there for 2 reasons, first of all it is an insulator, so it stops (or lessens) the heat transfer from the RTA to the mod. Secondly, if you didn’t notice, the PC is about 0.25mm deeper than the actual well that it sits in, to protect your mod from the hard metal scratching your mod.
Because the insulator only protrudes from the tank by such a small amount it is not noticeable.
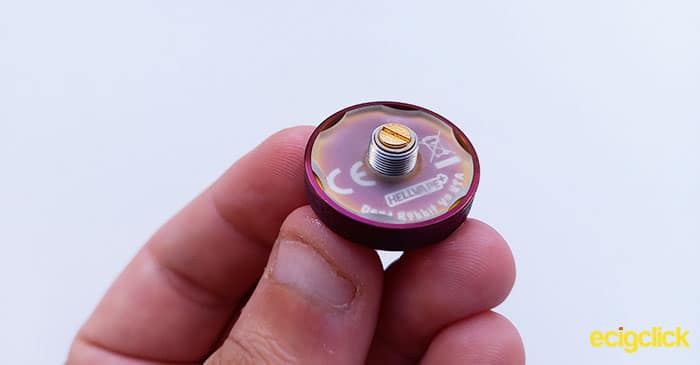
Another great thing about the insulator, is that it screws on and off, which is nice to see from a cleaning and maintenance perspective.
However because it is plastic, I would warn you to be careful in case of wearing out the threads, though I have took it off several times and it is still nice and smooth.
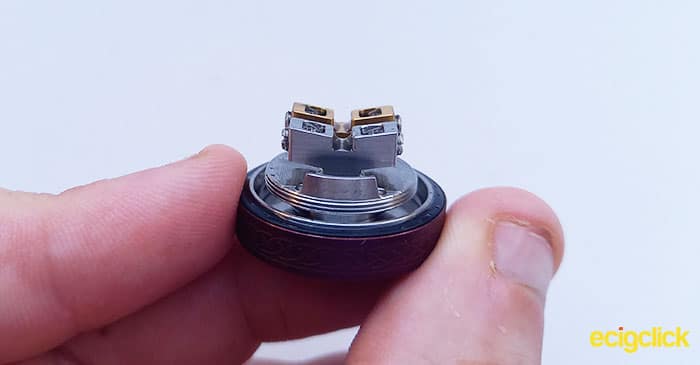
The Y Styled Rabbit Ear Deck
There is nothing wrong with the deck.
I mean seriously.. did you expect there to be something wrong with the deck? Let’s face it, it would be pretty surprising if it was low quality.
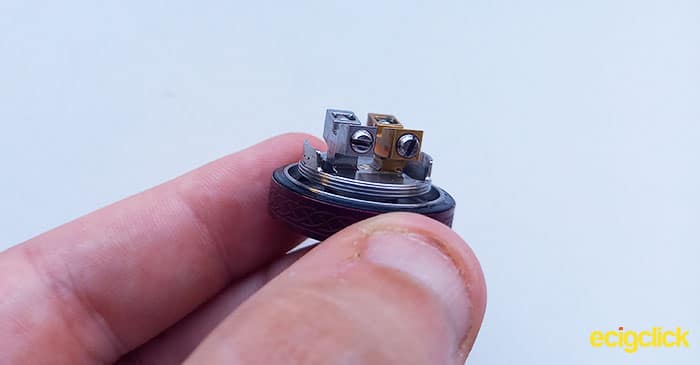
The deck is very reminiscent of the original Dead Rabbit RTA, but it is certainly not the same!
The posts make more of a Y shape than a T shape and the holes for the coils are bigger and square, allowing for thicker coils and I personally think it makes the whole building process a bit easier and nicer.
You may have also noticed on the outside of the wicking holes, there are these little ‘walls’ at very first glance I thought, “oh yeah look at that, I suppose it makes it easier to keep the wick tidy…”, however when I actually took a proper look at the RTA I realized these walls are apart of the anti-rotation system… Which is kind of obvious really.
The Airflow & Anti Rotation System
As I’ve literally just mentioned, on the deck is 2 walls, one behind each wicking hole.
These ‘walls’ fit perfectly into the bottom of the internal airflow chamber, and it is there where the anti rotation system was born.

When you first attach the deck to the tank, it doesn’t feel quite right and it’s not making contact with the threads (and now we know why) but honestly other than having to rotate the deck until it falls in place (like you have to on most RTAs) you wouldn’t really even notice this system exists.
This is pretty much a necessity for any top airflow RTAs, however not all designs execute it all that well. Some designs are a bit fiddly and awkward to use, it’s all subject to opinion, however the point I’m trying to make is the connection processes is very similar to the base connection of any sub-ohm tank.
From the outside the airflow is just a decent sized hole, however thanks to the internal airflow chamber the air is pulled diagonally down and then through a 6 x 3 honeycomb grill before hitting the coil, on each side.
In regards to the draw, the airflow isn’t restriction free but I like my airflow nice and free, and I think it’s ample. Turning the airflow band all the way down doesn’t make the system air tight, but it is tight enough not to allow DTL Vaping.
It could be argued that DTL Vaping is possible with airflow turned off, but it does cause an extremely tight draw.
HellVape Dead Rabbit V2 Top Cap & Top Fill
I like things to be as easy, efficient and fiddle free as possible, so I was delighted to see that the Dead Rabbit V2 has a slide out top fill system; unlike its predecessor which has a removable top cap filling system.
 In my opinion, the sliding system on the V2 has the right amount of resistance, it doesn’t open too easy for it to be a problem but it’s also not too tight for it to be a pain.
Usually this type of design can be problematic because designers often make it so you cannot remove the top cap, although this might sound meaningless, I think it is really bad for cleaning and maintenance. However, the top cap of the Dead Rabbit V2 easily unscrews allowing you to remove it and access the rubber seal, making it easy to clean or replace it if it breaks of swells.
The sliding top cap doesn’t have a screw or any other system in place to tighten if it comes loose.
I haven’t has a problem with it coming loose (in the 3 weeks that I’ve used it). And looking at how it is designed, with the rubbers, I don’t think it will ‘work itself loose’ at any point soon.
Once or twice, I did the old problem when the liquid blocks up the fill hole and pours down the tank, so be careful with that and take your time filling it.
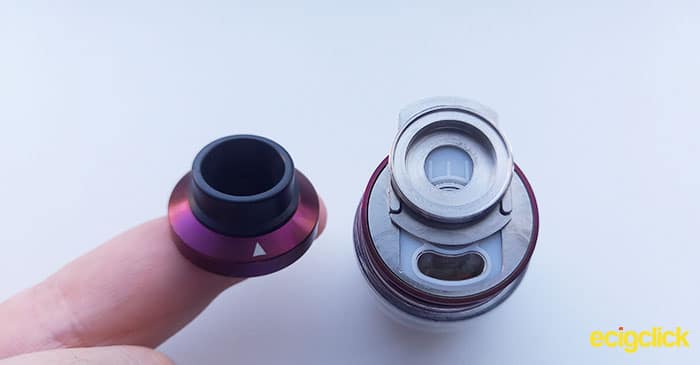
HellVape Dead Rabbit V2 Drip Tip
The drip tip that comes with the Dead Rabbit V2 is very low, standing at only 5mm above the top cap (or 6mm depending there you measure from). This doesn’t leave much room for your lips, making it super hard to drag on without your lips touching the top cap.
However I should point out that at no point did I notice the top cap was warm against my lips; honestly I didn’t even realise how short it was until I looked at it for the review, so it really isn’t that much of a big deal.
If you don’t like the drip tip you’ll be happy to know it is a standard 810 drip tip, supported by 1 O-ring inside the top cap.
Design & Build Summary
There isn’t anything I don’t like about the Hellvape Dead Rabbit RTA. It all functions as it should, it’s easy and efficient to use.
The knurled grip is always great to see on any atomizer but hellvape have put the effort in to make it look good rather than the standard knurled we usually see.
The deck is awesome for novices and experts alike. The Y shaped rabbit ear posts make it super easy to build on and the overall design allows for room to play. By room to play, I mean it allows you to use the coils you want to use rather than having to use a specific build to get great flavour.
Building on the Hellvape Dead Rabbit V2 RTA
There isn’t a major difference in building this RTA to building any other, so I’m going to skip the long tedious how to, because I imagine the majority of you reading this will already know how to build an RTA, so I’ll just skip to some pointers.
The pointers should make it easier for any novice to build on this RTA, however if you don’t know where to start, there will be a (2x speed) build demonstration at the end of my video review that is embedded towards the top of this page.
Coil height and Leg Length
First of all I found that when using a gauge, if you cut the legs at 7.5mm long the legs stand on the deck leaving the coils at about the perfect height.
This also takes away all awkward holding the coils at the right height when calming them in and thanks to the Y shaped rabbit ears it’s super easy to cut away the legs after tightening the screws.
Play About All Over The Place
I’ve found the coil placement isn’t super strict. Looking at Hellvape’s illustrations, the coils are placed pretty close together towards the center, however I’ve spent most of my time more out towards the edges.
Either is fine, the way I see it, just chuck them in and after a while move them a little to find where you prefer them.
Just remember not to let the coils touch each other or the cap and the closer the coils are to each other the more heat they will produce, so don’t get too carried away.
Time To Get Fluffy With The Dead Rabbit V2
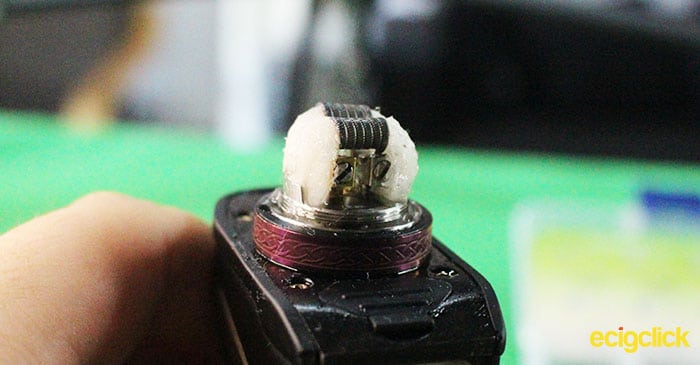
Anyone that knows me will know I’m not a major fan or fluffing or thinning, amateur hour or what? However I did go to town on this little beast.

The fourth set of coils I tried was a set of Tank Tracks with 6 wraps, I thinned and fluffed the cotton out, placed it nicely in the wicking holes and on my way I went.
I’m not quite sure what went wrong but it was pretty slow at wicking. The next day I took the coils out and too my surprise the cotton was still pretty wet. Still to this day I’m not fully sure what happened but it was either:
- The wick was too long (I had cut it at the O-Ring)
- 6 wraps of Tanks tracks made the coil too wide, maybe?
- The wick wasn’t thin enough, despite my though thinning and there being plenty of room
Either way I cut the wicks a few millimeters shorter, put some not so wide fused claptons in and thinned the wicks even more, then it was fine.
Actually, at this point there was lots of room in the wicking hole due to my super heavy thinning, so I expected leaking without a shadow of a doubt… but it didn’t leak… not a single drop in 3 days.
A Single Dead Rabbit
Truth be told, nothing changes, apart from the size of the coil and wick.
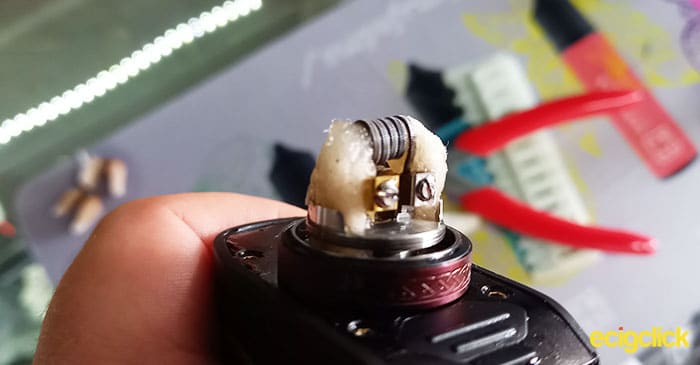
I made a 4mm inner diameter fused clapton coil (5 wraps 0.4ohms) and banged it in using diagonal posts, but keeping the coil straight. I still kept the coils legs at 7.5mm and still thinned the cotton (but not as much because there is less cotton present to start with).
I was super happy with the flavour and vapour production, truth be told the flavour was a lot better than I expected.
How Does Harley Like His Dead Rabbit V2 Built
Honestly, there wasn’t a build I didn’t like.
I’ve used Ribbon Twist coils, Mix Twist coils, Quad Coils, Fused Clapton coils and Tank Track coils, and fired at resistance ranges from 0.1ohm all the way up to 0.45ohm.
I’ve tried the coils close to the centre, and more out towards the edge.
All of those coils and set ups above produced great flavour and great vapour.
As I write this I’ve got 2 x 6 wrap fused claptons in, reading 0.28ohms, placed more towards the centre, I’m firing it at 140W (although I acknowledge that’s probably a bit too hot for a lot of people) and I have to say I’m in my happy place. I like what I’m getting.
Pros
- Good Flavour
- Good with Dual and Single Coils
- Replaceable 810 Drip Tip
- Adjustable top airflow
- Sliding Top Fill
- PC Thermal Insulation Plate To protect Mod
- Y Shaped Rabbit Ear Deck
- Easy To Build
Cons
- Wicking has to be right
- Purging blows vape in your face due to airflow design
- Filling can lead to vacuum leaking
- Original Drip-tip is low profile
Final Verdict
I love it, I actually took a full day to write the Cons list because I couldn’t think of anything.
I love how versatile the builds can be and still perform brilliantly with that and the design of the posts, this is a great RTA for anybody regardless of your previous experience rebuilding.
Although the wicking can take a bit of trial and error I don’t think it’s hard to do even for starters.
All in all I think the Hellvape Dead Rabbit V2 RTA looks good, feels good and works great.


