The Smoant Knight 80 pod mod review, and this one, as you’ll soon see, has a little bit more going for it than most run of the mill pod kits out there.
As we go through another week of lock down, I’m glad that I can keep up with my hobby whilst shut inside.
Lots of long walks on my government sanctioned exercise, and plenty of vaping!
Happily it seems like manufacturing in China is getting back on track now, so hopefully the lack of kit after Chinese New Year is starting to ease off.
What Can We Expect From The Knight 80 by Smoant?
Smoant has been on my radar for a little while now.
I was impressed when I tried out their Battlestar Baby in my local vape shop, and Harley seems to agree with me in his review.
I was also really happy to see rebuildable decks coming to the pod system market, and Smoant were one of the first to do this, with their Pasito that Michelle also rated highly.
They’ve also done some weird things, and yes, I’m thinking about the Campbell!
That even managed to put a smile on Neil’s face when he reviewed it here.
So I’m pretty excited to get my hands on the Smoant Knight 80.
It’s one of the newer style of “pod mods”, I term I personally hate, but it gives you an idea of what you’re getting.
It ticks all three of the boxes on my wish-list for a pod kit:
- Removable Battery
- Range of Coils
- Rebuildable Option
There’s two new coils for the Smoant Knight 80, and an optional RBA section.
And with the addition of a little adapter, it will also accept the two coils and RBA section from the Pasito.
So does it perform as well as it looks on paper? Only one way to find out, on to the review!
This was sent over for the purposes of review directly from Smoant, as usual I will report back honestly on what I find.
Inside the Box
- Smoant Knight 80 device
- Pod
- 0.3ohm mesh coil (installed)
- 0.4ohm dual mesh coil
- USB cable – type C
- User manual, battery safety card, warranty card

I also received the RBA deck in a little bag, along with some wire, cotton, and a blue handled screwdriver. You will need to buy this separately if you so wish.
Specs
- Dimensions – 90 x 45 x 27mm
- Power Output – 1-80W
- Temp Range – 100-300c / 200-600f
- Modes – VW, TC (Ni, Ti, SS316), TCR, DVW, Bypass
- Resistance range – 0.1-3ohm (VW, DVW, Bypass) / 0.1-2ohm (TC, TCR)
- Battery – Single 18650
- Charging – 1A USB Type C
- Capacity – 4ml (2ml TPD)
Design and Build Quality
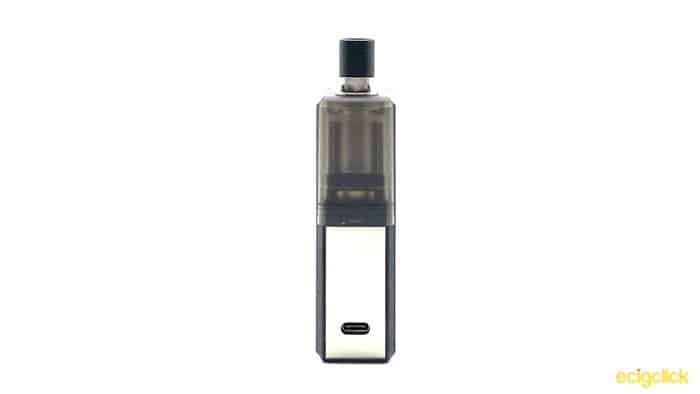
The Smoant Knight 80 takes broadly the same design as a lot of other pod systems we’ve seen over the past couple of years.
However, as it has space for an 18650 battery, it is noticeably chunkier than what you may have had previously.
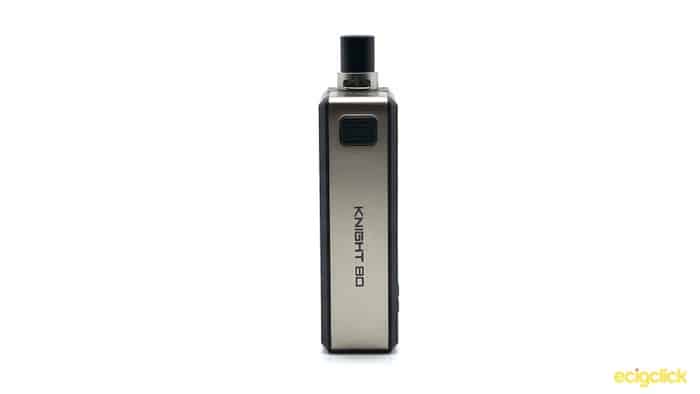
Smoant Knight 80 Body
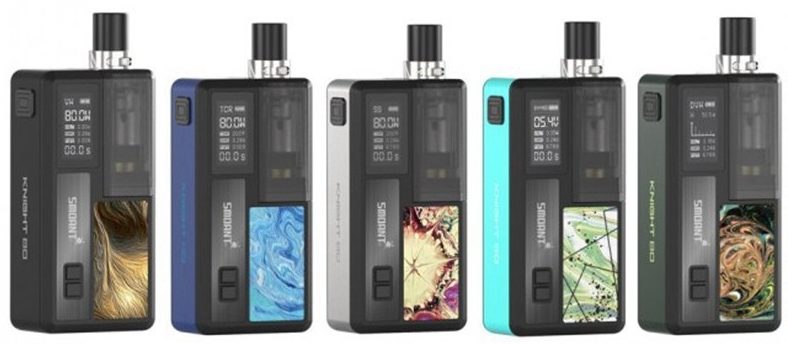
The body comes in 5 different colours, Stainless Steel (which I received), Bronze Blue, Tiffany Blue, Night Green and Black.
These have differently coloured printed panels that are matched to the body.
Without a battery, it’s a surprisingly lightweight device made of zinc alloy. It doesn’t feel cheap though, and there’s no looseness to it’s construction.
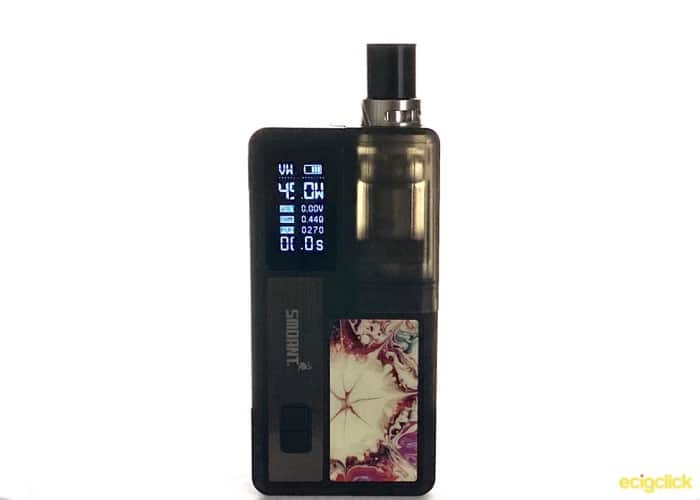
On one side you have you 0.96″ OLED screen, with the brand name printed below, and then your + and – buttons.
The other side of your device has the removable panel for you battery. On the base there’s a little notch to help you get a fingernail in to take this off, and it’s held in place by two strong magnets.
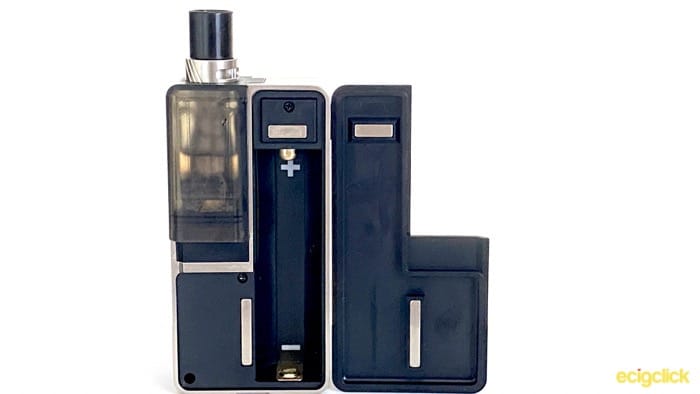
The battery compartment has clearly printed + and – indicators, and a sprung positive connector. No battery rattle, and no looseness to the the panel, so a big thumbs up.
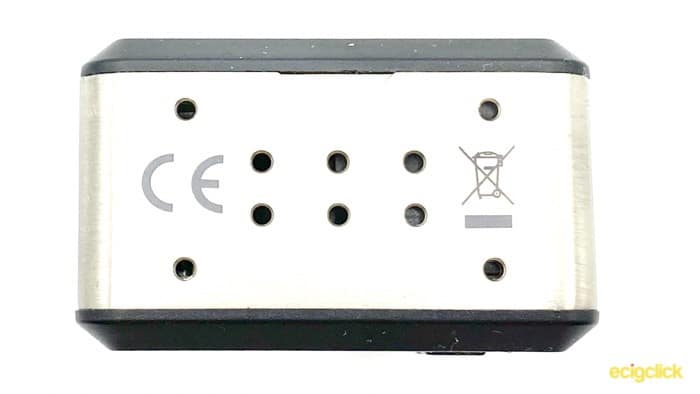
The base has your regulatory marks, and a decent amount of venting.
The two thin edges of the device are very plain, the one that has the cut out for your pod has your USB C charging port (thumbs up for USB C, even if it is only 1 amp).
On the longer edge you have your fire button near the top, and the words Knight 80 printed below. The fire button feels a little plasticky, but is nice and clicky in operation, and I never had any moments where I wasn’t sure whether it would fire or firing accidentally by brushing against it.
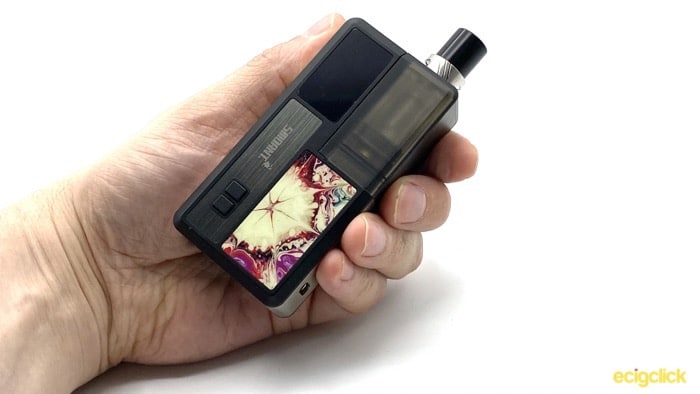
In the hand it’s a comfortable block to hold, thanks mostly to the beveled edges. However due to where the screen is, if you want to be able to easily see it after firing, I found that it suits being held in the left hand for thumb firing, and the right hand if you finger fire.
Smoant Knight 80 – Screen and Controls
The screen is a little 0.96″ OLED, that provides all your important information. There’s no information overload here, and it shows you:
- Your mode and battery level at the top (5 segment battery),
- Wattage (or temp)
- Volts being drawn when you fire
- Resistance of the coil
- Puff counter
- Seconds fired

Smoant Knight 80 – Wattage
Wattage ranges from 1W up to 80W, and for reasons beyond understanding, it scrolls in 0.1W increments.
However I’m not going to knock off any points for this, as it scrolls super quickly (15 seconds to go from 1-80W). It will stop when you reach either extreme, and then if you press the button again, it will round robin.
As well as normal Wattage control, you also have the option of Bypass mode, and DVW. Which apparently is a curve mode.
Unfortunately the manual goes into remarkably little detail about how to program curves, and I can report that it is far from intuitive!
Honestly, I gave up after fighting with it after a bit.
Smoant Knight 80 – Temp Control
A pod device that has temperature control is something I’d not personally seen before, but for those that enjoy this type, it’s there! If you want to be using this mode, you’ll be using one of the two RBA options.
You have the option of Ni, Ti, and SS, as well as a TCR for setting your own TC value.
By default it will be in auto mode, but you can set the maximum wattage you want it to fire up to. When you set your temperature, if you scroll all the way to the extreme, it will round robin to switch between Celsius and Fahrenheit.
The Knight Pod
The pod is made from dark PCTG, so you should be pretty safe from tank crackers. It is however easy to see your e-liquid level, something I’ve been put off by on dark pods in the past.
It’s held in place by two of the strongest magnets I’ve seen in a device, and with a little tongue and groove action (mind out the gutter!) it stays firmly in place with absolutely no wiggle. The fit is pretty much perfect.
On the top you have a 510 drip tip, that is slotted inside of your metal airflow control ring. These are both double o-ringed, and easy enough to pull out for cleaning or to switch your drip tip.
Although it looks close, the airflow control ring itself is not a 510 attachment, so you will need to keep this around.
Smoant Knight 80 – Airflow Control
The way the airflow control works on this, is that the collar that your drip tip slots into rotates.
The holes on either side of this collar, then line up with matching holes on the top of your pod.
Although you can’t see this changing, once you know that the holes in the pod are on the longer sides, it’s easy to line it up where you like.
A 90 degree turn will shut off the airflow as much as it can be. Turn them so the holes are facing the long edges, and it’s fully open.
One of the real benefits of this design is that no matter how you hold it, you are never going to be blocking your airflow.
Also I’m so pleased that you don’t need to remove your pod to adjust your airflow!
How To Fill The Smoant Knight 80 Pod
First remove your pod from the battery.
You then have a generous sized fill port on the side of the pod that faces in towards the battery. Just open this up, they give you a little lip to catch with your fingernail, and fill with your preferred e-liquid.
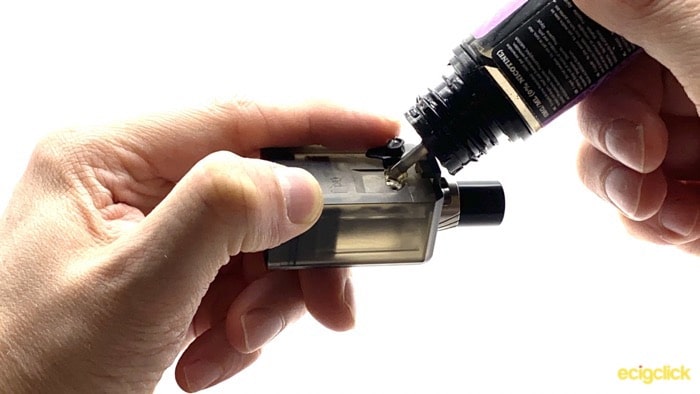
I had absolutely no problems filling this, just be careful not to fill it right to the top, or you will end up squeezing some e-liquid out when you replace the stopper. Remember to leave this to saturate for 5-10 minutes if you’re using your coil for the first time – known as priming your coil.
How To Change The Smoant Knight 80 Coil
Changing the coil is similarly easy. On the base of the pod you will see your gold coloured adapter.
Turn it upside down and pull this out to remove the coil. You can do this when there’s still some liquid left in the tank (about 1/3rd on the non TPD version), as the chimney for the vapour comes into the pod a bit.
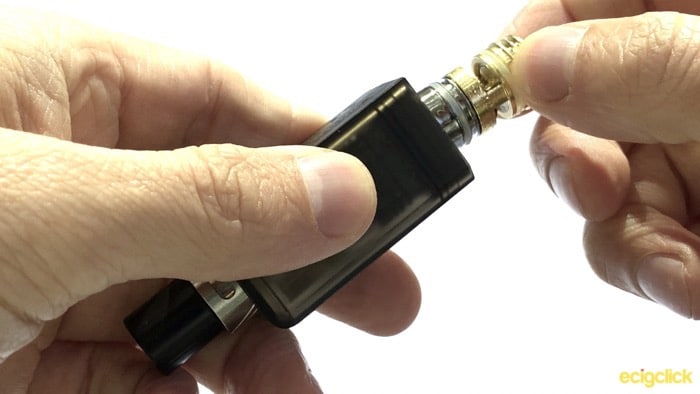
Unscrew the adapter from the coil, and screw a new one in place – then just push it back into the pod.
Don’t forget to leave a new coil to sit for 5-10 minutes to make sure it’s fully saturated – see priming your coil link above.
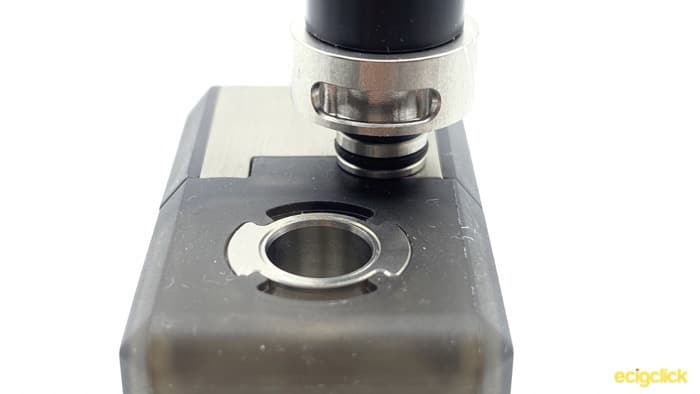
RBA Section
It looks like Smoant has listened to some of the criticism of the Pasito’s RBA section and the slightly weird S-shaped coil you needed to construct.
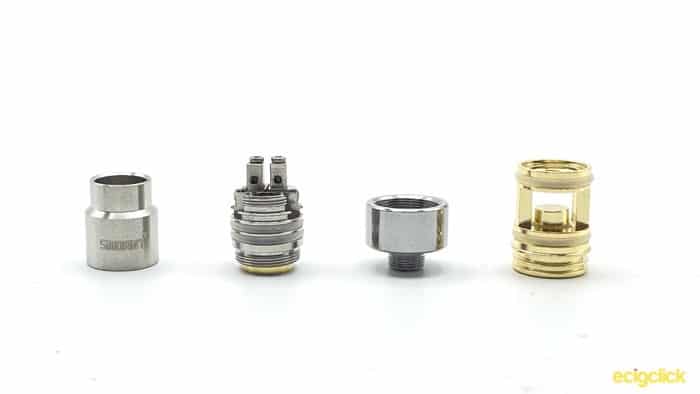
The post layout of the Smoant Knight 80 RBA is a much more traditional two-post design, where you have both the legs of your coil facing the same way, and sitting directly over the airflow. NB. The photo also shows the 510 and the Pasito Adapters.
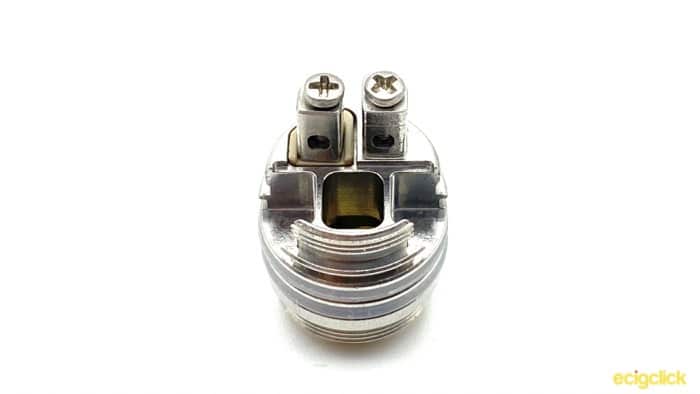
There’s a decent amount of space here, so on my first build (using the included round wire) I went for a 5 wrap spaced coil, 3mm ID, with a resistance of 0.8Ω.
The wick channels are also nice and big, and easily take the wick that the 3mm coil required. You can afford to cut the wick relatively short (you don’t need it to go right to the bottom), as once you screw on the the top of the RBA section, it will keep everything sealed up as the wick expands.
Just try not to get wick stuck in the threading, damping it with e-liquid will help this.
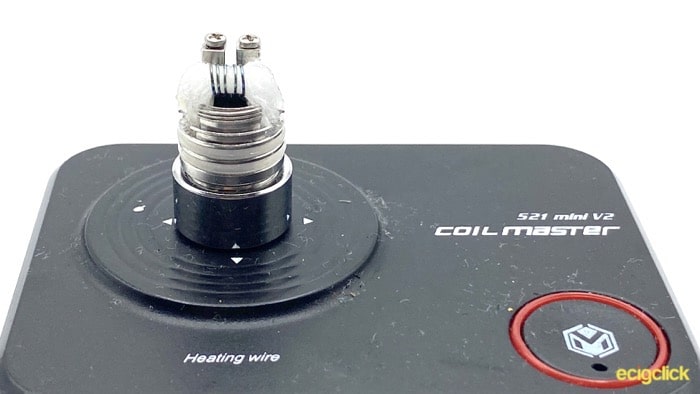
It comes included with a 510 adapter which allows you to put it a regulated mod or resistance tester whilst you’re building. Please forgive the slightly messy coil in that photo!
How Does the Smoant Knight 80 Perform?
There’s a lot of airflow on this little kit, and it’s definitely aimed squarely at people who want to vape DTL.
Read more about the different vaping styles here.
It’s comfortable in the hand, and the ANT chip that they are using responds super fast, there is no perceptible lag between pushing the button and it firing.
One nice thing that I didn’t mention earlier, is that when you fit a new coil, the device will detect which of the 4 coils you are using (2 Knight coils, 2 Pasito coils) and set the wattage appropriately, whilst also showing you on screen what the recommended wattage range is.
If you just want to use the stock coils, this makes it really easy to just plug and play.
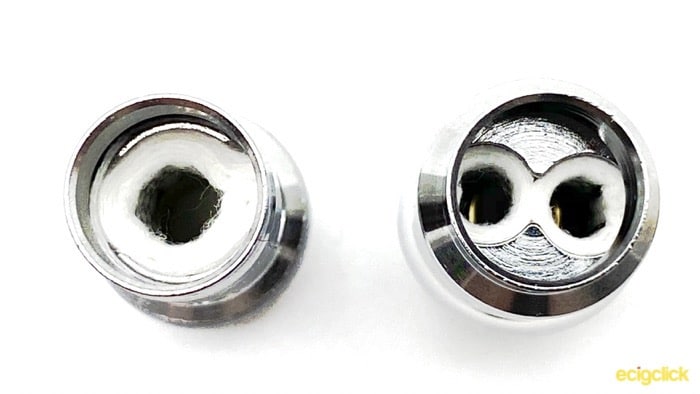
0.3Ω Coil – Airflow and Cloud Production
The 0.3Ω is probably the least restrictive of the two, and fully open it’s about a 9 on the 1-10 scale of restrictive to open.
Cloud production is also top notch, plenty of thick voluminous clouds from the single mesh coil.
Very impressed, and pretty much made me forget this was supposed to be a “pod” kit.
You can close it down to be a loose MTL vape (somewhere around a 5 on our 1-10 scale) but it’s obvious that this isn’t the target they were aiming at.
I would imagine that the thinner bore of the Pasito coils could give you a MTL vape if you liked the kit, but preferred to vape MTL.
0.3Ω Coil – Flavour
Flavour was absolutely spot on with this coil.
It’s rated as best between 50-65W, and I started my testing at 45W. For these tests I loaded it up with Rachael Rabbit – Redcurrant, Grape and Cherry.
Vaping at 45W is definitely a little on the cool side, so I bumped it up in 5W increments, and found that for me personally, the sweet spot was about 60W on this coil.
If you like a warmer vape, then you can definitely put it to 65W and even a little higher, but you don’t get much of an increase in flavour once you hit 60W.
0.4Ω Dual Mesh Coil – Airflow and Cloud Production
The dual mesh is a touch more restrictive than the single mesh, though as you can see in my side-by-side photos they should both let a fair amount of air through.
The dual mesh however has a bit of a slant at the top that slightly reduces the final diameter of the coil itself.
In fact closing this one down a bit I found I could it much more easily manage a MTL, going down to about a 4 on our 1-10 scale!
Cloud production is pretty much on par though, even at the slightly lower wattage that this one is rated at. Maybe just a little bit less than the single coil – still nice and thick clouds, and definitely a departure from what I tend to expect from a pod system!
0.4Ω Dual Mesh Coil – Flavour
I was a little disappointed by the dual mesh to begin with, the flavour was more muted and didn’t quite pop as much as the the single coil. However I persevered, and it definitely improves a little after it had been broken in.
It’s still not quite as good as the single mesh in my opinion, but it still compares favourably to other stock coil mesh tanks.
The other advantage is that because it doesn’t need as much power, it should allow you to eke out a little more battery life.
Smoant Knight 80 Coil Life
One possible negative I found was that the single coil seemed to burn out relatively quickly.
It lasted me through about 25ml of e-liquid before I started to notice a drop in flavour.
The dual coil by comparison, is still going strong after about 60ml, so it may just be that my first coil was a dud.
Of course if you do find the stock coils aren’t to your liking you always have the option to rebuild!
Smoant Knight 80 RBA Deck
I’ve tried a couple of builds on the RBA section now, and it definitely has potential!
It’s hard to say how good it could be, because like with all rebuildables, it takes time and experimentation to find what works best.
My first attempt was with the simple wire it came with, and whilst it was fine, I choked the wick channels so it didn’t wick as easily as it could.
Second attempt was using some Microfine Clapton (you’re limited to the size of wire you can put through the post holes, so no massive complex coils!) and cutting the wick shorter with a bit of thinning out.
This time, with the wick just covering the top of the juice channels, the wicking was instantly better, and there was more flavour as well.
However I’m sure there’s still more I can eke out of it, so as with all rebuildables, experiment, experiment, experiment!
Smoant Knight 80 Battery
Whenever someone asks me what the battery life is like on a certain mod, I’m always tempted to say “How long is a piece of string?”. Especially with a mod that takes a removable battery and has different coil options, there are going to be a lot of different factors!
In my testing I ran the 0.3Ω coil at about 58W, and was able to manage 133 puffs (typically 2-3 seconds) on a 3000mAh battery before it would no longer fire. So pretty good going, and easily got me through a day of vaping.
Using the 0.4Ω dual mesh at 45W, it seemed to just keep going forever. Just over 200 puffs.
Special shout out to the fact that the power doesn’t seem to drop when your battery gets low. Until right at the moment it won’t fire.
Pros
- Removable Battery
- Cracking flavour
- Rebuildable option
- Great build quality
- Plenty of options
Cons
- Slightly dim screen (but I’ve only really noticed that in the bright sunlight we’ve had recently!)
Final Review Verdict
As you can probably tell I have been really impressed with this little kit. It ticks all the boxes on paper, and it delivers in spades.
Flavour is always going to be my major deciding factor in whether I recommend something or not, and in this case it absolutely delivers.
Added to that is the fact that with a removable battery and a rebuildable section, you are never going to be limited by no longer being able to get a hold of coils, or the battery eventually exhausting.
I would be happy recommending this pod kit to both a new vaper wanting to try DTL, as well as the seasoned veteran that builds their own coils and wants a decent backup.


Saw it few hours ago and already plan to buy.
Great review, Will. Thank you.
Hey Alexander,
Glad the review was helpful! It’s a decent little kit the Knight, I gotta admit I was surprised at how much I enjoyed it!
Cheers for the comment
Will
Hi will, which one u recommend more, Smoant knight 80 or aegis boost? Can u help me choose
Hi Hanif,
I haven’t tried the Aegis Boost myself, but I have a couple of friends that really enjoy it. I would say that to decide between them you should work out what’s most important to you.
The Aegis has the advantage of being pretty rugged, so if you think you’re likely to drop it or have other accidents, then that will be a big plus. At the very least I would expect the panel, battery and/or pod to come flying off the Knight with a bad drop.
On the other hand the Knight 80 uses a removable battery, so that gives you the possibility of carrying a spare (though you’ll need to be more aware of battery safety, the guide here has some useful info), whereas the Aegis will need to be charged when it runs out of power. Also I think the magnets holding the Knight Pod in place are top notch, whereas Gaz wasn’t sure about the longevity of the clip on the Aegis.
Either way, they’re both cracking kits, with the Knight giving you a bit more flexibility with a higher wattage, removable battery, and wider range of coils (if you get the Pasito adapter). Whereas the Aegis is a slightly more simple device, that can take a bit more rough and tumble!
All the best,
Will
Hi Will. Based on your opinion, smok fetch pro and this smoant knight, which one you recommand to buy ?
Both pod looks great for me.
Thanks
Chua
Hi Chua,
I haven’t tried the SMOK Fetch Pro myself, but my colleague Neil seemed to rate it highly here. Personally I prefer the look of the Smok, but it looks like you need to remove the pod to access the airflow control, which has always been something that’s bugged me on pod mods.
They both seem like solid performers with a decent range of coils available to them. With the addition of a rebuildable section, they both have that flexibility as well. Under normal circumstances I would say that the best thing to do is to try them both in the hand and see which you prefer, but obviously that’s a little more challenging at the moment!
Either way you go, they both seem solid choices for a pod mod. Personally, I like the fact that the Knight can additionally take the Pasito coils that are more suitable for MTL. So that would be my choice, but either seem to be good bits of kit.