The Voopoo Vinci R is the close relative of the Vinci Pod Mod, without the flashy TFT colour screen. It relies on voltage output as opposed to wattage which should make it appeal to a relatively new vaper.
Update: Voopoo Vinci 3 Review Live
This is my first written review of a Voopoo product. I gotta admit to being a fan of their Drag 157W box mod which hits like a train! In fact I kind of lost track of their releases until recently.
Their pod based systems only entered my radar with the release of the dinky Drag Nano pod kit. Always brings a smile to my face.
So it came as something of a surprise to realise how quickly Voopoo have latched onto the pod based crazed. Offering kits such as the FIND S Trio, Rota, Panda and the simplistic Alpha Zip. I guess they never really have their fingers off the pulse. Or fire button.
What Can We Expect From The Voopoo Vinci R Pod Mod?
We are looking at a device that is pretty much ready to go out of the box. It’s a Pod Mod that is designed for someone that has already gained a few months experience with the Alpha Zip, for example.
As with the Alpha Zip, simplicity is the key as far as airflow settings are concerned. You get two options and that’s it! Something that I would expect the virgin vaper to appreciate.
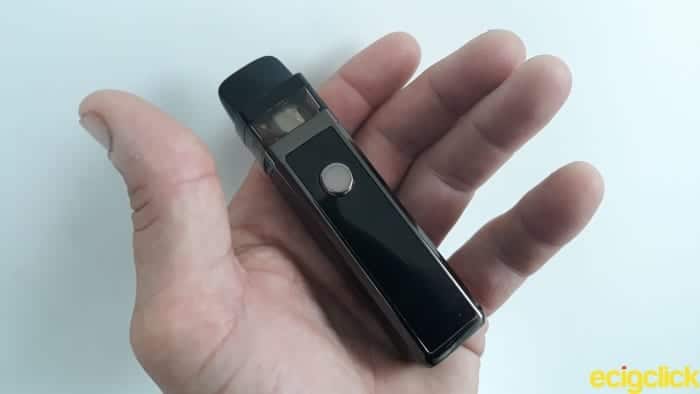
The Voopoo Vinci R is pocket friendly and may just about suit a shirt pocket. It’s quite a lightweight product and not too obtrusive.
There’s no type C charging via USB but Voopoo insist it will still only take around 90 minutes to charge from flat.. It’s my job to let you know if that claim is true. Speaking of my job I think it’s time I stopped waffling on.
These are my personal thoughts and opinions. The product was kindly sent over from Voopoo for the purposes of review. Thank you.
What’s In The Box
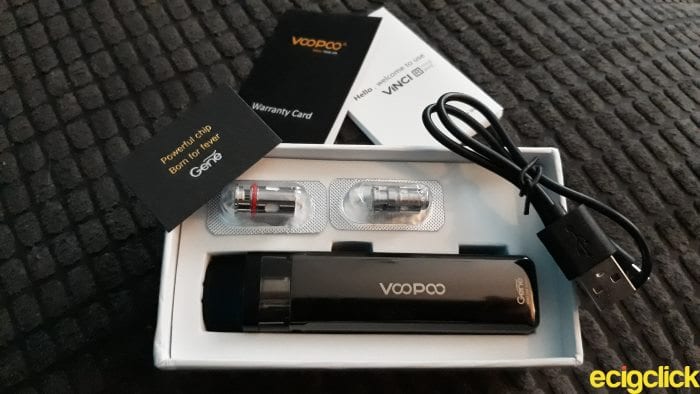
- Vinci R device
- PnP 0.8ohm coil
- PnP 0.3ohm coil
- Vinci Pod (5.5ml capacity)
- USB cable
- GENE Chip card
- User Manual
- Warranty card
It’s important to note that I have been sent the non TPD compliant version. The EU version packaging features a 2ml Vinci Pod instead. Otherwise everything else is identical.
I received the Dazzling Green version but there are other colour variations to choose from.
These are: Aurora, Space grey, Jade Green, Ink, Peacock, Opal, Scarlet, Carbon Filter and Hill Yellow.
Voopoo include two coils in the package. The Pod is compatible with other Plug and Play types in their range including a ceramic coil for true mouth to lung vaping.
Vinci R Pod Mod Specifications And Features
Mod
- Material Zinc Alloy
- Height 104mm (including Pod). Width 25.3mm. Depth 25.3mm
- Three step voltage levels. 3.2v 3.5v 3.8v
- Output voltage 3.2v – 4.2v
- Resistance 0.1ohm – 3.0ohm
- Battery capacity 1500mah
Pod
- Capacity 5.5ml or 2ml (TPD compliant)
- Material PCTG
- Coil resistance 0.3ohm VM1 PnP
- Coil resistance 0.8ohm R1 PnP
Features
This wouldn’t be a Voopoo product without the inclusion of their famous GENE chip.
- AI GENE chip for intelligent coil matching feature and auto power adjustment.
- Auto and manual draw.
- Three stage voltage regulation for flavour enhancement.
- Pod incorporates a metal leak proof housing for coil.
- E liquid level visibility.
- Innovative dual airflow system by rotating pod 180 degrees.
- Quick charging 1500mah internal battery.
- 7 stage safety protection.
Some of you are gonna hate me now, but let’s just go over that last feature in detail.
Safety Features. (Better safe than sorry, after all!)
- Overtime Protection. This prevents the coils from burning the cotton
- Short circuit protection. The device will cease to function if a short circuit is detected
- Output over current protection. Output current is closed when max limit is hit
- Over discharge protection. The battery is protected against this to prevent harm to user
- Overcharge protection. The battery will cease to charge beyond maximum capacity
- Over temperature protection. Prevents pod/mod from overheating using temp. control
- Max Power Protection. Intelligent power matching prevents coil burn out
..See? wasn’t that painful was it?
Design and Build Quality
Mod Design
Anyone familiar with the recent SMOK RPM40 pod kit will be instantly at home here.
The cuboid nature of the Vinci R is highly reminiscent of that device. The manual tells us that the vinic (!) is around three inches in height without the pod and around one inch in depth and width.
The device weighs around 100 grams and around 25mm in diameter, so not as discreet as others on the market. It’s still very portable and extremely easy to use making it ideal for both new and seasoned vapers alike.
Made of zinc alloy, it feels extremely well designed and is surprisingly comfortable in the hand.
Appearances Are Everything
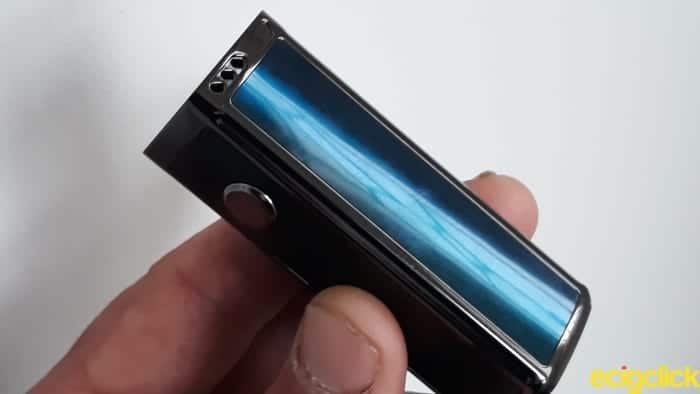
Two colour panels feature on the same side as the airflow ports.
My review model was received in Dazzling Green and demonstrates something of a hologram effect. You’ll notice a few alternating colour patterns when light hits at a certain angle. Quite effective!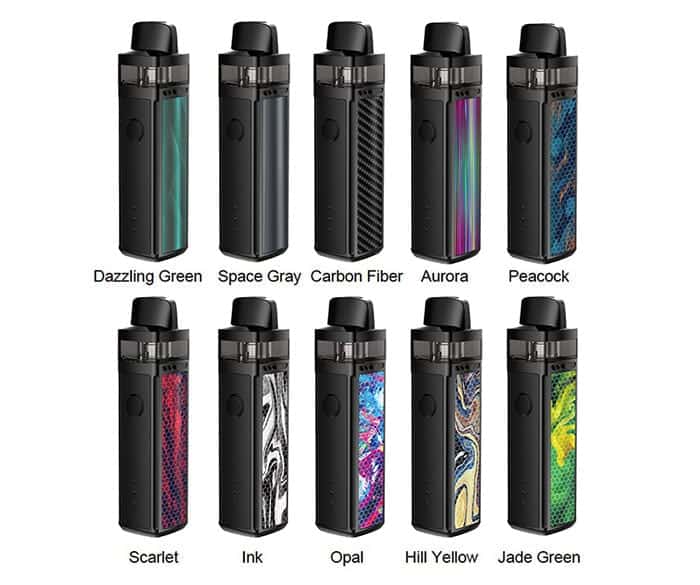
The Vinci R mod is a fingerprint magnet. So unless you plan to fit a straw down the mouthpiece using the auto draw feature you’ll be forever wiping.
OFD (obsessive fingerprint disorder) sufferers.. you have been warned!
Airflow
There are two banks of three airflow slots on the Vinci R mod, quite large for a pod based system. An indication of Voopoo’s stance on a more airy draw should the user require it.
As stated, this is achieved by flipping the pod 180 degrees around the mod. One setting provides a restrictive direct to lung experience while the other provides an open, classic direct to lung.
 The alternate sides of the pod feature the Voopoo logo with a reminder at the base of that infamous Gene chip technology which is built into the device. Take care, it’s prone to scratches.
The only button to be found is that of the firing type itself. Sitting towards the top of the mod is a rather classy chrome plated disc. It’s raised, making it easy to locate and is also snappy and responsive.
The underside of the Vinci R is where you will find the USB charging port. I can’t say I’ve ever been a fan of charging a device on its side but manufacturers will insist on doing it. Who am I to say? lol.
How To Use The Voopoo Vinci R Pod Mod

Five clicks will power the device on. A further five clicks will turn the device off.
Auto draw is included so if you’re really lazy (hands up!) there’s no need to go hitting that fire button.
A three step variable voltage system is employed on the Vinci R pod mod.
Three “well timed” clicks of the fire button will get you into the voltage modes.
- One white illumination indicates 3.2v
- Two white illuminations indicates 3.5v
- Three white illuminations indicate 3.8v
Pod Design
The pod is made of PCTG which is really just an abbreviation for a toughened plastic. It offers a high degree of transparency allowing liquid levels to be easily seen. The mouthpiece is moulded into the pod and feels quite comfortable when in use.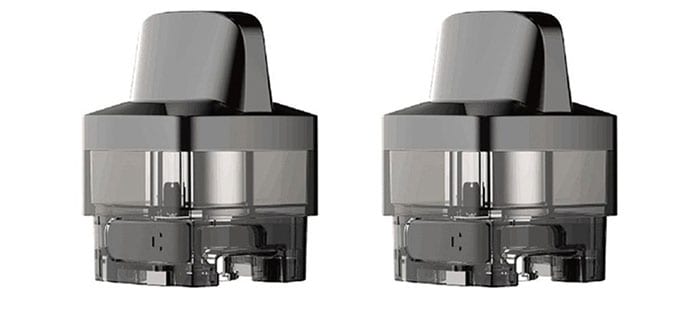
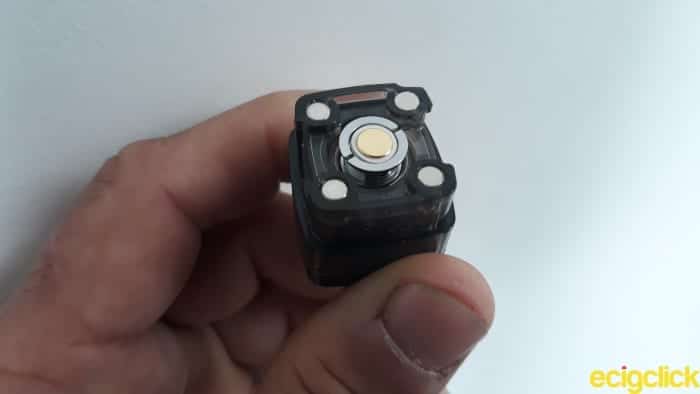
There are four substantial sized magnetic contacts situated on the underside corners of the pod. These line up with those within the mod providing a strong connection.
Pod Airflow
Simplicity should always be the order of the day with any pod based system. The Vinci R is no exception when it comes to airflow design. Voopoo have utilised a 180 degree system on the pod itself. There are two reverse mouldings on either side of the pod that line up with the airflow slots on the mod.
One moulding allows access to complete airflow while the other closes off four of the six slots. This forces a much tighter, mouth to lung restriction.
This 180 degree airflow system is also fool proof. It’s impossible to install the pod in any other way.
How To Install The Vinci R Coil
The simplicity of this device continues by the use of Plug and Play coils.
- Pull the pod out of the mod.
- Push the coil up and into the centre hole of the pod. Ensure a snug fit.
- Use the 180 degree system to snap the pod back into the mod.
Plug and Play offers a much easier approach to coil installation. It does however rely on good quality seals on the coils.
NB: Always try to apply a few drops of e liquid to the exposed cotton areas of the coil prior to fitting. Allow the pod to sit for five to ten minutes before using. This helps with the wicking process and can prevent premature burning of the cotton, also known as a “dry hit”.
How To Fill The Vinci R Pod
Achieved by exposing the fill port on the side of the pod.
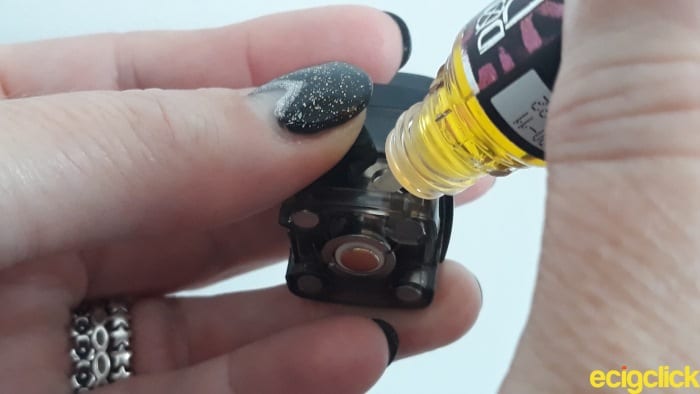
- Locate the arrow symbol on the rubber seal of the pod.
- Pull the seal back to expose the fill port.
- Gently squeeze e liquid into the fill port and ensure pod is at least three quarters full.
- Return the rubber seal back into place ensuring a snug fit.
How Does The Voopoo Vinci R Pod Mod Perform?
PnP R1 Coil
I started my tests by using the PnP R1 mesh coil rated at 0.8ohm with a power range between 12-18w.
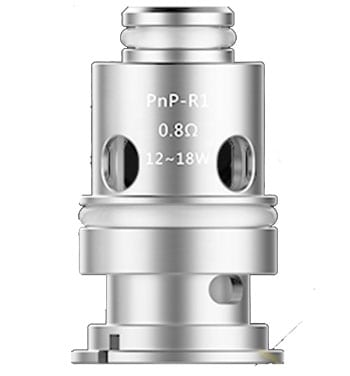 Although still technically a sub ohm coil, nicotine salts of a 20mg level or less should work fine at such output levels.
For this reason I chose Double Drip Cherry Bakewell with a 50VG/50PG ratio and 10mg nicotine salt.
50VG/50PG
Starting on a conservative 3.2v output as indicated by the single white power illumination I took my first hit. Wow!
Both cherry and bakery elements jumped out of the vape instantly!
Even at the lowest setting the Vinci R mod was packing a power punch, testament to that renowned Gene chip beating at its heart. Cloud production was more than I expected from the device so this was also very satisfying.
..and then Negative Neil reared his ugly head, once again..
It didn’t take long to realise that this amazingly condensed and saturated flavour was something of a ruse. A false hope that for once, just once, I’d taken receipt of a pod system worth its nic salt. Wrong.
E liquid was beginning to line the rear of my throat and I was actually tasting some on the tip of my tongue! Small wonder the flavour seemed so good. Somewhere between the vape and flavour, liquid was having its own little party.
Subsequent testing on the other power settings fared no better. Such a crying shame and an issue that I could only assume was caused by the diluted nature of the VG content.
The liquid was not fully vaporising on the coil. So the next test was to try a higher VG ratio with the PnP R1 coil.
I moved on to Cuttwood Mr Fritter, a 75VG/25PG mix with 3mg freebase nicotine content.
75VG/25PG
I managed to get through the entire day on a single 5.5ml pod filled with Mr Fritter.
After playing around with the three voltage settings I noticed very little difference to flavour quality. It was above average.
I could certainly pick out both apple and cinnamon with some bakery back notes. Cloud production was on par for a coil of this resistance.
There was no “spit back” of e-liquid as found on the previous, thinner liquid ratio. This 75VG/25PG blend was certainly more suitable for vaping.
So in general the coil-liquid-power combination was working very efficiently.
PnP VM1 Coil
Having spent a few days with the R1 coil I was hoping that the PnP VM1 rated at 0.3ohm would provide me with a little more oomph. With an output of between 30-60w was the much maligned Gene chip able to offer up its full potential?
In order to find out I began my first test using Wiz Mix Salt Berry Blizzard, a 40VG/60PG ratio. As before with a 10mg nicotine salt level.
40VG/60PG
There was an instant difference in power, flavour and cloud with this mesh coil.
The menthol from the e-liquid thundered around the back of the throat in the same way it would with a dedicated sub ohm tank. The blackberry and cherry was very lively and punchy.
In no way was this coil designed with the new vaper in mind, being more welcoming to those with a degree of experience behind them. The mod itself was now showing its true potential, bringing out individual flavour notes to great effect.
By the end of the day the 10ml bottle was exhausted, along with the battery.
The final test was to be carried out with a higher VG blend.
Could the pod keep up with the wicking? I certainly thought so.
80VG/20PG
Time for a spot of Riot Squad Boom Berry Pie, a concentrate I had mixed and left to settle for a few months.
Intermittently during the course of the days use I encountered a few nasty dry hits.
They usually occurred when taking consecutive pulls so there are going to be problems if you decide to opt for this liquid ratio.
It’s also true that on occasion there were some smooth hits with tons of cloud output. The truth of the matter revolves around the flavour output. It was suffering.
No longer was the pod giving a decent flavour partly due to some masking caused by previous liquid profiles. A case of hit and miss.
Recommended e liquid ratios based on my own experiences:
- Between 60VG/40PG – 75VG/25PG with the R1 coil.
- Between 40VG/60PG – 70VG/30PG with the VM1 coil.
Leaking Issues
The pod was prone to leaking from the base of the coil every time it was filled. It was an isolated occurrence but had an impact on the spring loaded contacts of the mod.
Until they were cleaned the device would fail to work, which became something of an annoyance.
Fill Port
The silica gel seal on the pod worked fantastically well. Admittedly it was fiddly to release and I had to resort to a paperclip to open it when filling but it did a fine job.
I never noticed any leaking, always snapping securely back into place.
Battery Life / Performance
Battery life was very impressive.
With the 0.8ohm coil:
- Green to blue – 8 hours
- Blue to red 7 hours
- Red less than 10 minutes
With the 0.3ohm coil:
- Green to blue – 5 hours
- Blue to red – 5 hours
- Red less than 10 minutes
Moderate vaping patterns applied with both coils with periods of switching between voltage output.
There was no drop in performance as the battery strength dropped which was pleasing to note.
It’s important to keep in mind that the red power indicator only really serves as a reminder to charge the battery.. like instantly!
Voopoo’s boast of a 90 minute charge cycle held up and actually fell within their claim.
Pros
- Fantastic battery life even under heavy use.
- Auto draw feature is very useful for stealth vaping.
- Easy to see the current juice levels.
- LED’s are bright and highly visible.
- Easy “lift and turn” 180 degree airflow control settings.
- Incredible performance from the 0.3ohm coil.
Cons
- Difficult to open the rubber sleeve to fill.
- Leaking from base of coil (only when refilling).
- Unresponsive on a few occasions.
- Auto draw feature didn’t function on 0.8ohm coil using full airflow option.
- A fingerprint magnet. (subjective con)
- Easy to scratch up.
- No cover cap for mouthpiece.
Final Verdict
The Voopoo Vinci R Pod Mod suffers from an over sensitive fire button which springs into life whenever a voltage change is required. Whenever the device needs powering down.
From experience, it’s much older relative, the DRAG 157 box mod was guilty of the same issue. The finger can be firmly pointed at the Gene chip for its eagerness to distribute power. Instantly!
I can’t bring myself to class this as either a Pro or a Con because the overall functionality of the Vinci R is quite exceptional.
There’s a clear difference in how the mod responds to the coils. As much as I wanted more power from the 0.8ohm coil, the chip simply wouldn’t allow it.
This proves the benefit of over voltage protection. You know, I mentioned that in the safety features section.. You did read it, didn’t you? lol.
It wasn’t until the end of my test cycle that I actually started making more use of the auto draw feature.
Again, there was no need to pull to the point of leaving dental impressions on the cheeks because the Gene chip was providing all the horsepower. The only negative Neil point was in the R1 coil not functioning on the full airflow setting.
Other than that the vape quality was no different from using the fire button.
All very impressive stuff.
Who Is The Vinci R Pod Mod Designed For?
I’ve discovered that this Pod Mod is not really designed for the virgin vaper. Why?
It’s a bit too powerful for one thing. The hits are instant as anyone familiar with the Gene chip will already know. Changing voltage settings is not what a new vaper is interested in either.
The filling method may also be off putting because it calls for a degree of patience, but the real reason comes down to that ‘ole chestnut. Airflow.
The Voopoo Vinci R is not a mouth to lung device, at least not with the packaged coils. Maybe I’m just old fashioned but I feel that’s what pod based systems were designed for.
Therefore it lacks the ability to emulate that “last cigarette”, the most crucial aspect for anyone wishing to quit. Anyone wishing to start vaping.
The most restrictive airflow setting was still too loose to offer a traditional mouth to lung vape. As a direct to lung vaper myself it worked very well, especially for flavour.
The full airflow option gave plenty of satisfying cloud production and was without doubt on par with any direct to lung sub ohm tank on the market.
Put the Voopoo Vinci R in the hands of an intermediate vaper or someone that sub ohm vapes and eureka! Instantly at home. The combination of power, authentic flavour notes and a silky smooth vape works to very good effect.


