The Kizoku Limit MTL RTA comes from a brand that I hadn’t come across before, turns out the only thing they had made I was half aware of, was a little magnetic atomizer stand!
They have also created a range of 510 drip tips that look like chess pieces, and I’ll admit there’s a little bit of me that wants to make a full chessboard from their black/white atty stands and a collection of tanks with the drip tips.
So I was very intrigued to have the sharp looking Limit MTL RTA turn up for review!
What Can We Expect From The Kizoku Limit MTL RTA?
I really wish I could tell you a little more about the company, but as it stands right now I can’t even find a website for them!
According to what I managed to dig up, they are a Japanese company that was formed in 2018.
As well as the Limit MTL RTA I have in for review, and the atty stands and drip tips I mentioned earlier, they have also created a disposable tank paired with a “mech mod”.
Though it is actually a little 18350/18650 MOSFET tube – I believe we’ll be getting the mod in for review soon, so be sure to check back soon for that.
 So what are we looking at with the Limit?
Unusually it is a rebuildable atomizer that also takes stock coils.
Off the top of my head I can’t actually think of another atomizer that does this, although plenty of stock coil tanks have come out with a rebuildable coil option, this is the first one I can remember that has the rebuildable bit fitted, and you can go buy coils if you want to.
It uses one of the most well regarded stock coils on the market, though oddly all descriptions I’ve seen only state that it is compatible with the 0.7Ω version, though I see no reason it couldn’t also work with the others.
Out the box it comes fitted with a rebuildable deck, but let’s crack on with the review before I spoil it all!
This was sent over for review from HeavenGifts (thank you!) but my thoughts are my own and are not influenced by freebies!
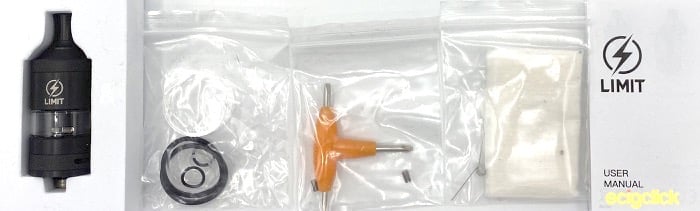
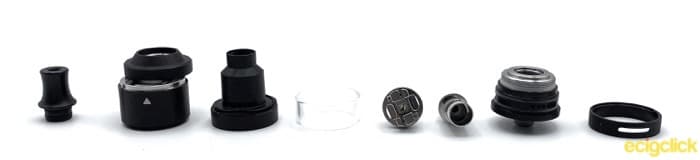
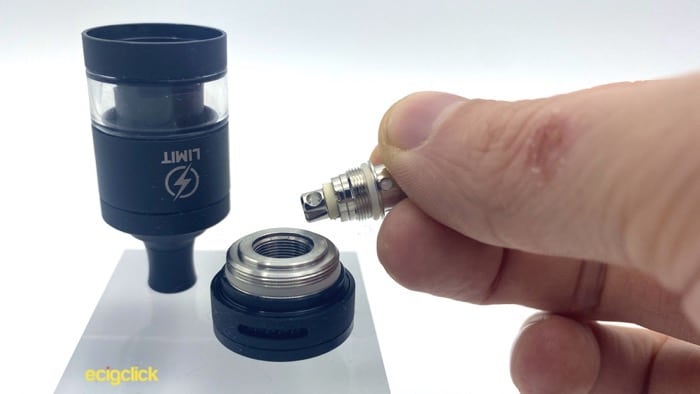
Inside The Box
- Limit Atomizer (rebuildable deck preinstalled)
- Spare Glass
- T Piece tool and spare o-rings/spare grub screws
- Cotton and prebuilt coil
- Manual
- Warranty Card
Kizoku Limit MTL RTA Specs
- Dimensions – 22mm x 55.7mm
- Weight – 47g
- Capacity – 3ml
- Coil – Popular Stock Coil or Single Coil RTA
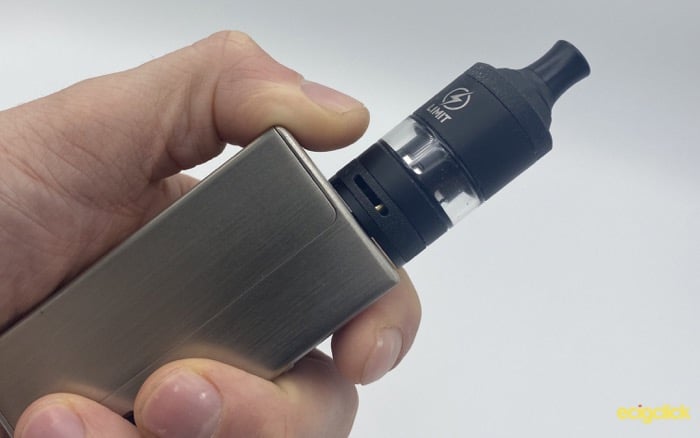
Design and Build Quality
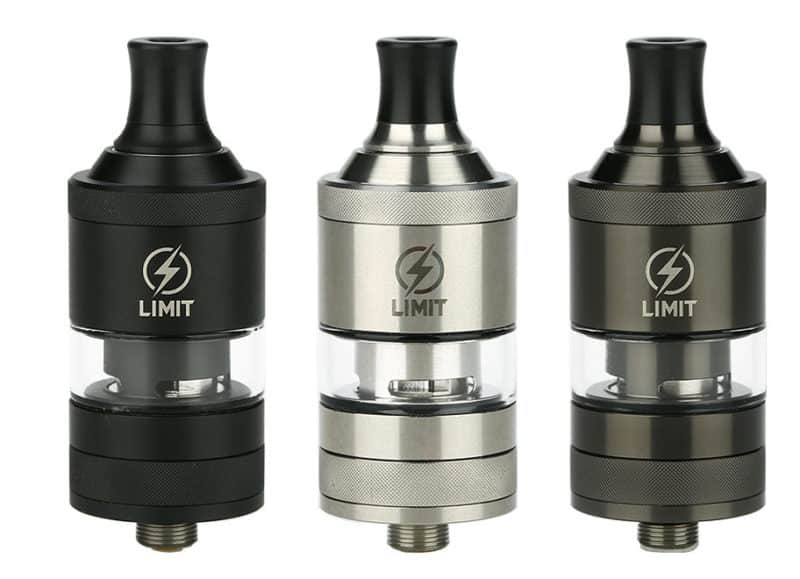
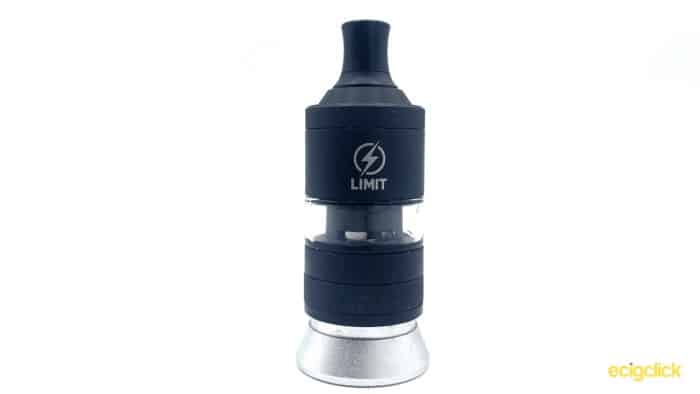
The Limit RTA comes in three colour ways, black, steel and gunmetal.
The black version that I have has got a wonderful silky finish to it.
Kizoku Limit MTL RTA Drip Tip
At the top of the tank you have a vase shaped 510 drip tip with double o-rings.
There’s no fussy detailing on here, so pretty much any of your 510’s should look fine on it.
Main Body
This is a neat little 22mm RTA, very clean fit and finish throughout.
Some of the threads on it are cranked tight though, so I had to use my tank grip tool to take it fully apart.
The only branding appears on the outside of the tank with a lightning bolt logo and the word Limit.
On the other side is your arrow to show you where to fill.
Both the top section that you unscrew to fill, and the airflow control ring have a very fine knurling to them.
It’s a thoughtful touch, as it adds a tiny bit of grip to what is otherwise a very simple looking tank.
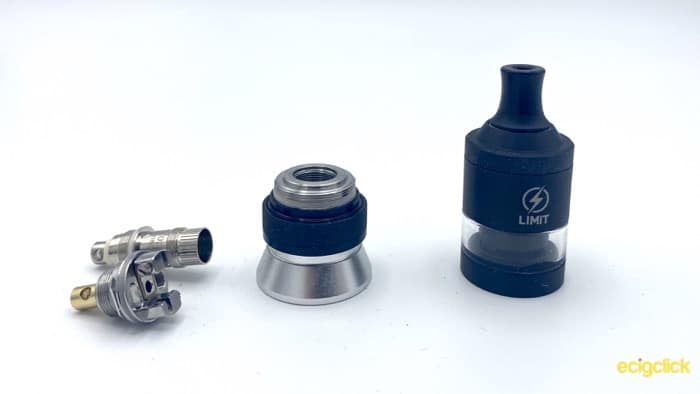
Kizoku Limit MTL RTA Deck
The deck is a fairly simple two post deck with a slight offset to make it easier to mount your coils.
Your wire is held in place by two tiny flat headed grub screws, and you get spares in the packet if you back them off too far and lose them.
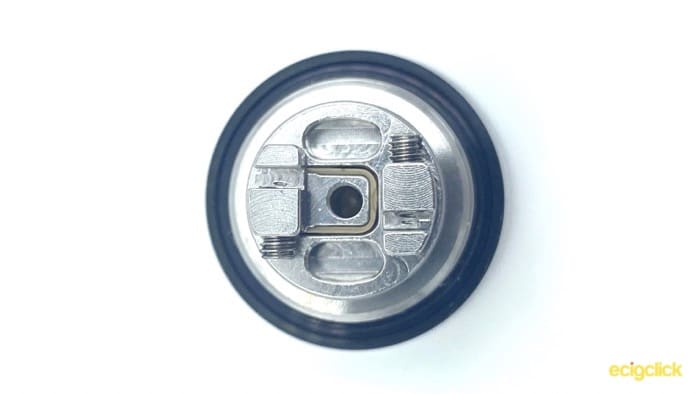
The posts are set up to take your coil wrapped the reverse of the “normal” way, so this is something to keep in mind.
When I was building it, I did test it out with a normal coil, and whilst it’s possible to install it belly down, it’s a bit more of a faff.
Underneath your coil is quite a large aperture for airflow, I measure it to be about 3mm in diameter – so we shall see what affect this has later.
Kizoku Limit MTL RTA Airflow Control
The airflow ring at the base of the Limit give you two options.
Either a set of 6 small holes, or a single long slot, with stops at either extreme.
I’ll go into more detail when we get to how it performs, but even the small holes are a lot airier than you might expect.
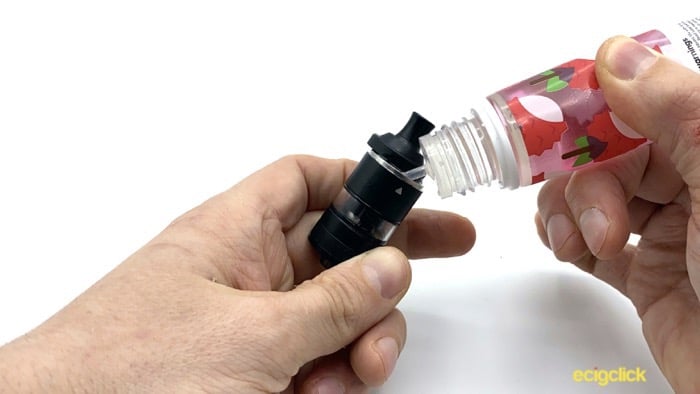
How To Fill The Kizoku Limit MTL RTA
First you need to unscrew the top section, it doesn’t come off totally – apparently this is child proofing.
Then look for the arrow to show you where to push.
Slide open the top cap and push the tip of your bottle through the membrane.
Fill up, close it and screw down the top cap.
Don’t forget to leave it to stand for a few minutes if you’re using a new coil!
Read more about priming your vape coils.
Filling it up is actually a bit of a pain, I really don’t like the membrane that covers the top as it’s really easy to form an airlock and have your e-liquid spilling out over the top before it’s full.
Also mine already has some tears in it, which is a bummer when they don’t give you a spare one.
It should be noted, that this is at the end of my testing, and I possibly wasn’t as gentle as this tank needs.
The design of the tank doesn’t make it easy to see how full it is, as the glass section is only at the very bottom of the tank, and you can’t look down and see the liquid because of that seal.
Because of this I’d suggest you take it easy once you can no longer see the level of your e-liquid.
Finally I’d advise you to keep some paper towel on hand the first couple of times!
Even if you thought you got away with it, sliding across the top pieces has a nasty habit of pushing any e-liquid that collected around the top along with it!
How To Change The Kizoku Limit MTL RTA Coil (or switch out rebuildable deck)
Unscrew the base of the atomizer, unscrew your old coil (or the rebuildable deck) and screw you new coil in place.
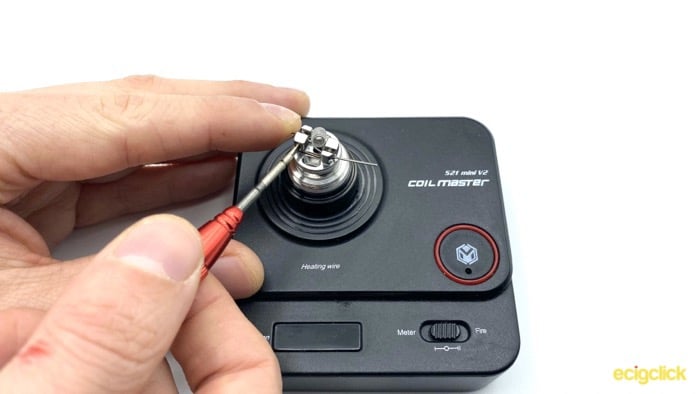
How to build the Kizoku Limit MTL RTA
- Unscrew the two screws with a flat head screwdriver, place your coil legs in the gap and tighten. Note. The way the deck is set up is the reverse of normal, so keep this in mind if you buy your coils pre-made. If you build your own, just wrap them the other way or you’ll have to install you coil belly down.

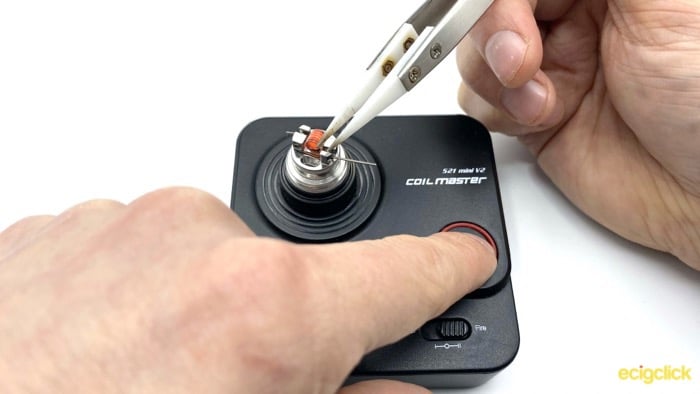
- Snip your coil legs close to the post

- Gently pulse your coil and strum with ceramic tweezers to eliminate any hot spots
- Roll your cotton and pull through your coil
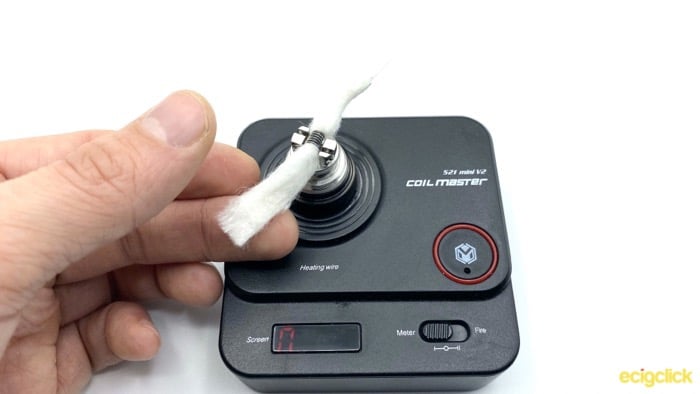
- Cut your cotton so that it will reach down into the juice wells
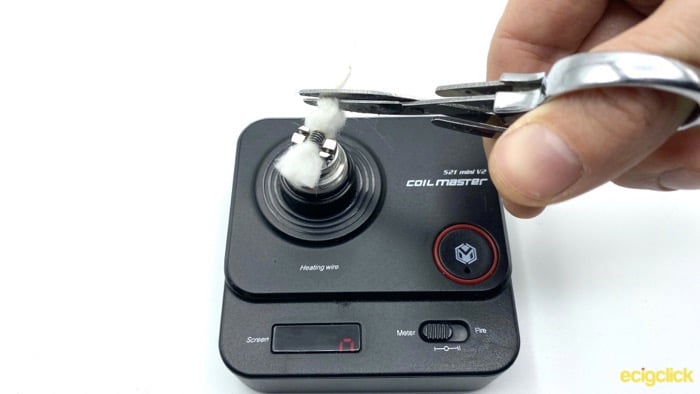
- Thin out your cotton as required. Note On the 2.5mm ID coil that I was using, I found I had to thin it out quite a lot
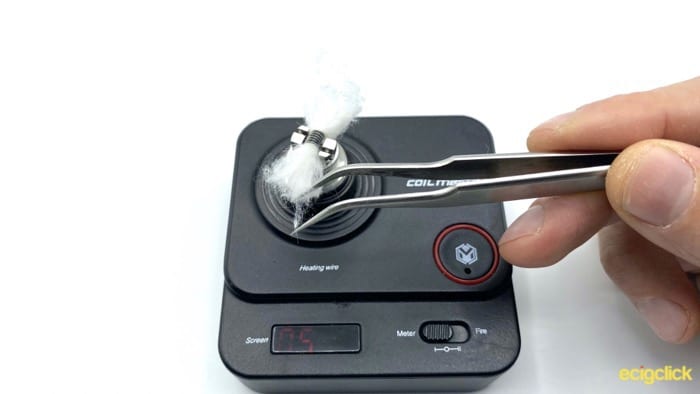
- Wet your cotton with e-liquid
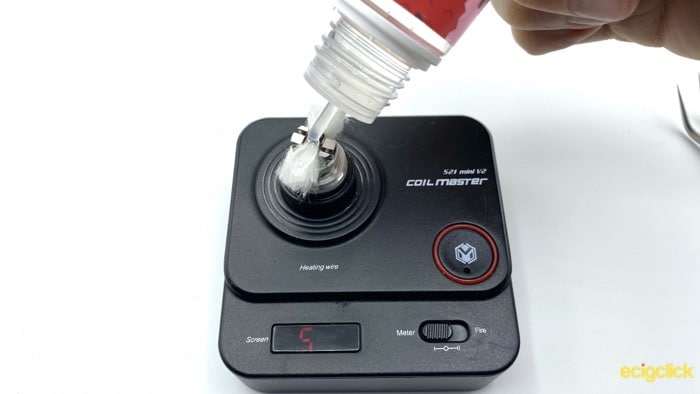
- The gently push the tails of your cotton so that they drop into those juice well without clogging them up
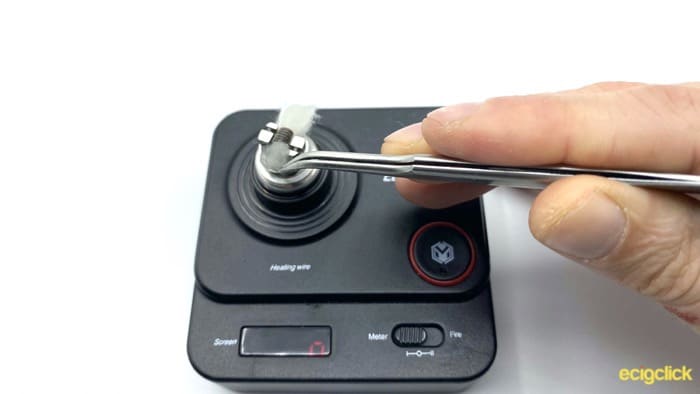
- Then reassemble!
How Does the Kizoku Limit Perform?
I’ve tried the Limit in a variety of different set ups, using both a stock coil, and the rebuildable deck.
For most of my points, it actually doesn’t matter to much which one you go with, but where there are noticeable differences I’ll be sure to point them out!
I tested a couple of different e-liquids in it, both Vape Simple’s Berry Ice at 50/50, and only liquids Lychee Lemonade at 70/30.
Airflow
Although the Limit is described as a MTL tank, it’s definitely on the looser side.
With 1 of the pin holes open, I would describe it as a slightly loose Mouth To Lung draw.
Opening up from there it is easy enough to get a restrictive DTL draw with them all open, and if you switch to the slot airflow, then it is only slightly restrictive.
On a scale of 1 to 10, where 1 is the tightest draw you can imagine, I would say this ranges from about a 3.5 up to an 8.
Comfortably allowing a DTL draw, or a fairly open MTL.
It is slightly less open with the stock coil vs the rebuildable deck, but it didn’t change the profile much.
If anything it probably only moved the scores down by about a 0.5 towards the tighter end of the scale.
Flavour
Using the stock coil I was really pleased with the flavour on this, which is hardly surprising given the coil in question.
However, it’s not quite as good as some of the other tanks that have used this coil, and I think part of the reason is down to relatively long distance from the coil to the drip tip.
Flavours were all accurate and well presented, but they didn’t have quite as much pop as I’ve had from this coil before.
After using a stock coil for a week I moved onto the rebuildable deck, hopeful that I would be able to coax a little more flavour out the tank.
Whilst I was able to get a slight improvement, it actually surprised me how little it changed.
I’ve put a couple of different builds in it, starting off with my standard testing build of microfine fused clapton with a resistance of about 0.6Ω.
I’ve also used a simple round wire build at 0.9Ω, and I would say that actually the tank performs a little better with round wire.
I think it was using more complex wires, capturing more e-liquid, that caused me to get some dry hits later.
I think one of the reasons that the flavour isn’t nearly as punchy as you might expect from the rebuildable deck, is there’s almost no doming going on inside the main chamber.
It’s really hard to show in a photo, but there’s not much doming, and what there is, gets interrupted by the top section that is designed to marry up with the replaceable stock coil.
Wicking
Wicking the rebuildable deck is mercifully easy, but I did run into a couple of problems based on how the inside of the tank is built.
Because it has to be able to fit over both a rebuildable deck, and a stock coil, the chimney comes down over the deck quite a long way.
There are cut outs that are obviously there to allow it to wick freely.
Unfortunately I found that these cut outs (like windows through to the juice wells of the deck) had a nasty habit of trapping the occasional bubble.
This meant that rather than the the e-liquid being able to travel straight into the juice wells and get pulled up to your coil by the cotton, the bubble would form a barrier.
On more than one occasion I got a noticeable dry hit from this tank, and it was almost always due to there being one or two bubbles that had gotten trapped in the window, and not floating out of the way of the juice wells.
This hasn’t been a problem when using a stock coil.
Leaking
This only happened with the stock coil, but I found that this tank had a nasty tendency to dump some of it’s e-liquid out of the air holes.
It seemed to solve itself after a few days, but it’s worth noting.
By contrast I never had any problems with the rebuildable deck.
Any Other Notes?
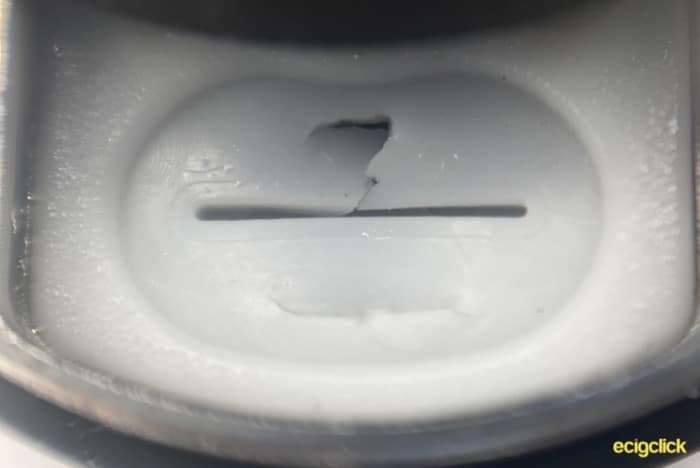
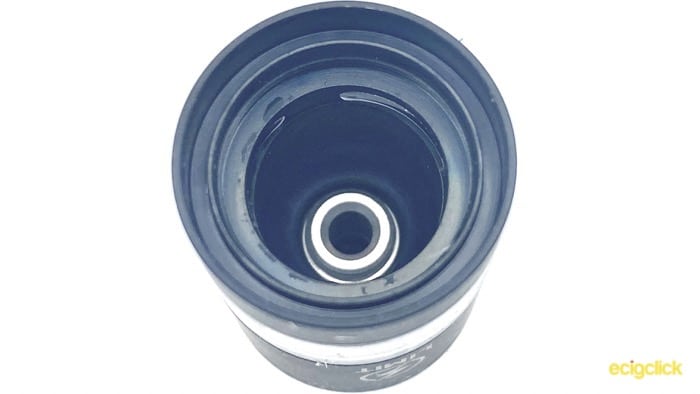
You can see in my photo of the seal around the fill port, that it’s already starting to develop splits.
That is probably on me for being a bit too keen to get the tip of the bottle fully inside.
However it made me wonder whether it could still work without it.
Note: You don’t get a spare one of these seals.
Taking the top section off is nice and easy, looking down where your drip tip goes reveals a Philips head screw when it’s open for filling.
Unscrewing that allows you to take the whole top off.
After reassembling, what I suspected might happen did.
The top no longer seals well enough to hold a vacuum, so you just end up with most of it dribbling out the airflow – so not something to try!
One final note is that if you do take it totally to pieces, be very careful when you’re reassembling it that the glass section is properly seated on the o-rings.
I was a little hasty and managed to crack the glass the first time around.
Happily they do give you a spare for that!
Pros
- Choice of stock coil or rebuildable
- Sharp looking “traditional” size MTL RTA (22mm)
Cons
- Filling can be a pain
- Flavour is not up to par with modern RTA’s
- Leaking when using stock coil
Final Review Verdict
This is a really interesting little tank, and I love the idea of being able to have either a stock coil or a rebuildable deck.
Whilst those that have read my reviews for a while will know that I love rebuildables, there are times where just being able to pop in a coil is great, holidays especially!
Unfortunately to have that flexibility, you’re giving up a little bit of the quality you would get from either a dedicated rebuildable or a stock coil tank.
The chimney section of the tank limits the flavour you’ll get from a rebuildable, and the stock coil isn’t showing what it’s capable of.
All in all, it’s not a bad tank, I just think there are plenty of better options on the marketplace unless you really want something that can switch from stock coil to rebuildable.
If you’re looking for MTL, then take a look at our Best Vape Tanks For Mouth To Lung Vaping
 Vaping")


I actually did not get a wrapped coil, I just got some wire 🙂 BUT I did get a spare rubber for the fill port. It will also rupture like the first one did. I will then close it with custom made silicon and I will puncture it with a needle since the syringe with needle is the only proper way to fill it. Forget gorilla bottles, top is too thick. You can just avoid this atomizer altogether and get something else with different set of problems, that we pretend don’t exist because we manage to avoid them now and then. But they are there.