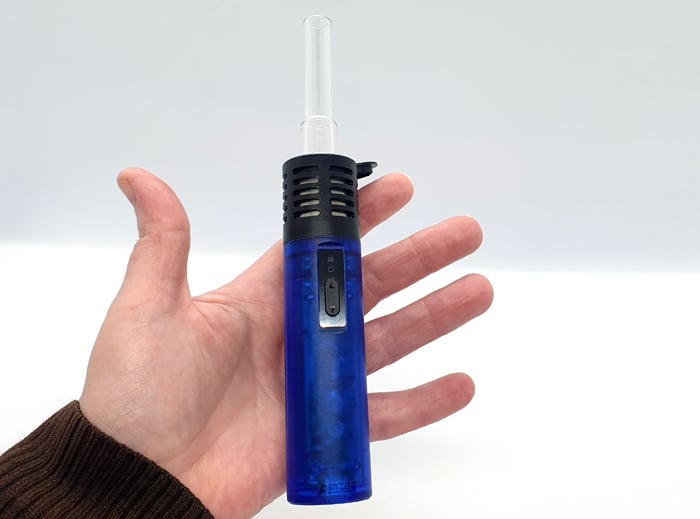
It is a bit of a change in direction for me with this review – I have the Arizer Air SE Vaporizer in my hand!
I am not the most experienced in using Vaporizers – I prefer my trusty Dynavap devices.
However I have had a play with vaporisers in the past and our lovely late Neil H sent me the DaVinci MIQRO vaporizer to play with. Sadly I only used it a few times and then due to building work at home, I bloody lost it!
So please bear with me – I may not get all the right settings – but this is also an insight into how easy this is to get to grips with. If I can work it out, then most people who can use a vape box mod should be able to.
If you would like to know more about dry herb vaporizers and how they work read our guide.
A little bit now about Arizer.
![]()
Their website does not elaborate on the story of the company but it says…
“At Arizer we focus on making our product better to serve our customers better. We don’t take the title of best dry herb vaporizer lightly, so we keep innovating and improving our products.”
Thank you so much to Joshua Seraj from Tools420 who sent this over to me for review. He was a pleasure to deal with, knowledgeable and very helpful
I will record my findings on the device in my possession. Your experiences may vary!

Time to play!
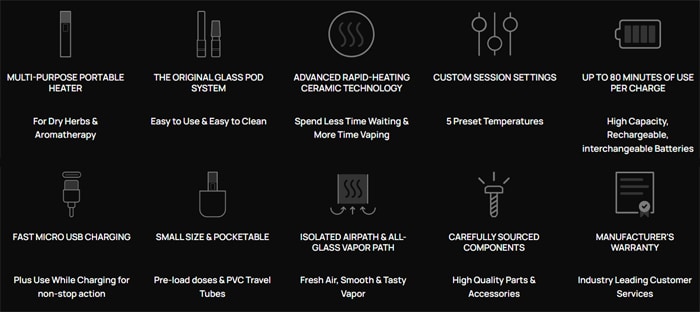
What To Expect From The Arizer Air SE …
This is an update to the previous Arizer Air and Arizer Air 2.

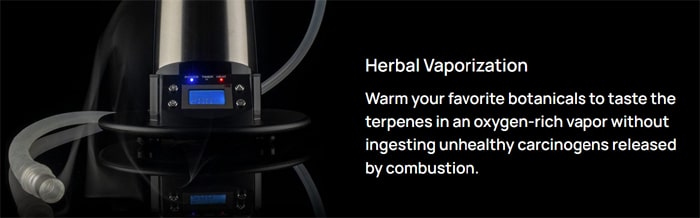
Basically this is a device with a battery which heats up an oven bowl. The heat of the bowl then vaporises the dry herbs for inhalation. Inhaling the vapour is safer than inhaling burnt matter which contains more toxins. Plus it gives a purer flavour.
The main component is the Stainless Steel bowl which has a ceramic heating element beneath. This design has the benefit of not having to buy new coils or chambers. You simply keep the bowl nice and clean.
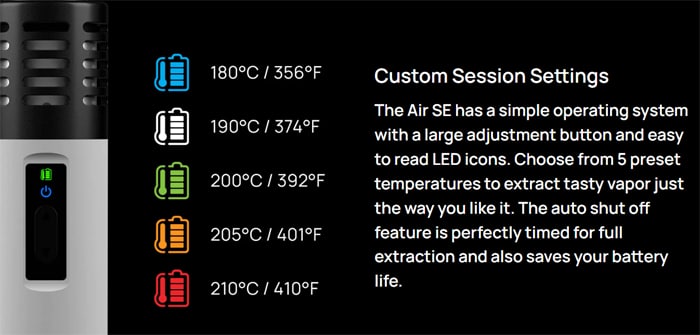
Press a button to start the heating cycle and the power LED will indicate when fully heated to the required temperature.
There are 5 temperature levels to choose from which are displayed using a different coloured LED. Plus there is also a battery charge remaining display too.
Once heated you use the included mouthpiece to inhale the vapour. The oven will stay hot for 10 minutes so you can get multiple inhales from one heating session.
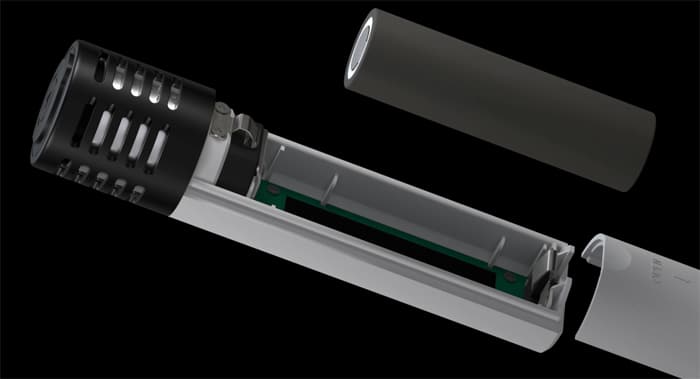
Providing the power is a removable 18650 battery – which is actually included in the kit! There is a Micro USB charging port, but you may prefer to remove the battery and charge it in an external charger.
An audio alert (Beep) will sound when turning the device on and off. You can of course turn this off – thankfully – as the Dog was petrified of it!
This is not suitable for wet products / e-liquids / concentrates / dab etc – it is for dry herb only.
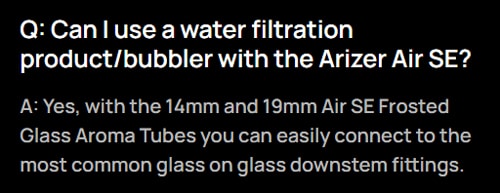
You can purchase many accessories and replacement parts. There are different mouthpieces and bubbler / water / flask adaptor options available too.
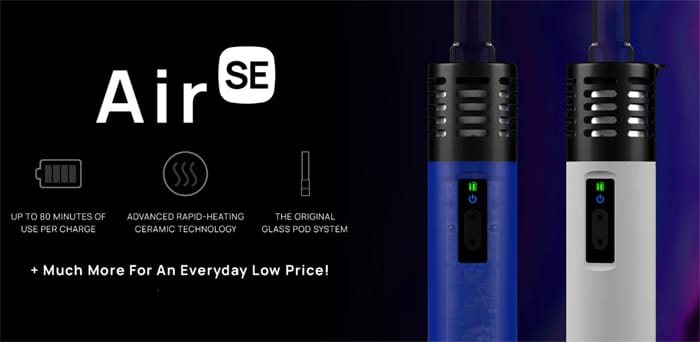
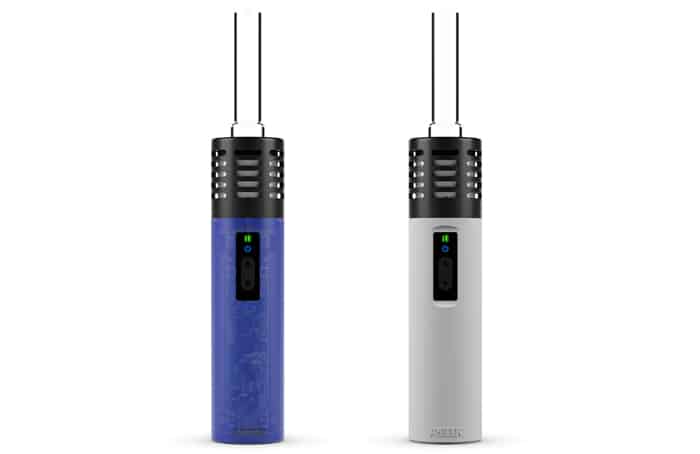
There are 2 colours to choose from: Blue Haze and Reefer White.
This is a dry herb vaporizer for herbs. Many people swear by using ‘legal’ herbs such as Mint – Lavender and even Catnip for aromatherapy purposes. Google is your friend to see what benefits vaping on certain herbs may have 😉
None of us at EcigClick are suggesting you vape on anything that may be illegal in your country…
Let’s see if this device can sit with some of the best vaporizers for dry herb.
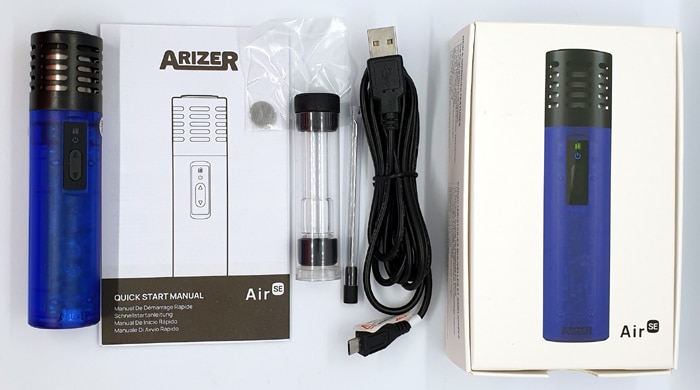
Kit Includes
- Arizer Air SE Portable Micro-Heater device
- Air SE 18650 Battery
- Micro USB Charging cable
- Air SE Glass Aroma Tube (70mm)
- Air SE Stem Cap
- Air SE PVC Travel Carrying Tube & Cap (70mm Size)
- Stainless Steel Stirring Tool
- Air SE Steel Filter Screens
- Air SE Owner’s Manual
Arizer Air SE Specs
- Size: 29x122mm (not including mouthpiece)
- Battery: Removable 18650 (included in kit)
- Display: Battery charge, heat setting and power indicators
- Heating system: Hybrid (convection / conduction)
- Heat up time: Up to 60 seconds
- Bowl size: 0.2g
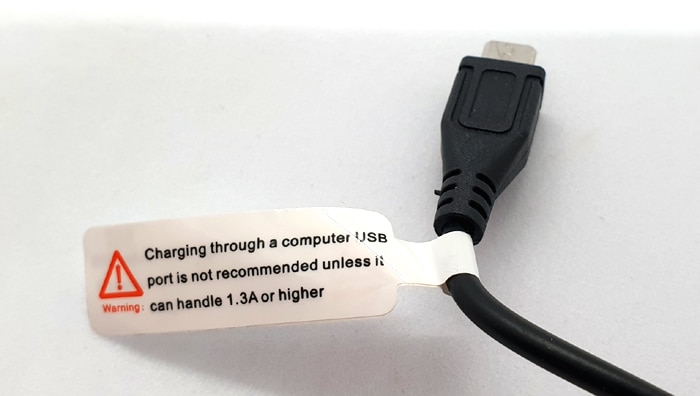
- Micro USB charging : requires 1.3A charge rate (not suitable for older 0.5A USB ports in devices such as PC’s and Laptops)
- Up to 80 minutes use per charge / 6 sessions of 10 minutes
- Rapid heating ceramic technology
- 5 temperature settings
- Bowl material: Glass mouthpiece / Stainless Steel oven
- 70mm glass mouthpiece
- Pass through charging (use whilst charging)
- Temperature range: 356-410°F / 180-210°C
- 10 minute session timer – device switches off after this to conserve energy
- Parts compatible with Arizer Air / Solo – Glass Mouthpiece
- 6 foot long USB cable included
- Audio warning when turning on and off (audio alert can be switched off)
- Use with adaptors (available separately) to connect to water pipes / bubblers
Arizer Air SE Design and Build Quality
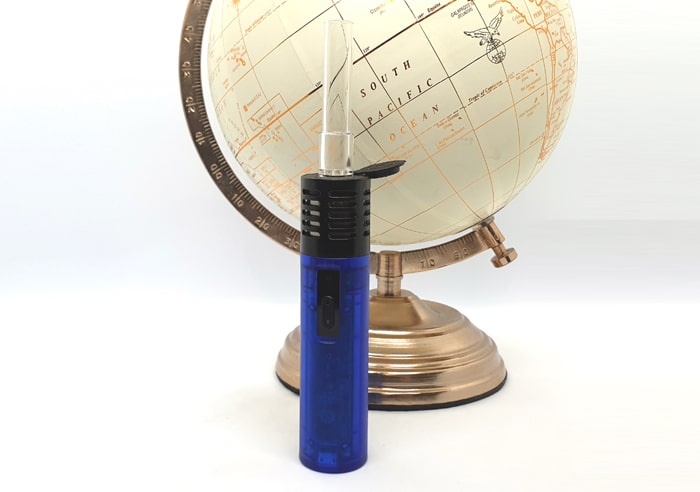
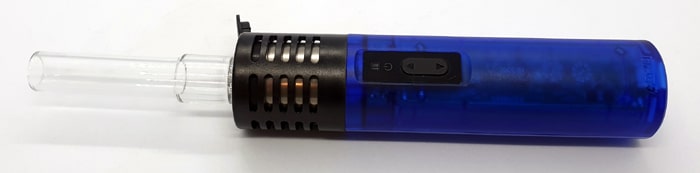
I received the Blue Haze version which is made from mainly slightly transparent plastic.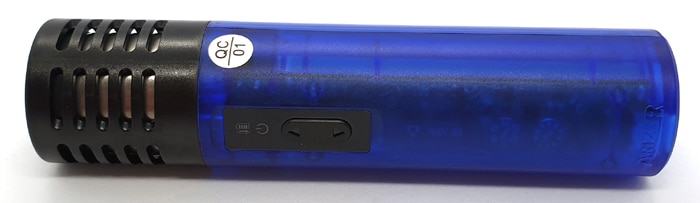
The packaging is great with the main device sat in a foam protective compartment and a box holds all the accessories.
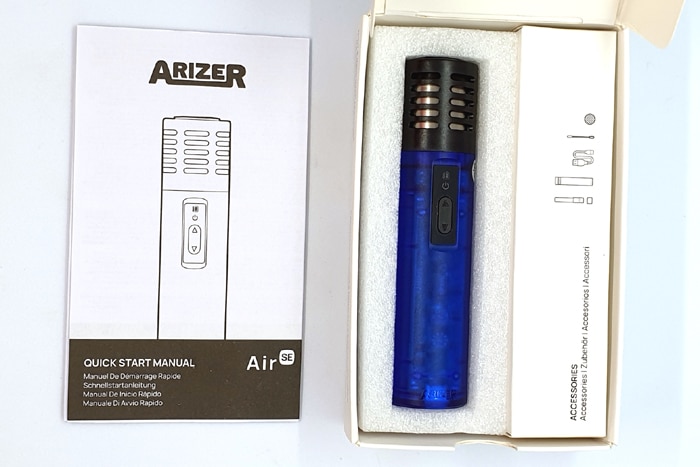
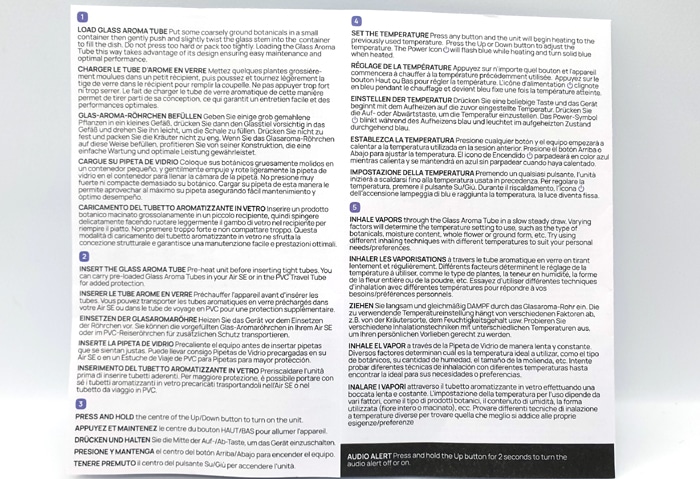
Sadly I feel the instructions are not great. Yes they tell you about most of the device operation, but not simple things like how to add your material etc. Here are a few pages of the instructions as an example – but there are more details on the control panel on other pages.
Main Device
At the top of the device is a metal area which houses the heating chamber. This has a finned design for cooling.
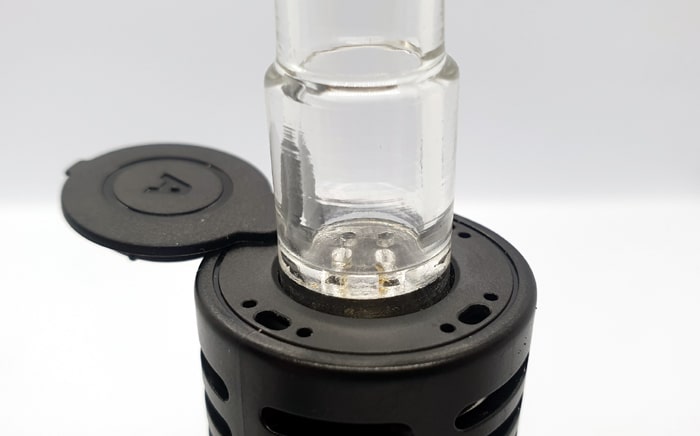
You will see a round cover with the “A” logo, this swings out of the way for installing the aroma tube assembly.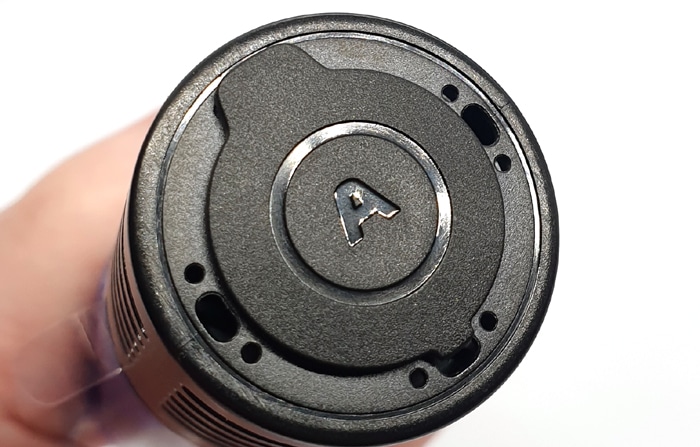
The pivot of this cover is a bit deceptive, the area with the large lip sticking out is the pivot. You would think at first glance this large lip was where you lifted the cover – but it is not! Opposite this is a smaller lip where you can lift the cover slightly to swing it. It closes tightly when not in use.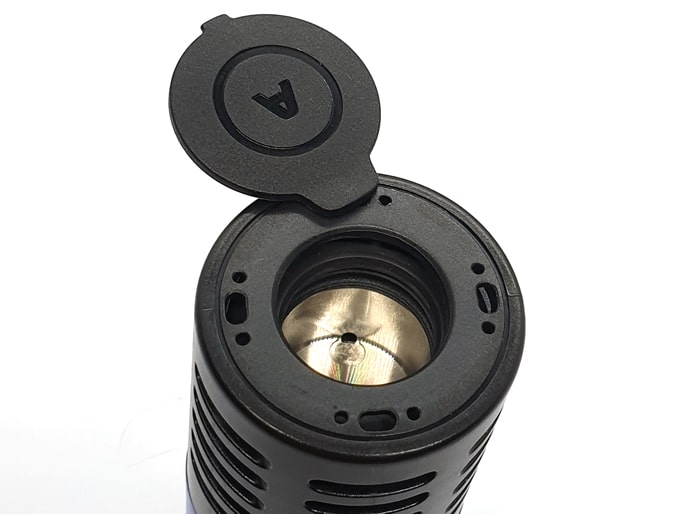
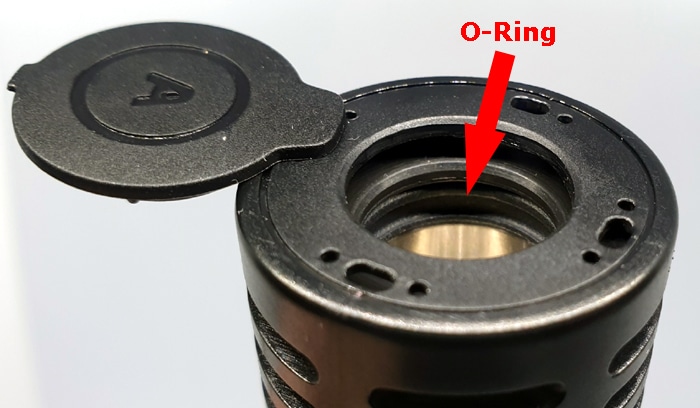
Below the cover is the oven assembly which sits in a chamber. This is quite easy to access for cleaning. Inside the entrance to the chamber is a thick O-ring which seals and secures the glass aroma tube in position.
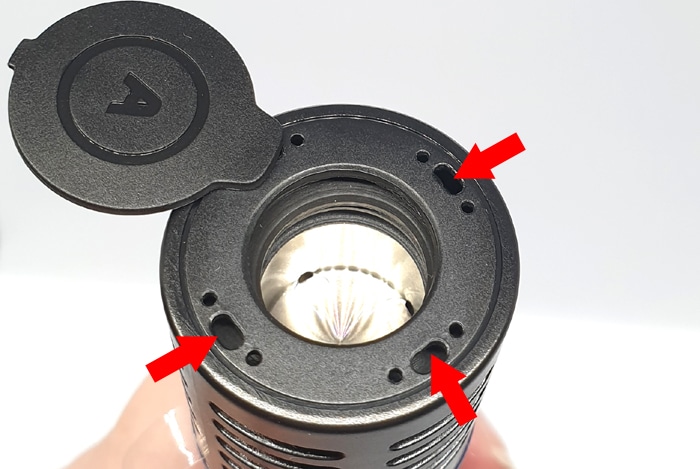
Around the chamber are airflow inlet holes which direct the incoming air through the chamber into the aroma tube. If you want to restrict the airflow you could cover one of these.
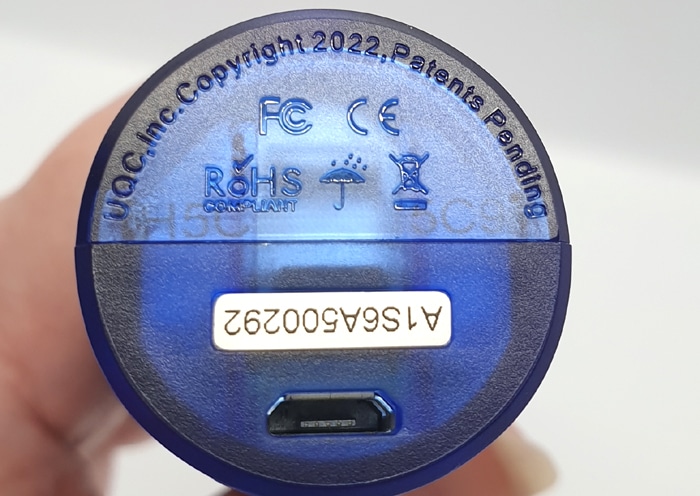
On the base you will find the Micro USB port and the legal logos. There appears to be a serial number too.
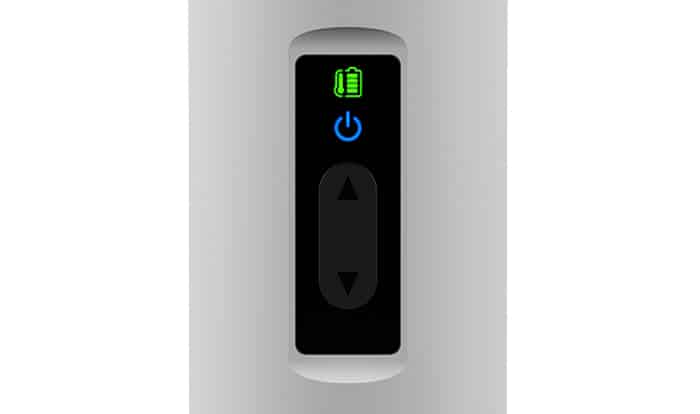
Control Panel
On the control panel you have the heating indicator light and the “on” ![]() symbol light. I will describe in the Quick Start Section what the indicators mean.
symbol light. I will describe in the Quick Start Section what the indicators mean.
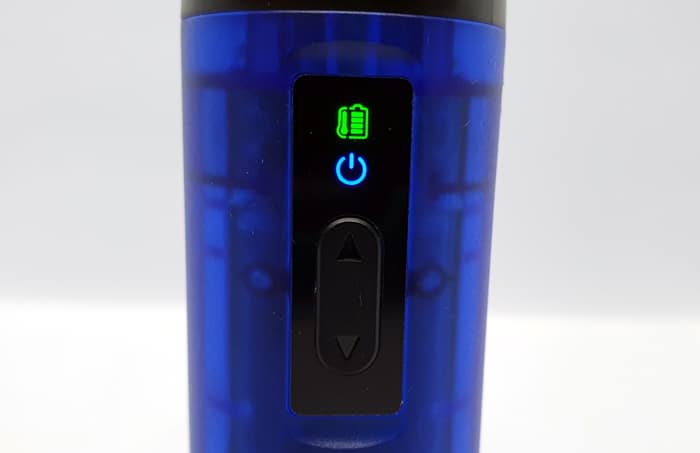
Below this is the rocker switch. This has up and down arrows etched in and the centre part of the switch is for turning on and off.
The switch is responsive and I have had no issues at all.
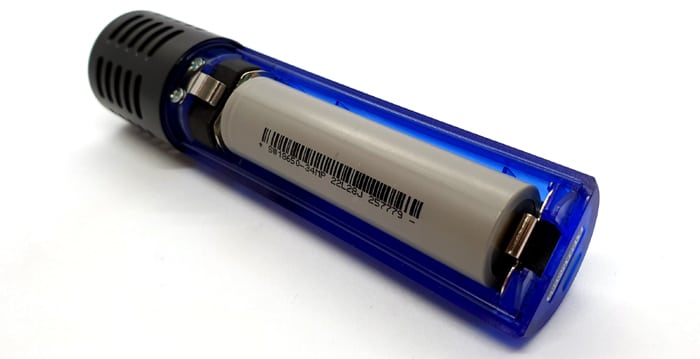
Battery Compartment
The battery compartment is accessed by sliding the cover off the rear.
An arrow indicates where to push to open and it will slide down the device body. The rails run all the way down to the base of the mod, so when replacing the cover you will need to align it at the bottom of the mod and slide it all the way up.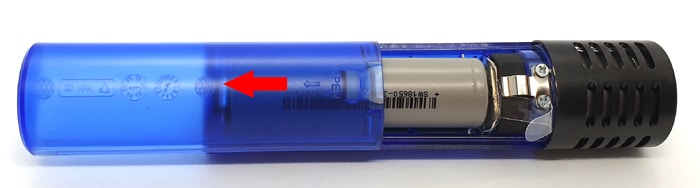
The cover feels sturdy and requires a bit of a press on the arrowed area where the spring catch is for it to move.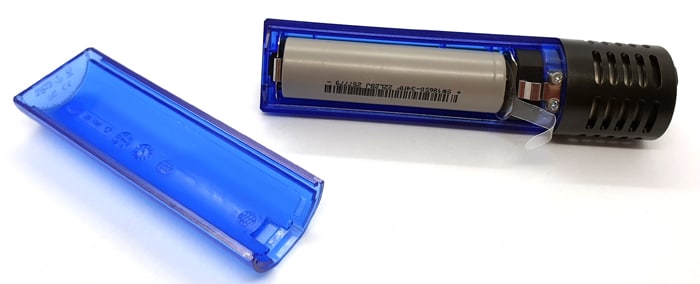
Inside the compartment is the battery sled. 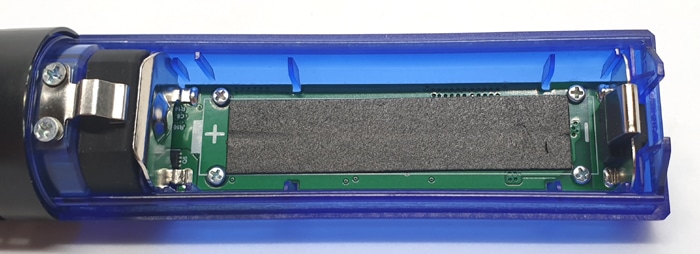
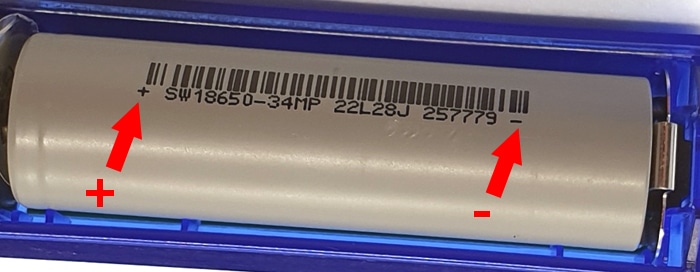
Both terminals are marked on the circuit board behind the compartment and what appears to be an isolating material is applied to the circuit board.
The bottom terminal (negative) is spring loaded so this will help to keep the battery in contact at all times. Plus this ensures the battery is held in securely.
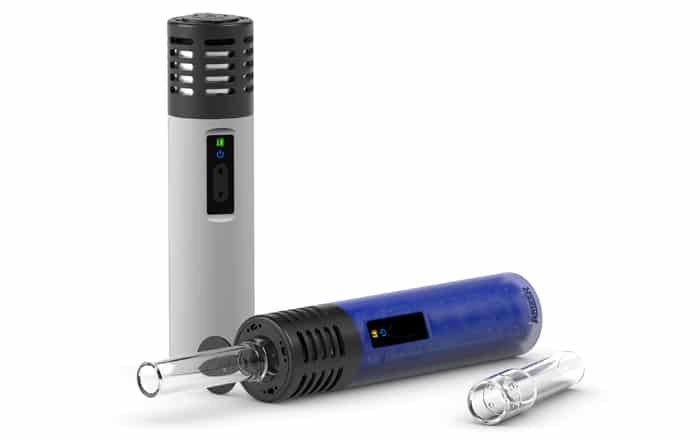
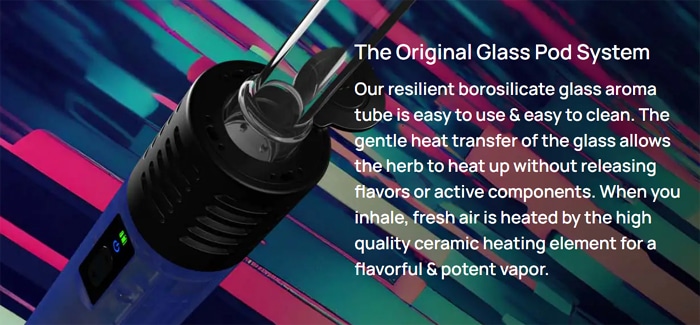
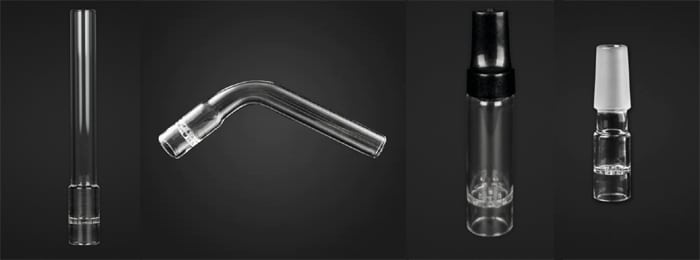
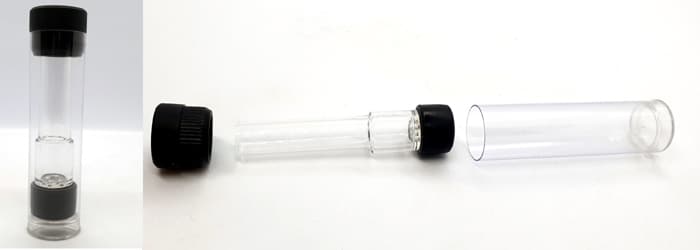
Aroma Tube
The kit includes a 70mm straight glass aroma tube.
This is made of clear glass and also contains the compartment where you add your dry material. You then install the tube into the chamber on the mod.
Sorry if there are some signs of use on my Aroma Tube, I gave it a quick wash – but didn’t spot the remaining bits until photographing & zooming in!
In this compartment the base has small holes for the vapour to travel through without allowing particles of the material to escape.
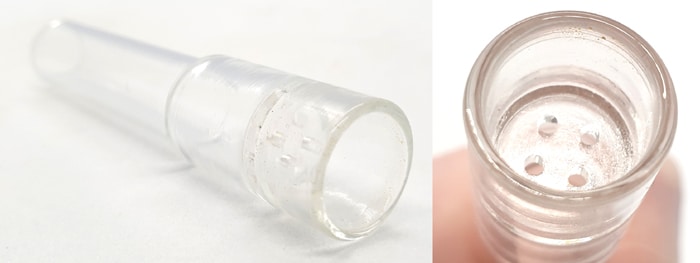
This is a great design as the majority of the material will stay in the glass tube rather than entering the oven section and being harder to clean.
The kit includes some metal screens but the Arizer website says the following on the topic…
“Note: Metal screens are included and available for your convenience but they make vapor harsh and diminish the flavors. The Air SE Glass Aroma Tubes have a built-in screen to keep vapor pure and flavorful so we recommend using whole or coarsely ground botanicals with no metal screen for smooth and Tasty vapor.”
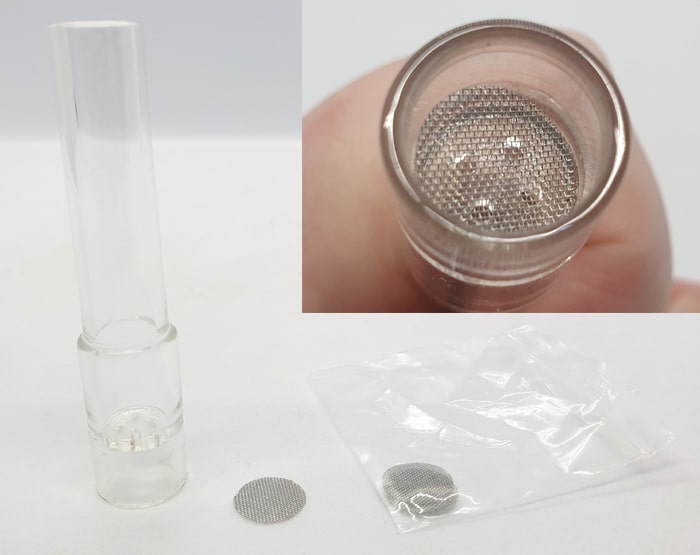
So I basically didn’t use the screens at all.
This feels very delicate and I would be scared of breaking it, but you can buy replacements plus Curved, Tipped and Frosted Glass versions. There are also different lengths of tube available – the longer the tube the cooler the output will be.
Also the kit includes a stopper to keep your material safe in the aroma tube when not in use plus a travel case for carrying the tube.
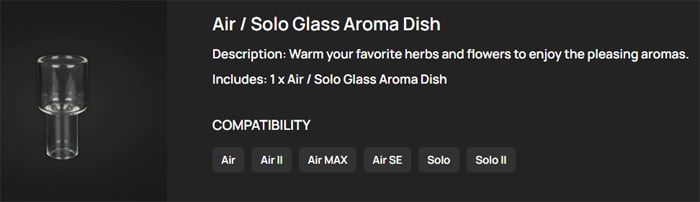
If you want to use this for aromatherapy purposes, you can buy a glass dish adaptor which you add your aromatic herbs to, heat and just let the vapour fill the air!
Quick Start Guide
If you are new to electronic vaporizers this may all seem a bit daunting. Hang in there and I will guide you through getting it up and running.
There is a plastic isolator sticker which must be removed in order to power up the device. See the image below for its location.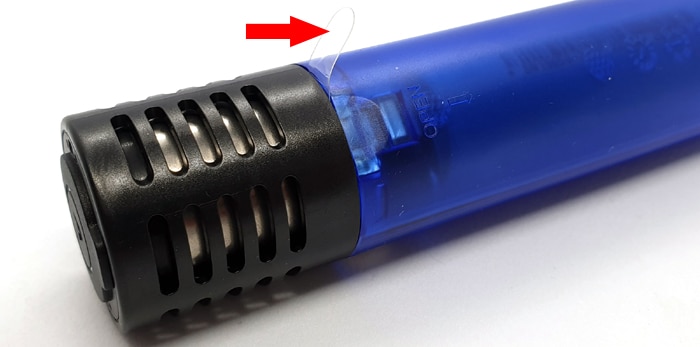
A video from Arizer included below shows how to do this.
Make sure to charge the device first then do a heating cycle to remove any impurities from the bowl section (with bowl empty). Set it to the highest temperature setting.
The device will get hot so make sure to wait until components are cool before filling or performing any maintenance / cleaning.
If you are not sure what temperature setting to use you can either start at the lowest and work your way up or do a search for the herb of your choice and the optimum temperature setting.
Also I have included the “Quick Start Video” from the Arizer website.
Basic Operation

Press and hold the centre of the adjustment button to turn the device on or off. This ensures the device cannot be accidentally switched on by just knocking the button.
Press any button and the device will heat up to the previously used temperature setting. This prevents the device accidentally heating up on its own as you have to press the button to trigger the heat cycle. If you want to adjust the temperature I cover that in the next section.
The ![]() icon will flash Blue whilst heating and turn solid Blue when fully heated. If the icon is Red the device will not heat up and requires charging.
icon will flash Blue whilst heating and turn solid Blue when fully heated. If the icon is Red the device will not heat up and requires charging.
Whilst the icon is lit in Blue the bowl is at the correct temperature for vaping.
When fully heated, you inhale through the glass aroma tube in a slow steady draw.
When the heating cycle is over (the bowl has cooled below the required temperature) the device will turn off and you will need to reheat.
To turn the audio alert on or off press the “up” button for 2 seconds. The audio alert will beep when the device is switched on or off.
Temperature Adjustment
 When you first switch on the device the colour of the LED shows the battery charge remaining. I go into more detail on this in the next section.
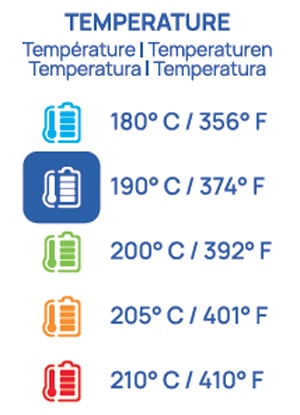
Then the LED colour will indicate which temperature mode you are using.
Use the up and down button to select from 5 temperature options.
- Blue = 180°C / 356°F
- White = 190°C / 374°F
- Green = 200°C / 392°F
- Orange = 205°C / 401°F
- Red = 210°C / 410°F
Battery Indicator
![]() The upper LED will blink once in the corresponding colour when you power on the device.
The upper LED will blink once in the corresponding colour when you power on the device.
- Green = 100% charge remaining
- White = 70%
- Orange = 40%
- Red = 10%
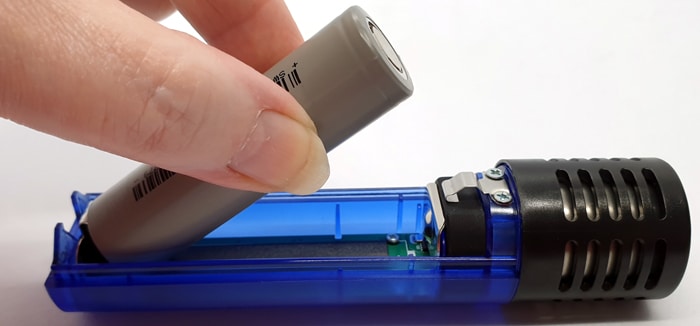
How To Install / Remove The Battery
To install / remove the battery you will need to open the rear cover.
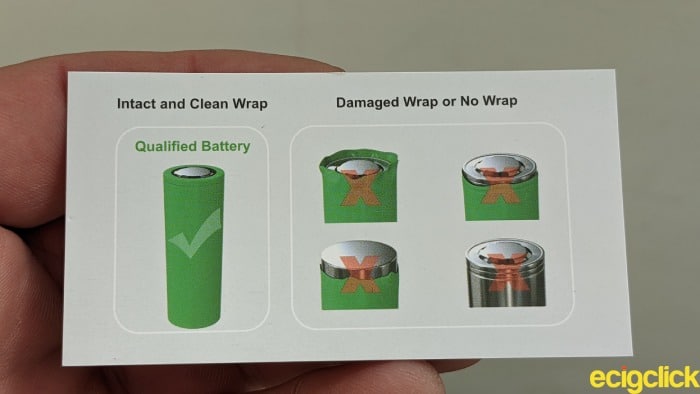
Make sure you are clued up on battery safety and always check that the battery wrap has no damage, splits or bulges.
- Slide down the rear cover in the direction shown.

- If a battery is installed remove it by pushing the battery against the spring loaded bottom contact and lift out the top of the battery.

- To replace make sure the battery is in alignment with the correct terminals – Positive (+) is at the top and Negative (-) is at the bottom. The battery also has the terminals marked as below.

- Install the battery bottom end first. Press against the spring to push the positive end of the battery into position.
- Replace the cover by sliding it on from the base of the device, the securing rails run all the way to the bottom of the mod.
How To Charge The Battery
For charging it is recommended to remove the battery and use a dedicated charger. However if you need a charge in a hurry you can use the supplied USB cable. The indicator light will change colour to display the charge progress. When fully charged the light will stay on in Green. 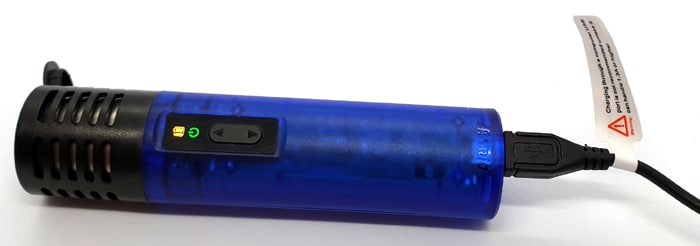
It is worth noting that you cannot charge the battery using the USB port of an older computer / Laptop which only outputs 0.5A. You need to use a mains plug or port with at least a 1.3A output.
Sadly it does take a while to charge and I lost track of the time!
How To Fill & Use
Unfortunately the instructions do not really tell you much about filling, so I will tell you how I did it.
- Remove the aroma tube (mouthpiece) from the device.
- Turn it upside down.
- You can put a screen in the base of the tube chamber, but to be honest this is already shielded for stray particles so I didn’t bother.
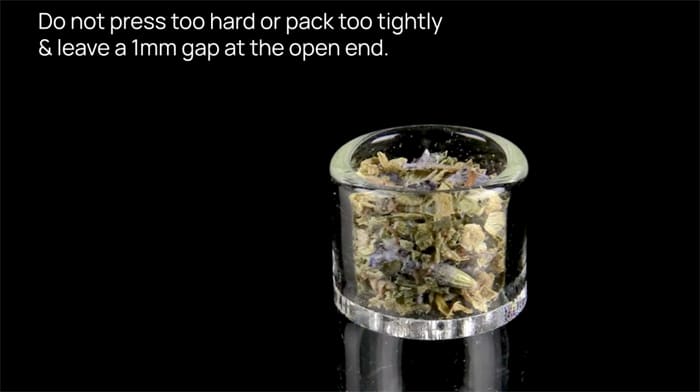
- Add ground up material to the tube chamber, do not overfill.

- Tip the Arizer Air SE device upside down and slightly lift then slide across the chamber cover.

- Insert the tube into the device. If you have difficulty in inserting the aroma tube, Arizer suggest heating the oven first, then install the tube.

- Switch on the Arizer and select temperature level.
- If you want to stay at previous temperature level just press any button for the heating cycle to begin. Or use the up and down adjustment to scroll through the temperature modes. The “on” indicator light will flash whilst heating.
- Once the correct temperature has been reached the “on”
 indicator will stay lit up solidly.
 - Take some inhales from the mouthpiece. Try to hold in the vapour for as long as you can without hurting yourself obviously!
- You can keep vaping until the device indicators turn off – 10 minutes after heating.
- To continue, turn on the device and press any button to start the heating cycle again.

How Does the Arizer Air SE Perform?
I only used the lowest power level (Blue = 180°C / 356°F) as this is a similar temperature to the Dynavap which gives me a great experience with my particular dry herb.
The inhale is so very smooth and can be deceptive! You think nothing is happening until it comes to the exhale! Depending on the material and heat setting you will get some vapour. It was not thick vapour like with an e-cigarette, more like a trickle.
As there is no burning the flavour is purer, there isn’t excessive heat and this is unlikely to make you cough. I did not find it harsh at all, but I was on the lightweight lowest temperature setting!
I found it was around 40 seconds for mine to heat up to the lowest temperature but it then stayed at temperature for 10 minutes. During that time I could easily get 7 vapes, that was with big gaps inbetween!
You cannot adjust the session time of 10 minutes, which was a bit long for me, I wasn’t vaping on this constantly. But if there are a few of your sharing the device this is ideal.
After each session I checked the condition of my dry herbs and even after 3 sessions there was still plenty of life left in it. Give it a bit of a stir with the excellent pokey thing. This is extremely efficient in its use of the material, after all it doesn’t end up all turning to ash!
When the flavour drops or the material has taken on a dry or dark appearance it is time to clean out the aroma tube chamber.
I did find with very dry or small ground material there would sometimes be some of this coming up to the mouthpiece. This could be cured by adding a screen or not grinding the material too finely.
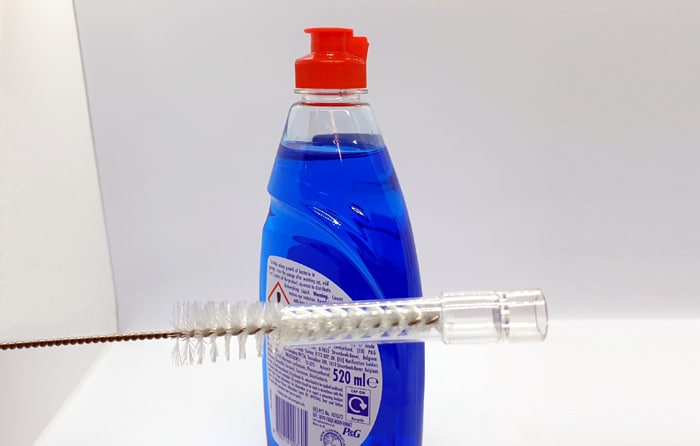
This area does get a bit stained after a while, so I used household Washing Up Liquid with one of those thin bottle brushes, plenty of hot water and job done! I left it to air dry before use.
Thankfully the design of the aroma tube chamber means that the material is mainly retained in there and does not enter the oven chamber. This prevents sticky residue which would contaminate the oven area. The glass is far easier to clean!
I really enjoyed using the Arizer Air SE, it was gentle and it was quite a surprise how much I effect it had as I felt like I had inhaled very little!
Battery Life
This will vary according to the temperature setting you choose.
But to give you an example my experience is below.
I have done 10 heat cycles (10 minutes each) to one charge, 1 was to maximum temperature (to sanitise the chamber) and the rest were to the lowest temperature. Which is way above the specified battery life – very impressive!
Pros
- Very inexpensive compared to some vaporizer models
- Plenty of accessories available and compatibility with previous Air and Solo models
- Simple controls
- Removable 18650 battery means you can swap to a charged battery when in use and if the battery fails you can simply replace it without having to discard the whole unit.
- Heated bowl design means no replacing coils or elements
- Excellent flavour and vapour
- No harsh smoke
- Stays at temperature for 10 minutes – ideal for multiple users
- Automatically turns off when below temperature
- Quick heat up – less than a minute for lowest setting
- Very long USB cable (6ft) – so there should be little restriction as you can use this whilst charging (pass-through)
- Easy to clean, the main maintenance will be cleaning the aroma tube which is easy with Washing Up Liquid and a small diameter bottle brush
- Arizer say to expect 6 x 10 minute heat up sessions per battery charge. I got 10! Which was a nice surprise!
Cons
- Instructions are not the best – I was still left with plenty of questions after reading them!
- Micro USB charging instead of Type C = slow charging time. But it is recommended to use an external charger anyway for removable batteries.
- Can only charge using a mains plug – a computer or laptop USB port is not powerful enough.
- Limited temperature customisation and missing features you would find on more expensive devices.
- Being mainly plastic construction, it may not look as classy as other vaporisers
- Not that portable, it is a bit chunky and the glass tube would be vulnerable to damage. You do get a carrying travel tube to protect it when not in use though.
- I would like a separate icon for battery charge status so this could stay lit at all times.
- You cannot adjust the 10 minute session time, I would prefer to make this shorter when using on my own to conserve battery life.
- If you use very dry or finely ground material it can enter the mouthpiece tube. Rectify this by using a coarser grind or using a screen.
Arizer Air SE Final Review Verdict
This is a lower price and not the most stylish vaporiser out there, but the performance was perfect for me. It really outperforms your expectations! I was expecting a “Budget” experience, whereas the performance betrayed that label!
The heat up was really quick and the output was extremely satisfying.
Sadly the instructions are a bit rubbish. Hopefully if you are thinking of purchasing you can see my guide in this review to help you get going. This did impact my “ease of use” score.
The fact that this has Micro USB charging which is a bit bloody slow did impact the “design” score. It could be improved with Type C charging. However you really should charge the battery in an external charger anyway. Purchasing a spare battery which you could charge separately and just swap would be a quicker way of keeping this in action. But you can use this whilst charging.
One other slight gripe – which comes under the “design” category is that there is no separate icon for the battery charge status. You will only briefly see this when you switch on and it is the same icon as the temperature. This could be confusing? Also it would be great to see the status as you are using it.
There are plenty of accessories available to customise the experience further and many are compatible with previous Arizer devices.
It is not particularly stealth like when in use, it is a bit of a chunker, plus with the glass tube on top is it long! Also I would worry about damaging the fragile glass tube. You do get a travel tube carrying case included in the kit plus covers to keep your material in place in the chamber.
Maintenance wise this is pretty simple! You don’t need to buy coils, heating elements, screens etc. The chamber on the mod never looked unclean – but the aroma tube did get a bit of staining. Simply wash and leave to air dry!
I have really enjoyed using this! Yes it is tricky to set up for the first time, but after that it is very simple. Plus the output is excellent 😉 !


