I’ve just received the ‘King of intelligence and toughness’- (according to Oxva!) it’s the Oxva VapX Unibox Kit!
That’s right a collaboration between OXVA and VapX. Both of which are fairly new brands but both have already got a pretty good reputation.
OXVAs name is unique… The OX represents the ‘powerful and reliable working animal’ and VA is simply the first half of the word vape. They were founded in 2019 by Justin Lai who is widely known for his previous design creations.
Despite OXVA barely being 3 years old (at the time of writing), they’re pretty much already a household brand. Some of their most popular devices are the Origin (Pod range) and the Arbiter (Rebuildable Atomiser range).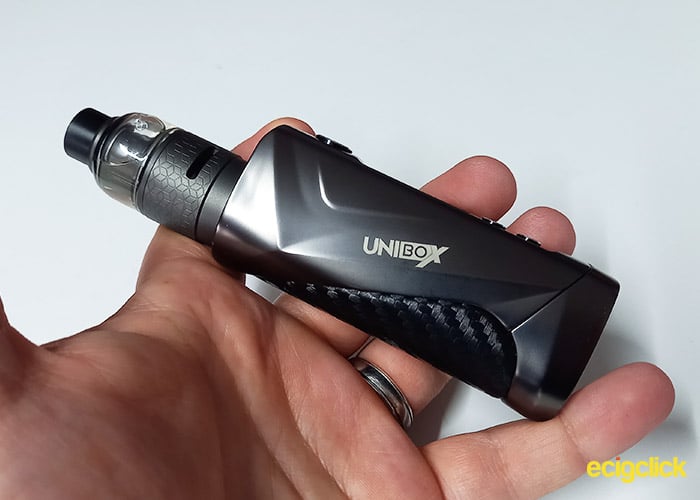
VapX are even newer, I believe they launched their first device (Vap X Geyser S) in 2020. They don’t have as much of a reputation. However, I personally quite liked the Geyser.
What Can We Expect From The OXVA VapX Unibox Kit?
The OXVA VapX Unibox Kit is apparently “nearly indestructible”.
It is IP68 dust and waterproof, which is one up from IP67. It’s also shockproof. Now we know it should be pretty tough, but what makes it so intelligent?
I think the most head turning feature of the Unibox is the “Rate your battery feature” which we’ll get onto later.
We’re granted a lot of customisation options with the Unitool, again we’ll take a close look at this later.
Every great kit needs a great atomiser system. The Unibox comes with the PnM (Pyrex ‘n’ Magnetic) Tank, which takes the Uniplus coils..
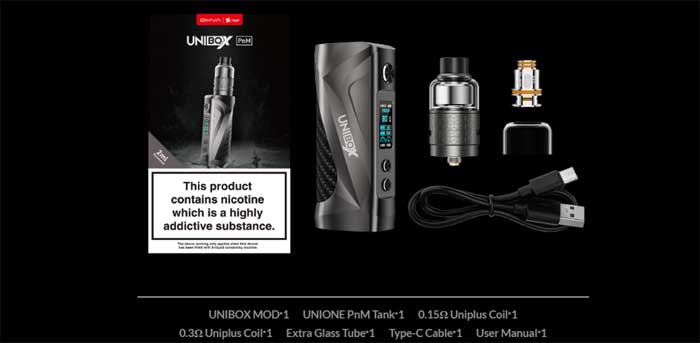
In The Box
There are 2 different box listings; a standard and a TPD box. As far as I can tell the only difference is the tank capacity (2ml in TPD)
- OXVA Unibox Mod
- OXVA Unione PnM Tank
- 0.15ohm Uniplus Coil
- 0.3ohm Uniplus Coil
- Bubble Glass (extra glass in TPD)
- Spare O-Rings
- A Coin (tool)
 There are also 2 mod only boxes, as far as I can tell they’re both the same in all but name.
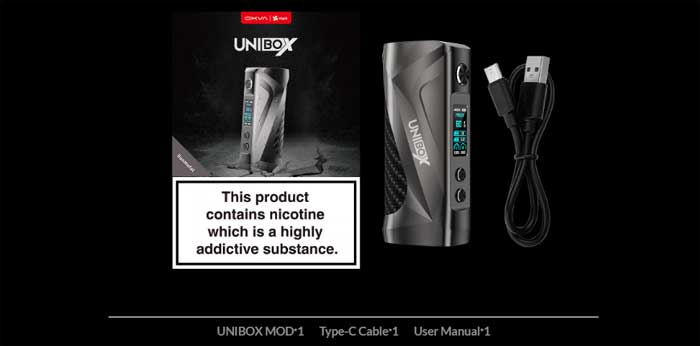
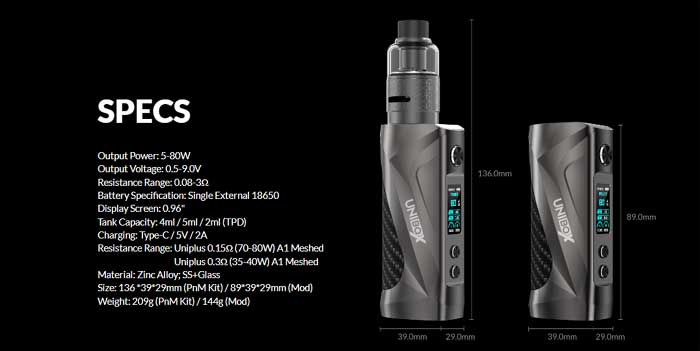
Specifications
- Overall Size: 39×29×136mm
- Overall Weight: 209g
- Mod Size: 39×29×89mm
- Mod Weight: 144g
- Power output: 5-80W
- Voltage Output:0.5-9V
- Resistance Range: 0.08-3ohm
- Battery: External 18650
- Screen: 0.96″
- Tank Capacity: Standard- 4ml, Bubble- 5ml, TPD- 2ml
- Built in Charging: USB-C 2A
- Coils: Uniplus range
- Mod Material: Zinc Alloy
- Tank Material: SS + Glass
Features
- Adjustable Airflow
- Modes: Power (W), TC (Ni, SS, Ti, TCR), Voltage (V), Variable Power Curve, Bypass
- Battery Rating Feature
- Shockproof
- IP68 Dustproof
- IP68 Waterproof
- Customisable User Interface
Build & Design Quality
It’s nice to have a separate features list. It’s been a while since a kit has been different enough to warrant one, in my opinion.
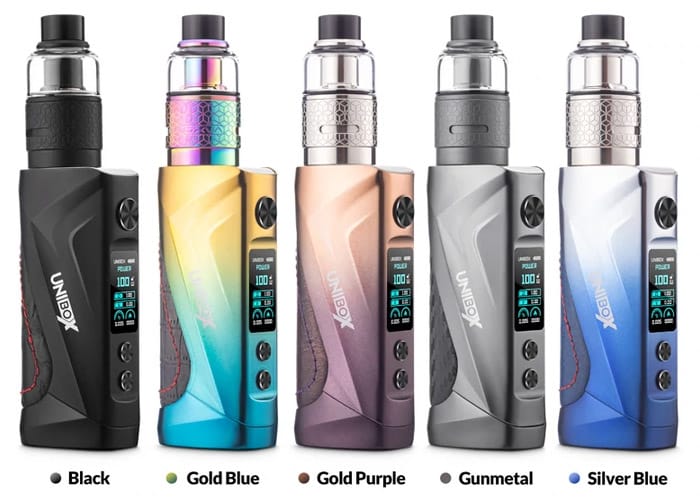
The kit comes in 5 different colours. Although the Unione PnM tank is only available in 4 different colours.
I received the Gunmetal, but I think they all look pretty slick!
Oxva VapX Unibox mod
The Unibox mod has a really smooth satin finish. The outer shape of the mod is quite hard to describe because it’s made up of lots of stylish grooves, so I’m going to have to rely on pictures quite a lot here.
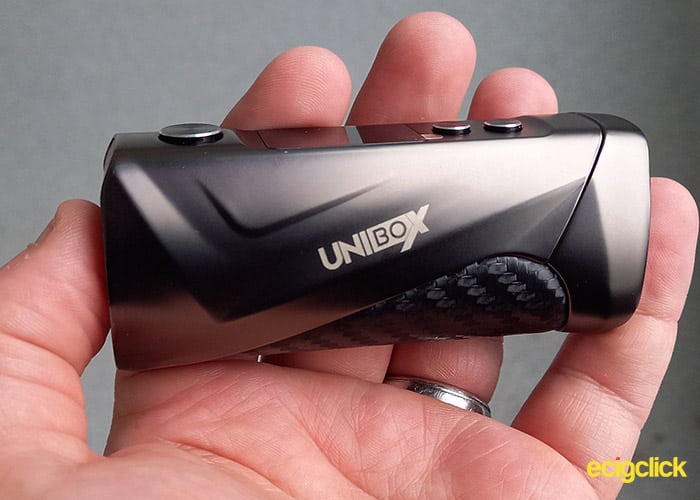
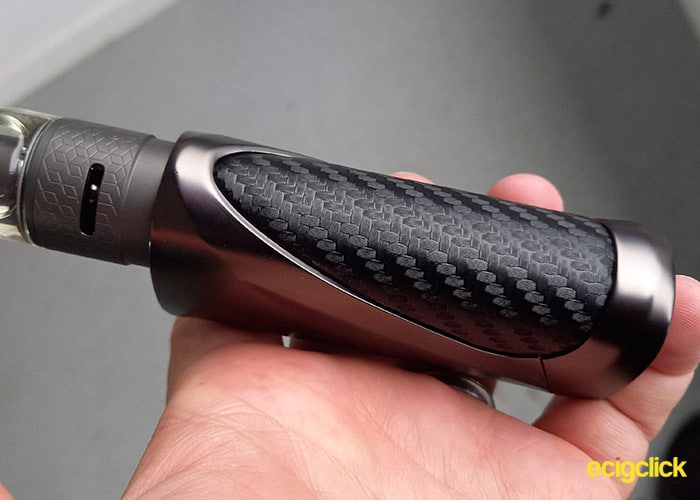
However the base shape is a sort of oblong oval and it has a leather patch on the back, which is nicely padded.
All in all, It’s a nice comfy shape and size to hold, regardless of if you prefer to use your finger or thumb to fire.
Unibox Mod Base & Battery Port
As I’ve just mentioned, the base shape is an oblong oval. Towards the thicker side is the battery port. The Unibox uses the screw cap kind of battery ‘door’.
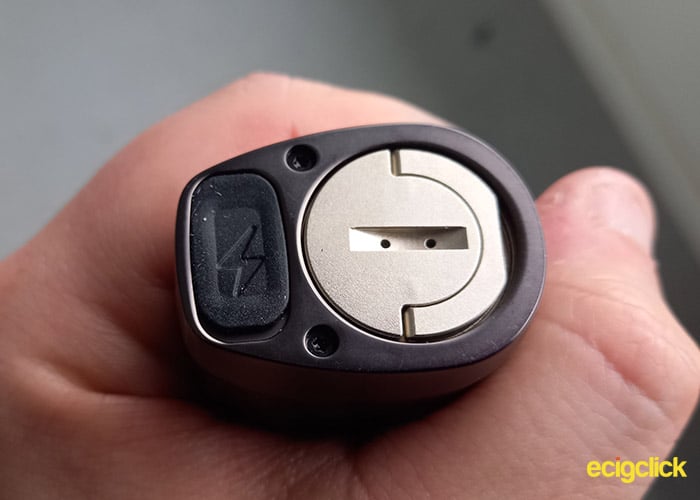
I have a love hate relationship with these screw caps. The core design is simple, it’s a cap that screws onto the end of the battery port. The caps have a built in handle that lifts up, along with a gap to use a coin (supplied) or screw driver, just in case it jams. There are also two vent-holes inside that gap.
I like this cap, it’s nice and smooth. I’ve recently stopped biting my nails, which makes it a lot easier to lift the handle. However I did try to lift the handle with a coin and it wasn’t possible. So if you’re a nail biter, it might be a bit of a pain.
On the thinner side of the base is the USB-C port. Covered by a rubber bung to achieve waterproofing, the USB-C port is set back into the mod. Unlike some similar designs, the area around the port is sufficiently sized. So finding a replacement USB-C cable shouldn’t be too hard.
Buttons
The buttons on the Unibox are very similar to buttons you’d expect on a Voopoo mod. Although they lack the indentation that Voopoo buttons have.
On my mod all of the buttons are black with an etched in radial pattern, which just gives that extra comfort and grip.
The edges of the buttons are silver, which adds that premium touch.
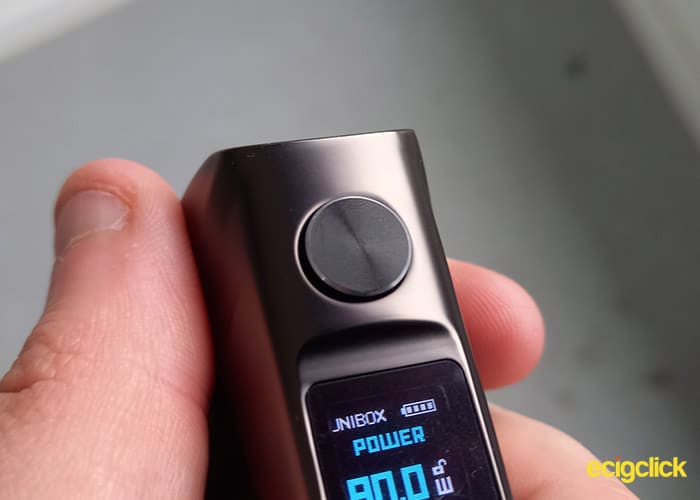
The fire button is placed towards to the top of the mod, measuring at 10mm, while the +/- buttons are positioned towards the bottom, inside an inset section with the screen. They each measure at 6mm
All the buttons are nice to press and don’t rattle. Interestingly the +/- buttons have more press resistance to them.
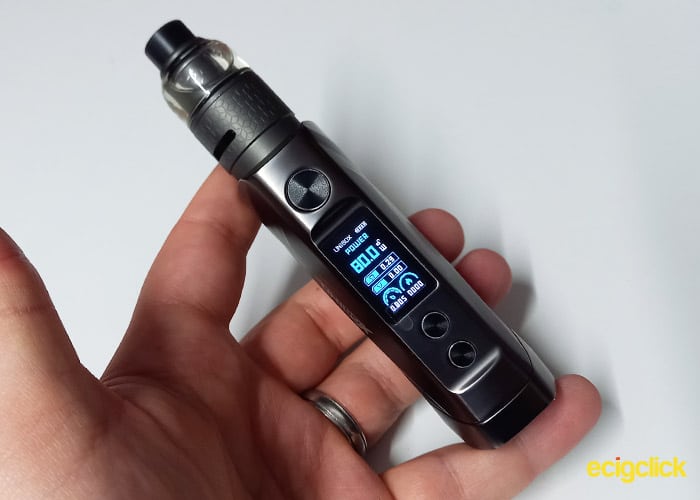
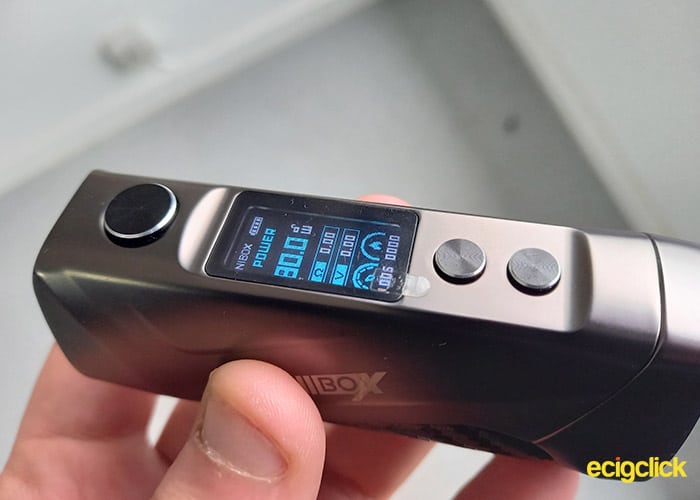
Screen
The 0.96″ screen is positioned slightly above centre on the front of the mod. It measures at 11x 21mm and its nice and bright making it easy to see.
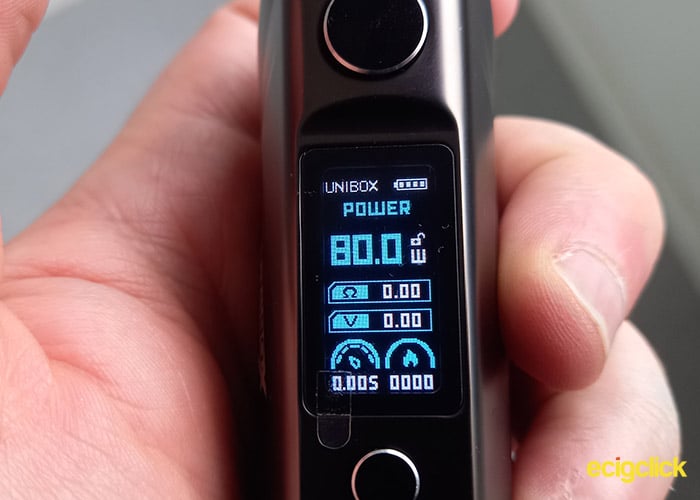
At the top left of the screen is “UNIBOX” and to its right is the battery bar. The battery bar is divided into 4 sections and although I’d prefer a percentage, at least we have sections to better see the rough percentage of the battery level.
Just below that, spanning the width of the screen is the power mode, with the power/temp setting below that. Just to the side of the power setting is the padlock icon to signify if the mod is locked or unlocked.
Onto the bottom half of the screen, spanning the full width, there is the coil resistance, then the output voltage.
Side by Side at the bottom of the screen is the puff timer and puff counter.
The above is true for all power modes, with exception of VPC. VPCs screen continually displays the curve settings.
510 Connection
Yes, some mods still take 510 connections, thankfully.
Due to the oblong shape of the device the 510 connection isn’t centred, which is great because it allows for bigger tanks.
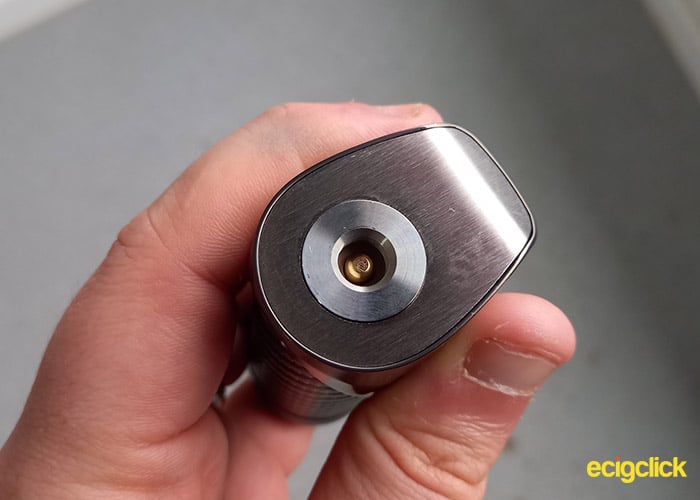
Despite the Unione tank only being 23.5mm in diameter the mod can easily take tanks with a 28mm diameter.
The top of the Unibox is Zinc Alloy (like the rest of the mod). Interestingly there isn’t a connection plate that is screwed into the top.
There is a very small connection plate that measures at 11mm, but the fixings must be underneath the surface.
It’s an interesting design, I think the durability of the 510, will come down to how strong the top is, rather than the screws and threads.
I’m fairly confident in its durability.
It’s also raised by 0.5mm to prevent the top of the mod being scratched.
Oxva Unione PnM Tank
I shall suppress my stress about the definition between Pods, Tanks and Pod Tanks…. But it’s a Pod Tank!
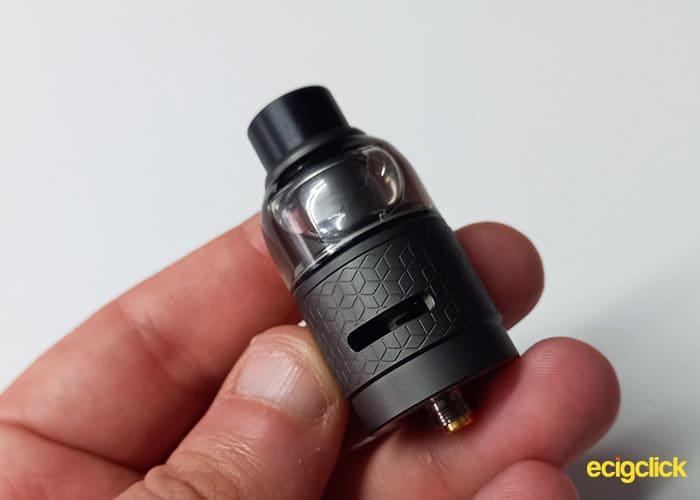
Base
The 510 base of the Unione PnM Tank is really tall standing at 20.5mm. The wall of the base is 0.5mm thick.
On the outside, there is a 3D cube etching which looks great and helps with grip. On one side OXVAs logo is also etched in, but it’s super discrete.
At either side there is an airflow hole measuring at 13x 3mm. However the entire base is one solid piece, there is no Adjustable airflow band.
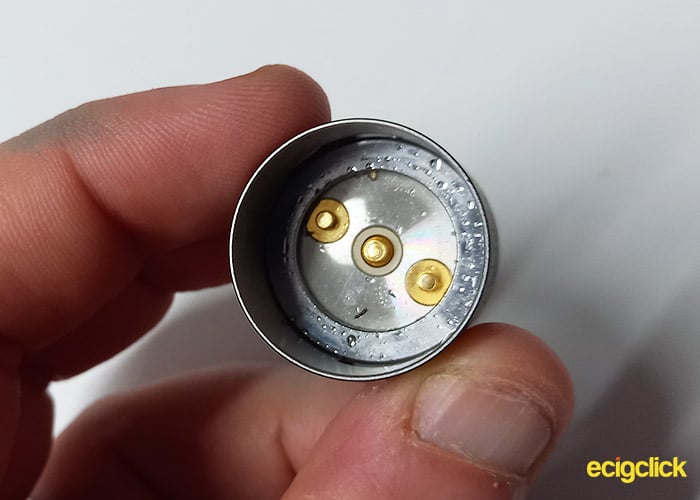
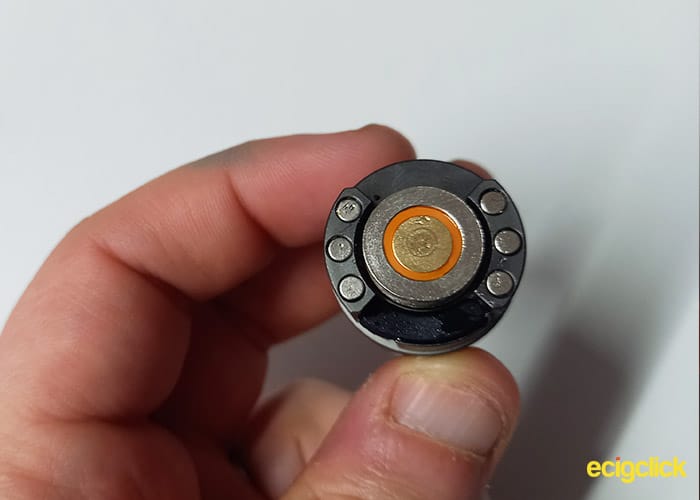
The inside is nice and shiny, but there isn’t much to mention other than on the base, there is one positive pin, in the centre, and 2 negative pins. All 3 are spring loaded.
Adjustable Airflow
Although the Unione tank doesn’t have an adjustable airflow band, that doesn’t mean it doesn’t have adjustable airflow.
Thanks to the design of the bottom of the pod, all you have to do is rotate the pod.
Due to the ingenious design, and a lack of O-rings, the pod isn’t airtight when the airflow is fully off. In fact it’s still a fairly loose Restrictive Direct to Lung draw.
However with the airflow fully open, it provides an almost restriction-less draw.
All in all it’s an excellent design, which makes adjusting the airflow easy and hassle free.
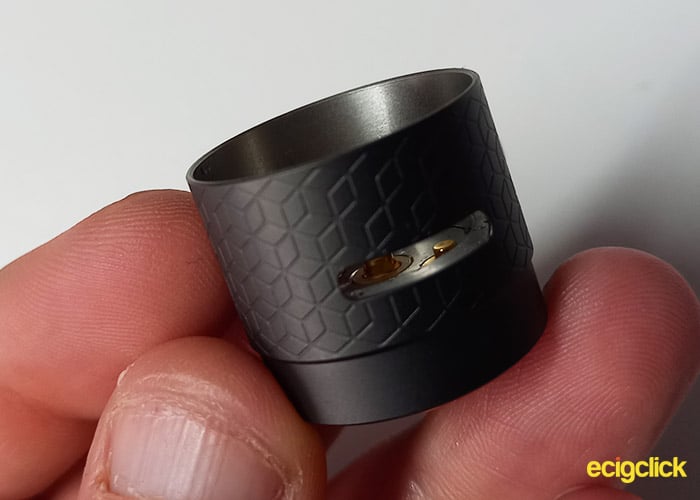
Pod Section
The bottom of the pod is as huge as the 510 base. It’s also made out of stainless steel, which gives it that extra bulky feel.
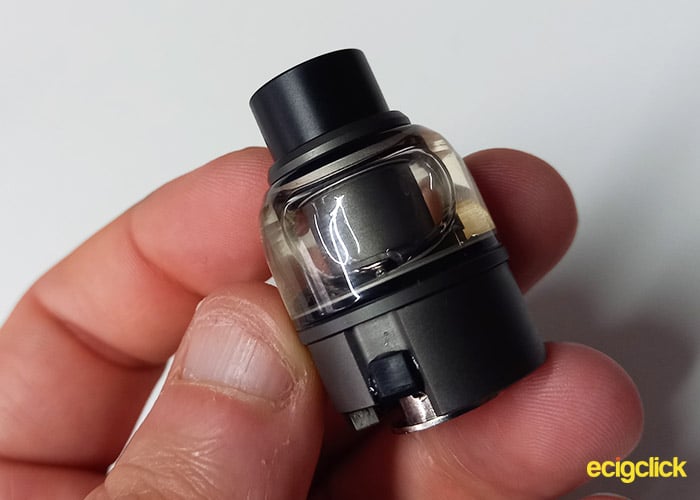
On the raised sides of the base, there are 6 small magnets that give the pod a great hold into the base.
2 sides aren’t raised, this is obviously where the airflow holes match up. The fill hole is also placed on one of these gaps. It’s covered by a rubber bung.
This does mean its bottom fill, which won’t win many points with some readers, as bottom fill rubber bungs aren’t always the best in the long term.
The majority of the liquid is above the bottom section (but not all of it), it would still be a good idea to keep the liquid level up to or above the glass.
The glass forms a dome shape, which looks both unique and cool.
Mouth Piece
On the top of the pod is a metal cap with a slit though it. The slit, is there to allow you to unscrew it in order to change the glass. A little faffy, but let’s face it, it’s hopefully not something you’ll have to do often and it ensures the glass won’t just fall off… That would be disastrous.
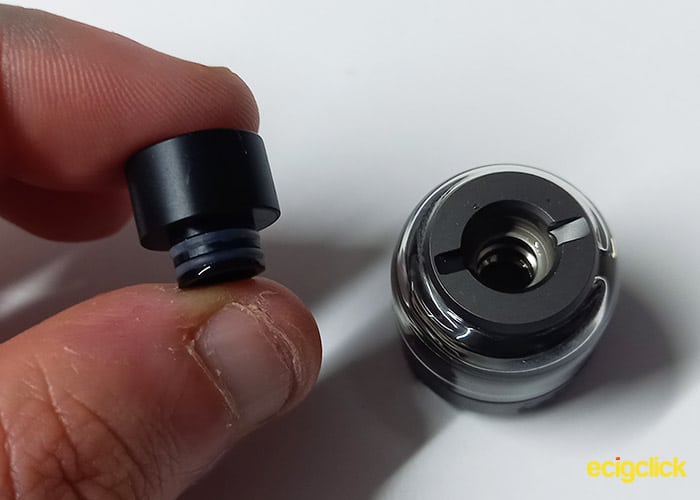
If you noticed, there is a ‘coin’ in the box. This is actually supplied to unscrew the cap.
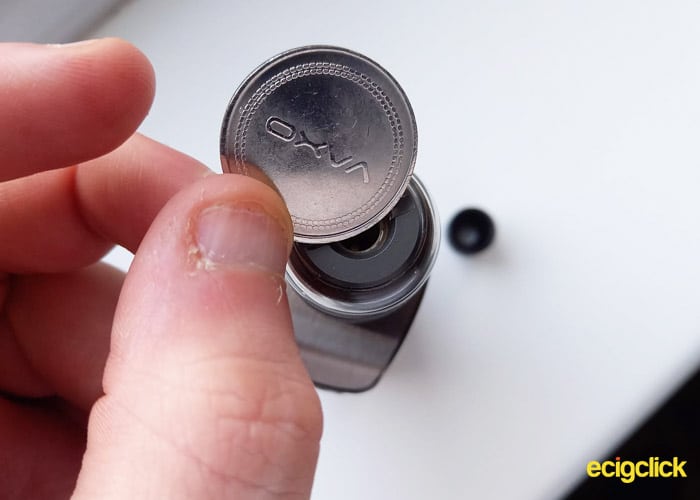 The removable 810 mouth piece fits into this cap. There are 2 O-rings, both of which are on the mouth piece itself.
I like the mouth piece, it stands at 9mm above the tank and is 19mm in diameter.
Quick Start Guide
Filling The Tank

- Remove the pod from the base
- Holding the pod upside down, lift the bung.
- Fill the pod through the newly exposed hole
- Reapply the bung, and pod
If you’re filling the pod with a new/unused coil, allow the liquid to soak into the coil for 5 minutes before using it.
Replacing The Coil

- Remove the pod from the base
- Holding the pod upside down, pull the out from the base of the pod
- Insert new coil, pressing it into place firmly
- Fill the pod, then leave for 5 minutes before using
Changing/ Replacing The Glass
This is best performed while the pod is empty
- Remove the mouth piece
- Using the coin supplied (or other coin/screw driver), unscrew the top cap
- Remove the glass taking care not to lose the O-rings
- Ensure the O-rings are in place, apply the new glass
- Reapply the top cap
Operations
You have multiple user modes to choose from – Variable Wattage (Power) , Variable Voltage, VPC (Variable Power Curve), Temperature Control and Bypass.
- Turn on/off = Press fire button 5 times within 2 seconds
- Lock/Unlock +/- buttons = press and hold + and – at the same time.
- Adjust power = press +/- to turn power up/down
- Mode Setting = Press fire 3 times within 2 seconds, use +/- to change the mode, then press and hold fire or leave idle for 5 seconds to save the option
- Lock/Unlock Resistance (ohms) = press fire 3 times, when the mode setting is activated, press fire 1 time to highlight resistance. Press ‘-‘ to lock/unlock. When locked the V will change into a padlock icon
- Set W in TC mode = press fire 3 times, when the mode setting is activated, press fire 1 time to highlight W, then use +/- to set the wattage.
- Set VPC = set the mode to VPC, then fire once to move down to p1, use +/- to set the wattage, press fire once to move to p2 and repeat.
- Battery Rating Feature = Install fully charged battery and make sure a (any) tank is installed. Then in the mode settings select “Rate Battery”, press fire and wait.
- Set theme colour = press fire and “-” simultaneously, use +/- to change the option and press fire to select and save
- Screen Brightness = Press fire and + at the same time, press +/- to adjust, then fire to save.
- Factory Reset = Turn device off, long press + and – simultaneously for 2 seconds. When the version number is displayed, press fire, + and – simultaneously, then press +/- to select yes or no.
How Does The OXVA VapX Unibox Kit Perform?
I’m using these coils with Rochford Projects Lemon meringue Tart. It’s mixed at 70VG/30PG and I’ve added a Nic shot to make it 3mg.
0.15ohm Uniplus Coil
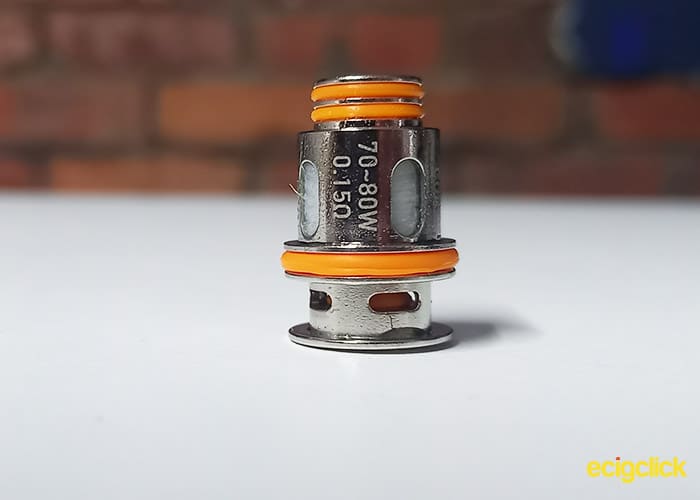
This coil is actually reading at 0.17ohm for me. It’s recommended for 70-80W with 6mg or less nicotine strength liquids.
Let’s start down low. Down at 60W, it’s pretty impressive. We’re 10W below the recommended range and the flavour is easily identifiable. It does taste a bit ‘watered down’ but the flavour is certainly there. Also it comes with some fairly thick vapour. I preferred the airflow set to anyway between half way and full.
70W is the bottom of the recommended range. Here the clouds and the flavour intensifies a little bit but there isn’t a huge difference. Again anywhere between half way to fully open was the sweet spot for the airflow.
80W is the top of the recommended range and it’s the Unibox mods full power. I leaned more towards having the airflow fully open at 80W, it seems to enhance the flavour a little bit.
I have to say I’m a little underwhelmed. Don’t get me wrong the flavour is there and it’s prominent, but it doesn’t quite flood the mouth. I feel like I’m constantly hoping for a little more.
The same applies to the vapour production, it’s there and it’s lovely and think. However it’s super smooth, so you don’t get the really thick feel of the vapour rolling out of your throat.
It’s going to be hard to rate, because it’s good… but it’s not amazing.
0.3ohm Uniplus Coil
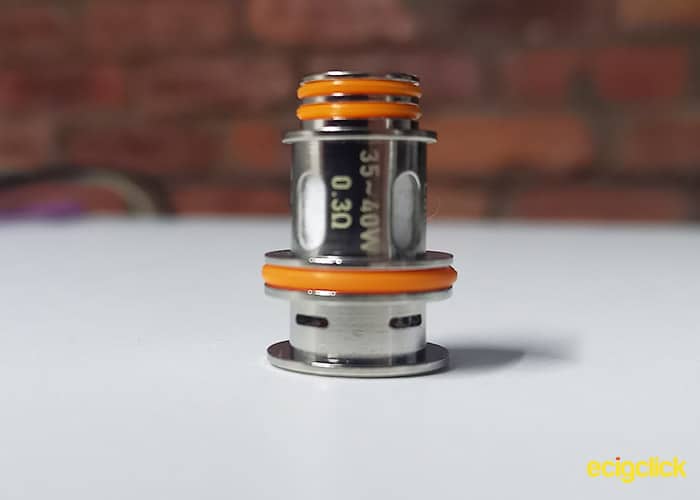
This coil is reading at 0.29ohm and has a recommended range of 35-40W, with 6mg or less nicotine strength liquids.
Let’s start off way down low at 25W. It works quite well at 25W regardless of the airflow, however I preferred it at about half way, to maximise the flavour.
To say we are firing quite a lot below the recommended minimum power setting, it does provide a good prominent flavour at the back of the mouth and throat, as well as a nice thick but little cloud.
35W is the bottom of the recommend range and I preferred it with the airflow fully open. It doesn’t quite flood the mouth with flavour but it isn’t far off! The vapour production is now a medium sized thick cloud.
Up a little bit to 40W, which is the top of the recommended range. It’s lovely. Okay, it’s still not flooding the mouth, but it does fill the mouth with flavour. I don’t think you could possibly get more flavour out of a 40W coil. And you’ve still got that lovely thick cloud!
It wouldn’t be a Harley review if I didn’t go above and beyond, so up to 50W we go. And we crash back to earth. 50W is a no go with this coil I’m afraid. It did in fact kick out some flavour, unfortunately there were a very distinct undertone of burning cotton, so I only tried this once.
The vapour production from this coil is lovely and thick, while remaining smooth. It still doesn’t give you that thick vapour rolling feel, but can we really expect that from a 40W vape?
Out of the two, all things considered this was my favourite.
Battery Life & Charging
As always I advise you to charge your batteries externally. It’s thought that dedicated chargers give your battery a bit more TLC. However the biggest benefit is you can have one battery charging while one is in use.
However, if you’re charging the battery in the mod, the time it will take to be fully charged depends completely on your battery. If you’re using a 2500mAh battery you can expect it to be fully charged in roughly 1 hour and 15 minutes. If you’re using a 3,000mAh battery, you should expect 1 hour and 30 minutes.
Similarly the battery life depends on your battery and power settings. I used a 3,000mAh battery so we’ll go on that.
I got more than a full day out of a full charge at 40W and that’s not surprising because on a fully charged 3000mAh battery, firing at 40W you can get 16 hours worth of constant use. Constant use meaning a 2 second puff every other minute.
Firing at 80W lasted me into the evening 7am till 6pm. At 80W with a 3000mAh battery you should get about 8-9 hours of constant use.
Battery Rate
The battery rating feature is set up as a mode, so to access it, press fire 3 times within 2 seconds then press + until the battery rate screen shows, then press and hold fire to exit the menu.
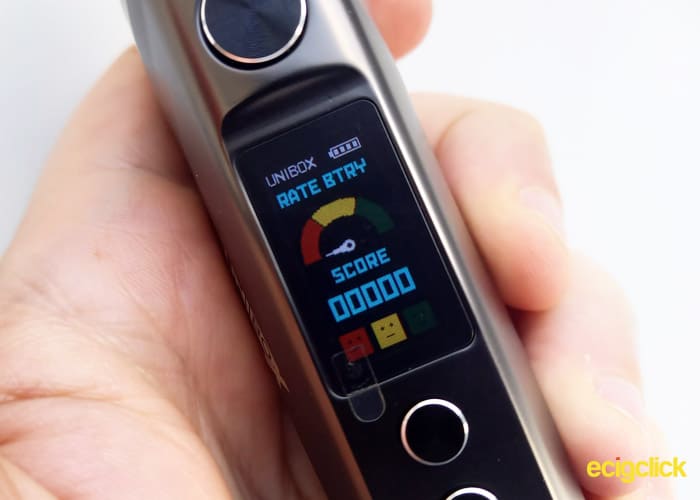
The feature is designed to be used with a fully charged battery. In order to use it, you have to have a tank installed, but it doesn’t matter what tank you’re using.
When you’re all set, press fire and wait. The battery then fires for 3 seconds in bypass mode to rate its performance.
The feature will then rate your battery out of 10,000. 10,000 being excellent battery and 0 being you need to get a new battery.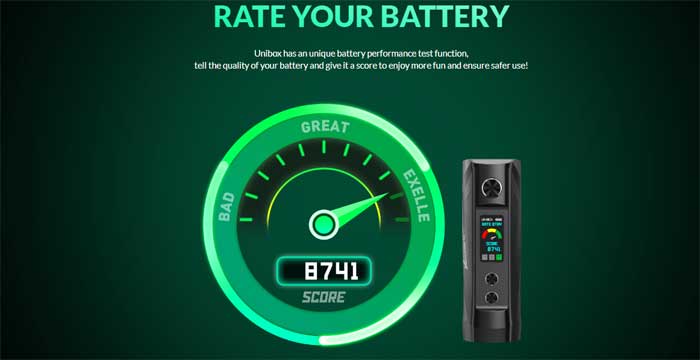
I like this feature, if nothing else it highlights that we should be looking after our batteries. It’s a shame the mod only takes 18650 batteries.
I played about with some old batteries and some newer ones and it does seem to work.
Menus & Functions
The usability of the Unibox is very similar to a Geekvape device. I mean it doesn’t have a menu and the way you navigate through the modes is very reminiscent to a Geekvape device, maybe you could say a Justin Lai Mod doesn’t fall far from the tree…
All in all I like it and the Unitool is an extension of what can be done…
Unitool
The Unitool is PC software that you can download from https://OXVA.com/pages/unibox .
You simply download and install the software then connect your Unibox, with the provided USB-C.
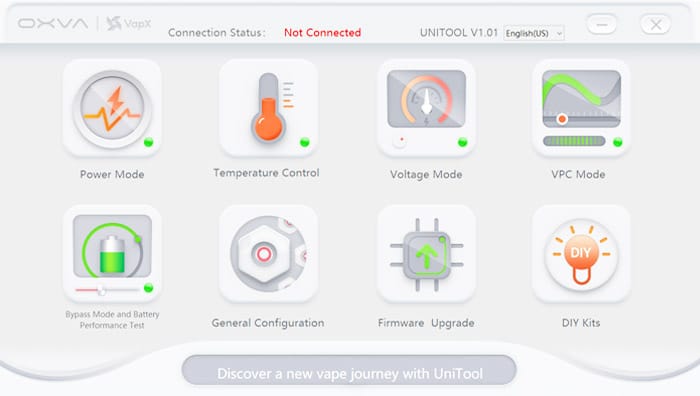
At first glance I thought it was bit pointless. You can do things like click and hold the fire button on the software and it fires your device…
However there are a few things you can control through the software that you can’t do without it.
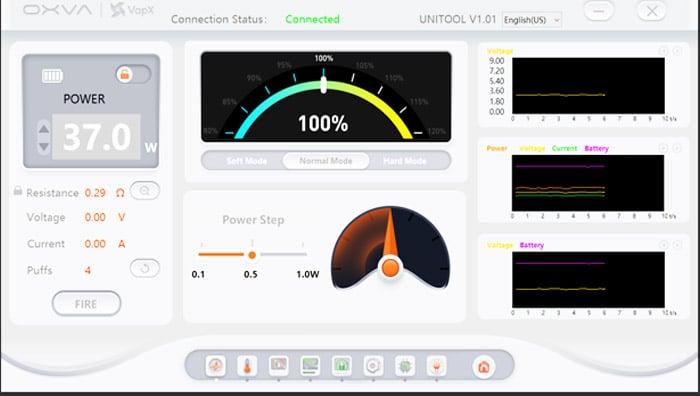
- Change power increments: by default when you press + or – it changes the setting by 0.5W. In the app you can set that to 0.25W, 0.5W or 1W. You can also do this to the Volts power mode separately.
- Completely disable TC materials: you have to leave at least 1 on but if flicking through them in the power modes is a hindrance to you, you can remove 3 out of the 4 from the ‘menu’.
- Set VPC by clicking and dragging.
- Change the background of the mods screen: you can set any 80x160px picture as your mods screen background. Simply press, upload then press send to send it to your mod.
- Max puff timer: this is limited to between 3 and 10 seconds you can change this.
- Change the amount of seconds before the screen turns off.
- Change the amount of minutes before the mod goes to sleep.
- Screen brightness adjustment.
- Update firmware.
There are also a few more things you can do. You can set the screen up to show graphs, so as you vape with the device plugged in, it plots the chart in live time… although these were a little underwhelming…
Finally, there is probably the most useful feature, the “DIY KITS”. This screen has an Ohms law calculator, Coil Wrapping Calculator helper and a Battery Drain Calculator. If you don’t use RBAs this section is a bit redundant, and you can get these on websites and mobile apps. However I still think it’s a nice addition.
You do not need to use the Unitool software to use or enjoy the Unibox kit. However for nerds like me, it is quite fun, in a safe and responsible way.
Unlike Vape companion software that I’ve used in the past, the Unitool just works, it’s so simple and easy. It also has actual uses and it looks great. You can tell OXVA / VapX have actually put a lot of time and effort into getting it right.
Durability Testing
The Unibox is ‘Military grade’ IP68 Waterproof, dustproof and shock proof. Now if you’ve read my reviews before you’ll be expecting some fancy testing. In the past I’ve put mods in a pint of beer and buckets of paint then washed them while it’s been turned on, run mods over with my car and had the kids playing throwing games with them.
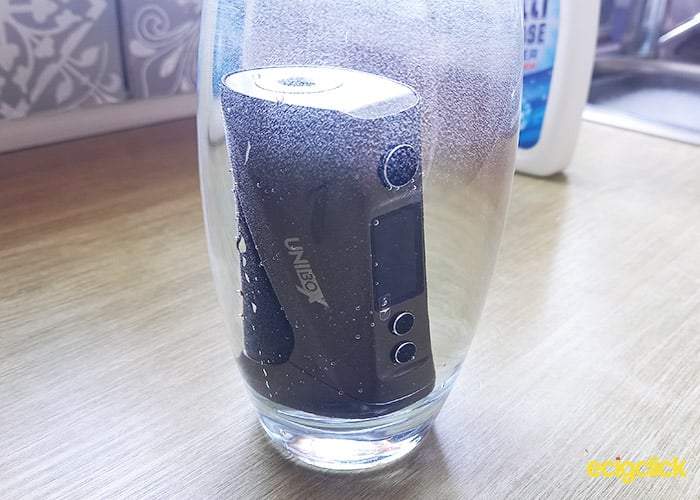
I swear I had just as fun ideas for this. More specifically I was going to drop it from 120M from my drone and take it for a game at my local cricket club… However of all weeks, here in the UK we’ve had 3 back to back storms, so I’ve had to settle with throwing it about a bit and leaving it in a pint of water for an hour.
It sat in the pint of water like a submarine, it actually looked pretty good in there..
Let’s be honest “shock proof” doesn’t mean “can be run over by a tank”, it means it can be dropped and not break.
I teach my 7 year old his times tables by reciting them while playing catch (usually with a soft ball). He’s not the best catcher, even less so when it’s a hard Vape Mod that’s being thrown to him.
It was ‘dropped’ at least 20 times, and I can’t see a scratch on it. I think it fared a lot better than my laminate floor did. Obviously if I was to drop it on concrete it would be more prone to scratches.
The most amazing thing is, no matter how hard it were dropped it never turned off. Usually all devices (even the Aegis’) turn off when they’re dropped. Simply because the battery ports are spring loaded and they usually lose connection from the force.
Pros
- Battery Rate Feature
- Easy To use
- Looks great
- Feels great in hand
- Awesome 40W performance
- Waterproof dust-proof and shockproof
- Easy to adjust airflow
Cons
- Only 18650 (not 21700)
- Airflow doesn’t get super restrictive
- Coil could be better at 80W
Oxva VapX Unibox Kit Final Verdict
All in all it’s a great mod, however there could be some improvements.
A 21700 version would be very much welcomed and an improved 70-80W coil would be a much needed improvement. However, it provides a great experience.
It’s set up in a way that makes it a great easy to use Direct To Lung starter kit, but it also has the features which make it a little more advanced.
I can’t be too harsh on the 0.15ohm coil because it is decent. It provides thick and tasteful clouds, unfortunately, for me it just isn’t quite enough to get me exited.
However the 0.3ohm cloud makes up for it, that little beast is incredible for 40W!
It’s a durable mod that both looks good and feels good, without being covered in rubber!
So, who is it for? It’s a hard question really because it’s got good clouds but it’s not epic enough for cloud chasers. There is good flavour but not quite bold enough for flavour chasers.
It’s also awful as a Mouth To Lung kit because the Unione tank just isn’t designed for it.
However if you’re looking for a durable, fairly light sub ohm kit, this is a good one.
Alternatively if you’re looking for your first Direct To Lung Device this would be a good first.
If you own this kit – let us know your thoughts in the comments below!


Jeto dobrá