In for review is a chunky pod kit with a difference – the Uwell Havok!
I am hoping that the Uwell flavour magic is present – which is what you get with the Caliburn and Crown ranges!
Thank you to Vape Club for sending this over for review! I will report back honestly on the device in my possession.
What To Expect From The Uwell Havok Pod Kit…
This is more than just your standard pod kit, in fact it has a lot more features!
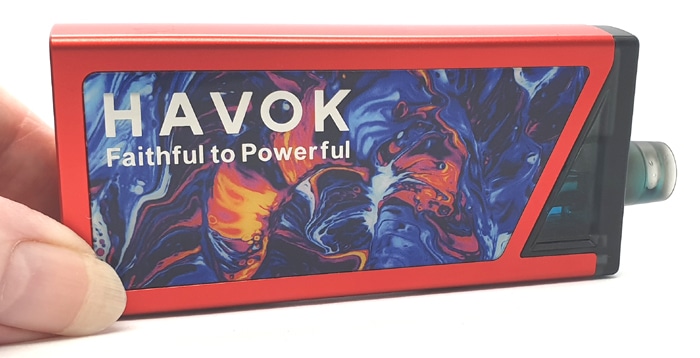
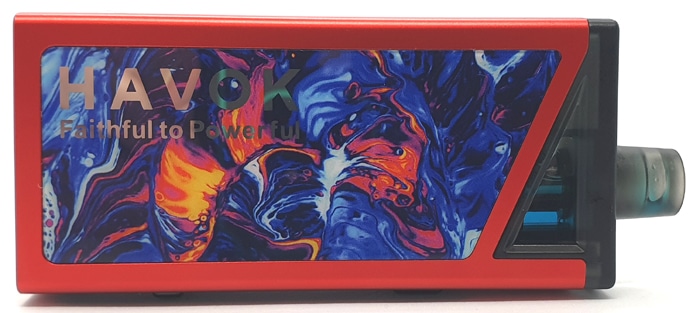
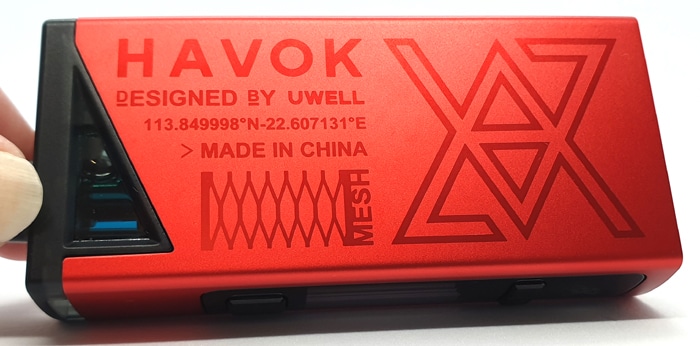
The design is a bit out there with the resin styling on the front – to all the logos and writing on the back!
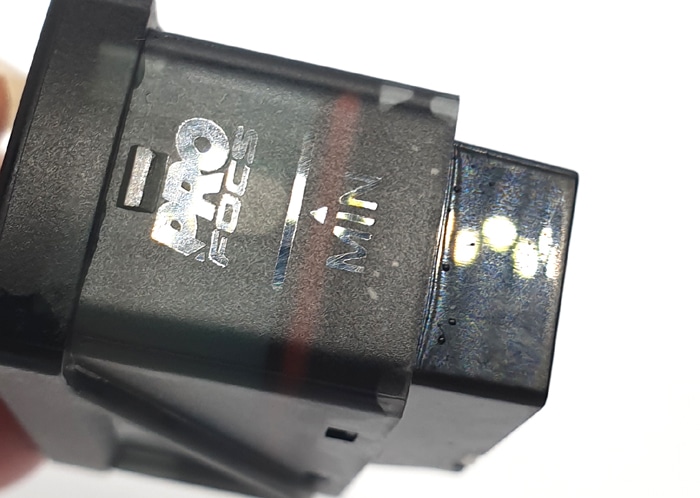
The strange symbol on the rear spells out Havok – see the image below…
![]()
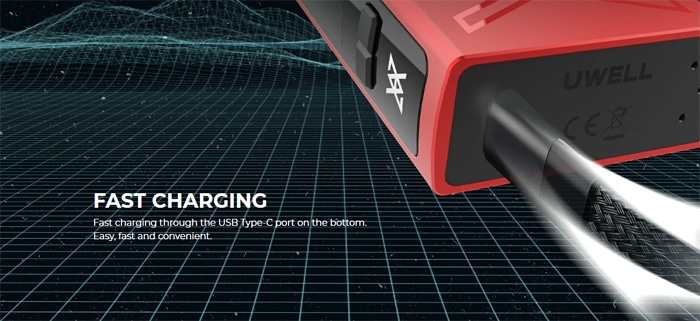
The mod contains an internal 1800mAh battery which is charged using the USB Type C port on the base. The charge rate is 2A but there is no USB Charging cable included.
You can adjust the output from 5-65W and a 0.96in OLED screen will display all of your vaping data.
The pod is clever with some great useful features.
For instance refilling is taken care of via a sliding top fill cap and a silicone seal prevents leakage from the fill port if the mod is turned upside down. However on the CRC version (covered below) there appears to be a valve in the base for filling.
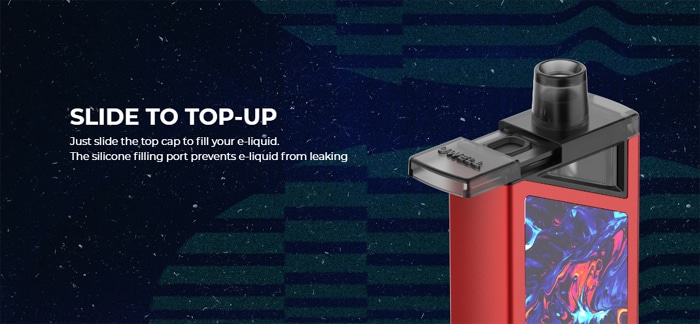
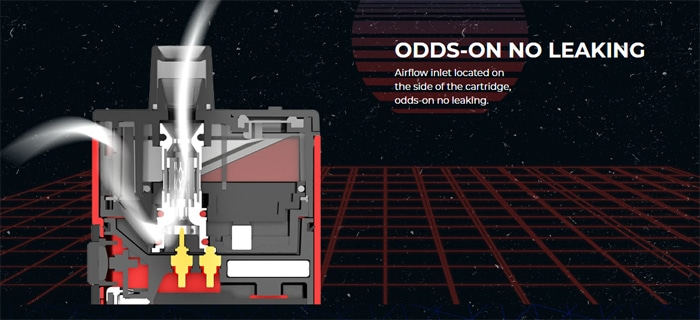
Also you have a sliding airflow adjuster on the side of the pod.
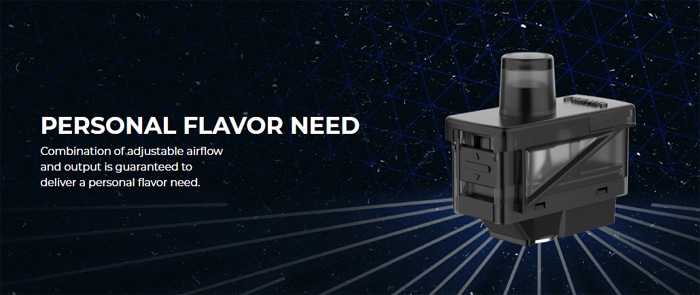
With this airflow being side mounted this should reduce the chance of liquid leaking through the airflow system.
There are two versions of pod…
- Replaceable coil
- Fixed coil (CRC – Child Resistant Closure)
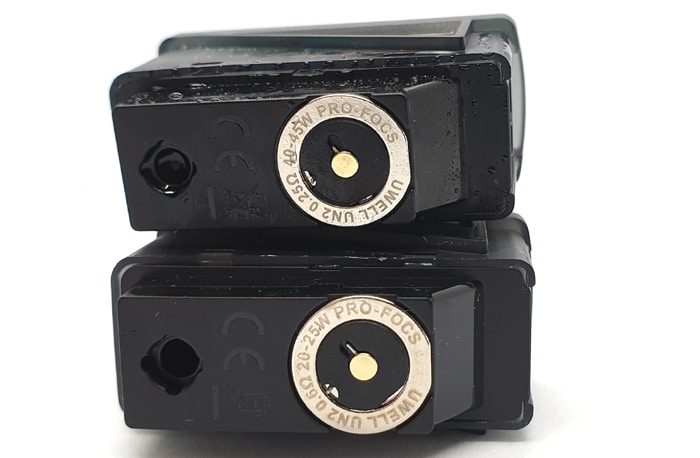
On the replaceable coil pod it uses the UN2 Meshed-H 0.25ohm and 0.6ohm Havok V1 coils which are both included in the kit. I am not sure if this kit is compatible with any other Uwell coils – I would assume not.
For the fixed coil pod version you get 2 pods – the 0.25ohm DTL pod and the 0.6ohm MTL / RDL pod which appear to be the same coils. The coils are not replaceable and you discard the pod section and replace with a new one when the coil performance is poor.
The coils for both varieties, of course have the “PRO FOCS” technology (I have no idea what that stands for). But usually when you see this logo on a Uwell device it results in the most epic flavour!
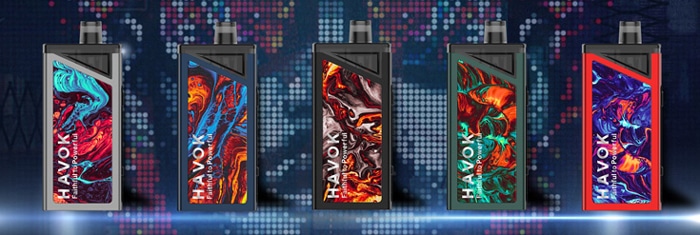
There are 5 colour options to choose from: Silver, Blue, Black, Green and Red.
Kit Includes
Note: No USB cable included
- Uwell Havok Pod mod
- UN2 Meshed-H 0.25ohm Havok Pod (CRC DTL)
- UN2 Meshed-H 0.6ohm Havok Pod (CRC MTL / RDL)
- User manual
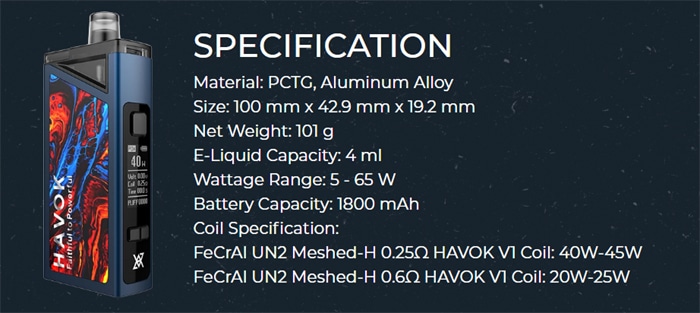
Uwell Havok Pod Kit Specs
- Size: 100×42.9×19.2mm
- Output: 5-65W
- Battery: 1800mAh (internal)
- Display: 0.96in OLED Screen
- Resistance range: Not specified
- Material: Aluminium Alloy, PCTG
- E-liquid capacity: 4ml (standard) / 2ml (TPD / CRC)
- USB Type C port – 2A charge rate
- Pods: Refillable, replaceable coil or fixed coil child resistant
- Replaceable Coils: UN2 Meshed-H Havok coils – 0.25ohm and 0.6ohm
- Slide top filling pod (standard) / Bottom push to fill valve (TPD / CRC)
- Adjustable airflow
Uwell Havok Design and Build Quality
I received the Red version in the CRC fixed coil pod variant.
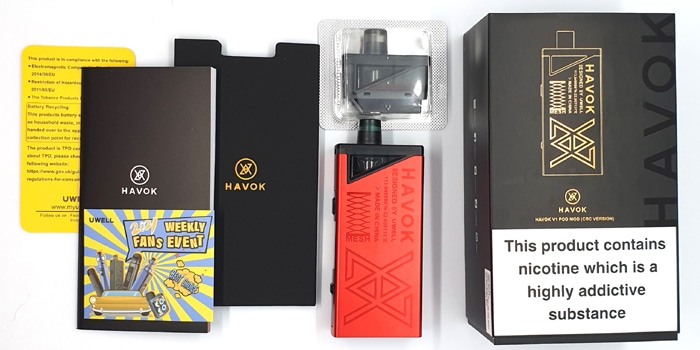
The packaging is very classy with a cardboard outer sleeve which when removed reveals a sturdy Black box.
Remove the lid of the box and you will be greeted with a Black cardboard wallet which holds the instruction book, warning card and marketing card.
Lift out the wallet to view the device sat in a foam frame. A little tab allows you to lift up the foam layer and access the second pod.
Protective cover stickers are provided the resin side of device and pod base to prevent accidental operation.
The instructions are ace to be honest – they are 64 pages long, but only 9 per language. They include everything you need to know and some great diagrams.
If you find these instructions too small you can download a digital version here and zoom in to your hearts content!
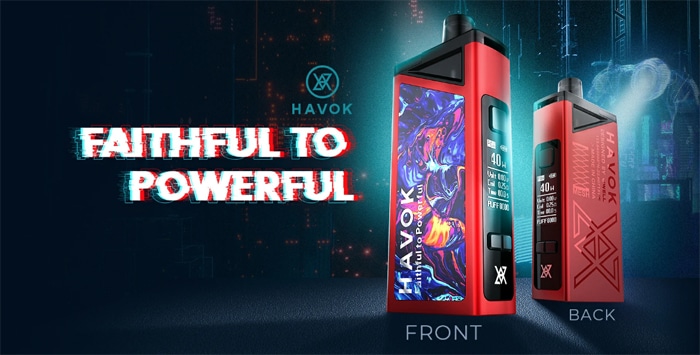
Uwell Havok Mod
The shape of the mod reminds me a lot of the Smoant Pasito just with a bit more “pazazz”! You will see the “pazzaz” is provided by different textures, text and pointy angles!
The main finish is a kind of matte metallic in the colour of your choice. This is made from Aluminium Alloy and acts as a frame to which other parts of the device attach.
The front of the device has a resin style effect panel, I am not sure if actual resin but it feels plastic-like. This has “Havok” and “Faithful to Powerful” printed on in reflective Silver. I am not a fan of the “Faithful to Powerful” text as it is pretty meaningless and seems to have been mixed up in translation.
On the rear things get busy too. It is mainly the matte metallic Red with various logos and text etched in in a reflective shiny finish. There is all sorts on there, mesh symbols, Havok text, Havok symbol and some weird stuff which I assume are map co-ordinates?
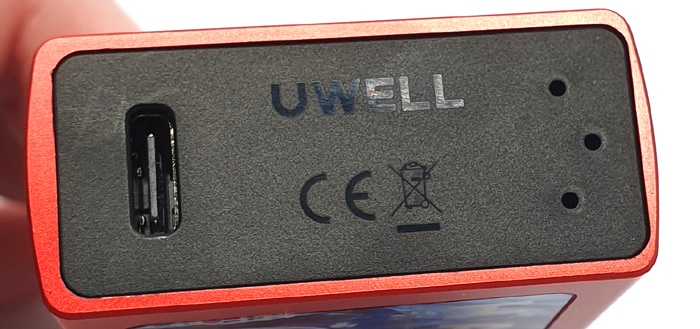
The base appears to be a plain Black plastic and it houses the USB type C port, 3 venting / airflow holes and the Uwell and legal logos. It will stand up quite happily on its own.
The metal frame goes a bit pointy up towards the top and the angles of the frame match the angles on the pod, so it can only be inserted one way around.
Inside the pod compartment are 2 spring loaded Gold coloured connectors. The pod appears to be attached by clicking into the frame and boy is it held in firmly!
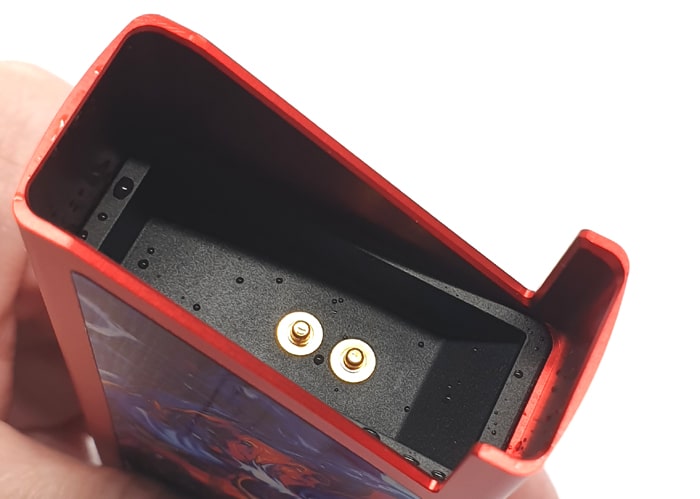
The side where the pod airflow lives stands up on its own and feels a bit sharp.

One side is totally plain and the other side houses the screen.

Not the comfiest of devices in the hand, whilst not sharp, it could do with being a bit more rounded as it is quite a chunky sausage!
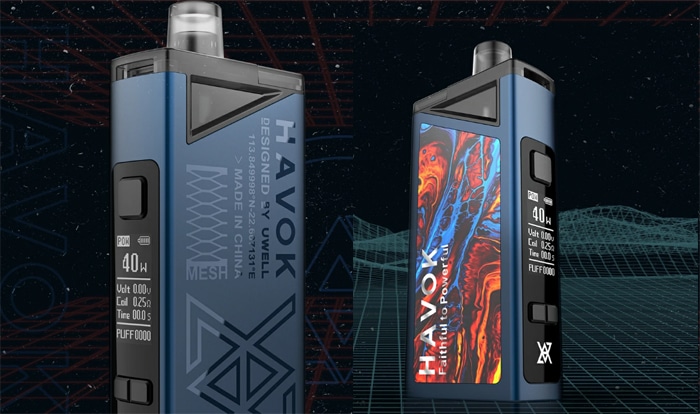
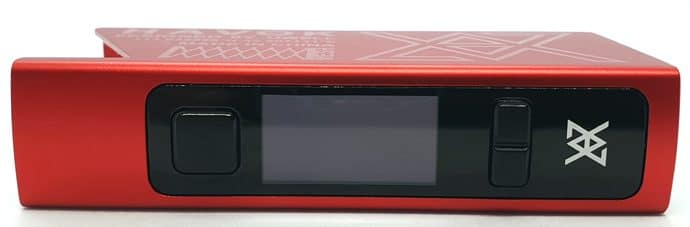
Screen
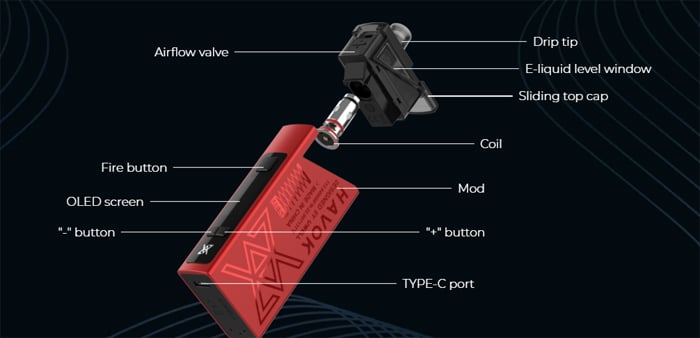
The screen side has a large Black plastic panel which contains the operating buttons and screen.
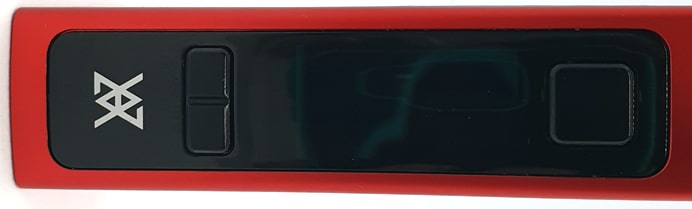
Above the screen is the small square fire button, which is perfectly responsive and in a great position as this is manual fire only.
 Below the screen are the 2 adjustment buttons, left = down and right = up. Again these feel nice and responsive.
Below the buttons is the Havok symbol which is in Silver behind a clear cover over the whole screen panel.
Looking now at the screen, this is super clear to read and well laid out.
Working down from the top you have…
- “POW” – this stands for power mode – basically Variable Wattage. This is the only user mode available.
- Battery icon – this shows in bars how much battery charge is remaining.
- Wattage – the power output value selected followed by a “W” to signify Watts.
- Volt – the voltage when vaping is displayed. This will not be full battery voltage as the device is regulated to provide the selected output.
- Coil – this is the coil resistance of the pod installed.
- Time – this is the length of the puff you are taking in seconds and will stay on screen for a second or so after vaping.
- PUFF – this is your puff counter. You can reset this which I will cover in the Quick Start Guide.
Uwell Havok Pod
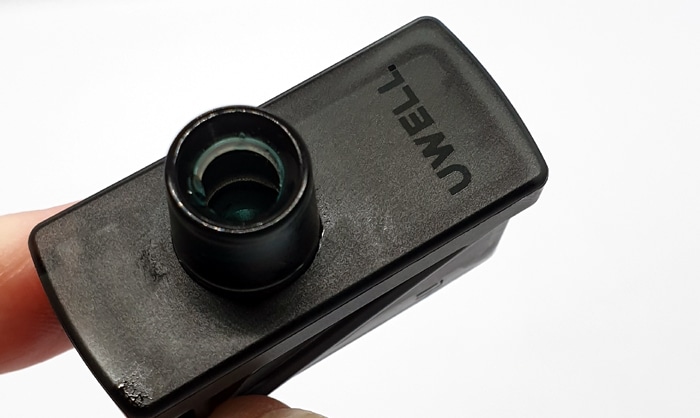
This is a darkly frosted plastic with a cylindrical mouthpiece.
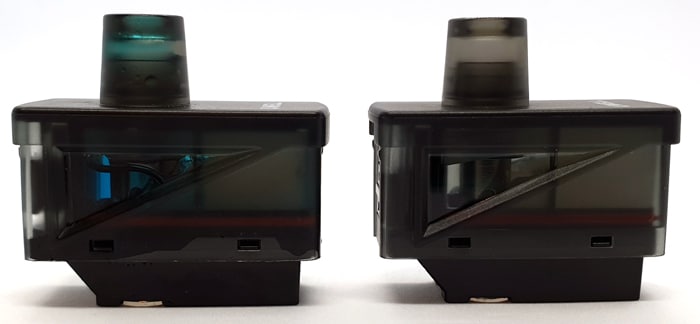
Each side of the pod has triangular mouldings to match the pod compartment frame on the mod.
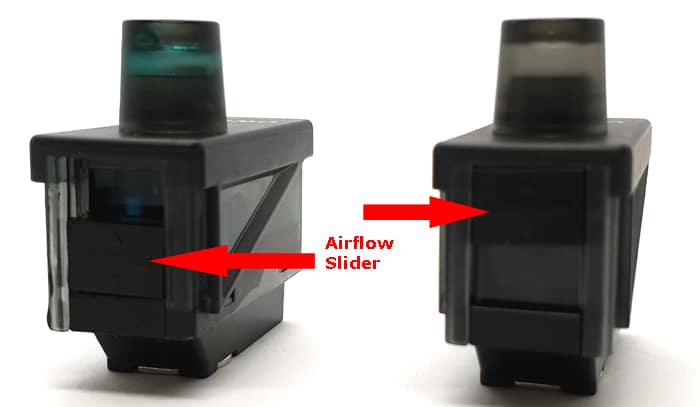
On the one side is the sliding airflow adjuster which works well and is easy to grip. But you do have to remove the pod from the mod to adjust the airflow.
On the opposite side is the minimum fill level marking and the “PRO FOCS” logo. The min marking is totally pointless on the 2ml pod as it is on the side where the spacer is installed to reduce capacity! Therefore there is no e-liquid in the area adjacent to the minimum line!
The base of the pod houses the coil which is not removable. However the coil base has the coil resistance and recommended power limits etched on clearly.
Etched in the base are the required legal logos, which are next to the fill port valve system which I will talk about later on.

It is so hard to see the e-liquid level that I vaped the pod dry once thinking it was still full. It may be worse due to the horrible Silicone bung inside to reduce the capacity, but being able to see the level is a basic requirement really and it is bad.
I had to change e-liquid to one that was bright Blue in colour just so I could see it!
The pod may feel like it is inserted into the mod, but give it a final push to make sure it clicks fully into the device.
Sadly this pod seems like an afterthought in the design process. It is annoying and appears to be a bit of a bodge in order to satisfy the CRC and TPD regulations.
It is such a shame we can’t get the 4ml version in the UK as the design looks to be far more practical than this nightmare.
Filling
The worst part of this pod is the filling system – it is horrendous.
On the TPD CRC pod you do not get the nice slidey happy top fill port. Instead on the base you have a kind of port with a valve. Or a “PTF” (Push To Fill port).
You have to really push the e-liquid spout into the valve to get it to open. Even then it is not great and pushes e-liquid straight back out of the port. You end up with e-liquid dripping down your arms and any furniture in the close vicinity.
I could get it to work slightly better by removing and inserting the e-liquid nozzle, but there were still puddles of e-liquid. This also means you need tissues to remove the excess e-liquid before replacing the pod in the mod and to mop up the dribbles down the side of the pod. Not exactly convenient when out and about.
This is the mess from just one typical refill (and this is one of the better ones)…
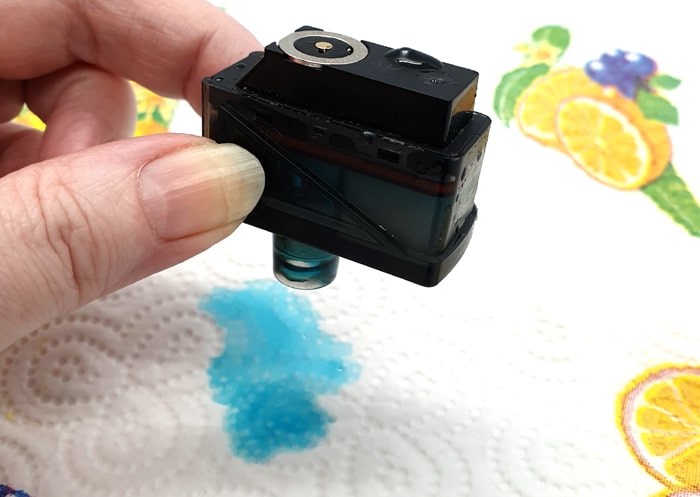
Oh and to add to the fun, you get e-liquid dripping from the mouthpiece when the pod is upside down when filling.
Both pods were just as bad, plus the 0.6ohm was reluctant to fill up fully.
I will also add I tried 3 different styles of e-liquid bottle – a 30ml, 60ml and 100ml and it made no difference.
Quick Start Guide
This arrives with a plastic protective sticker on the resin side, peel this off.
Fill the pod and then remove the protective sticker on the pod base, the device will not fire until this sticker is removed.
There are plenty of adjustments to play with and I will describe them all for you below.
Basic Operation
- Power On/Off = Press the fire button 5 times to turn on and off.
- Vaping = Hold down the fire button to vape.
- Battery indicator = The screen will display the battery charge remaining in the icon.
- Battery indicator when charging = The screen displays the charging progress and turns off when fully charged.
- Airflow: Remove the pod and slide the airflow slider up and down. Up = more restricted airflow, down = less airflow restriction.
- Adjust output = use the up and down adjustment buttons until the required power is on the screen. If you hold down the adjustment button it will scroll through quicker. The recommended power limits are etched into the coil base of the pod. This also has “smart” output – where the device will automatically suggest the best power output for the pod installed. Once you reach the maximum output for the pod the next press goes back to 5W.
- Lock / Unlock all buttons = Hold the fire button and the down (left) adjustment button to lock / unlock the buttons.
- Lock / Unlock adjustment buttons = Hold the fire button and the up (right) adjustment button to lock / unlock the adjustment buttons.
- Reset puff counter = Hold the 2 adjustment buttons at the same time to clear the puff counter.
- Factory reset = to reset the device to factory settings hold the fire button and both adjustment buttons down for 3 seconds.
Protections
- No Atomiser – if there is no pod / coil installed or the resistance is too high the screen will show “No Atomiser”.
- Low Battery: When the battery needs charging the screen will display “Low Battery” and will not work until charged.
- Short circuit: If there is a short circuit or the pod / coil resistance is too low, the screen will display “Atomiser Short”.
- Over time protection: If the fire button is pressed for longer than 8 seconds the vape will cut out and display “Over 8S”.
- Overheat protection: If the temperature of the device is higher than 80°C then the vape will cut off and the screen will display “Too Hot Please Wait”. Wait for the device to cool down and vape as normal.
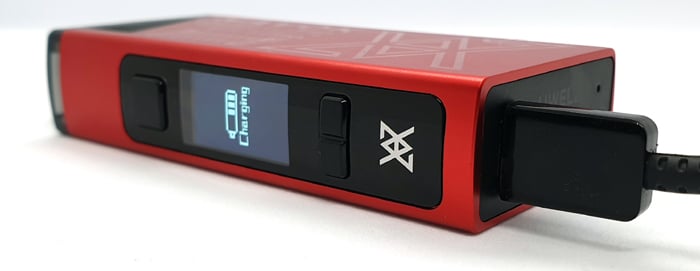
How To Charge The Battery
The charging rate is specified as 2A.
- Using a USB type C cable, connect the small end into the USB port on the mod.

- Connect the large end of the cable into a suitable USB outlet.
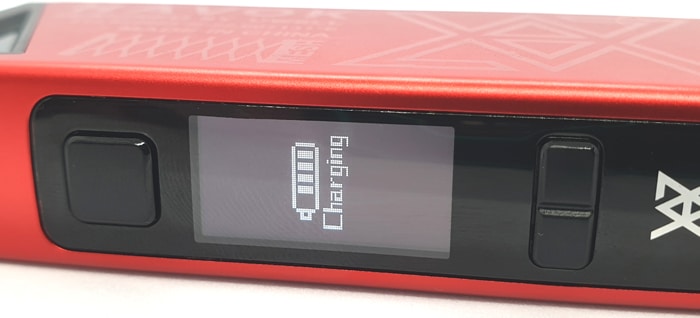
- The screen displays the charging progress and turns off when fully charged.

Usually I would record how long this took to charge, but sadly I could only manage to use it for 2 full charges so I didn’t get to record it. I would usually use a device for at least 5 to 6 full charges before finishing the review. But due to the issues with the pod, I gave up. I tried my best!
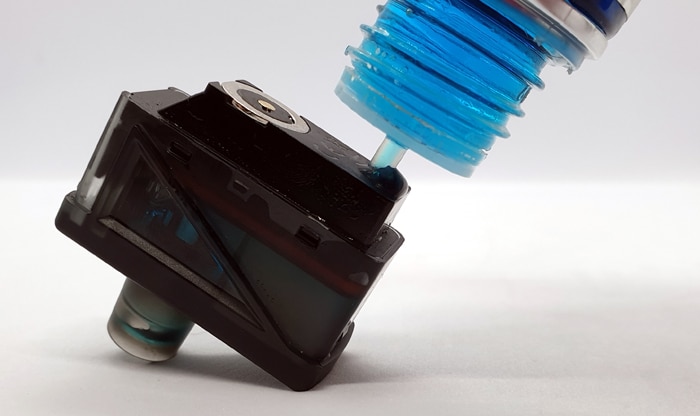
How To Fill the Pod
Surround the pod and the adjacent area with plenty of tissue before attempting this.
- Remove the pod from the mod.
- Turn the pod upside down and push the e-liquid bottle nozzle firmly into the fill port.

- You need to push the nozzle in far enough to open the valve.

- Watch the e-liquid level whilst filling.
- This can be quite messy so make sure to dry the pod base with a tissue before replacing the pod in the mod.
If a new pod leave to stand for 5-10 minutes to allow the coil to saturate with e-liquid.
Make sure to fill when the e-liquid level (if you can see it) is above the minimum marking on the side of the pod.
How Does the Uwell Havok Perform?
As there are different styles of pod included in the kit, I will choose different types of e-liquid to suit.
If any of these terms are over your head – have a read of our handy guides below!
- MTL V DTL V RDL – A Guide To Vape Styles
- VG and PG in E-liquid – all you need to know
- Beginners guide to E-liquid
- Nic Salt E-liquid
0.25ohm Havok V1 Pod – DTL
I used the Ruthless Energy Drank e-liquid in here, which is 70%VG and I added no nicotine as I love the strong flavour.
Also because I couldn’t see the e-liquid level I changed to Choppa Salts Blue Slush as it is bright Blue and I could then view it through the pod.
Wow this is a beauty!
The device automatically set the power to 40W and to be honest I only went up to 41W as it was perfect!
I have had some sub ohm tanks running at 60-70W that haven’t tasted this good! The syrupy sweetness of the e-liquid runs at you and then decides to stay with you long after vaping – delicious!
It feels fierce even at 41W and the heat and airflow push that flavour out at you. Not to mention the lovely cloud of vapour too. It isn’t what you would get from a tank but not far off.
The quality of flavour means I did hammer this a bit, hence I was refilling every few minutes.
I got 175 puffs to 10 refills of the pod – 17.5 puffs per 2ml of e-liquid! That is how thirsty this little 2ml capacity is. This is not Uwells fault – as we have a maximum 2ml capacity limit in the UK, but it does make it not very practical for things such as driving or walking around.
But the vapour is very enjoyable – absolutely stunning!
I managed to persevere with this pod for 15 refills, but as it has to be filled every 15-20 vapes, I got sick of it very quickly. The mess it made every time I filled just made me put this pod back in the box.
Which is a shame as it performs incredibly 😥
0.6ohm Havok V1 Pod – RDL / MTL
This pod is designed to satisfy MTL and RDL vapers.
However when it comes to e-liquid choice, this is a bit confusing.
Usually for MTL devices you would choose 50/50 VG /PG e-liquid as it is thinner which is easier for small coils to wick. Also the extra PG enables a nicer throat hit. These liquids usually are available in higher nicotine strengths for those who need a bit more nic.
But this might be slightly too low resistance / high power for e-liquid that has too much nicotine / PG. So I will also try a higher VG e-liquid in here.
Sometimes with smaller coils the Higher VG e-liquids are a bit too thick to wick the coil efficiently and can result in burnt hits or coil damage.
So it is quite important to select the correct e-liquid.
I will be trying both types in here.
50/50 VG/PG E-liquid
For this test I used my normal 50/50 VG/PG e-liquid. I use the IVG Bubblegum Concentrate, VG/PG base mix and add 6mg nicotine salt.
The device automatically set itself to 22W – this is between the recommended output limits of 20 to 25W.
I tried lower and higher outputs but the mod was right – 22W suited me perfectly!
It isn’t too hot and the flavour is just excellent, I also get a nice throat hit with my 6mg e-liquid.
So far 12 refills in the flavour is still perfect – but they are not quite full 2ml refills. Because of the awful filling system I just cannot get the 0.6ohm pod to fill fully. It just splurts back out of the fill port. Yes extremely annoying and sadly overshadowing the beautiful vape experience.
I am using the airflow in the mid position for a slightly looser MTL style of vaping and this for me gives the best balance of flavour.
64/36 VG/PG E-liquid
Sadly I gave up before I got through a whole pod of this as the battery needed charging and to be honest I had had enough of this kit.
I used the Choppa Vapes Blue Slush again, with no nicotine added.
The few vapes I had of this e-liquid were excellent and it seemed to have no trouble wicking. But this was only a brief few vapes – it would need a more prolonged testing to see if thicker e-liquid impacted the coil life.
But I was not prepared to continue to use this kit and waste more tissues and e-liquid due to the messy filling. Plus the 0.6ohm pod would not let me fill it fully.
Airflow
To help rate how restricted the airflow is, I use a scale – where 0 = fully closed, no airflow up to 10 = breathing fresh air.
On the 0.25 ohm pod, the airflow adjustment goes from 0 up to about 9. In theory this would suit MTL, RDL and DTL vapers! However with the airflow less than half open this is an extremely hot fierce vape, which is not that comfortable. I found myself using this pod in the fully open position.
With the 0.6ohm pod this ranges from 0 to around 6 – so it has slightly more restriction than the 0.2ohm pod, but still gives a great airflow for MTL and RDL vapers.
Mod Performance
I found the mod performance in general to be excellent. The firing was quick and the power levels seemed to be genuine.
I also loved the smart output – where the device set the power according to the pod installed – this worked perfectly.
When the battery charge drops, the device automatically drops the output to a level the charge (voltage) remaining will allow. So it was dropping from the 22W I wanted down to 10W for the last few vapes. I would rather it just stopped working as 10W was of no use at all, would barely warm the coil up and just results in a mouthful of e-liquid as it is not getting atomised.
Leaks
No real leaks, just the side effects from the horrible fill port. When filling the liquid often comes back out and collects in a puddle on the pod base. You have to clean this up every time you fill. But you can’t totally clean the residual liquid from the port, so sadly this does start to drop into the pod compartment.
But between fills there were no leaks from the coil or pod.
Battery Life
This will vary according to the pod resistance, power level selected and your own vaping habits.
As a guide I got 7 hours from the 0.25ohm pod, which was around 175 puffs and 10 refills. I did try to time it for a second time but the nightmare of filling it was driving me up the wall. Along with the tons of tissues I had to use to keep mopping up the e-liquid piddling out the bloody pod.
For the 0.6ohm I got 8 hours, 308 puffs and 13 refills.
Pros
- Excellent packaging
- 0.25ohm pod gives the flavour you would expect from a sub ohm tank!
- Huge airflow adjustment range
- Sturdy and solid device
- Build quality is brilliant
- Instructions tell you everything you need to know
- Love the bright and clear screen
- Battery life / capacity is excellent even with the higher powered pod installed.
Cons
- The design is very divisive, it is quite busy
- Very difficult to see e-liquid level, I vaped the pod dry TWICE because of this, may be worse because it is the TPD 2ml version with bottom fill and a spacer inside to reduce capacity.
- 2ml capacity for a 0.25ohm coil means you are constantly refilling, it guzzles the e-liquid. Not Uwell’s fault at all, but still not very practical.
- Push to fill port (on TPD / CRC pods) is a nightmare. Hard to push the valve open and airlocks / valve issues push the e-liquid back out again – everywhere. It was the same on both pods and I really got so fed up with mopping up e-liquid. The 0.6ohm pod I couldn’t get to fill fully either as it just stopped about 3/4 full and spewed out any e-liquid added after that.
- When battery charge is low the device drops the wattage output, this means the coil barely heats up and you just end up with non-atomised e-liquid in your mouth.
Uwell Havok Final Review Verdict
The appearance is odd, I am not 100% sold on it, I think the resin side is a bit ugly as the colours clash with the Red of the device. Also the rear is a bit too busy. However I have shown it a couple of people and some loved it, so it will be divisive.
I have no issues with the mod build quality, it seems rugged and feels substantial. It is a bit of a chunky mod and would benefit from slightly smoother corner edges.
Sadly the “design” and “ease of use” points that have been dropped are all due to the horrible pod design. You can’t see the e-liquid level – resulting in me dry burning the pod twice.
Also the push to fill port is horrendous – really messy, no good if you are out and about. I got so annoyed with this that I had to give up reviewing both pods – it was such a chore. I was sick of being covered in e-liquid and the frequently of filling made this worse.
The poor pod design will only affect us poor buggers who have to use the TPD / CRC pods due to TPD regulations. The 4ml standard pod looks a lot more practical. Such a shame that Uwell could not just restrict the 4ml pod down to 2ml and make life a lot easier.
However the flavour from this little beauty is epic and similar to that produced from a good quality sub ohm tank. The excellent battery capacity and clear screen are also winners.
To summarise the device is pretty good, the coils are perfect, just the pod design lets everything down. Get the 4ml pod and the whole kit would improve significantly. With the 2ml pod I cannot recommend it at all. Sorry Uwell.
In future Uwell please consider us poor souls restricted by the TPD – we buy your products and this pod design is really not good.


