I’ve just received the Wotofo Profile RDTA and let me tell you, things just got serious.
This is the All In One Sub-ohm RBA.
Before we get into the nitty-gritty of this review there is a couple of things you should know.
First of all I own both, the Wotofo Profile Unity RTA and the Wotofo Profile RDA. The important thing to know about that is, I don’t like either of them.
The truth is, I don’t like ‘mesh rebuildables’ and I honestly don’t see the point in them. I also managed to fit them both out with Claptons and still didn’t like them.
Second of all, RDTA’s are my absolute favourite of all things vape.
The business / politics side of Wotofo is a bit complicated because it’s been a busy 12 months for the company.
Briefly put, in August 2019 Wotofo Acquired OFRF, and then at the end of 2019 Smok “invested” in Wotofo. Although, it is unclear what that means and to what extent the two companies are partnered.
Founded in 2012, Wotofo’s catalogue currently holds:
- 9 Mods (including 3 Squonk mods)
- 3 Sub-ohm Tanks
- 2 kits
- 12 RDAs
- 6 RTAs
- 2 RDTAs (Including this one)
Wotofo is renowned for rebuildables, especially the Profile range.
What Can We Expect From The Wotofo Profile RDTA?
Let’s first look at what I mean by the All In One Sub-ohm RBA.
The Wotofo Profile RDTA is and can be all of the following:
- RDTA -Mesh Coils
- RDTA – Dual Regular Coils
- RDTA – Single Regular Coil
- RDA – Mesh Coils
- RDA – Dual Regular Coils
- RDA – Sinlge Regular Coils
It’s important that you understand that Wotofo hasn’t built a deck for mesh strips and claimed it can handle regular coils, it actually has both – the Mesh strip clamps and the postless deck screws for regular coils.
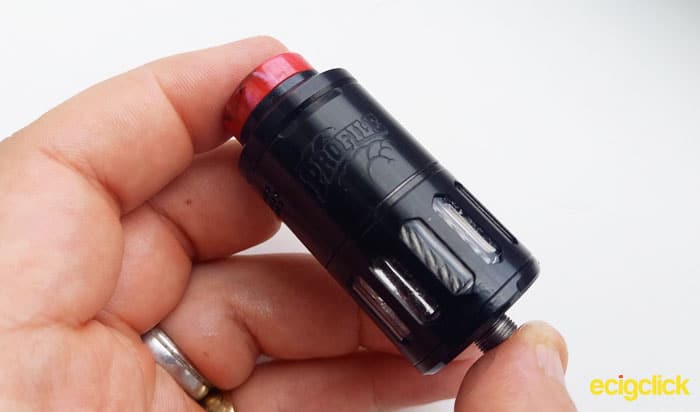
It’s a fairly big piece of kit, it only has a 25mm diameter but its stands at 52.7mm high (excluding the 510 pin), however that is justified by the huge 6.2ml e-liquid capacity.
It uses stainless steel wicks to transfer the liquid from the tank to the cotton on the top.
This section could go on forever, so to get to the point, to get a high rating score the Wotofo Profile RDTA is going to have to perform well as all of the above.
If it can handle a single regular coil, I’ll be super impressed.
Watch Harley’s Video Review of the Wotofo Profile RDTA
Inside The Box
- Profile RDTA x1
- nexMESH Clapton Ni80+A1 0.20 ohms x1
- nexMESH Extreme A1 0.16 ohms x1
- nexMESH Turbo A1 0.13 ohms x1
- Framed Staple Clapton Ni80 0.33 ohms x2
- 6mm Thick Cotton Strip x2
- 3mm Thick Cotton Strip x2
- Stainless Steel Wick x6 (4 pre-installed + 2 spares)
- Mesh Bending Tool x1
- RDA Adapter x1
- Cross Head Screwdriver x1
- Allen Key x1
- Accessory Bag x1
- User Manual x1
Specs & Features
- Diameter: 25mm
- Height: 52.7mm
- Build Deck Diameter: 22.5mm
- E-Liquid Capacity: 6.2ml
- Coil Types: Single Mesh Coil, Single Wire Coil, Dual wire coils
- Drip Tip: Removable Coloured Resin / 810
- Filling Method: Mid filling for RDTA / BF squonkable for RDA
- Airflow: Adjustable Side Honeycomb Airflow
- Connection: 510
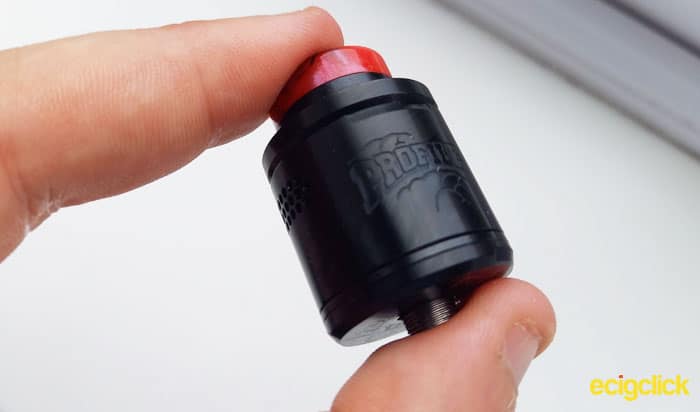
Design & Build Quality
The Wotofo Profile RDTA comes in 6 colours:
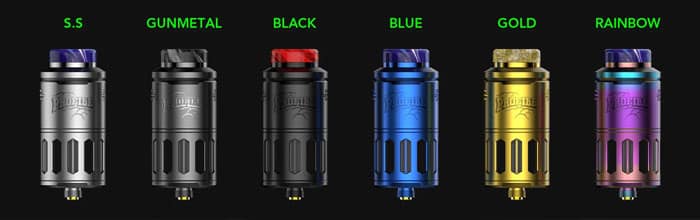
I was fortunate enough to receive mine in black!
The Wotofo Profile RDTA Assembly
Although I think the outer design of the RDTA is pretty standard, there’s quite a lot of little pieces at play here.
We’ll discuss the overall assembly, then take a closer look at each part.
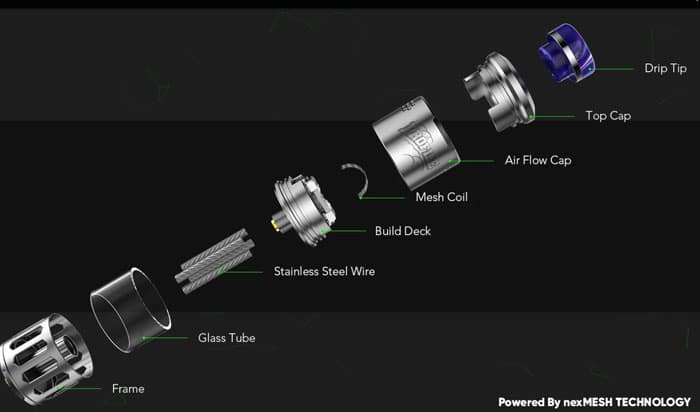
First of all there is the ‘frame’ which is the base and surround of the ‘tank’ part, including the 510 connector.
Then we have the glass tube although Wotofo informs me the glass is being replaced with PTCG.
Then there is the build deck, and in our bag of ‘spares’ there is a vanity ring type thing, that is actually the bottom base for the RDA. So If you are using the setup as an RDTA you screw on the frame with the glass. If you are using it as an RDA you simple just screw on the base.
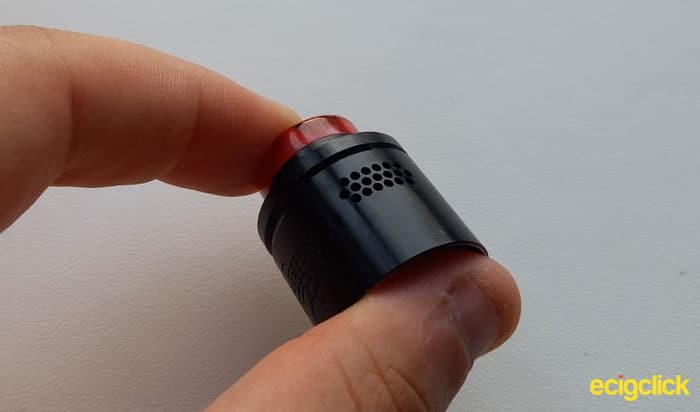
Then up top, we have the ‘airflow cap’ with the honeycomb airflow hole, the top cap that has the lips which restrict the airflow and finally the 810 resin mouth piece, which has a metal rim.
The Wotofo RDTA Tank – Frame
Around the tank section, the frame consists of 12 bars, or has 12 pill shaped window holes depending on how you look at it.
Regardless of how you word it, its a great design that allows you to see the liquid level with ease while protecting the tube inside.
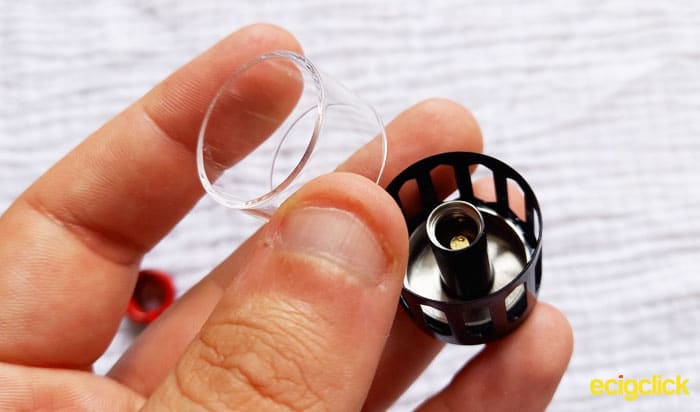
Inside, the tube fits into a groove on the bottom of the frame which has a O-Ring to prevent leaking.
In the center of the frame / tank, is the connection pipe. There isn’t really much to be said about it, it simply connects the deck to the connection pin on the bottom.
The frame uses that connection tube to hold the deck via a 510 threat.
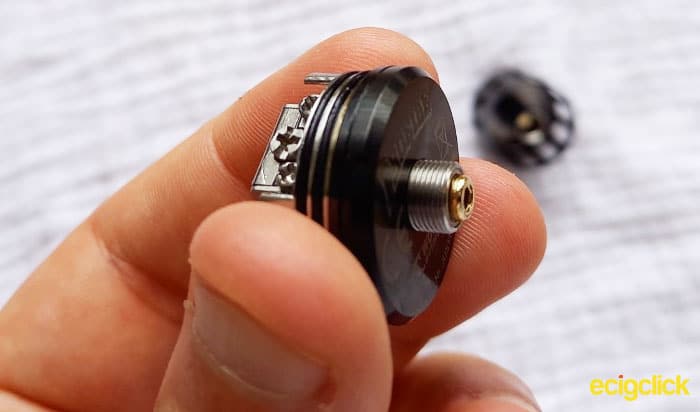
The Wotofo RDTA Deck
As I’ve just mentioned the build deck connects to the frame via a 510 connection.
It’s that connection that makes it possible for the deck to be used as an RDA.
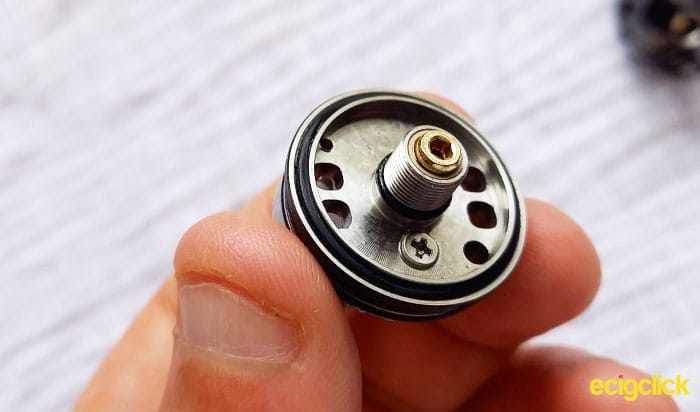
Inside the wicking ports, there is 4 holes (2 in each) for the stainless steel wicks, obviously that will cause leaking, or so you would think! That’s why there is a separate base for the RDA, to seal the holes and prevent leaking from the base.
Underneath the deck, there’s a ridge and an o-ring around the edge to secure and seal the RDTA tank/ frame or the bottom cap of the RDA.
Unlike the frame, the build deck has a removable pin so you can use it as a squonker if you so wish.
Like all good RDTAs, the build deck has 2 holes, 1 hole for filling and a hole to release there air from within the tank.
The holes are on opposing sides and the fill hole is the perfect size for a bottle nozzle. Although I think you’d struggle to fill it with a tincture.
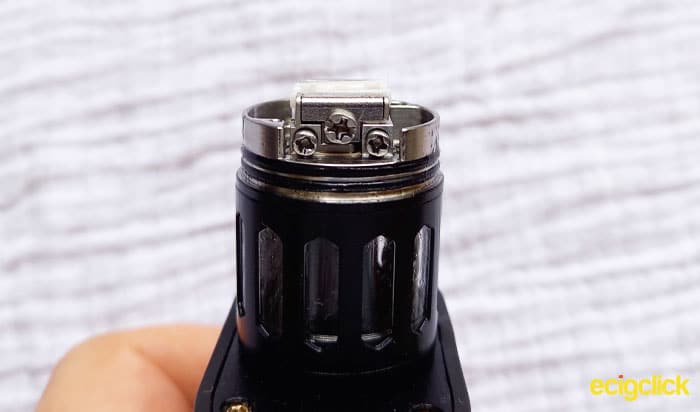
The Wotofo RDTA / RDA Build Deck
The actual deck is something special on it’s own.
You have 2 clamps for the mesh strips, with a spring loaded ceramic bed in between, and each clamp is controlled by a Phillips screw.
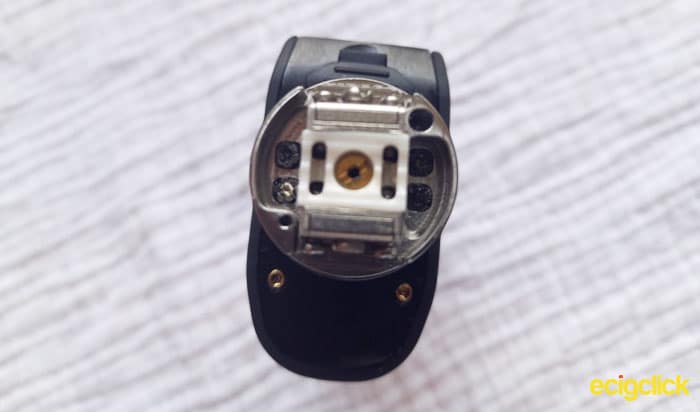
In the middle of the ceramic bed is the squonk ready pin, and at either side of that is are 2 slots – are you ready for this? Those slots are there to expose the holes for the traditional coils.
The postless deck for the traditional coils operates by 4 Phillips screws that are located just below the mesh clamp screws.
To me, that is just ingenious magic.
There is so much going on, but yet it’s still so tidy and well organized.
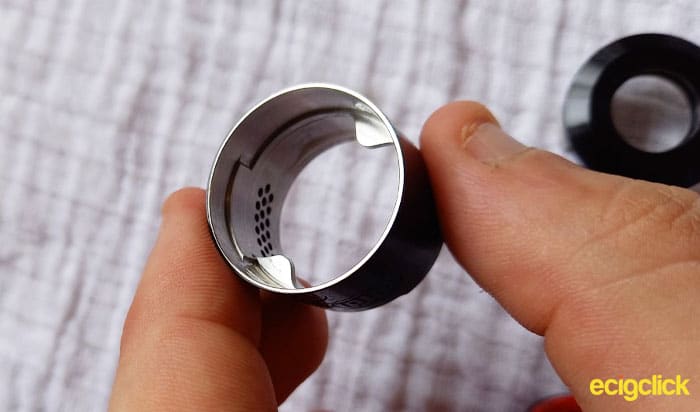
The Wotofo RDTA Top Cap
As we mentioned earlier, the Wotofo RDTA top cap comes in 3 different parts, the airflow cap, top cap and 810 drip (not to mention the metal ring around the drip tip).
Top caps play a really important part of an RDA and I think they’re design importance is often understated.
So lets take a seconds to admire how much effort Wotofo has gone to, to make this beauty so great.
Inside there’s 2 lips that are quite important, first of all they ensure you have the top cap on at the correct rotation and ‘lock’ it into position but they also cover the fill hole and the tank air hole, to minimize leaking.
Right at the top inside the cap the roof is really nicely chamfered, which is believed to enhance flavour quite a lot.
I do notice the 810 drip tip port is dropped in creating a little ledge, is this a design oversight?
as Wotofo Gone out of their way to put it their? Will it affect flavour production? We’ll have to wait and see.
The Wotofo RDTA Airflow
The airflow is a honeycomb side airflow, made up of 38 x 1mm holes (19 on each side).
Thanks to the rotating top cap, with its staged sides you can pretty much turn the airflow down by 2 holes at a time (1 hole each side) until the airflow is fully shut off.
By rotating the top cap clockwise the top line of the airflow holes gets closed off first, then the other 2 at the same time. Thanks to the honeycomb design, with precision you can still manage to close off 2 holes at a time even when doing the latter).
I personally like max airflow and yes it gives a great, almost resistance free , draw.
With the airflow fully shut off the top cap isn’t fully air tight. But if you like a super tight DTL draw you’re in luck. It is super tight for DTL vaping.. but quite loose for MTL Vaping.
Wotofo RDTA the Steel Ropes & Wicking
All the RDTAs I’ve used in the past have the conventional wicking, where the wick is stuffed into little wicking holes and hangs half way down the tank, like a paraffin lamp.
However the Profile RDTA uses the Stainless Steel ropes, that are designed to pull the liquid up to the wicks, which sit on bottom of the deck; like an RDA.
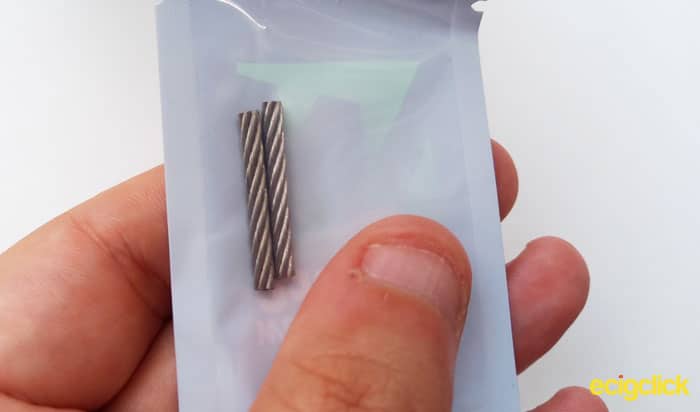
Having never used SS rope wicks, I’m a bit skeptical on how they work, I don’t understand the logic. So we’ll be checking on this in the performance section.
I’ll also be test the RDTA out without the Stainless steel wicks.
How To…
There’s a lot going on here, So we’ll look at how to
- Set the RDTA up
- Set the RDA up
- Build using Mesh Coils
- Build using Traditional Coils
The Wotofo Profile RDTA Set Up
This is fairly easy.
All you really need to do here is make sure all the pieces are together and the SS rope pieces are inside the tank, preferably popping out of their holes in the build deck.
See simple, especially as that’s how it comes.
If you have been using it as an RDA and want to switch back to RDTA, all you have to do, is unscrew the base from underneath the deck, screw on the tank / frame and drop your SS ropes in.
Using The Wotofo Profile RDTA As A RDA
This isn’t a complicated process either, but it’s best done when the tank is empty.1
First of all you need to unscrew the tank section, before you do that I would suggest, removing the SS wicking ropes.
It’s not essential, but I found unscrewing the tank with the wicking ropes in can cause the ropes to fray and it can scratch the inside of your tank.
To remove them simply lift up your cotton wick (if you haven’t already removed it) and tip the RDTA upside down, baring in mind any and all liquid will also come out. If they don’t come out, just give it a little jiggle.
Once the tank section has been removed, all that is left to do is locate the RDA base that came with the setup and screw it onto the bottom of the base.
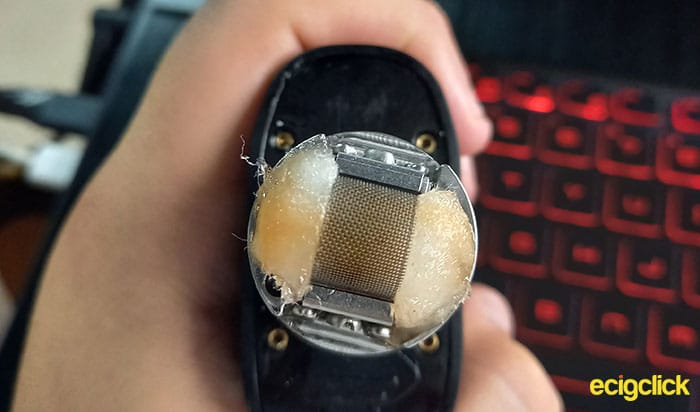
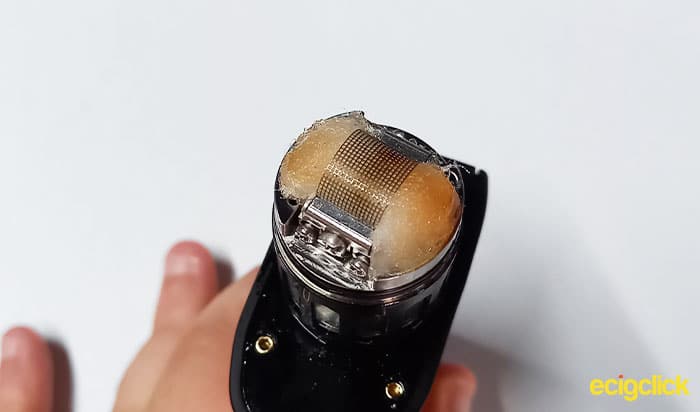
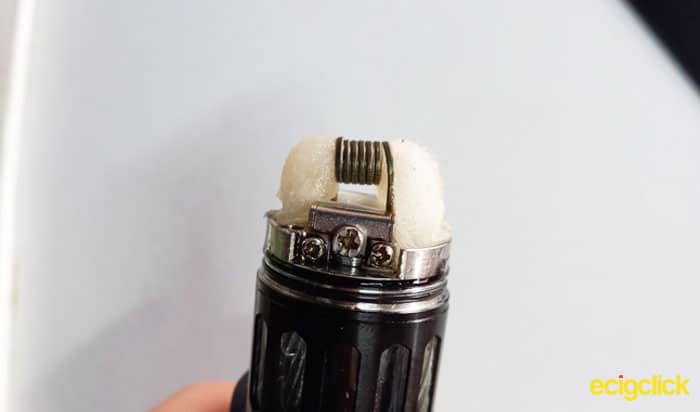
Wotofo Profile RDTA – Build using Mesh Coils
On either side of the deck, there are 3 screws.
The clip for the mesh strips use the top screws.
- Use the bending tool to bend a mesh strip into an arch shape.
- Unscrew the 2 clamp screws (the top one on each side).
- With the mesh bent, the connection strips on the mesh should fall into the clamps pretty easy.
- Ensure the Mesh in level and screw the clamps shut.
- Pre burn the coil at 10-20w to burn off any impurities.
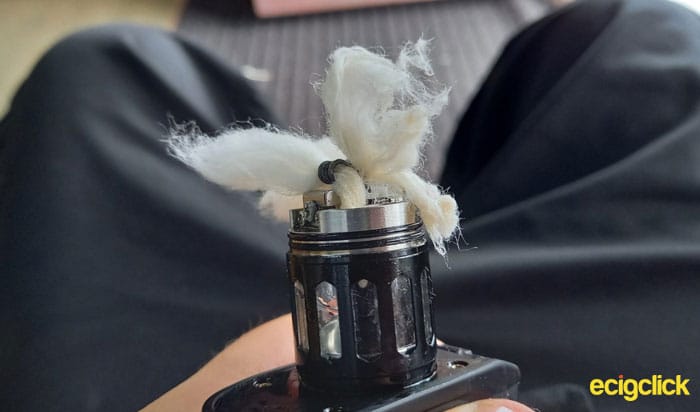
- When the coil is cool, get the Cotton strips and pull it through, applying pressure downwards to prevent pulling the coil.
- Trim the cotton, in line with the bottom O-Ring (on the outter edge).
- make sure the cotton is fluffy. Do NOT thin the cotton out
- Press the cotton down into the wicking wells.
- Wet the cotton, ensuring the cotton under the mesh is nice and wet.
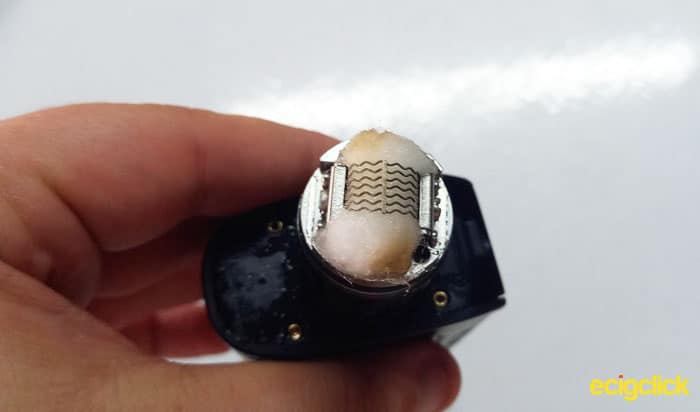
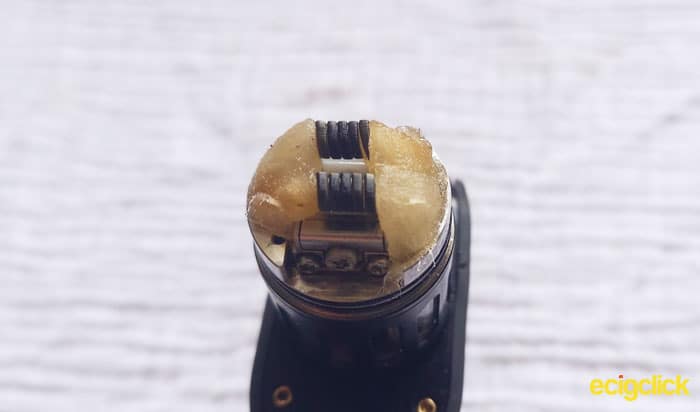
Wotofo Profile RDTA – Build using Traditional Coils
On either side of the deck, there are 3 screws.
The bottom 2 screws are for the traditional coils.
- Unscrew the 4 screws (2 if you’re only using 1 coil)
- Cut the coil legs down to size (I used 8mm).
- Place the coils into the holes. (The coils run length ways)
- Tighten the screws tight to hold the coils firmly
- Pre burn the coils and ensure they glow equally
- When the coils are cool, get the Cotton strips and gently pull them through, trying not to pull the coils.
- Trim the cotton, in line with the bottom O-Ring (on the outter edge).
- make sure the cotton is fluffy. Do NOT thin the cotton out
- Press the cotton down into the wicking wells.
- Wet the cotton.
How Does The Wotofo Profile RDTA Perform?
Just to warn you, I love it.
Something that has annoyed me though is nowhere does it say what the recommended wattage is for any of the mesh strips.
As a rebuilder, it isn’t a major issue, we can just slowly turn up the wattage until we are happy.
However the mesh strips that came with the other Profiles, had a wattage recommendation, even a max wattage recommendation would suffice.
Wotofo states the entire RDTA has a wattage range of 60-80w with a recommended wattage of 70-75.
I should also mention, I’ve never really been a fan of mesh rebuildables. In my experience Mesh strips are fragile, flimsy and have to be perfect to work great, even then, you don’t get a lot of play room in regards to power.
However, with that said you really ought to carry on reading…
I tried out all the coil set ups with Brain Freeze Apple, with maxed out VG, 0mg nicotine. It’s a nice sweet apple flavour, strangely with no menthol.
I also tried all the coils with the Peachy Promise Nic-salt by Got Salt (50/50 and 10mg).
NexMesh Extreme – 0.16ohm Mesh Strip
I reluctantly put the Extreme strip in, using the coil bender tool.
I have to say it was a lot better experience than I had with the previous mesh coils (for things like the profile unity). The strips are thicker, and more durable.
At 50w there’s not much to talk about, it ramps up fairly slow and although you get a medium sized cloud there isn’t much flavour.
At 60w the flavour is starting to come through, it is prominent but there isn’t much to brag about. Meanwhile the clouds are getting bigger, we’re not at a decent thick cloud.
Up at 70w, we’re going up! The flavour is now starting to flood the back of the mouth in a great way, but it’s still not quite at a whole mouth flavour.
I stopped the search at 80w. The flavour is a good whole mouth flavour, although I wouldn’t say it floods the mouth. You get a nice big, thick cloud and it’s still a super smooth vape, that isn’t too warm.
Overall I am impressed. It’s a lot better than I anticipated.
NexMesh Turbo – 0.13ohm Mesh Strip
I got a very similar feel from this coil
Again At 50W there’s not much to say, it ramps up slow and although you get a thin medium sized cloud there isn’t much flavour, the vapour production is definitely thinner.
At 60w the flavour starts to come through and the vapour gets thicker, but I still wouldn’t say the cloud is thick nor the flavour prominent.
We start to get somewhere at 70w. The flavour starts to be prominent at the back of the mouth but it’s still fairly disappointing. As for the cloud, we start to get a thick medium sized cloud.
80w provides a fairly decent cloud and the flavour is a prominent whole mouth flavour, however, I still don’t think it’s prominent enough, it seems a bit ‘watery’.
Against recommendation and in risk of dry burn I turned it up to 90w here is where the magic starts to happen the flavour is whole mouth, fairly prominent and it provides a decent cloud.
NexMesh Clapton – 0.2ohm Mesh Strip
What is it with claptons? They seem to enhance everything!
Starting way down, at 35w the ramp-up time is slow, and there isn’t much vapour, however can already taste the flavour.
Pushing it up to 45w, the flavour is surprisingly prominent, although it does taste a bit ‘watery’. The vapour production is on it’s way up too, giving off a thick medium sized cloud.
55w is purely satisfying. You know that prominence of flavour that is just mouth wateringly good? That is where we are right now.
It is prominent to every taste bud around the mouth and throat. The vapour production still hasn’t changed a great deal, providing us with a big / medium cloud.
If you thought it couldn’t get better, you were wrong. At 65w we are fed a fair and thick cloud, although it’s still not huge, and the flavour is absolutely on point!
Truth be told it kept going, up and up. I stopped pushing my look at 95w and even then it was still smooth, tasting great and providing lovely thick clouds.
Although, I think the sweet spot for me was between 75-85w that’s where I feel like it his the roof.
Dual Framed Staple Claptons – Ni80 0.33 ohms
Perfect, Perfect, Perfect!
I’ve been using the Framed Staple Claptons at 115w and I have to say it is awesome.
This is exactly what I look for in an RDA, RTA or RDTA. The flavour is on point, the airflow is on point.
I don’t know what else I can say. I’m just say here with love hearts for eyes.
Single Fused Clapton – Ni80 0.9 ohm
I don’t know what happened to my calculations but I did not expect 0.9ohm when building this coil…
I had to do this. for this to be the fully versatile RDTA / RDA that I’m expecting it to be it has to be able to take a Single coil and still perform beautifully…
So I wrapped up a Fused Clapton at 4mm diameter (the biggest jig I had handy) and screwed it in, with the legs in diagonal holes.
I had a few things going through my mind, firstly a 4mm thread would definitely not be enough wick to prevent the RDTA from leaking. Secondly the flavour wasn’t going to be up to much.
Well I was wrong. Between 50-70w, the cloud is nice and the flavour is on point. No matter what you want to do this machine is a wonder tool!
Can You Wick the Wotofo Profile RDTA Traditionally?
I fully expected to be able to but I didn’t manage it.
To be honest I didn’t try like it was a matter of life and death but I did try for about 15 minutes.
The problem is the height of the tank section.
When using a cotton wick with an RDTA, you don’t put the wick all the way to the bottom of the tank, but it should be half way or two thirds the way down.
Because the tank is so tall, you need a fair bit of cotton to go though the wicking holes, that’s what makes it so hard.
I’m not saying it can’t be done, but it is certainly harder than other RDTAs, I’d probably do it if I had to. But the stainless steel wicking ropes are good enough anyway.
If you did take your time and manage to do it, I imagine it would wick just fine.
Does the Wotofo Profile RDTA Leak?
That’s a pretty broad question.
Even if they are designed right RTAs and RDTAs can still leak, it all depends on how you wick it.
I must have completely rebuilt the Profile RDTA 7 times there was one occasion where I left it on it’s side and it leaked a few millilitres. There was one or two occasions that I’d left it on it’s side and after half an hour there was a ‘spot’ of leakage.
However as a whole I’m fairly happy to say that the Profile RDTA does not leak.
All the leaking I had was due to wicking and at no point did it leak from anywhere that it shouldn’t have (i.e. the tank seal).
Pros
- Transforms from a good RDTA to a good RDA
- Handles all sub-ohm builds excellently
- Great adjustable airflow
- Wicks well – Not had a single dry burn
- Great Juice Capacity
- Easy to build on
Cons
- It’s a bit tall…
Final Review Verdict
So while reading this review back I couldn’t help think it sounds a bit like a sales pitch…I don’t mind that because it is truly an awesome piece of kit.
So awesome that it has without a doubt replaced the Vgod Elite RDA as my day to day device.
It is rare that a dual coil RBA can perform well with a single coil, but it did not to mention it’s impressive performance with mesh coils.
It really has changed my opinion of mesh RBAs (although I would still rather use traditional round coils).
It’s also been the first time I used steel wicks on an RDTA, and again I’m sold.
Is this for everyone? No, I can’t imagine it will be suited for Mouth To Lung Vapers and I’m sure there will be some Sub-ohm vapers that don’t like it.
But I think the vast majority of sub-ohm vapers will be impressed.


Great review. Thank you so much.
I’ve only had it a few days and love it. But have had an issue with liquid flow. And a few almost dry burns. What would you suggest? Thinning the cotton or lower vg?
I have been using this for a couple of years. The glass is very protected. Where I have cracked the Profile Unity tanks a half dozen times in a bit longer time frame I have cracked the Profile RDTA tank once. All my fault. I brush a small tail of cotton over the fill port and experience no leaks. I use a spool of SS mesh and cut to length and width. They come out at .20-.25 Ohms and vape at 40watts. Very satisfying warm vape and all the flavors are released.
Just got my wotofo profile rdta two attempts at wicking not wicking thifd attempt fantastic flavour blew me away with the clapton mesh get the wicking Wright spot on 60 w perfect
Nice one Harley, it was reading this I decided to push the NexMesh Turbo in my Profile 1.5 to 90W and I was blown away.
Shweet! I’m far too power hungry when it comes to RBAs. Currently hitting dual claptons, 0.4ohm, 6 wraps each at 145w… opps… 😀
Oh Dear!!!
Other great review from the most beautiful vape reviewer of UK :Harley from Vape Mill!!!
Congratulations!!!
❤️