The Geekvape Sonder Q Kit is created to be simple but with great compatibility.
There is one other Sonder branded device – the Sonder U – but this is not compatible with the “Q” version!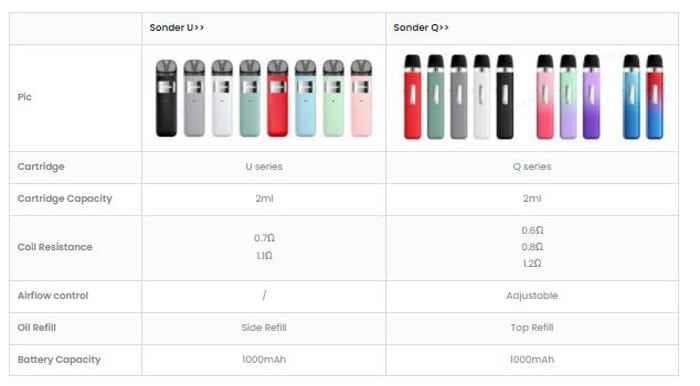
Will this little cutie be ideal for new vapers? Time to get stuck in and find out!
Thank you to Geekvape for sending me 5 of these kits for review and I will report back honestly on my findings with the devices in my possession!

What Can We Expect From The Geekvape Sonder Q…
So even looking at the promo photos for this kit you can see it is a super simple design.
No buttons or screens to contend with and the pods have fixed coils so you dispose of the pod section when the performance has dropped off.
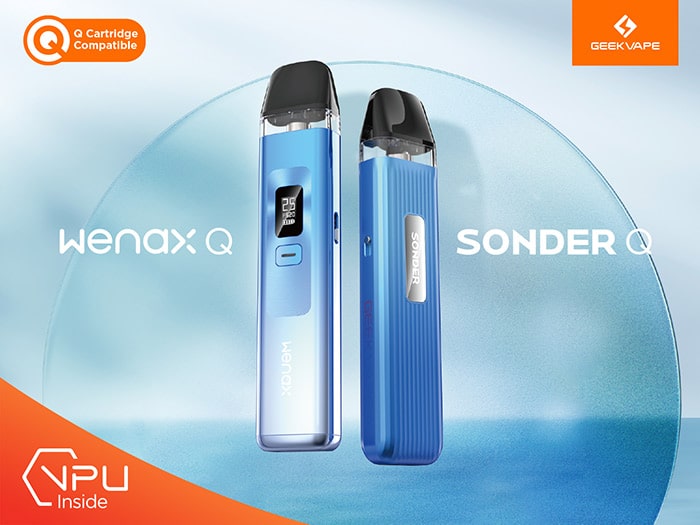
 Talking of pods – these are the new “Q” range which are designed to be compatible between different devices. In this case the Sonder Q and Wenax Q kits.
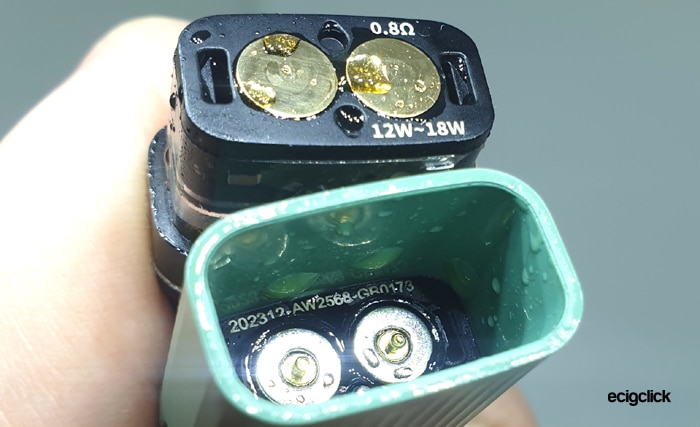
There are 3 pod resistances to choose from – 0.6ohm, 0.8ohm and 1.2ohm. You get the 0.8ohm pod included in the kit.

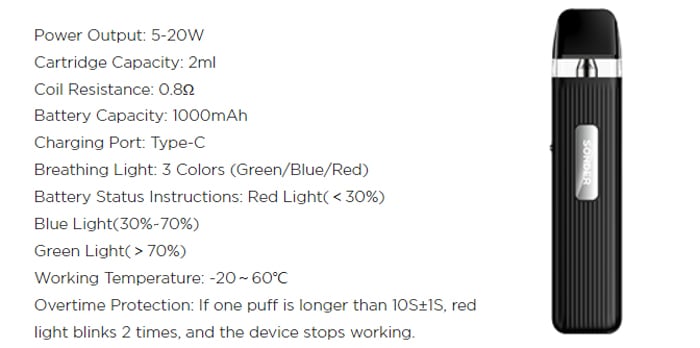
Inside the device is a whopping 1000mAh battery which is rechargeable via the USB Type C port. Sadly the charging rate is not specified.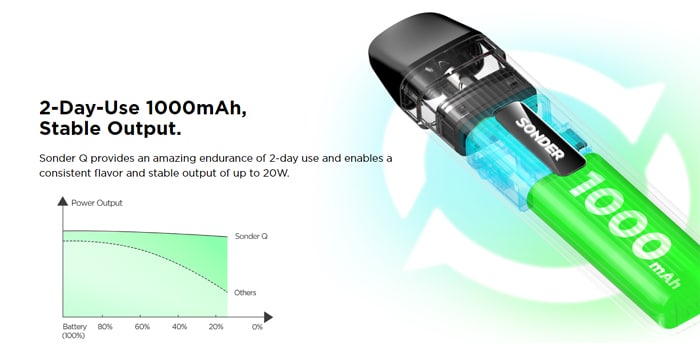
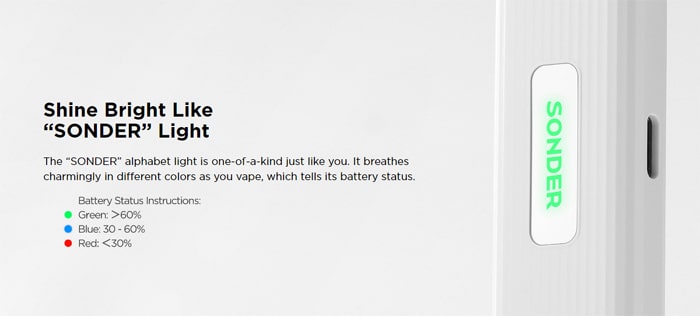
There is a breathing LED indicator to inform of battery status and any fault conditions.
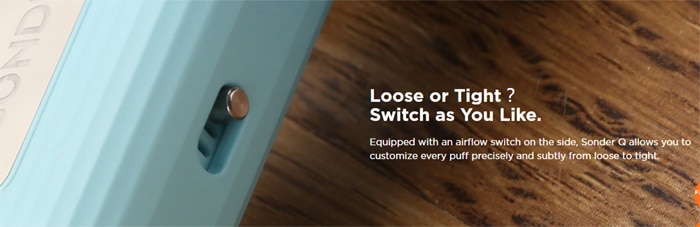
The only adjustment you need is the airflow slider to tailor the vape to your preference!
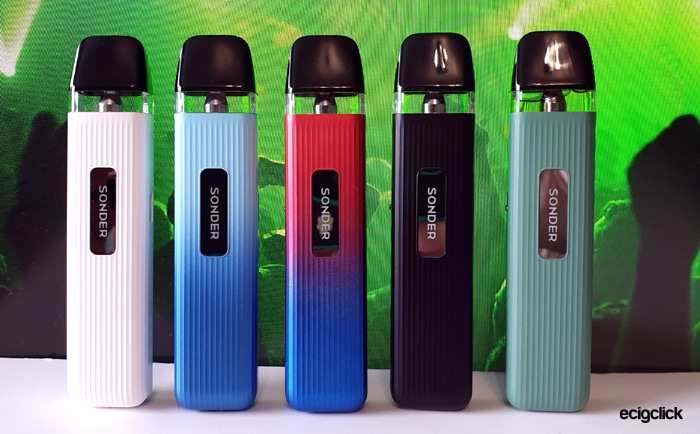
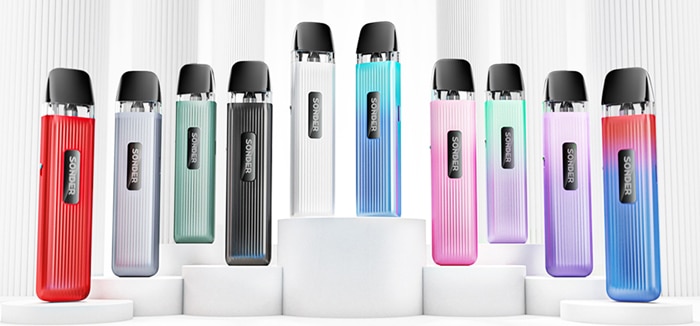
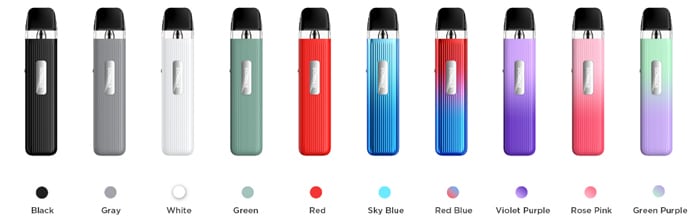
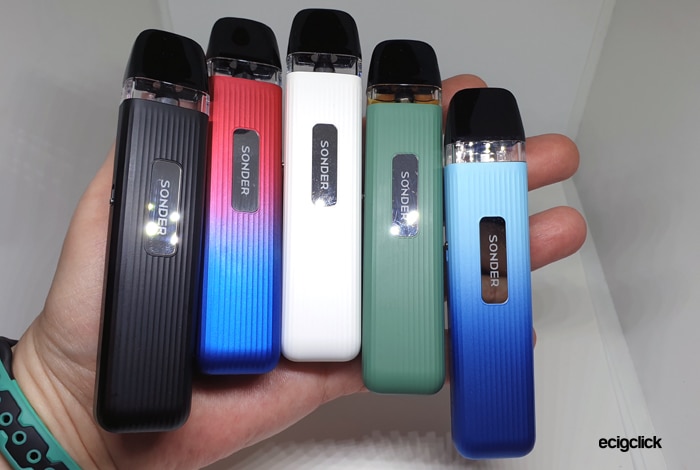
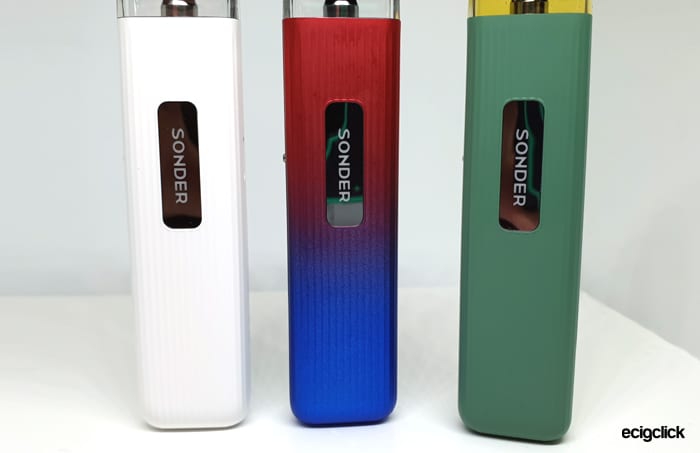
There are 10 colours to choose from: Black, Grey, White, Green, Red, Sky Blue, Red Blue, Violet Purple, Rose Pink and Green Purple.
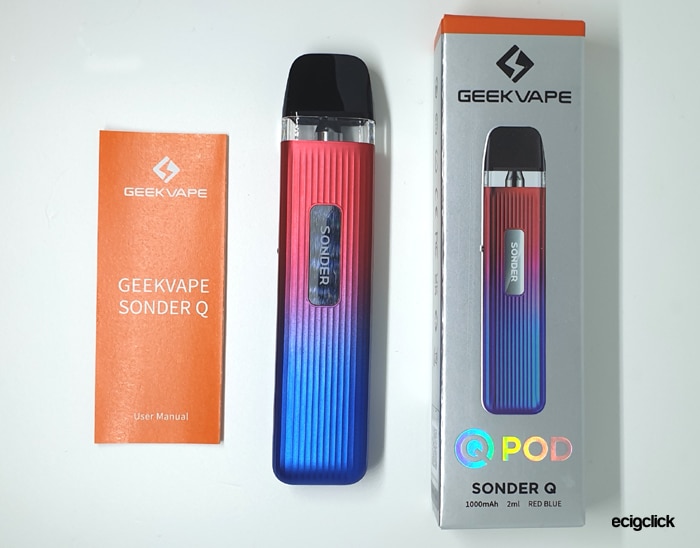
Inside the Box
- Geekvape Sonder Q device
- 0.8ohm Geekvape Q pod
- User manual
Geekvape Sonder Q Specs
- Size: 23.8×108.9mm
- Output: 5-20W – automatic power selection
- Battery: 1000mAh (internal)
- Display: LED indicator
- Resistance range: Not specified
- USB Type C port
- Pods: Refillable, fixed coils
- Compatibility – Geekvape Q Pods
- Capacity: 2ml
- Top fill
- Adjustable airflow
- Auto draw
Geekvape Sonder Q Design and Build Quality
I received 5 of these kits in the Green, Red / Blue, Black, Sky Blue and White versions.
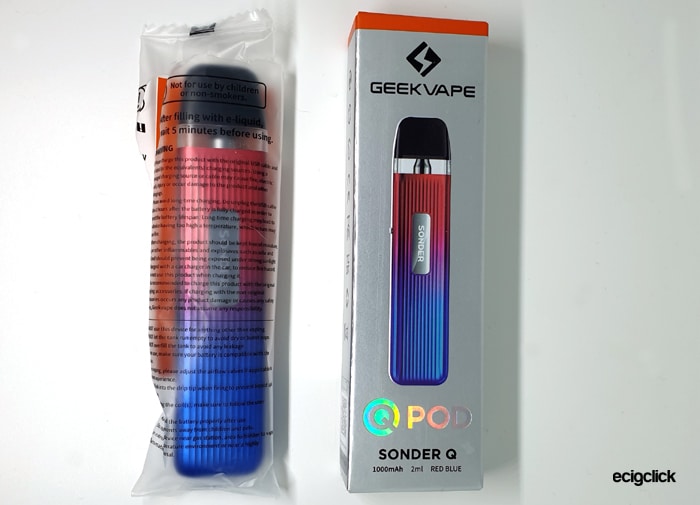
The packaging is very minimalistic with the device and instructions stored in a Plastic bag which is then pushed into the very thin box.
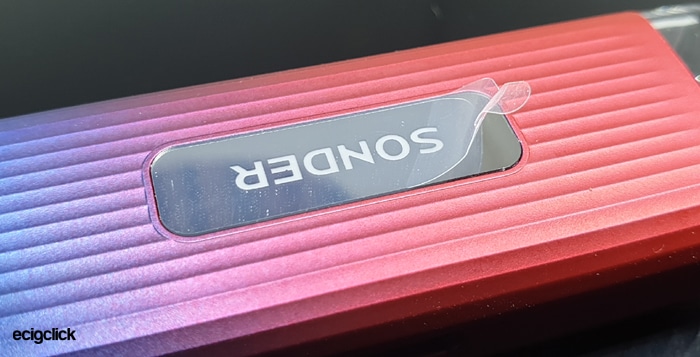
A great feature is that the shiny mirror finish area gets a protective sticker, plus the base of the pod gets an isolator sticker too.
You only get 1 pod and no USB cable- but the inexpensive price point of this kit does kind of excuse that.
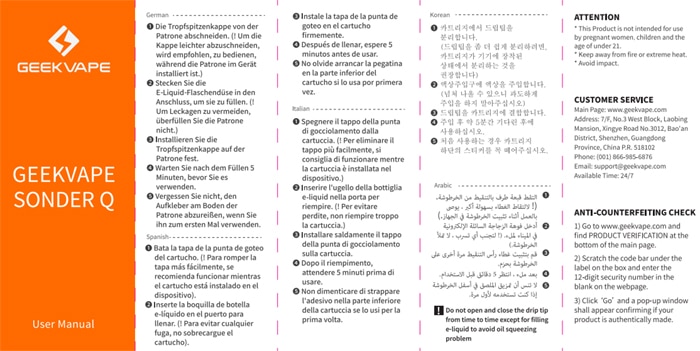
I am not very impressed with the instructions to be honest. They do open out and are a mismatch of different languages. You can view them online here.
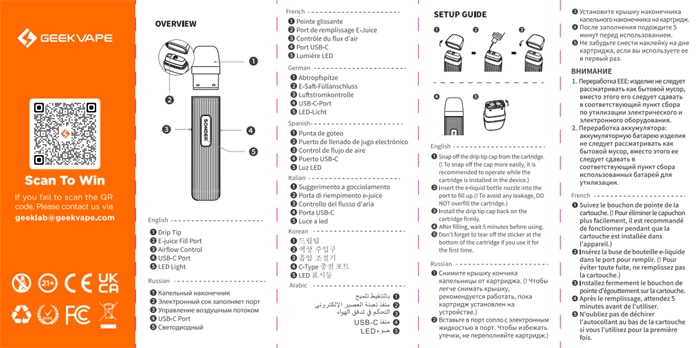
The first page gives a great diagram of the device and the components. The third page shows how to fill the pod. Then after that you are on your own as the rear of the sheet is just alternative languages!
No mention of the LED indicator or what it displays, if there are fault protections etc.
There is some info in the specifications on the Geekvape website but again still missing information on charging.

I know this seems petty but these devices are targeted at starter vapers or those transitioning from disposable vapes. A lot of these people will not know what LED indicators usually display – so this is a bit rubbish Geekvape.
Geekvape Sonder Q Mod
This is made from what feels like a hard Plastic with a Matt finish.
The plain colour versions are just one colour, whereas there are some dual colour models with a nice colour fade effect.
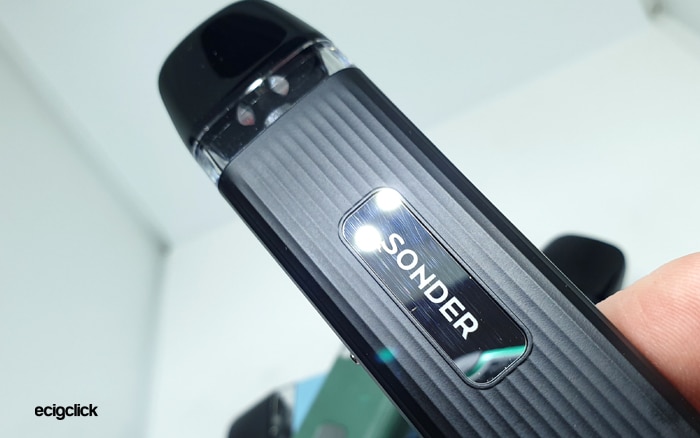
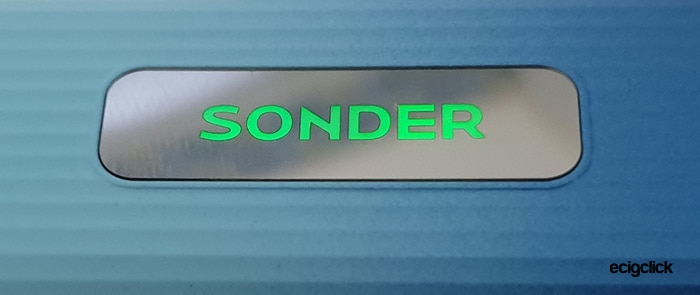
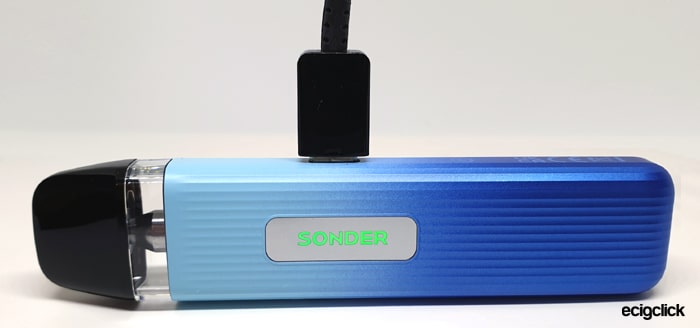
On the front of the device is a mirror finish panel with the word “Sonder”. This is actually the LED indicator and the letters light up in the applicable colour to denote battery charge status or other fault conditions. I really like this touch!
Other than that the front is plain apart from the textured ridges which aid grip.
The rear is plain.
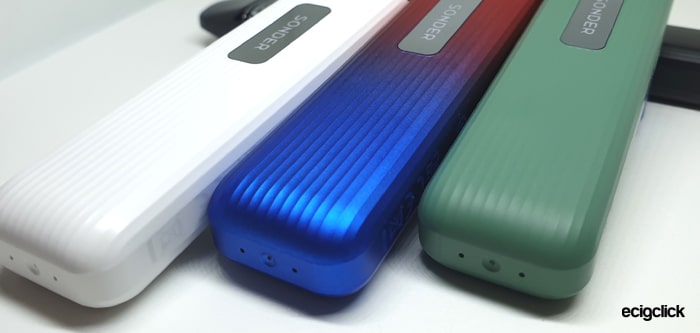
One side houses the airflow slider which is pretty stiff so should cause no concerns of the airflow adjusting itself.
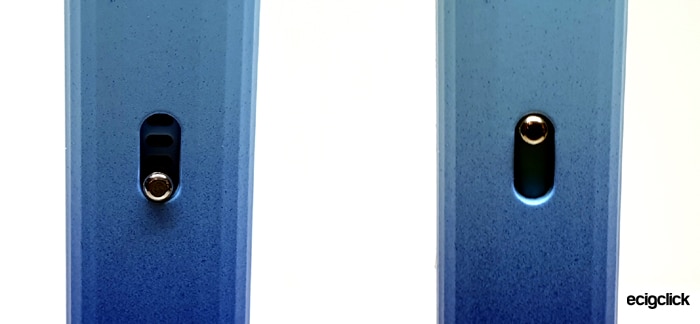
Also the slider knob only protrudes around 1mm which again means this should not get caught in bags or pockets.
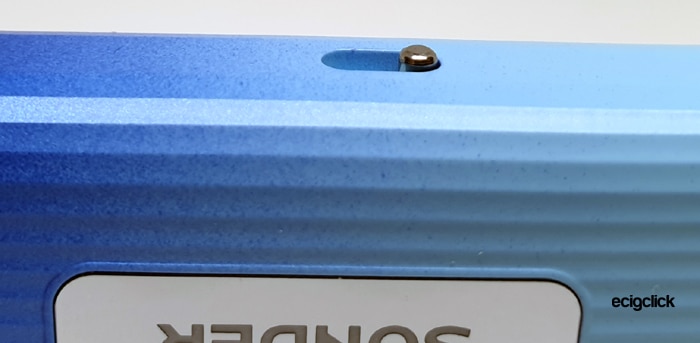
Below the airflow slider is the “Geekvape” text etched in, which on some colours you can only see if tilting the device to the light. So no gaudy branding here.
![]()
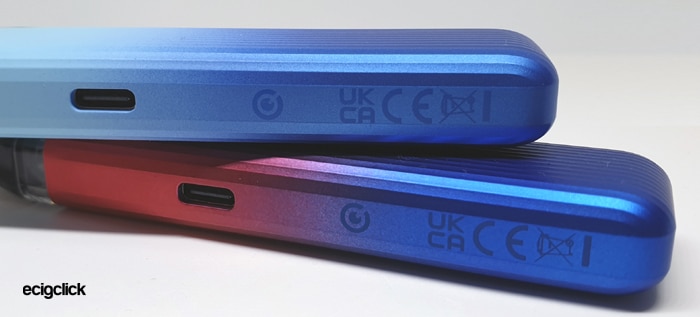
The opposite side hosts the USB Type C port and the etched in legal logos.
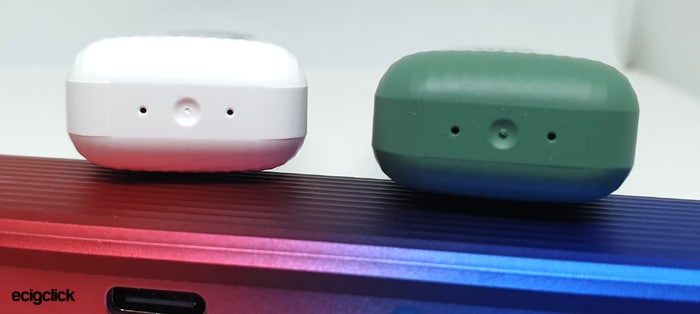
The base is slightly curved so whilst it will stand up, it doesn’t need much persuasion to topple over. There are 2 small holes on the base which must be battery venting as they don’t seem to be connected to the airflow.
Overall the smooth edges and rippled texture make this a comfortable device in the hand.
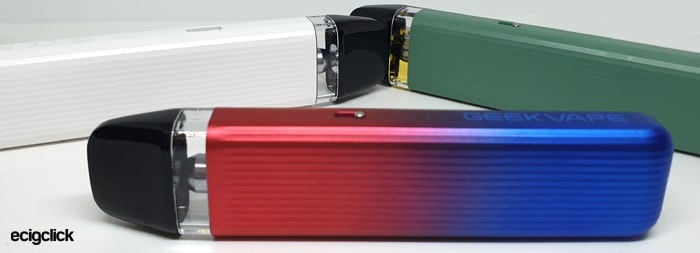
The pod port is very simple with 2 spring loaded connectors which are surrounded by large magnets.
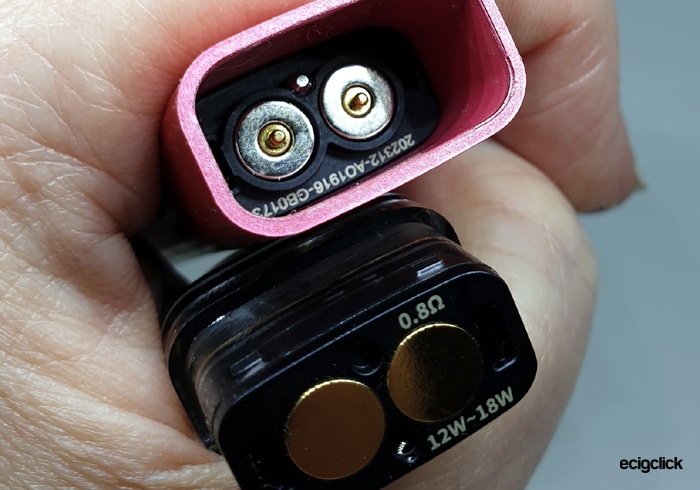
You only have to install the pod half way before the magnets pull it fully home. The pod feels secure yet easy to remove.
Geekvape Q Pod
The pod is basically clear with a Black Plastic mouthpiece.
About a quarter of the pod is concealed by the mouthpiece and another half is not visible when the pod is installed in the mod. So you can only view around a quarter of the contents when in use.
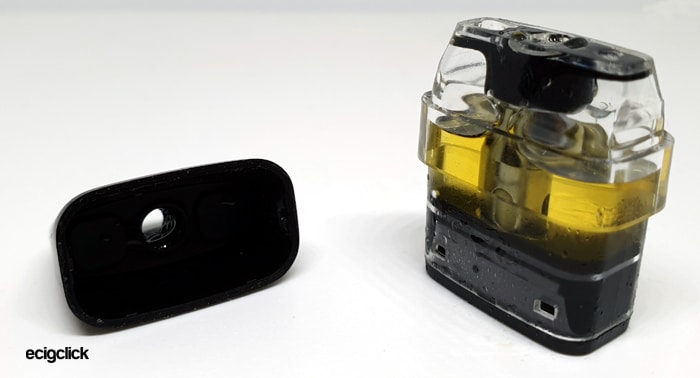
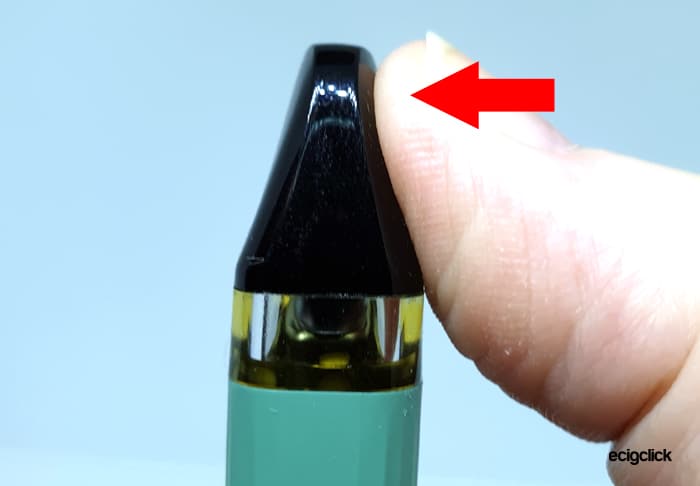
The filling method is a top fill by removing the mouthpiece section. You simply push it across and it will pop off. I usually hate this style of filling (often found on the Caliburn kits) as I have dodgy joints in my hands and I end up biting the buggers off.
However this time it is really easy to flip the mouthpiece off and it clicks back in position firmly.
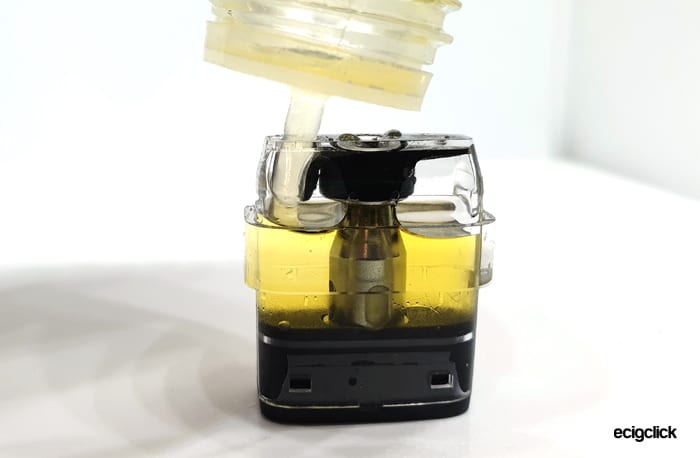
After removing the mouthpiece you are faced with 3 holes on the top of the pod.
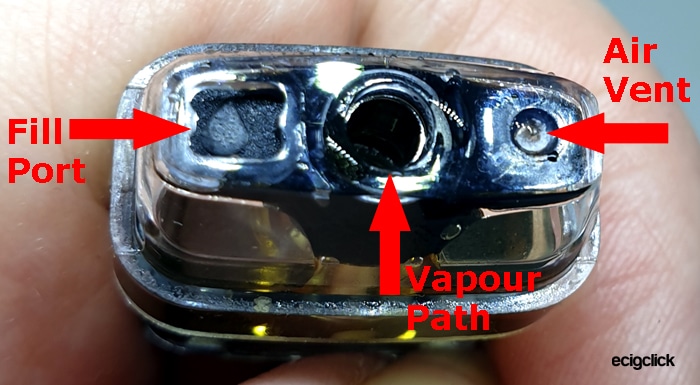
They are the Air Vent, vapour path and fill port.
The air vent port prevents air locks whilst filling. However I am not sure if mine is blocked as I am getting some air pushing out of the fill port.
Never add e-liquid to the centre port as this is the vapour path and any e-liquid in here will result in spitting and gurgling.
The fill port has a black Rubber or Silicone flap and you need to push this down with the bottle nozzle in order to fill. It is like a check valve to prevent liquid escaping.

Therefore you may be restricted by the size of the bottle nozzle you can use as the nozzle does need to enter the port to open the check valve.
The port measures approximately 3x4mm.
There are 2 large contacts on the pod base so you can use it either way around and also there you will find the pod resistance and power limits.
Quick Start Guide
This comes with the pod installed but there are further steps before you can get started.
Most importantly fill the pod first. Then you can remove the isolator sticker from the base of the pod.
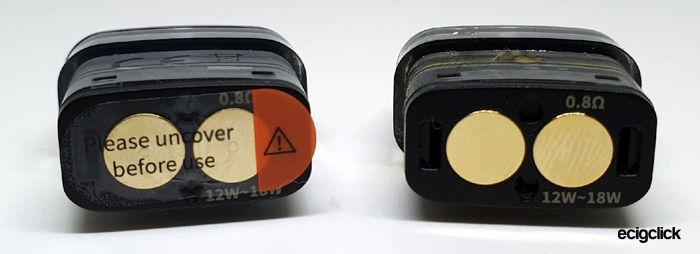
If you remove this before filling and accidentally vape you could burn out the coil and the pod will be fit only for the bin!
Also remember to remove the clear film from the mirror LED area.
Then you can charge up and get started!
Geekvape Sonder Q Basic Operation
- Power On/Off = there is no on / off function. Inhale on the mouthpiece to wake up the device.
- Vaping = This is an auto draw device, so simply inhale on the mouthpiece to vape.
- Battery indicator = when vaping the indicator will light up Green for over 70% charged, Blue for 30-70% and Red for less than 30%.
- Battery indicator when charging = this follows the same pattern as above but the lights will pulse and when fully charged the Green light stays on solidly.
- Adjust airflow = move the slide switch on the side of the mod to increase / decrease the incoming airflow to your preference.
Protections
- Low battery – Red LED will blink 5 times and the device will cut out until recharged.
- Short circuit / too low resistance – Red LED blinks 8 times. Check the pod and device connections, clean connectors. If this does not rectify try a new pod. If fault still occurs the device may be faulty.
- Over time – if you vape for over 10 seconds the Red LED will blink twice and the fire will cut out. Simply stop inhaling and then vape again.
How To Charge The Battery
The charging rate is not specified.
- Using the included USB type C cable, connect the small end into the USB port on the mod.

- Connect the large end of the cable into a suitable USB outlet.
- The LED will display through the colours in a pulsing style.
- When fully charged the LED will stay on Green – not pulsing.
The charging time for me using a 2A mains plug was 1 hour and 15 minutes.
How To Fill the Geekvape Q Pod
- You can leave the pod in the mod when filling.
- Push the mouthpiece off the pod.

- Add e-liquid to the port with the fill flap.

- Watch the e-liquid level through the clear side of the pod.
- Replace the fill port cover firmly.
- If this is the first fill allow the pod to stand for 10-15 mins to allow the e-liquid to soak into the coil. This is called Priming and is a very important step. If not fully primed you could burn the coil out and your throat lining in the process!
How Does the Geekvape Sonder Q Pro Perform?
I used one kit for approximately 10 refills until it started to leak and caused performance issues. So I used a second kit from that point onwards. A third kit was also in use with a friend.
I use my own e-liquid mix which is 50/50 PG/VG made from IVG Bubblegum Concentrate at a 20% concentrate ratio. This is quite high a flavour ratio as I prefer plenty of flavour, but sadly this means it can be a coil killer sometimes.
I add nic salt to approx 6mg strength.
If any of these terms are over your head – have a read of our handy guides below!
- MTL V DTL – A Guide To Vape Styles
- VG and PG in E-liquid – all you need to know
- Beginners guide to E-liquid
- Nic Salt E-liquid
Geekvape 0.8ohm Q Pod
This was the only pod supplied so I can only test this version!
The first few vapes gave me a slight cottony taste, which was not great. However please persevere as this does fade and leave you with a lovely flavour.
If you fully open the airflow the sheer volume of vapour left me pretty stunned – amazing for such a low powered kit!
You get a warm vape which feels like it is coming at you fast with the airflow fully open. However if you close the airflow down fully it almost burns your lips!
An absolute beauty of a vape this is! Very impressed!
I managed 10 refills and the flavour was still epic but leaking sadly meant I had to try another kit.
The second pod at 25 refills is still excellent flavour and no leaks – yay!
Airflow
In a fully closed position this will still fire but you are not getting much vapour as there is very little airflow.
Open this mid-way and things start improving with a slightly open MTL airflow and the flavour starts kicking in.
I found this most efficient in the fully open position where the flavour and vapour really are at their best.
As for the resistance (with 0=fully closed and 10=wide open like breathing) I would rate this as being from 1 to 5 so there is quite a wide range of adjustment.
I would recommend this for MTL and RDL vapers for sure. But I would still stick with a maximum of 60VG e-liquid ratio.
However the 0.6ohm pods might be able to cope with higher VG ratios but I have none of these to try!
Leaks?
Sadly the first kit I tried had a leaky pod. Also the air vent hole seemed to be blocked as I was having trouble filling too.
Possibly the blocked vent may have caused the leak by pressure pushing liquid out of the pod when filling.
This gradually got worse until the liquid got into the device and it began firing on its own. This happened twice. There are protections against this but I didn’t wait for anything to kick in – I just pulled the pod out from the battery!
I moved to another kit as the leak may have damaged internal components.
The second and third kits had no leaks and only a small amount of condensation to report.
Mod Performance
The mod didn’t miss a beat. The auto draw fire is instant regardless of what airflow setting you are using.
I was slightly disappointed by the recharging time of 1 hour 15 minutes, so I am assuming this is only a 1A charge rate which is a shame. A lot of devices now have 2A charging.
As mentioned above the first mod suffered from an e-liquid leak. I wish I had waited to check if any of the protections kicked in, but after experiencing this a lot of times during my reviewing experiences I just automatically pull the pod away from the battery.
The second and third kits suffered no leakage issues.
The power output is pretty stable but you can feel the decrease in power when the LED turns Red. You can keep vaping but the firing time gets shorter and shorter until it stops working completely and you need to charge.
Battery Life
This will always vary depending on the pod resistance and your own vaping habits.
I am a heavy vaper and I averaged around 7 to 8 hours and 5 pod fills between each charge.
Pros
- Easy top fill – I usually dislike this system of filling but the mouthpiece was very easy to remove.
- Very inexpensive – ideal for those wanting to transition from disposable vapes
- Simple to use – despite the poo instructions
- Amazing flavour and vapour
- The LED indicator and mirror finish panel look very classy
- Great airflow adjustment range from super tight MTL to great RDL.
- Excellent battery capacity of 1000mAh
- Am on 25 refills and the flavour is still ace!
Cons
- Leaking pod on first device – e-liquid got inside the mod and caused auto firing briefly. Two other devices were leak free.
- Instructions are a bit rubbish
- Only 1 pod supplied
- Slow charging at 1 hour 15 mins
Final Review Verdict
What a lovely kit! The vaping experience is excellent. Also I love the large battery capacity which means I can happily take this device out and about.
Sadly the leaky pod on the first device I used has reduced the build quality score. It caused the device to auto fire a couple of times which could be dangerous. I didn’t test the safety protections as I was more interested in getting the pod out of the device and quick. This happened twice.
I am not sure if the pod vent hole was blocked on this first kit as I was getting airlocks and this could have pushed e-liquid out from the pod too?
Thankfully another 2 kits were tried and neither suffered from leaks and so far I have got to 25 refills on one kit and the flavour is still excellent.
Plus the other area to be massively impacted on the scores is the ease of use category. This is an easy device to use – there is no doubt. But the crappo instructions could confuse a non vaper or someone only used to disposable vapes. These instructions need improving massively.
Yes the device and kit contents are very basic but when you factor in that this retails for the price of 2 disposable vapes – it can be excused!
If you buy this yourself or for someone else – please guide them to this review to help them to get set up. It is such a shame that people might get confused with how this works as otherwise it is excellent. For instance my late Mom would have been on the phone every 10 minutes asking how to charge it, what the lights mean etc etc. But if the person is used to vaping pod kits this should be pretty instinctive to use.
Please let me know your thoughts and opinions of the Geekvape Sonder Q in the comments below!


I have been vaping since 6/25/15. I actually I know that day, is bc the guy who made a new shop called Doc’s Vape.
That day I went to my out patient addiction, I went to check out Doc what I can find out my 1st times.
I’ve always been 💨 ever since with Geekvape device along GeekVapeZ with a Quadra coil, like I had to get with the kit. I wish that the coils would be lasting longer.
But I know it’s from the sweet Pink & Blue Ejuice.