The OXVA Origin 2 has arrived for me to give it a good going over!
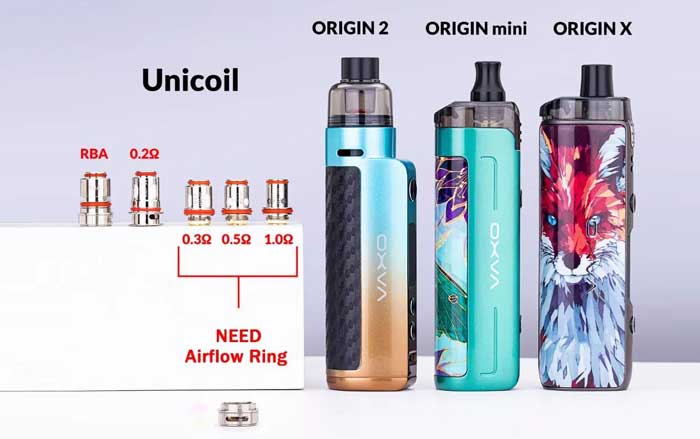
This is another member of the Origin range which also includes the original Origin, Origin X, Origin Mini and the soon to be released Origin SE.
I have only recently been introduced to OXVA with the exceptional Xlim V2 and Xlim SE kits, which I am still using right now. I do hope this kit has the flavour and coil life of my two favourites!
What Can We Expect From The OXVA Origin 2…
This version is all about stunning design and compatibility…

I actually held one of these kits before they were released whilst I was at Vaper Expo 2022, such a co-incidence that one of the kits I received is exactly the same colour!
This is basically a single 18650 pod mod which uses a magnetic pod with a unique connection.
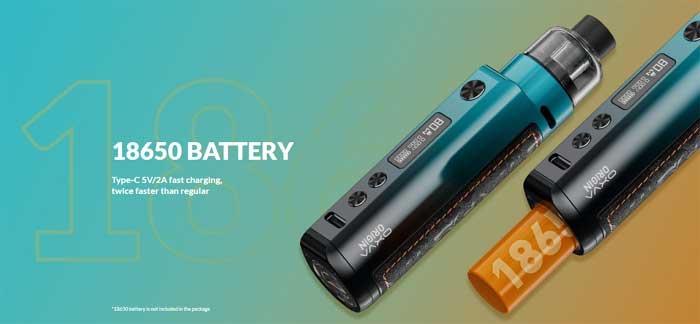
There is a USB Type C port for fast charging at a 2A rate and the output is specified as 5-80W.
You can adjust the wattage and there also seems to be an “intelligent-match system” according to the instructions, which I think is a kind of smart mode – where the device automatically sets the output limits for the coil.
Rotate the pod in the mod body to adjust the incoming airflow!
The compatibility game is strong here – you can use the included Unione Pod Cartridge or the PnM tank found on other OXVA kits.
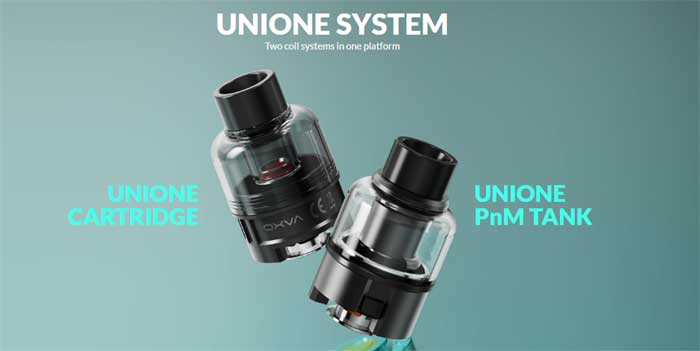
With the ability to use both pods/tanks the coil options increase!
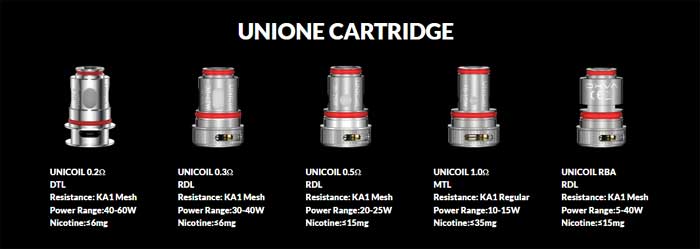
Using the Unione pod cartridge, this is compatible with the whole Unicoil range. The 0.2ohm Unicoil is included in the kit.
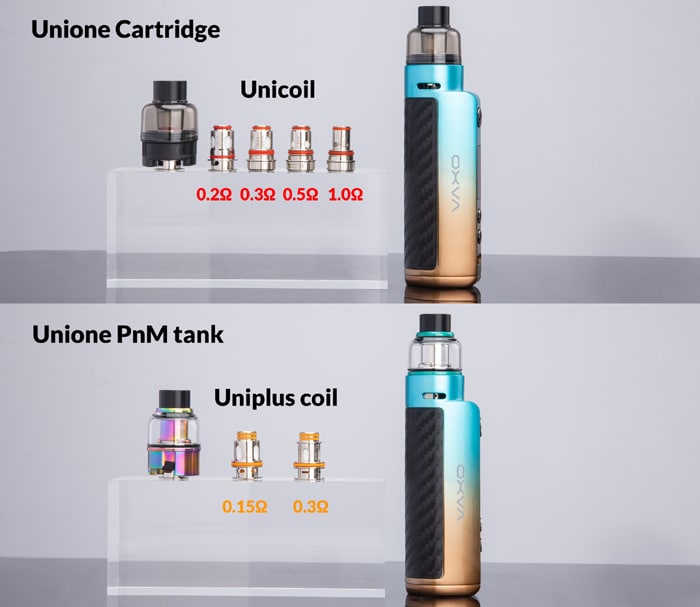
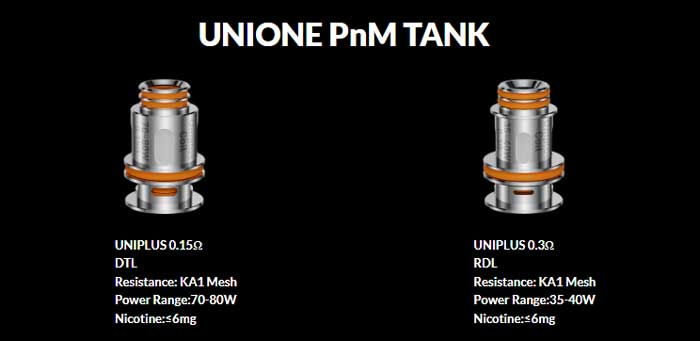
However you can also use the Unione PnM tank on here which is compatible with the Uniplus coil range. This is also found in the Vativ and Unibox kits.
The pod base features the fill port and has a magnetic connection to the mod. In standard form the capacity is 5ml however for TPD regulated areas this is reduced to 2ml.
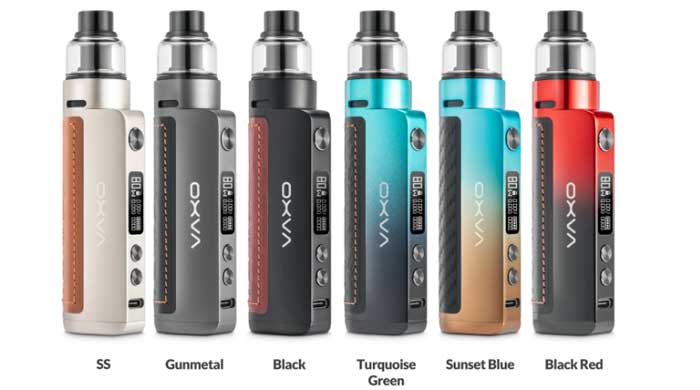
There are 6 colour options to choose from: SS, Gunmetal (under review), Black, Turquoise Green (under review), Sunset Blue and Black Red.
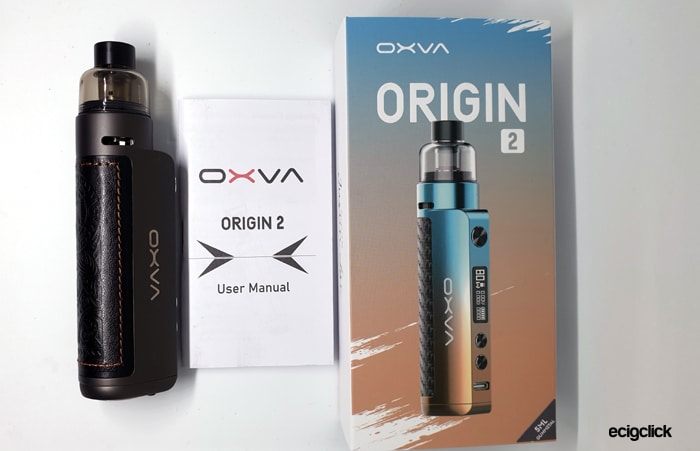
Inside the Box
Later models will include a USB Type C Cable and the 0.3ohm Unicoil (with airflow ring) in addition to the sample kit I received below.
- OXVA Origin 2 mod
- Unione pod
- 0.2ohm Unicoil
- User manual
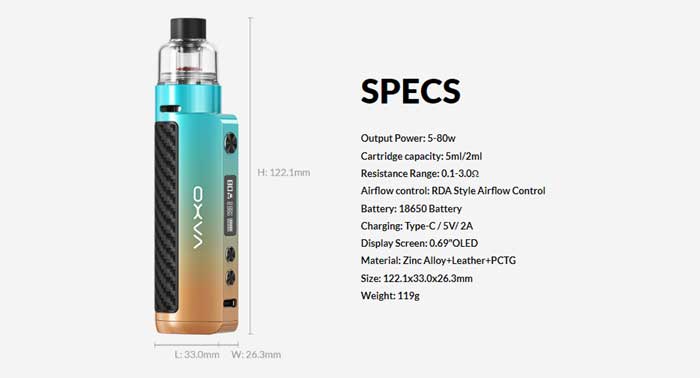
OXVA Origin 2 Kit Specs
- Size: 122x33x26mm
- Output: 5-80W
- Modes: VW
- Battery: 1×18650 (not included)
- Display: 0.69in OLED screen
- Resistance range: 0.1-3ohm
- USB Type C – 2A charge rate
- Pods: Refillable, removable coils – compatible with Unione PnM tank
- Capacity: 5ml (Standard) / 2ml (TPD)
- Coils: Unicoil & Uniplus (with Unione PnM Tank) compatible
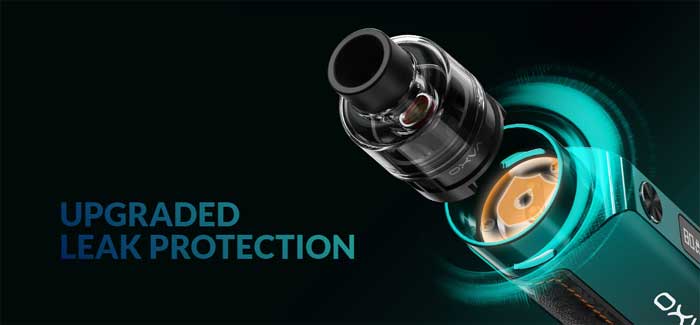
- Upgraded leak protection
- Adjustable airflow
OXVA Origin 2 Design and Build Quality
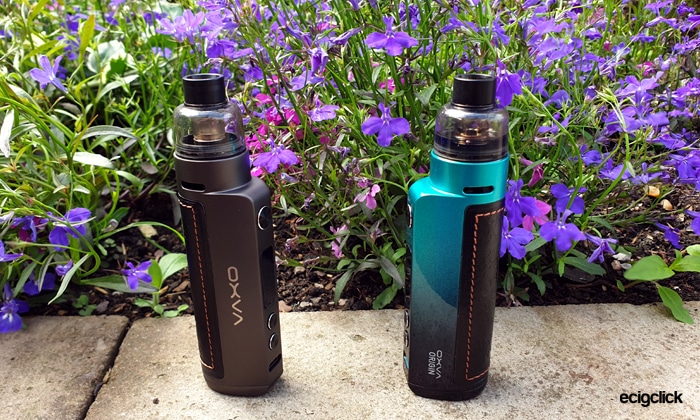
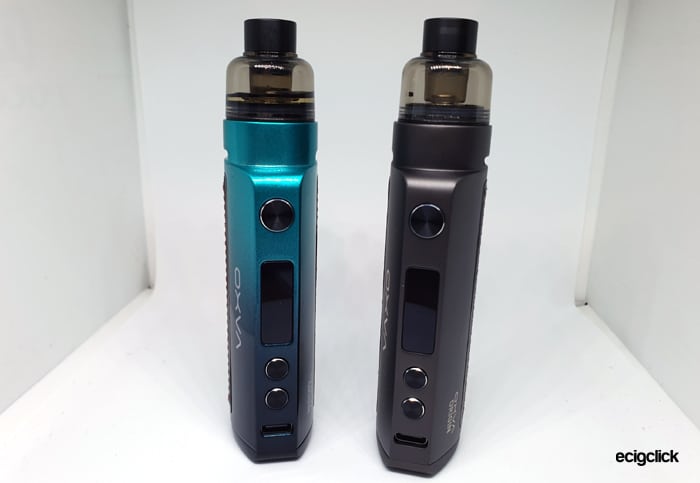
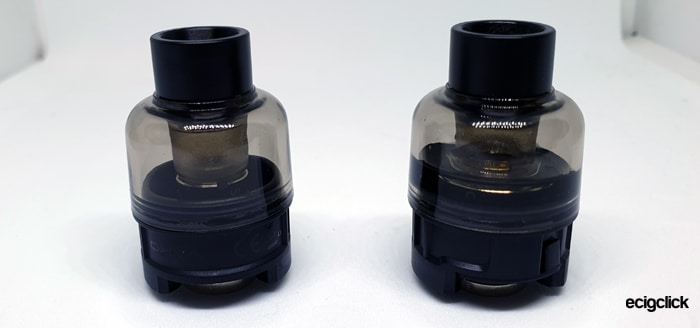
I received the kits in the Turquoise Green and Gunmetal colours. It is also worth noting I have received sample kits with the standard 5ml capacity. You may only be able to purchase the 2ml TPD friendly kit in the UK.
I also received a pack of a variety of coils (Unicoil Family Kit) containing the 0.2ohm, 0.3ohm, 0.5ohm and 1ohm Unicoils. I will also add these to the review. Being a mainly MTL vaper I am looking forward to trying the higher resistance coils too!
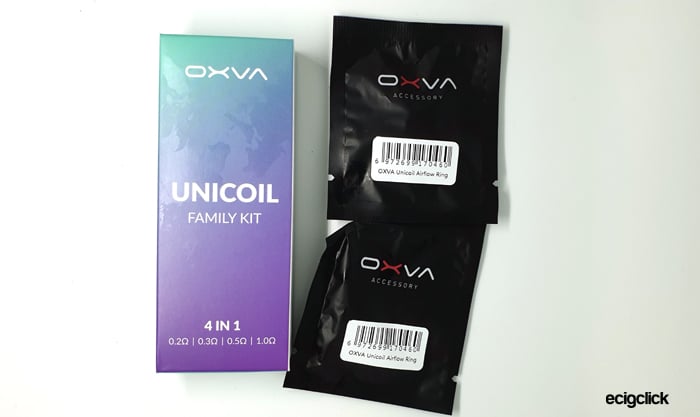
Plus OXVA sent me some airflow control rings – which are needed for the 0.3ohm, 0.5ohm and 1ohm coils.
I haven’t got the Unione PnM tank but we have reviewed it previously in the OXVA Vativ Kit.
The packaging is simple but effective, a cardboard outer sleeve, which then reveals a sturdy Black lidded box. On the side of the box is the signature of “Justin Lai” who is the CEO of OXVA. He was previously the CEO of Geekvape and was involved in the design of the Aegis and Zeus ranges.
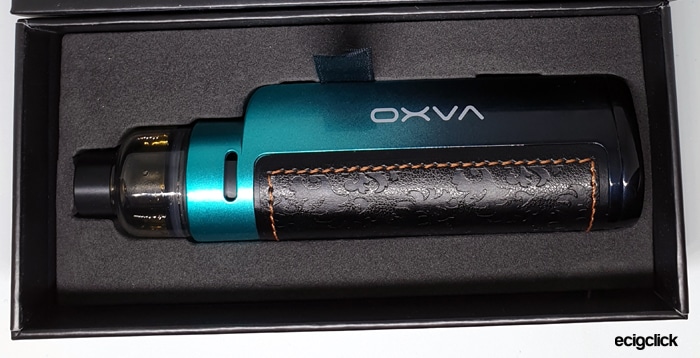
Only 1 coil is included and no USB cable so the top tier of the box is just the mod and tank with coil installed.
Below this are the instructions. The instructions are OK, with 5 pages per language but a few times it didn’t have the information I was looking for.

OXVA Origin 2 Mod
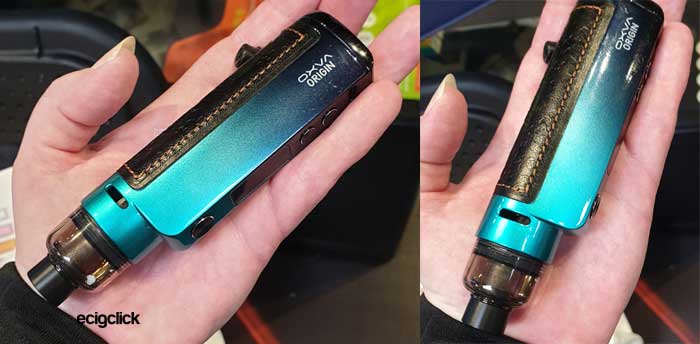
This is absolutely beautiful but a lot smaller than I was expecting!
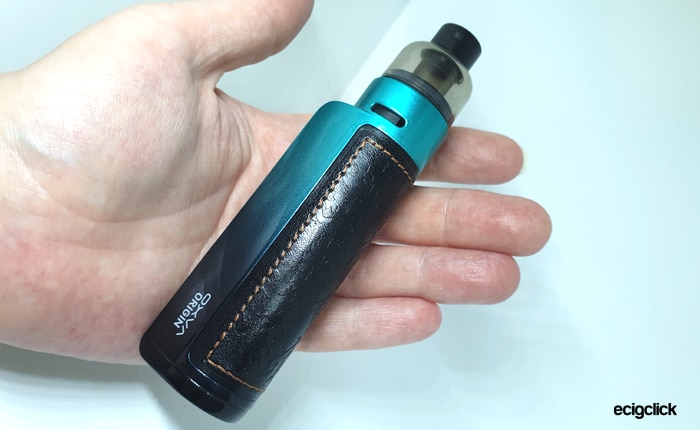
The Turquoise Green version has a lovely metallic finish which starts as a beautiful Green and turns darker as you get to the base of the mod.
On each side of the mod is the branding in Matt White – OXVA and OXVA Origin.
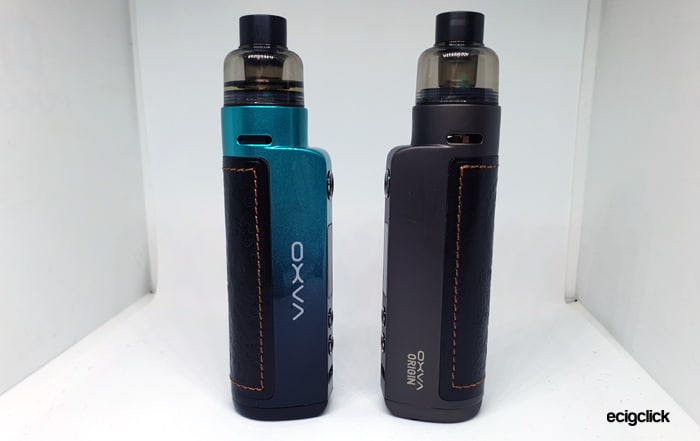
Whereas the Gunmetal version has more of a matt finish with the OXVA branding in a Metallic Silver colour.
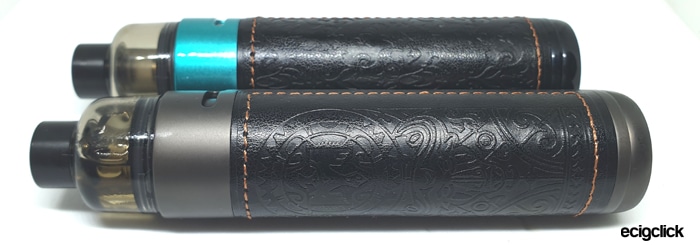
The mod profile is kind of an elongated oval shape with one flat side where the screen and controls live.
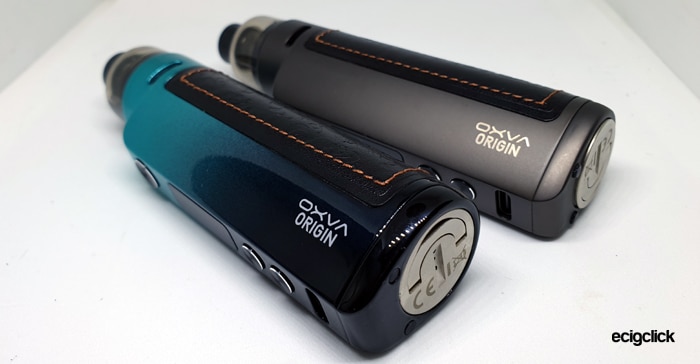
On the rear of the mod is a Leather grip section with neat Orange stitching. The pattern embossed on the leather is different on each of my mods.
With a battery installed this is slightly heavy but it all feels in proportion when you have 5ml of e-liquid in the tank. If the mod was any lighter the tank would be top heavy.

All in all this is a stunning looking device and build quality is 10/10.
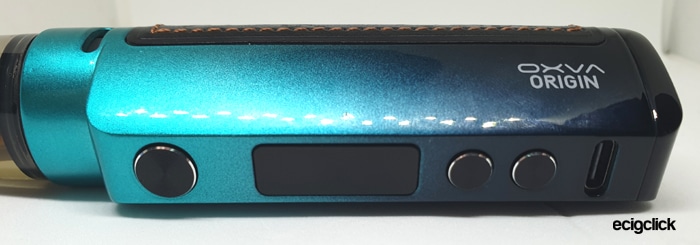
Screen & Controls
This has a 0.69in single colour OLED screen which is clear and bright, but a slightly bigger screen would be nice. Some of the text is crammed in a bit.
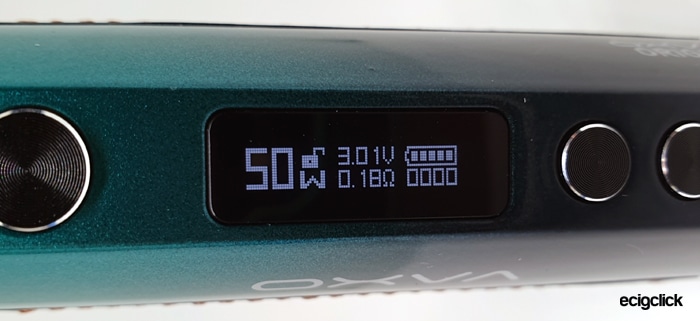
On the left side of the screen is your wattage and to the right of that is the padlock symbol to display the lock status.
In the middle the top row gives you the voltage of your battery with the coil resistance displayed underneath.
On the right of the screen is the battery charge icon (but no percentage figure sadly) and the puff counter.
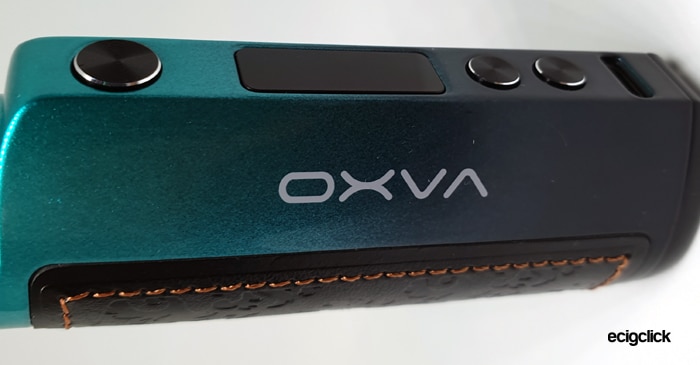
Above the screen is the circular Fire button which has a circular engraving and the adjustment buttons whilst being smaller have the same finish.
Below the adjustment buttons is the USB Type C port which I have tested and it works perfectly.
Airflow Adjustment
To adjust the airflow with this kit there are two options.
For the 0.2ohm Unicoil (included in kit) you rotate the pod whilst it is installed in the mod to open or close the airflow inlet slots on the mod.
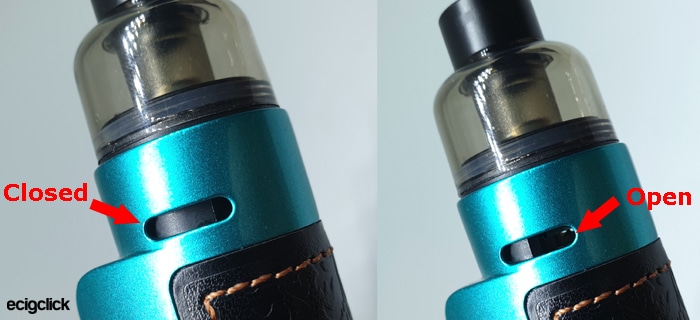
The base of the pod has cut out sections which open the airflow and when you rotate it the closed sections shut off the inlet.
If you are using any of the other Unicoils they have an airflow adjustment ring on the coil base. You can adjust the airflow here to your preference.
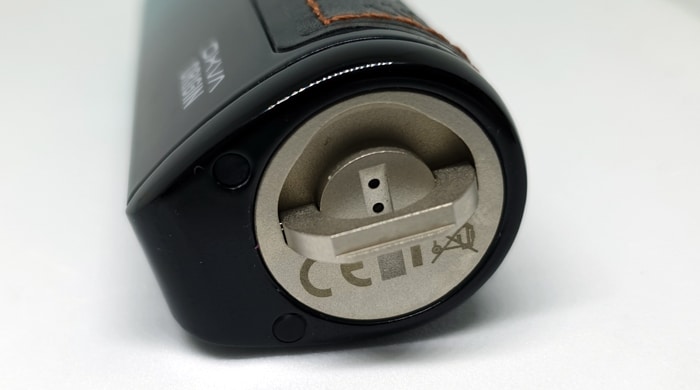
Battery Compartment
This is a bit fiddly but luckily OXVA have given the screw off battery cap a lift up handle.
The handle is small so it’s only grabbable between your thumb and finger but it does do the job.
If you are struggling to remove the cap after tightening it too much, you can put a screwdriver blade or similar through the handle and use that to unscrew. Also a clever slot allows you to use a coin to unscrew the cap.
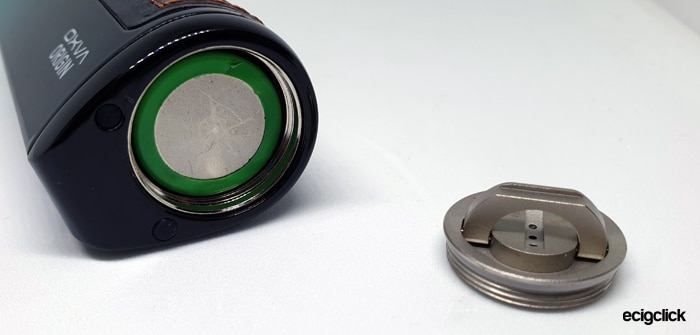
The threads are slightly crunchy but not alarmingly so and screwing the cap on doesn’t need any pressure so just let it find its own way.

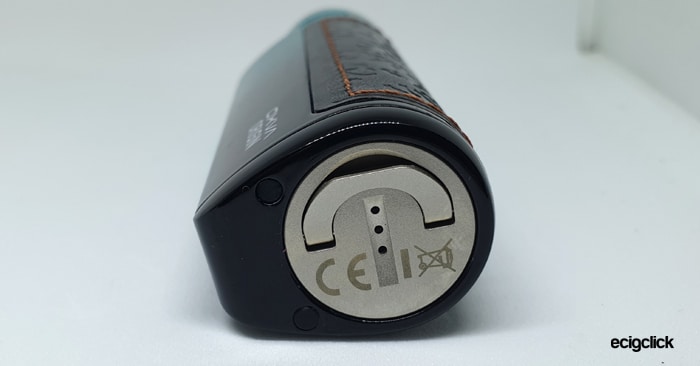
Inside the mod is the Red “+” sign for the positive end of the battery and the rear of the cover has a “-” for the negative end.
Engraved on the cap are the required legal logos and 3 vent holes are provided.
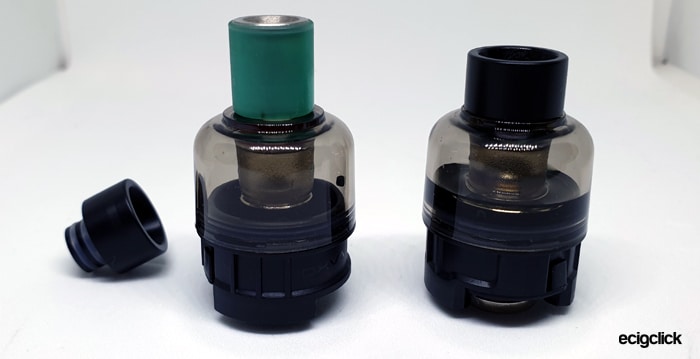
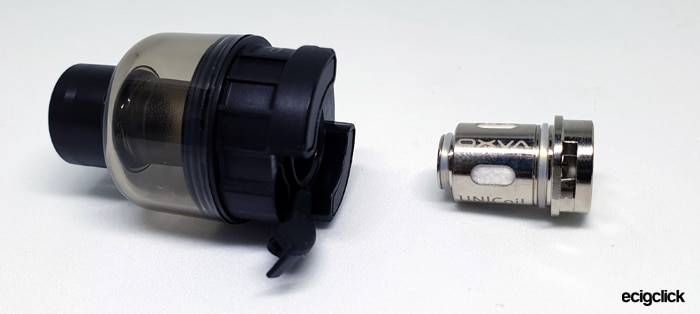
Unione Pod Cartridge
The pod has a lovely smooth design with a slight tint but still clear enough to see your e-liquid level.
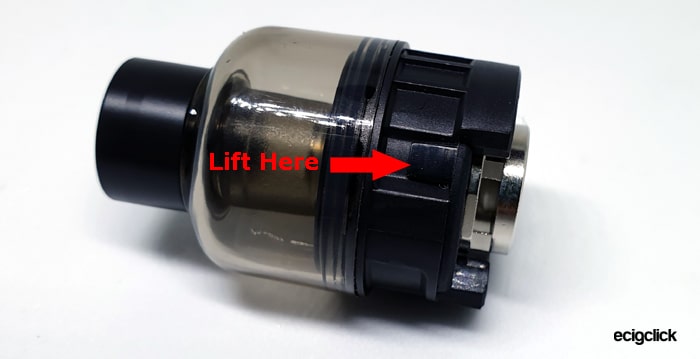
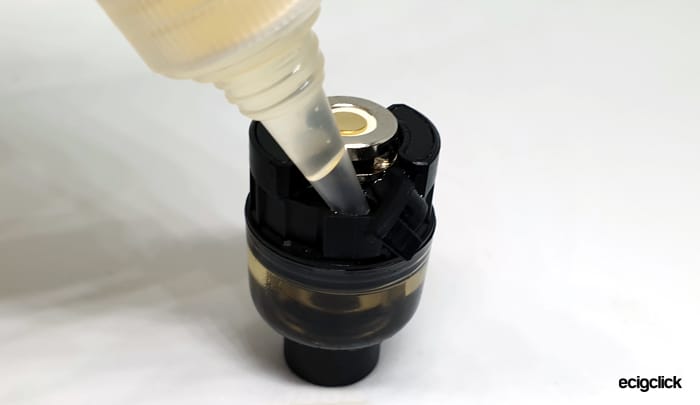
Unfortunately the fill port is on the base and it is a bit fiddly.
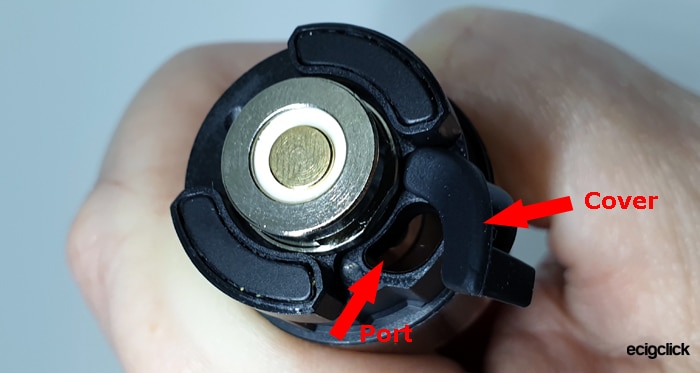
You have a very small tab to put a fingernail into to then lift up the port cover. The cover will not rotate out of the way which is a bit annoying. Also when you close the cover make sure all the lumps sit firmly inside the fill port.
The fill port is a decent size measuring approx 6mm by 4mm at the widest point. I did find one of the spouts on my e-liquid bottles was too thick to fit into the port, but other bottles I had no issues.
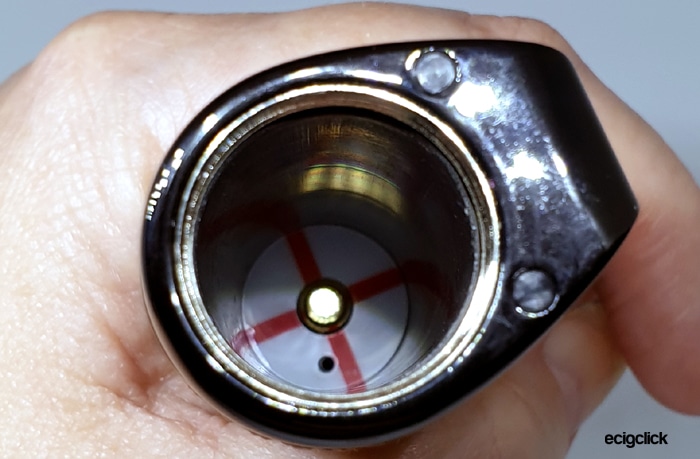
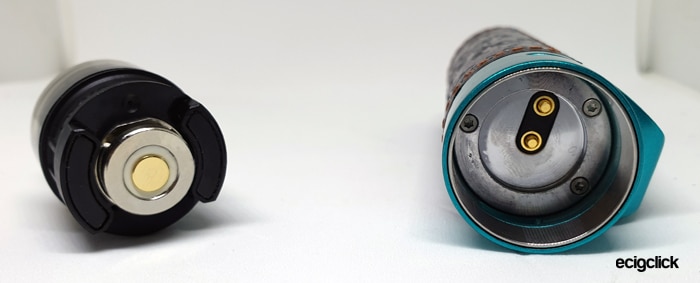
A simple push and pull takes care of coil installation and removal and it doesn’t matter how the coil is oriented it will fit in any way as the contacts in the mod will always connect.
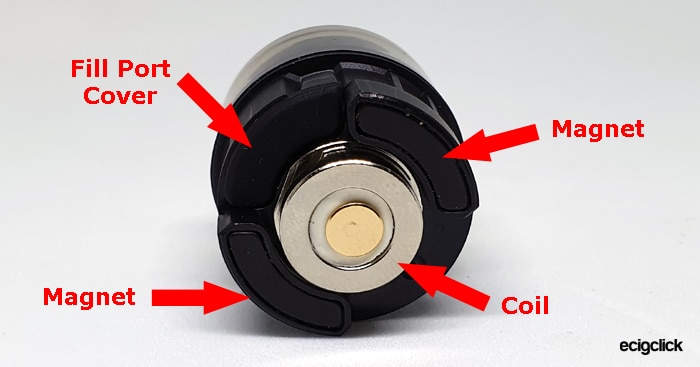
On the base of the pod the coil base makes contact with the two spring loaded contacts in the mod. Two large magnets ensure the pod stays firmly in place – these magnets are attracted to the metal pod compartment on the mod. You can shake the mod and the pod still stays in position without any wobble.
You can remove the drip tip and I found that a standard 510 drip tip with O-rings fits perfectly if you do want to change it.
The position of the pod in the mod determines the airflow. If you rotate the pod you will see the airflow inlet open or close. Bear in mind when you remove the pod for filling etc. the position you replace it may need adjusting to set your airflow.
Quick Start Guide
The kit comes with the 0.2ohm Unicoil installed.
You will need to fill the pod, install a battery and away you go!
I will hold your hand through the whole process with the instructions below!
Basic Operation
- Power On/Off = press the fire button 5 times quickly.
- Vaping = press the fire button to vape. It will cut off after 8 seconds.
- Adjust wattage = use the up and down adjustment buttons.
- New coil? = when replacing the pod the mod will ask if a new coil is installed. Use the down adjustment button to select “yes” or the up adjustment button to select “no”.
- Lock / unlock fire button = press the fire button 3 times quickly to toggle the lock on or off.
- Lock / unlock adjustment buttons = press the + and – at the same time to toggle the lock on or off.
- What wattage should I select? = If you are unsure as to what output to select, a range is printed on the actual coil or the OXVA website. I have also included a graphic to show the coil range and the recommended power limits.


- Airflow = to adjust the incoming airflow rotate the pod in the mod to open / close the airflow inlets.

- Clear puff counter = press the fire button and – (down) button at the same time.
Protections
As this has a screen when a protection kicks in the screen will tell you the following:
- Battery Low – time to charge the battery – the voltage has dropped below 3.3V.
- No atomiser – the coil or pod is not installed. If they are check all the contact areas.
- Short – a short circuit has been detected, check all the contact areas, replace coil. If this doesn’t clear the fault the device is faulty.
- Time Out – if the fire button has been held down for more than 8 seconds this warning will display and the fire operation will cut out to prevent damage.
- Temp Too Hot – device has overheated, allow it to cool down before use.
- Power Locked – fire button is locked – press 3 times to unlock.
- Wattage Locked – adjustment buttons are locked – press them down together to unlock.
- New Coil? – The device wants to know if a new coil has been installed.
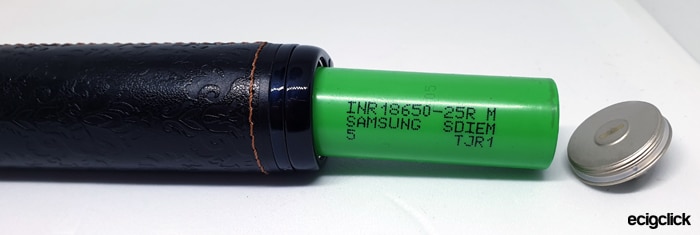
How To Install The Battery
Make sure to use a good quality battery in good condition.
We tell you more in our Guide To Batteries – but basically you want no tears or damage to the outer cover (wrap) of the battery, and check for damage or bulges in the battery itself. Anything you are not sure of I would use another battery to be on the safe side.
- Turn the mod upside down.
- Lift up the small handle on the battery cover.

- Unscrew cover anti-clockwise.
- Install battery with the positive end into the mod.

- Replace the battery cover.
How To Fill the Pod
- Remove the pod from the mod.
- Turn the pod upside down.

- Lift up the fill port cover.
- Fill the pod whilst watching the e-liquid level.

- Replace the port cover firmly.
- If a new coil or for first time use, leave the pod to stand for 10-15 minutes to allow the coil to absorb e-liquid.
- Replace the pod in the mod.
How To Replace The Coil
- Remove the pod from the mod.
- Turn the pod upside down.
- Pull the coil out from the pod.

- Push a new coil fully into the pod.
- Fill the pod and replace back on the mod.
If you are using the 0.3, 0.5 or 1ohm coils you will need to install the coil base airflow ring. Do not chuck this in the bin – remember to remove it. You can buy just the ring on its own, but you will be stuck until it arrives.
OXVA Origin 2 Performance
The 0.2ohm included coil is for a Direct to Lung (DTL) vape therefore I am using thicker (Higher VG) e-liquid in here with less nicotine.
I am using the Dispergo Fizzle Drips – Cherry and Strawberry Fizz for the 0.2ohm coil. It is a 70/30 VG/PG mix ratio with 3mg of Nic Salt added.
For the 0.3ohm and the 0.5ohm coils I am using IVG Bubblegum which is also 70% VG.
For the 0.5ohm and 1ohm coils I will be using my own 50/50 VG/PG e-liquid which is based on the IVG Bubblegum Concentrate at a 20% flavour ratio with 6mg Nic salt. I will be testing to see if these coils are capable of a fulfilling MTL vape.
In the kit you will only get the 0.2ohm coil, but as OXVA were so kind to send me the others in the range I might as well review them too! I have not added the score for the extra coils to the final score as they are not part of the standard kit.
0.2ohm Coil Performance
This is rated at 55-60W, the mod automatically set the initial output to 56W which seems fine by me!
At this level the vapour is incredible – much more than you would expect from a weeny pod kit at 56W!
The flavour is clear but already the vape feels really hot to me, perhaps it’s because I am used to 15W on an 0.8ohm MTL coil!
At 60W the flavour is stronger but a bit too hot for my liking. The short height of the pod means your lips are close to the coil and you can feel that heat!
I don’t usually like using coils at a power output lower than the recommended but I found using this at 50W was much more comfortable for me. Even at 45W it was hot! If the pod was taller like a tank then 60W would be a breeze – but at this height it was like trying to kiss an electric hob.
Opening and closing the airflow makes little difference to the heat this is chucking out!
This coil is ideal for those who love the clouds and love a really hot vape. I like something a little bit calmer, but that is not the fault of OXVA as this device is doing exactly what it should be!
It is a solid 9/10 for performance from me!
0.3ohm Coil Performance
This is rated at 30-40W. The mod automatically set the power to 35W so this seemed a good place to start!
Instantly I prefer this coil, it is a lot more “tame”! It is super strong for flavour but without feeling red hot.
If I was a DTL vaper this is 100% the coil I would choose. Strong 10/10 for flavour easily!
It was almost like drinking the e-liquid (don’t do that OK) the flavour purity is fantastic!
0.5ohm Coil Performance
This is rated at 20-25W and the mod set itself to 23W which sounds good to me!
You can feel the difference in power instantly. This is a lot weaker in flavour and heat.
Even so I am still getting some flavour but not a lot of vapour. I then tried this with my 50/50 e-liquid as it might be calm enough for MTL vaping.
For DTL vaping you won’t be impressed.
I closed off the coil base airflow to about 1/3 open to see if I can get a good MTL vape.
In fact the airflow is pretty tight even at this setting!
The vape does feel warmer with this e-liquid and with the tight airflow I am getting a good MTL performance. The flavour is muted though and with long inhales there is a lot of heat hitting my lips. Due to the heat generated I didn’t wish to increase the power to this coil.
This is the weakest coil of the range for me as it’s not particularly satisfying for either MTL or DTL vaping with the flavour being only decent. For example I get a much better flavour from my Oxva Xlim V2 0.8ohm pod at 16W.
1ohm Coil Performance
This is rated at 10-15W and the mod decided 12W was a great place to start so I went along with it.
Again the airflow is tighter with this coil, I set the coil base airflow to 1/2 open and turned the pod until the main airflow was also 1/2 open and got a perfect tight MTL.
The flavour is not amazing though, even at 14W it is not a patch on the Oxva Xlim 0.8ohm pods which I still prefer. I am a bit sad about this as I really wanted this coil to be excellent so I could use this as a replacement for my Xlim pods for out and about with a bigger battery but sadly it is not to be.
Even saying that though, it has a lot more flavour than a lot of kits I have tried and as a MTL device the versatile airflow really works to give a perfect restriction.
Airflow
This is different depending on the coil installed.
The 0.2ohm coil uses the airflow inlets located on the mod and you simply rotate the pod to open or close the inlets. Fully closed off there is a small amount of air still getting through. Fully open there is very little restriction. So it can be adjusted from a restricted to open DTL vape. With this coil there is a huge amount of airflow adjustment!

For all the other coils there is an airflow ring which fits on the base of the coil in addition to the inlets on the mod.
With this it depends on how you set the coil base airflow ring. If you set it below half open – then rotating the pod makes little difference other than cutting the airflow off totally.
If you set the coil base airflow to almost fully open then rotating the pod does make a lot more difference. I found it took a lot of messing about to get the airflow I wanted as I had to try lots of different combinations of both airflow settings. Plus every time you change the coil base adjustment you have to click to tell the mod a new coil is installed – yeh annoying.
It is hard to judge the airflow range with the coil base ring coils as there is such a variation, but keep playing and you will find the perfect setting.
I got a nice tight MTL setting with the 0.5ohm and 1ohm coils by using the coil base ring in a 1/3 or 1/2 closed position.
Does It Leak?
I did experience one big leak, I had left the kit standing unused for about a week and found the contents of the pod running through the airflow holes in the mod.
I am not sure what caused this as in use I had zero leaks. So I assume I didn’t replace the fill port cover properly or coil wasn’t fully pushed in as this did not happen again.
Mod Performance
One annoying thing about this kit is the bottom fill port on the pod. Whenever you remove the pod to fill, the mod asks if you have installed a new coil. You must respond before it will fire. Plus it doesn’t tell you which button to press, I have found pressing the down adjustment button will answer yes. If you press the up adjustment button the power level stays the same even if a different resistance coil, which could be a bit nasty.
The fire operation was super quick, it seemed to fire and get the coil warm quicker than I expected it to!
I had no issues with the adjustment buttons and being able to lock them independently from the fire button was so useful.
Although you should really charge batteries with an external charger, I did test the USB port and it worked well. I found it charged my Samsung 25R in bang on 1 hour.
Battery Life
This will all depend on your own vaping habits, coil installed and output level selected.
I used a Samsung 25R battery with a 2500mAh capacity.
But to give you a rough idea using this with the 0.2ohm coil at 50W – I got 4 hours 45 minutes and 165 puffs.
Pros
- Beautiful looking device
- Clear and informative screen
- Excellent build quality
- Airflow adjustment range is huge
- Little details such as the handle and slot on the battery cap make life easier
- Replaceable drip tip
- Clear view of e-liquid level
- Feels very powerful, the 0.2ohm coil kicks out the vapour and heat.
- 0.3ohm coil (not included) is tamer but the flavour is the purest I have ever tried!
- Excellent clean flavour.
- If using other coils with the coil airflow ring it is possible to get MTL and DTL airflows!
Cons
- Bottom fill port which is a bit fiddly
- The screen information is slightly cramped and no battery % displayed
- Every time you remove pod to refill – mod asks if “new coil installed”
- As the bottom half of the pod is black it is hard to see if you have filled it fully.
- 0.2ohm coil is very thirsty – 4.5 refills (22.5ml) to one battery charge
- Swapping the airflow ring from old coils is messy – but this is not applicable to the 0.2ohm coil included in the kit.
OXVA Origin 2 – Final Review Verdict
This kit is not perfect, the main issues all stem from that bottom fill port on the pod. It is fiddly to open, annoying to keep removing the pod and even worse the mod asks if there is a new coil every time. Plus some bottles are awkward to get the filler nozzle into the port.
But those niggles aside what a brilliant kit. The power you get with the 0.2ohm coil would make you think this was a dual battery mod with a huge sub ohm tank on the top! It is surprisingly forceful! The heat you get from that coil coupled with the epic vapour and flavour really blew me away. Sadly I am a bit too much of a wuss for that coil!
Don’t forget you can use other coils in here, my personal highlight was the 0.3ohm, slightly less harsh than the included 0.2ohm and the flavour was as clear as if I was drinking the e-liquid honestly – it is that good!
It is possible to get a good MTL tight airflow too when setting the coil base airflow to a more closed setting. This worked OK on the 0.5ohm coil but did kick out a lot of heat which made it a slightly uncomfortable vape with long inhales. The 1ohm coil performance was decent too and again the versatile airflow allowed me an excellent MTL vape.
Have you tried the OXVA Origin 2 kit? Let me know what you think in the comments below!


