The Smok RPM 4 is the latest release in the RPM range of pod devices.
So far we have had the RPM40, RPM80 Pro, RPM Lite, RPM2, RPM2S and the massive RPM160 kits!
I have only used the RPM Lite so I have no idea what to expect from this kit!
Ooh goody – once I saw the box I was dying to get stuck in!
What Can We Expect From The Smok RPM 4?
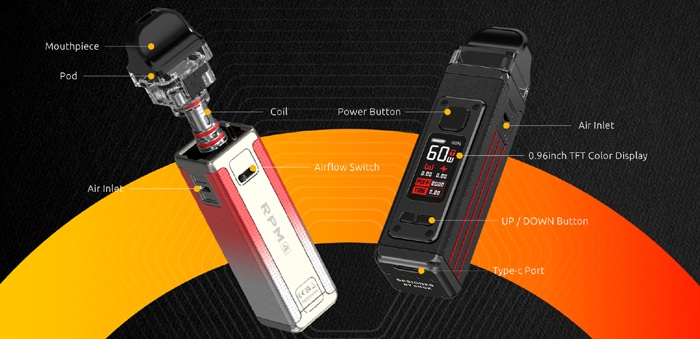
Following on from the rest of the range you can see the styling is very similar plus a 0.96in colour TFT screen with different themes to choose from.
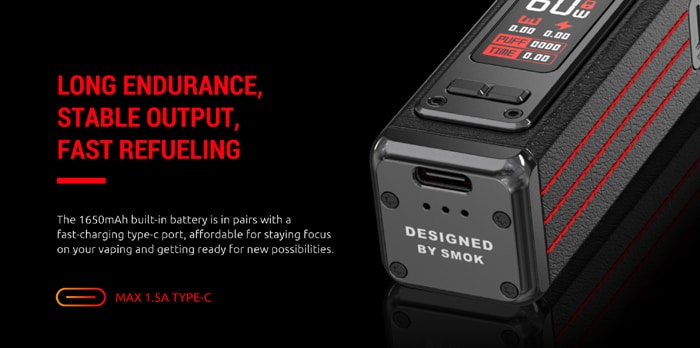
Inside the mod is a 1650mAh battery which is recharged via the USB Type C port at a fast 1.5A charge rate.
The output is variable and you can select anywhere between 5-60W.
A new and welcome addition is the airflow slider switch to tailor the airflow to your preference and the coil you have installed.
Plus the pods have been designed to give a clear view of your e-liquid level and are held into the mod magnetically.
There are 10 colour options to choose from in 2 ranges…
Regular Range: Black, Pale Champagne, Rose Gold, Silver Red, Silver Blue and Cyan Pink
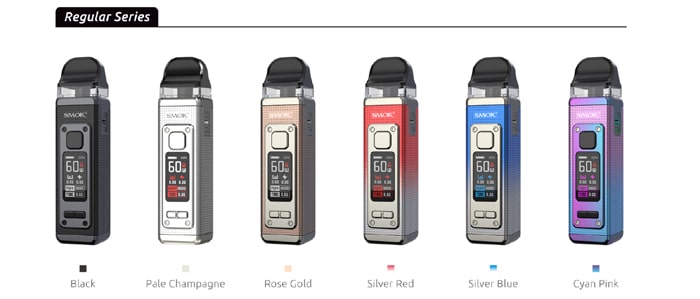
Leather Range: Black Leather, Red Leather, Blue Leather and Brown Leather.
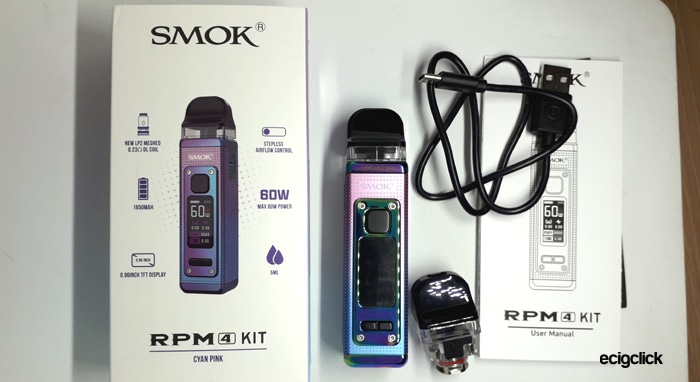
Inside the Box
- RPM 4 mod
- LP2 RPM 4 pod (LP2 Meshed 0.23ohm coil installed)
- RPM pod (RPM Meshed 0.4ohm coil installed)
- Type C USB cable
- User manual
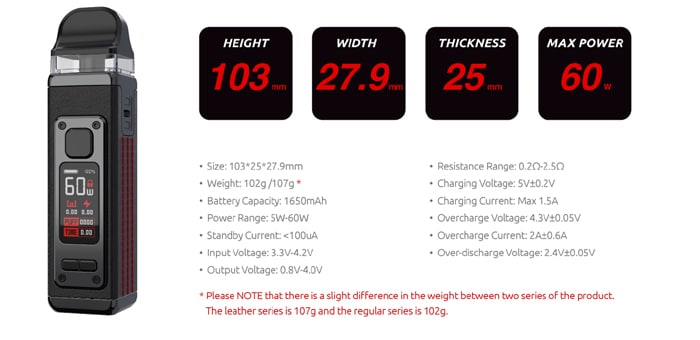
Smok RPM 4 Kit Specs
- Size: 103×27.9x25mm
- Output: 5-60W
- Battery: 1650mAh (internal)
- Display: 0.96in colour TFT screen
- Resistance range: 0.2-2.5ohm
- E-liquid capacity: 5ml (standard) / 2ml (EU TPD version)
- USB Type C – 1.5A charge rate
- Pods: Refillable replaceable coils
- Coils: LP2 coils (with LP2 pod) , RPM coils (with RPM pod)
- Adjustable airflow
- Side fill port
- Magnetic pod connection
- E-liquid viewing window
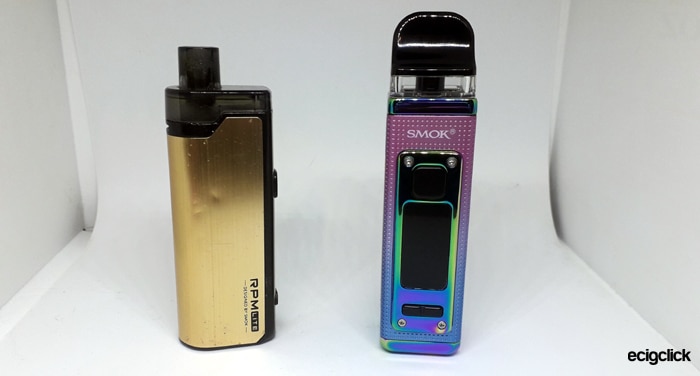
Smok RPM 4 Design and Build Quality
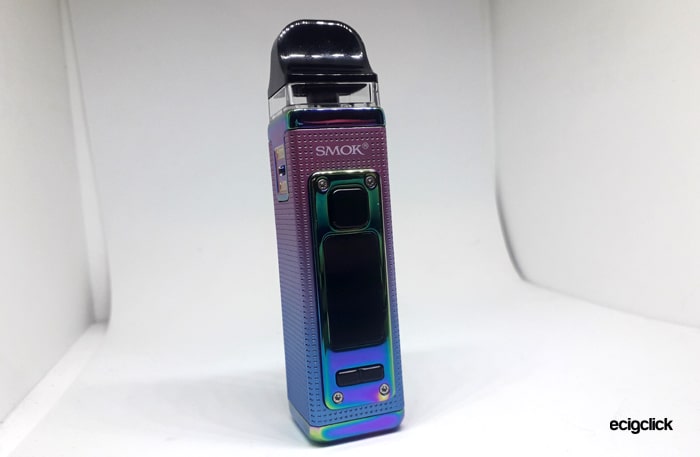
I received the Smok RPM 4 in the best colour there is – Cyan Pink!
If I could choose any in the line-up this would have been the one – so I am over the moon!
The packaging is perfect and everything arrived in sparkly condition.
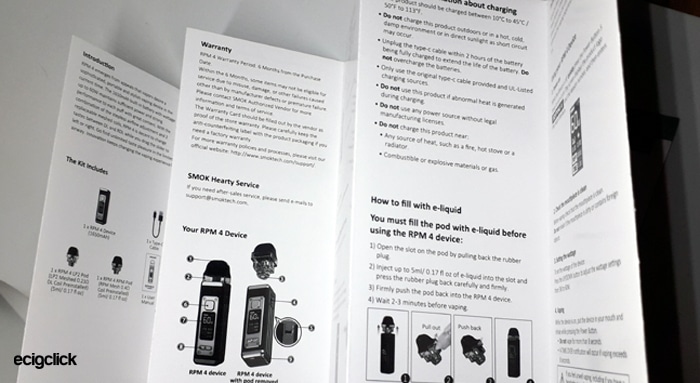
Even the instruction booklet is great – all these pages (both sides printed) are in English language only – so you can see how comprehensive the instructions are!
In some kits a booklet this size caters for all the languages ever known to man with only 3 sentences for each language – Bravo Smok!
On slight downside is quite a short USB Type C cable at 50cm long – but I have seen a lot shorter so this is still ok-ish.
Smok RPM 4 Mod
Just WOW! I can hardly express how beautiful this device is!
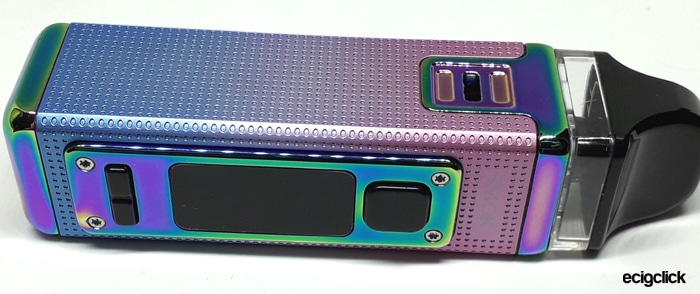
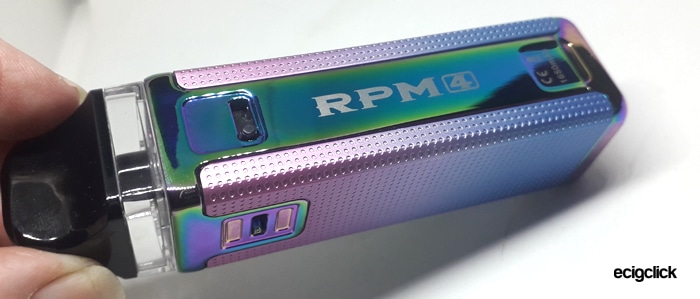
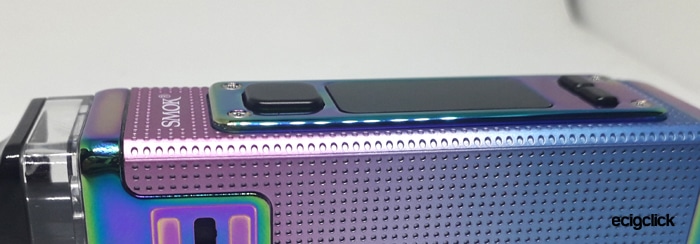
The main body has a metallic feel with small indents as a pattern to give texture.
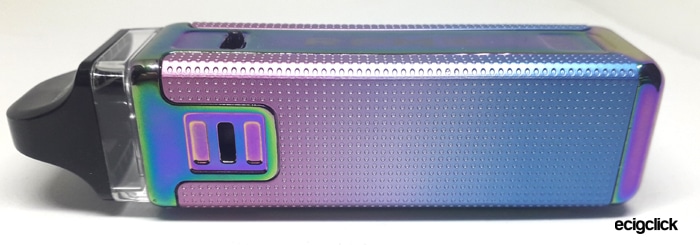
The colour at the base starts at a Cyan blue metallic and gently fades into a really pretty metallic pink – Absolutely stunning.
Even better than the main body finish are the trim panels!
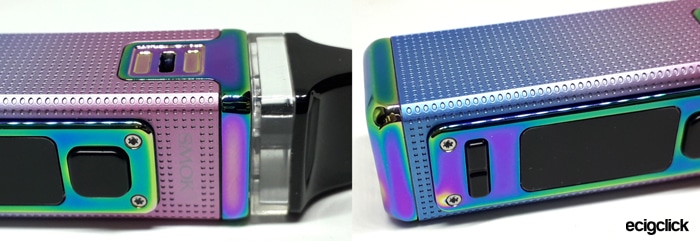
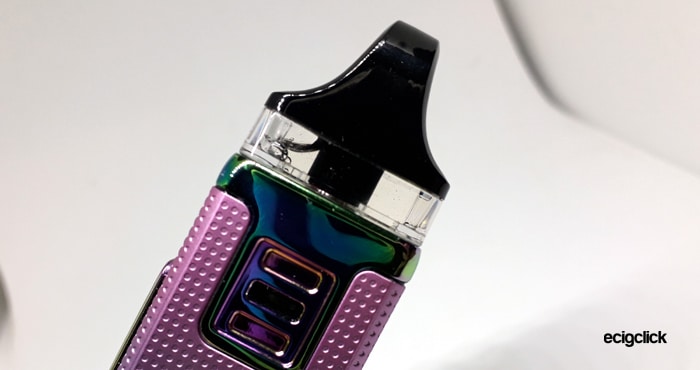
These are a highly polished beautiful rainbow metal finish and are found on the base of the mod, the front control panel, around the 2 side airflow inlets and a panel on the rear of the mod.
The colour change is perfect and just makes this mod shine with beauty.
All the fittings and connectors feel absolute top quality – not a wonky or wobbly bit in sight.
A Small “Smok” logo is on the front of the mod and on the rear rainbow panel is the RPM 4 logo and CE markings etc.
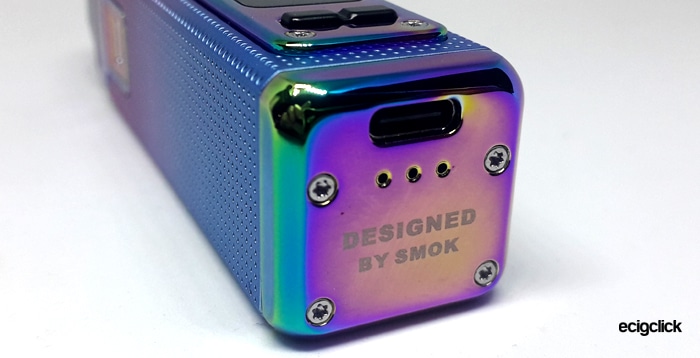
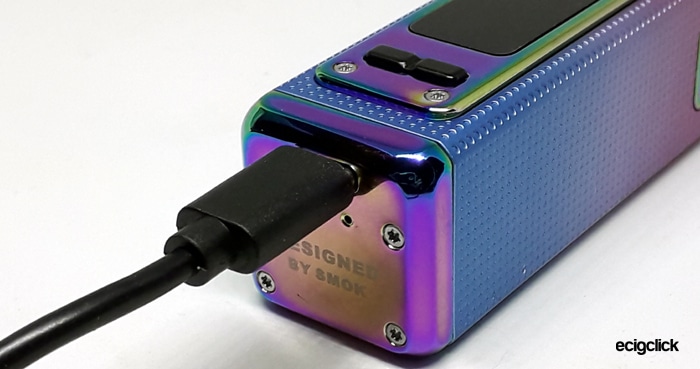
The base houses the USB Type C port and it works perfectly along with some text saying “Designed By Smok” just in case you had forgotten who made your kit.
Plus there looks to be 3 small battery venting holes.
The pod will only slide in in 2 ways – two lugs on the side of the pod align with 2 cut outs in the mod body. The pod will also fit if you rotate it 180°.
A magnetic connection secures the pod in firmly – you can even test this by only installing the pod half way and watch the magnet suck it in like magic into the mod.
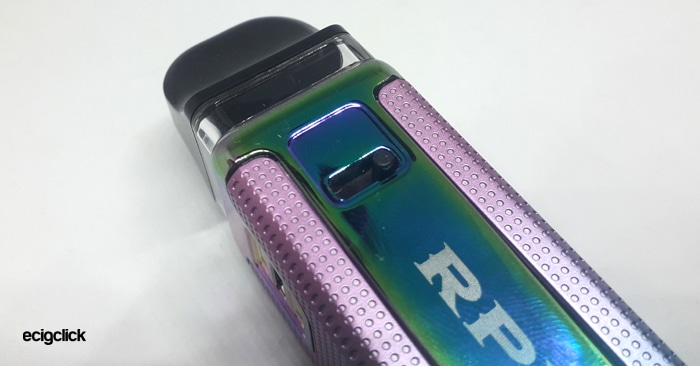
An airflow slide switch is located on the back of the mod, it is a bit difficult to move as it is slightly stiff and a bit recessed so it will need a fingernail or similar implement to move it.
However, the good news is once it has been adjusted to your preference it is unlikely to require moving again.
Display Panel & Controls
The front of the mod features the display panel and main device controls.
At the top is the square fire button, which has been positioned well and is responsive with a dull click sound.

Below that is the lovely TFT 0.96in colour screen which is clear and quite bright.
At the top of the display is the battery data – an icon displays pictorially the charge remaining plus a percentage is displayed in text next to it – I like having both of these.
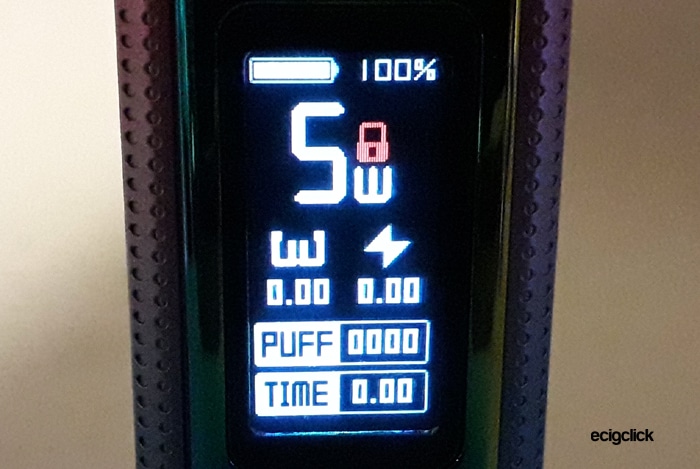
Below that is your wattage setting – from 5-60W with the W symbol next to it.
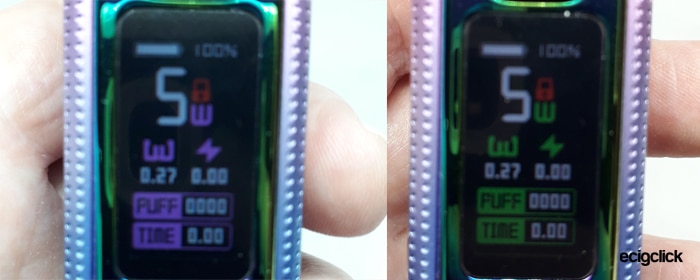
Above the wattage symbol is the “lock” symbol – a padlock which will be displayed in red if the fire or adjustment buttons are locked.
Underneath that is the coil resistance with a strange coil style symbol and to the right of that is the voltage and a little spark symbol.
The voltage will only display when the fire button is pressed and is not adjustable.
The last 2 lines on the screen are dedicated to the puff counter and vape time.
The timer resets every time you press the fire button. I am not sure really if this function is of any use as the only incidence where vape time is an issue is if you hold the fire button down for over 8 seconds and the device will cut out to prevent overheating.
Next are the up and down adjustment buttons these are nice and clicky and although small are easy to use.
I love the fact you can lock the fire button and wattage buttons independently – some devices only lock one or the other. You can do just one or both on this.
Smok RPM 4 Pod
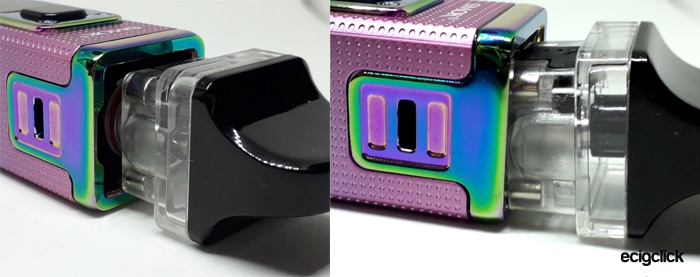
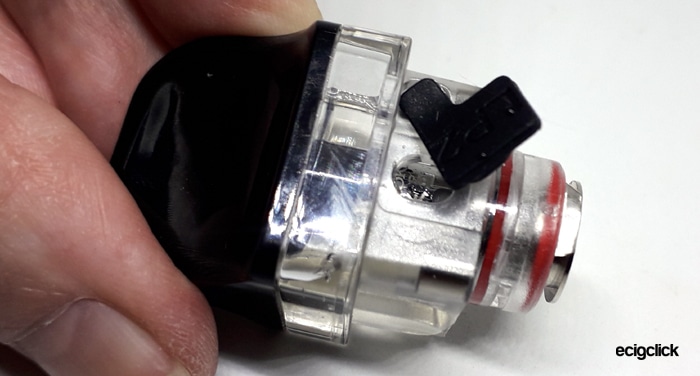
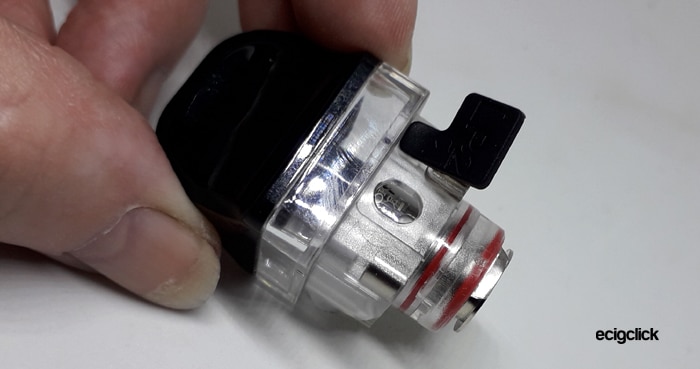
The best feature of the pods are the clear windows at the top to give a good indication of liquid level.
Some of the pod is still concealed within the mod but if you tip the mod you can judge from this small window how high the liquid level is.
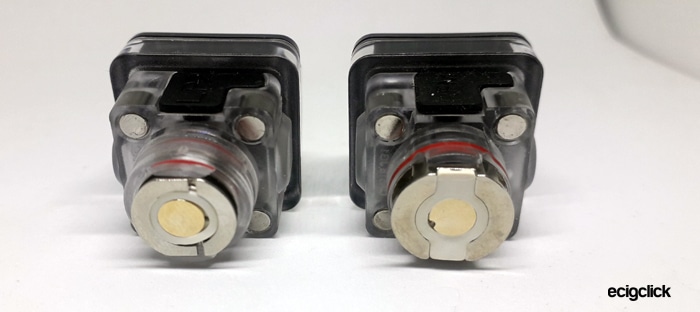
You get 2 pods in the kit – the LP2 compatible pod and the RPM compatible pod.
The fill port cover has the name of the pod stamped on.
The cover is quite easy to lift and you can rotate it out of the way to make filling easier.
But like the RPM Lite I do find it hard to close the pod as it has quite a tight plug fit in the fill port hole.
Size wise the fill port is pretty standard I have encountered no issues using spout bottles but a dropper applicator might be difficult to use.
Following on from the earlier RPM kits this has the “Duck Bill” style mouthpiece which is really comfortable in the mouth and I found it great on the original Nord kit.
This is just slightly larger than the mouthpiece you would find on the Nord but still great to use.
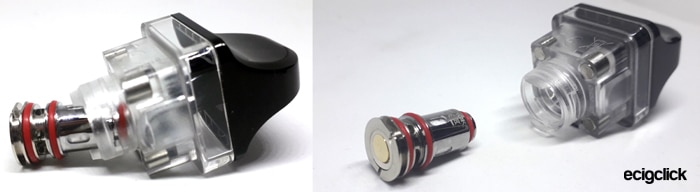
The pod base houses the pull out coil and the magnets to secure the pod firmly in the mod.
One issue I did find was that the RPM pod was a bit difficult to push into the mod fully.
I don’t know why but it sort of stopped with a gap between the pod and the mod.
You can push it in further but took more effort than the LP2 pod. Also it is a lot tighter to remove than the LP2 pod.
Smok RPM 4 Coil Options
The kit comes with 2 different pods compatible with different coil ranges…
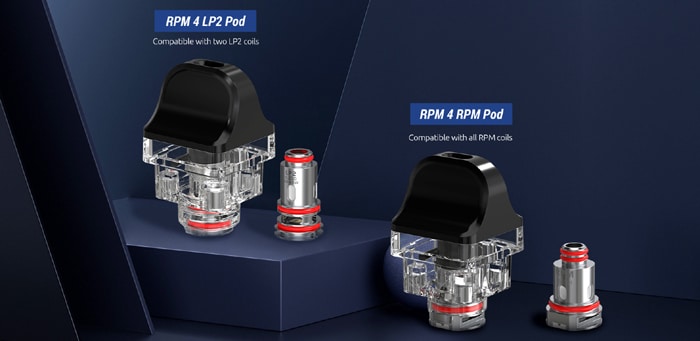
- RPM4 LP2 pod – this uses the new range of LP2 coils
- RPM4 RPM pod – this uses the existing range of RPM coils compatible with other RPM devices including the RPM range and some later Nord devices.
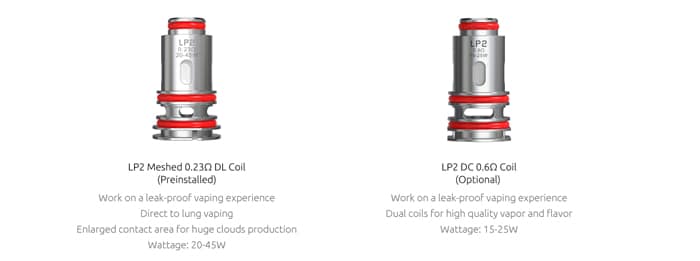
There are 2 different LP2 coils available a 0.23ohm meshed coil which is included in the kit and a 0.6ohm dual wire coil which is available separately.
When it comes to the RPM coils there are lots to choose from – you get the 0.4ohm RPM Mesh coil with the kit.
Smok RPM 4 Quick Start Guide
The kit arrives with the LP2 pod installed.
However there are a few more steps to take before you can get up and running – I will grab you by the hand and guide you through them gently I promise!
Firstly the coil is protected by an insulating sticker – this is to prevent the device firing accidentally in the packaging.
Also make sure to fill the pod with e-liquid and leave to stand for 10 minutes before removing this sticker to prevent burning the coil out and knackering it up totally.
Remove the sticker – install the pod into the device and follow the rest of the instructions below to get going!
Basic Operation
- Turn On / Off = 5 quick presses of the fire button
- Vaping = with the device turned on press the fire button to vape.
- Lock fire button = 3 quick presses of the fire button locks the fire button to prevent accidental firing.
- Lock adjustment buttons = press the up and down adjustment buttons at the same time.
- Adjust wattage = use the up and down buttons below the screen to scroll through the wattage to the desired setting.
- Puff counter = the screen displays the total puffs taken up to 9999P where it will reset to 0. You can manually clear the counter by pressing the Fire and Down adjustment button at the same time.
- Confirm = if in a menu you need to confirm a choice – press and hold the fire button for a longer press.
- Change theme colour = press Fire and the UP adjustment button to cycle through the theme colours. Stop when you have reached the colour you want.
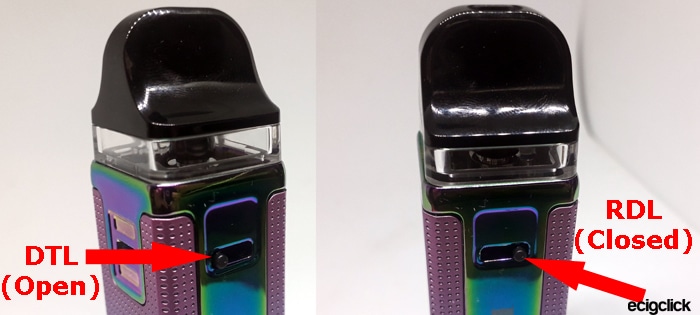
- Airflow adjustment = move the sliding switch to open or close the airflow as required.

Protections
- Low battery – Display will show “Battery Low” and you will need to recharge the battery.
- Short circuit – Display will show “Atomiser Short” – replace coil and check for any leaks or damage
- No Atomiser – Display will show “No Atomiser” and you can still make adjustments etc but the device will not fire until the pod and coil have been installed correctly. If this comes up and the pod is installed check the connection to the coil and pod or replace the coil.
- Resistance limits – if a coil over the 2.5ohm resistance limit is installed the display will show “Ohms too High”. If a coil below the 0.2ohm limit is installed the display will show “Ohms too Low”. In both cases replace the coil which has a resistance which is within these limits.
- Over time – there is an 8 second fire cut-out and “Time Over” will be displayed and the fire operation will stop. This is to prevent overheating and accidental button pressing.
- High temperature – Display will show “PCBA Too Hot” and the high temperature protection kicks in to prevent operation until the device has cooled down.
- Power Locked – unlock the fire button by pressing it 3 times.
- Wattage Locked – unlock the wattage adjustment by pressing the up and down adjustment buttons at the same time.
How To Charge The Battery
- Using the included USB C cable connect the small end into the USB port on the mod.

- Connect the large end of the cable into a suitable USB outlet.
- The screen will display the progress and approximate time remaining until full charge.

- The display will go out when fully charged.
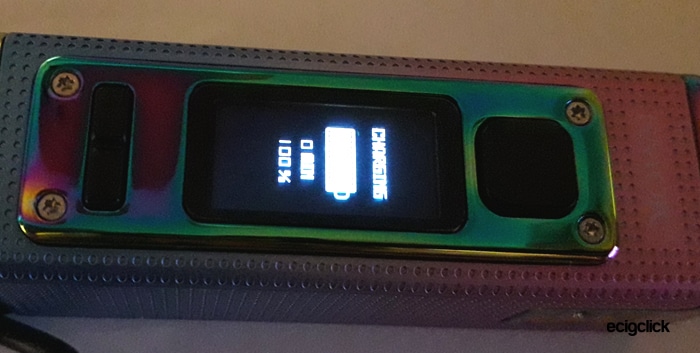
Using a 2.4A charging plug it took to around 1 hour and 2 minutes to charge. Initially the display told me it would be 59 mins to fully charge – so this is pretty well guessed!
Although my charging output was 2.4A – the max input for the mod is 1.5A. I think I am right in saying the device will only draw the current it is capable of anyway?
How To Fill
- Remove the pod by pulling it out of the mod. There is some resistance due to the magnetic retaining system.
- Turn the pod on its side with the fill port cover facing up.
- Using a finger nail or similar prise up the fill port cover and swing it out of the way.
- Add e-liquid to the fill port whilst observing the liquid level through the side of the pod.

- Replace the port cover firmly and wipe away any spillage.
- If this is the first fill or when using a brand new coil leave the pod to stand for 10 minutes to make sure the e-liquid has fully soaked into the wicking in the coil.
- Inhale on the mouthpiece 2 or 3 times before pressing the fire button to just make sure the coil is saturated with liquid.
 Using a finger nail or similar prise up the fill port cover and swing it out of the way.
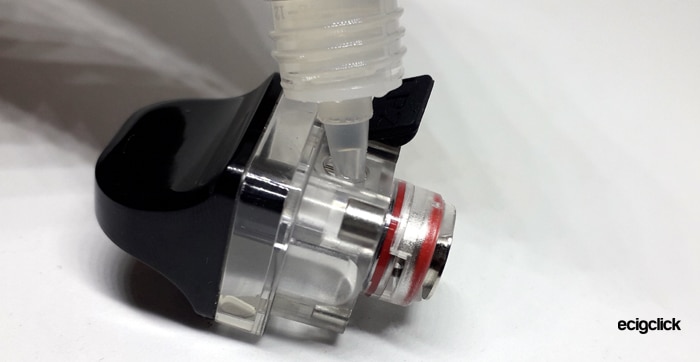
How To Replace the Coil
- Remove the pod from the mod and turn upside down.
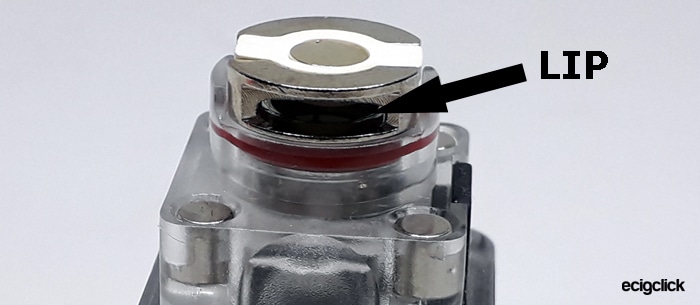
- Locate the small lip on the coil base and insert finger nail or similar.

- There is some resistance as the coil is held in with O-rings – but you can pull it out by initially gripping the lip on the base.

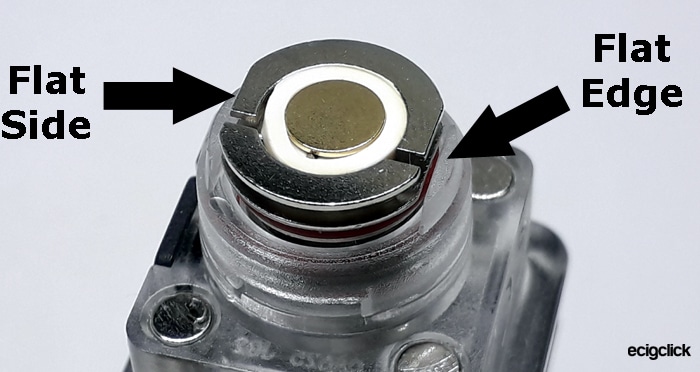
- Install a new coil making sure that the flat sides on the coil base align with the flat areas on the pod base.

- Push the coil in fully.
- Fill the pod as described above.
How Does the Smok RPM 4 Perform?
As this is a DTL (Direct To Lung) / RDL (Restricted Direct Lung) kit I will be using lower nicotine and higher VG e-liquid.
I am using my old favourite Stika Bombz Fruit Salad. This has freebase nicotine and is an 80/20 PG/VG e-liquid.
It is also pretty kind to coils I have found over the years.
If any of these terms are over your head – have a read of our handy guides below!
- MTL V DTL – A Guide To Vape Styles
- VG and PG in E-liquid – all you need to know
- Beginners guide to E-liquid
LP2 Meshed 0.23ohm DL Coil
This has a recommended power rating of 20-45W.
I started at 25W with the airflow in the more restricted area and already just wow!
From the first vape the flavour blew me away!
The vape is quite warm even at the lower end of the power limits but slightly less vapour than I would expect from this e-liquid..
Up to 30W and this has warmed up even more and I am having to take shorter vapes already!
At 35W this is warmer still but the cloud output has increased. I am sad that being a MTL vaper nowadays I can’t take the massive inhales I used to!
I got brave and went up to 40W and more of the same. The flavour output has become more intense with different nuances of flavours coming through. Also the vapour output has increased hugely.
At 40W I also opened up the airflow fully and the experience became even more intense.
I will say this is quite a noisy vape – not turbulent but you can hear the airflow and even without vaping with the fire button pressed you can hear the coil firing.
This feels way more powerful than 40W! It is similar to using a large mesh sub ohm tank at 70W
Quite incredible – I love it!
I found myself knocking the power down to 30W and setting the airflow just slightly below fully open for a small restriction. In fully restricted the flavour is good but the clouds suffer and it does become a bit too warm to vape. However with the airflow closed down the warmth makes it feel like you are vaping at 50W rather than simply 25W!
Having vaped 5ml already and on my second fill up – the flavour is still beautiful and got around 150 puffs from 5ml.
RPM Mesh 0.4ohm Coil
This has a recommended power rating of 25W.
I used the same e-liquid as used on the LP2 pod and started off at 25W – which is the only recommendation on the Smok website.
Again which ever airflow setting you use the flavour is punching!
The vapour is a lot thicker than the LP2 coil I think with the airflow fully open.
At 25W I found the vape was slightly cooler than it was with the LP2 coil and I was able to take longer inhales – they were more comfortable.
It is a much drier vape than the LP2 coil – but the flavour is strong and the throat hit is definitely there. But I do prefer the moist (urgh horrible word!) vapour from the other coil / pod combo.
Also the output feels a lot lower but smoother – I did a direct comparison swapping between both pods at 25W – the LP2 had more of a kick and a crackle, whereas the RPM was a lot smoother and calmer.
Both coils really have a lot of flavour going on – but for my preference the LP2 coil suited me better.
The RPM coil is a lot more refined, smooth, cool and gentleman like whereas the LP2 was a bit more fiery.
Airflow
With the LP2 coil in the fully closed (more restriction) setting there is definitely a lot of restriction.
I wouldn’t say quite MTL though! Also fully closed this does affect the vapour output but the flavour is still pretty epic!
In the fully open setting this is very airy with 1 being fully closed and 10 being like breathing this is about 8-9. So the very slightest of restriction. The good news is that in this setting the flavour and clouds are really at their optimum.
With the RPM coil and pod the fully open airflow was slightly more restricted – around about an 8 and the fully closed was a restricted DTL vape – still not closed enough for MTL.
Smok RPM 4 Mod Performance
I have had no issues at all with the performance and even been really surprised at how well the battery lasted.
Also the build quality was surprising!
The speed of firing was instant with no lags and the power output seemed to be constant right down to 3% battery charge remaining.
One thing that did really surprise me was how economical this was with e-liquid – I did get the 5ml version – but even so I got over 150 puffs from one tank full.
I have had no issues at all, no leaks or malfunctions, there was a slight amount of e-liquid in the mod connection area from the fill port cover.
I did struggle to get the cover to go in fully – as it has a really tight “Plug” seal and I think some liquid may have seeped out as I was fannying about trying to close the cover.
Smok RPM 4 Battery Life
Usually I time how long the battery lasts with regular vaping – but this is so variable with different vaping styles and your own preference.
So when a device has a puff counter I will use the puff count instead. This is also quite variable as some people do take longer inhales than others and this will of course affect the battery life.
Anyway as a guide I got 275 puffs with the LP2 coil at 30W. This has the 5ml pod and that was basically 1.5 pod fulls (approx 7.5ml) of e-liquid to one charge.
I didn’t notice any drop in power or performance until the battery display showed 3% battery remaining, then I got the “Battery Low” message if I vaped longer than a second.
Pros
- The prettiest pod kit I have ever seen – beautiful detailing on the panels too!
- Build quality is pretty incredible – especially for a Smok device in the lower price bracket too!
- Compatible with RPM and new LP2 coil ranges – plenty to choose from.
- LP2 coil gives the output at 40W of a large sub ohm tank at 70W! Quite surprising. This coil even performs at the lower power of 25W!
- RPM gives a smoother, quieter vape
- Easy to see e-liquid level with clear window area in pod.
- Economical e-liquid usage
- No leaks or malfunctions
Cons
- Fill port can be a bit fiddly
- Hard to tell the pods apart if you had sight issues – the writing is not very clear on the fill port covers, a colour code or similar might improve this.
- Can be a bit difficult to grip the coil base for coil removal – if you haven’t any fingernails you will need something to prise it out with – not ideal if you are out and about.
- Vaping is quite noisy on the LP2 coil – from the airflow to the actual noise of the coil being fired.
- RPM pod was quite a tight fit and took more effort to remove and install.
Final Review Verdict
I fell absolutely head over heels with this kit the second I opened it – really really beautifully designed and finished.
It is that good that I will be ordering some of the LP2 coils as I really enjoy this lower power DTL experience and how little e-liquid this uses in comparison with a huge sub ohm tank.
I think any DTL vaper would enjoy this experience, but if you are someone who needs high nicotine and throat hit – this is not really a kit for you.
For those people you are better off looking more towards the RPM Lite or the Nord / Novo range. Or even chucking the 0.8ohm DC RPM coil in this kit.
This is not a huge cloud chucking power monster by any means – but any vaper who likes higher VG e-liquid flavour could happily take this out with them for a few hours and enjoy the flavour and warmth you get.
A Couple Of Niggly Issues…
I have a few slight niggles about things like the fill port cover being fiddly and telling the pods apart. But these are more niggly concerns than actual deal breakers.
Also as this is a DTL device I have not used this away from home – I am an MTL vaper who needs some heavier nicotine when I am out and about.
So for this review the kit has only been used sat at a desk or lounging at home – it hasn’t had the “handbag” or “rolling around the car” experience my devices usually have to handle!
I always rate the product I have in front of me and in terms of vaping pleasure this is a beauty.
I am aware of how much the quality can vary with Smok devices – I have my own experiences of this sadly.
But in my hands the RPM 4 kit I am using is an absolute beauty which chucks out way more flavour than I expected.
I love it – do you?
Please let me know your thoughts and opinions in the comments below..


I got the Smok RPM4 model in Cyan around Spring of 2021. It worked great except leaking all over the place all the time. I wasn’t doing anything wrong and simply got used to having a paper towel with me to soak it up everywhere I used it (I live in MA so I can’t use the warranty as vaping was made illegal in my state over some crazy story about people dying from a bad batch of street made e-liquid in the mid-west, or so the Media was saying. I live close to CT where it is though). I finally got sick of constantly having sticky hands, oily spots on my pants or shirt, having an eventually soaked paper towel, thinking about all the liquid I was losing but I did love every other feature on the model and how it hit so I went to the same Vape shop in Summer of 2022 and bought another one in Champagne color because they didn’t have Cyan. Took about 6 months and again this one started leaking. Needless to say I’m beyond disappointed because it does have so many awesome features. I’ve been vaping for a long time now and I knew it wasn’t something I was doing wrong. Low & behold when I got sick of the 2nd one leaking everywhere, I went to the Vape shop with the intention of getting a different brand altogether. When I got there and explained my journey and asked for suggestions on what to get, they didn’t even sell the Smok RPM4 anymore because of all the leaking complaints over the years. I knew it wasn’t me but it was nice to have that reinforcement albeit unfortunate. I switched to a Vaperesso Xros 2. Not as many bells or whistles, smaller pod but 0 leaks. 0. That has been refreshing. I didn’t even realize how much liquid I was losing to leaking until I got a model that didn’t. I take far less trips to the Vape store now and I’m much happier. If Smok would make a model that doesn’t leak I would absolutely buy another one in Cyan but until that day I’m not wasting anymore money on faulty products.
After vaping for about a year, this is my second mod and it is nice and effective with the LP2 at 25 watts burning 60/40, Vapetasia, Salt, Iced Trapple with 48 mg. No complaints!
Im somewhere in between a MTL and DTL smoker and prefering the higher VG liquids. Would the Smok RPM 0.6 Ohm Triple Coil fit the RPM or LP2 pod?
In youre review you are talking about a higher VG is better with these coils but youre using an 80/20 PG/VG e-liquid. Is this a typo?
Yes that is correct, 80/20 is higher VG as opposed to a 50/50 VG PG e-liquid which the coils included aren’t designed for. I also used the 0.8ohm RPM MTL coil in here too and that was OK for 50/50 e-liquid. I would assume the RPM 0.6ohm should fit in the RPM pod too and be ok with 70/30 at least.
I would go for 70/30 as most pod kits can tolerate that, 80/20 is quite a bit thicker – which the lower resistance coils (0.4ohm) are happy with, but some of the higher resistance coils have smaller e-liquid inlets which could clog up with the thicker e-liquid. But you can always try it, the worst that will happen is a dry hit or lower coil life.
I got the rpm 4 smoked model and its say “ohms too high” I had it for 3 mouths and I just need some help asap
Usually that means there is an open circuit. Clean out the pod bay and the base of the pod and coil.
If that doesn’t work try a new coil.
Again if that doesn’t remedy the issue you may need to return the device as being faulty.
Mine leaks like crazy! I’m using saltnic at 9watts with the LP2 pod. Juice everywhere! I just got it and made sure everything was in tight. Idk I’m not having very good luck or I just don’t know what I’m doing. I’m going to try the other pod provided in the kit to see if that’s better.
Is the e-liquid 50/50 (VG and PG)? If so that is way too thin for those coils, you need at least 70% VG e-liquid.
We tell you more in our Guide to VG and PG.
This coil needs to be used at 25-40W – it is not suited for high nicotine strengths and using it at only 9W will make it spit and leave unburnt liquid in the coil.
You need a thicker e-liquid and lower nicotine and make sure to run this at the power limit suggested.
I am about 1000 hits into an RPM 4 and the flavor is gone! No idea why. I’m using a menthol juice and I can still get some of the menthol chill but none of the flavor anymore. I’m using the RPM coil, not the LP2 one yet – is this normal?
Just sounds like you need to switch the coil out Gabe. When you notice flavour deteriorating or a slight burnt taste coming through it’s time to swap out coils.
my son got a smoke rpm2 kit and its rubbish.
Absolutely no flavour at all, tried multiple different liquids on both the coils/pods it comes with, and it leaks all the time.
When was the release date for this please? I’ve just ordered one today!
Hi, could you tell me the release day for this please? I’ve just ordered one today.
Totally agree with LP2 coil! My everywhere to go with from now on.
What an amazing coil – I use mine at only 25W and the performance is amazing – it is still going strong on the same coil at 550 puffs so far!