In for review is the Uwell Caliburn G3 Pro, which is the newest member of the very popular Caliburn family!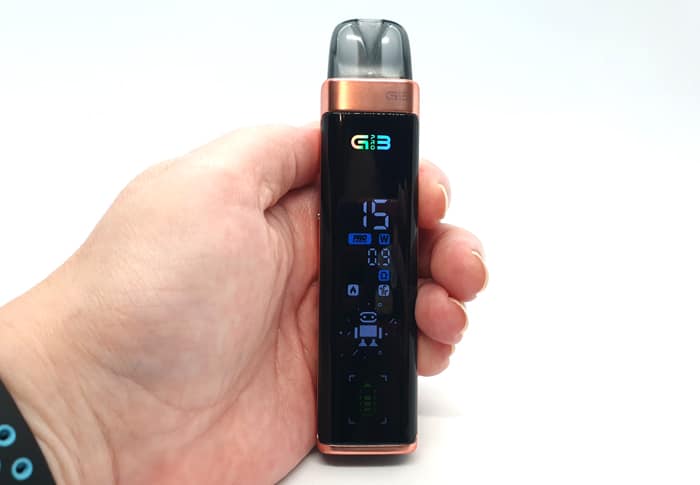
The G3 sub-section of the Caliburn family includes the Caliburn G3, Caliburn GK3, Caliburn G3 Lite and Caliburn GK3 Tenet.
Thank you to Uwell for sending these over for review. As always, my views are my own. My experience may differ from yours.
What Can We Expect From The Uwell Caliburn G3 Pro?
A pocket friendly vape with lots of smooth edges and one of the biggest displays I’ve ever seen on a vape pod. The whole front panel is a LCD colour screen!
It displays everything from your battery charge remaining, pod specifications, power level, puff count and any warnings.
It’s not all fur coat though, the Calburn G3 is packed with all sort of goodness.
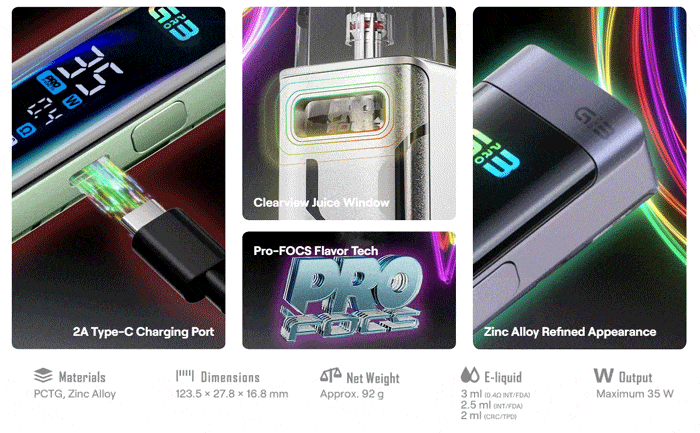
An impressive 1000mAh internal battery which can be charged via the USB Type C port at a quick 2A charge rate.
Adjustable wattage up to 35W. Don’t worry though, if you just want to plug and play the device selects the appropriate adjustment range to match the pod installed.
Manual firing (button press) or use the auto draw firing. The fire button can also be locked for inhale activated auto draw only. Airflow too. It’s got it all, which we will get to below.
Good news as well for all Caliburn G3 users. The pods are compatible all of the G3 family of devices. And plenty of options there are as well!
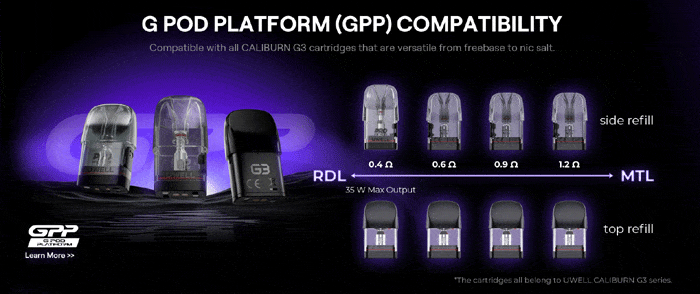
The kit includes the 0.4ohm and 0.9ohm pods. However the FDA version swaps the 0.4ohm for a 0.6ohm pod.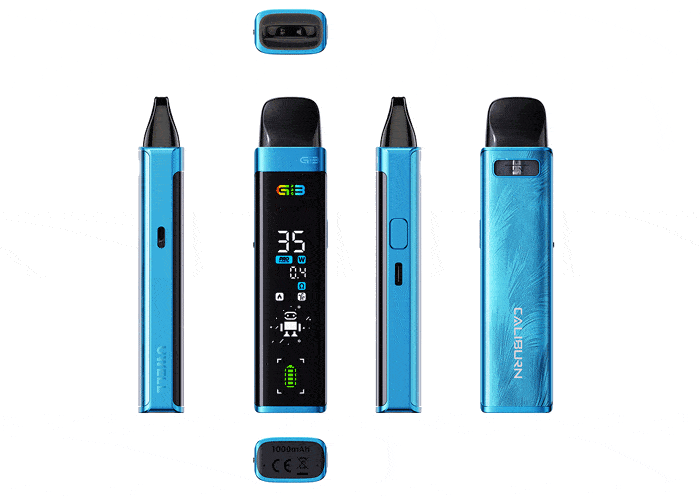
These have “PRO-FOCS” technology. Nobody seems to know what that means, but usually pods / coils with this branding kick out excellent flavour.
Here is an introduction video from the Uwell YouTube channel.
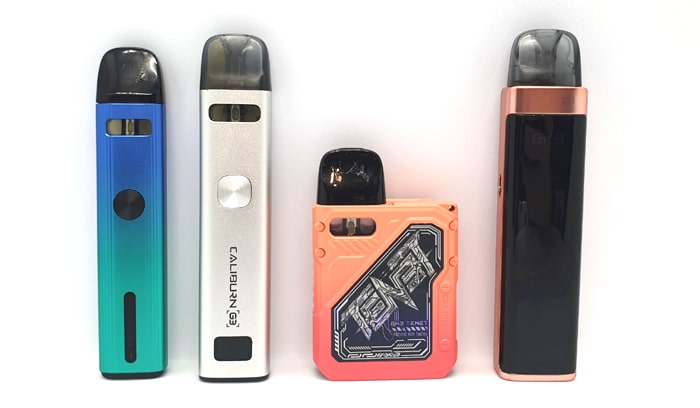
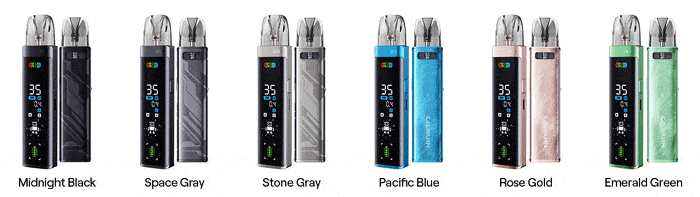
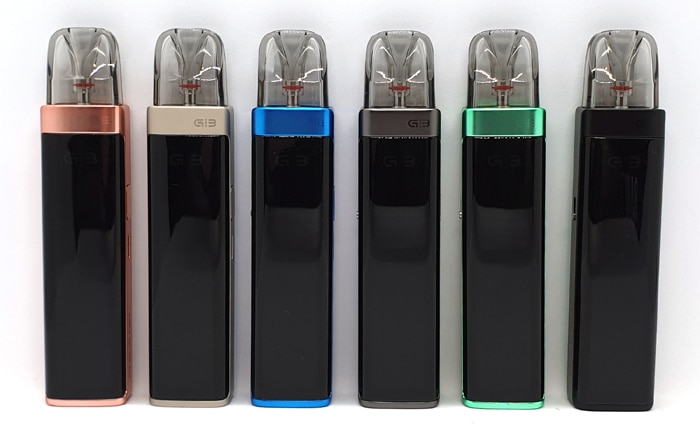
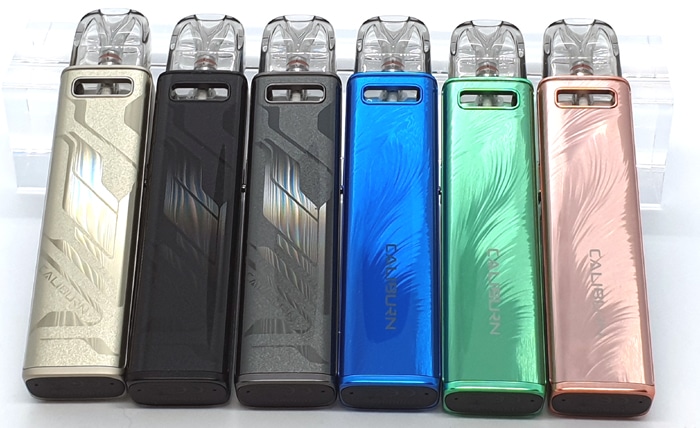
You can choose from 6 colours: Midnight Black, Space Grey, Stone Grey, Pacific Blue, Rose Gold and Emerald Green.
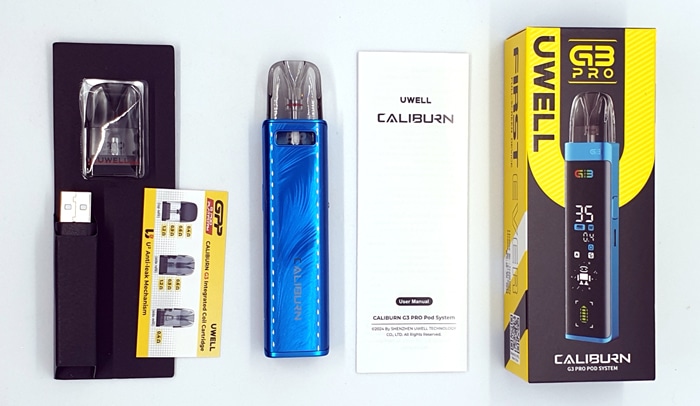
Kit Includes
- Uwell Caliburn G3 Pro device
- 0.4ohm G3 pod (replaced with a 0.6ohm G3 pod in the FDA kit version)
- 0.9ohm G3 pod
- USB Type C cable
- User manual
Uwell Caliburn G3 Pro Specs
- Size: 123.5×27.8×16.8mm
- Battery: 1000 mAh (internal)
- Display: Full sized screen
- User modes: Variable Wattage
- Output: 35W Max
- Type C USB charging – 2A charge rate
- Resistance range: 0.4-3ohm
- Capacity: 3ml (Standard) / 2.5ml (FDA) / 2ml (TPD)
- Side fill (standard) / top fill (TPD)
- Compatibility: Compatible with Caliburn G3 pods
- Adjustable airflow
- Auto draw / button activated
Design & Build Quality
I received all 6 colours – of course the Rose Gold one found its way into my hand straight away!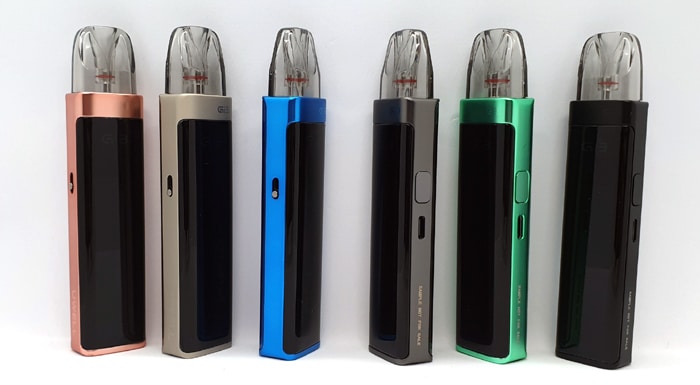
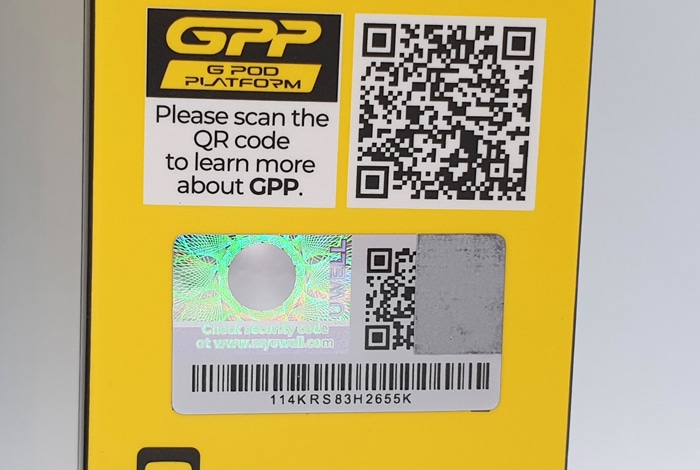
The packaging is great and also has an anti-counterfeit verification system. Simply head over to the Uwell verification page here and follow the instructions.
The instructions are some of the best I have seen in a while, really informative and cover all aspects of operation!
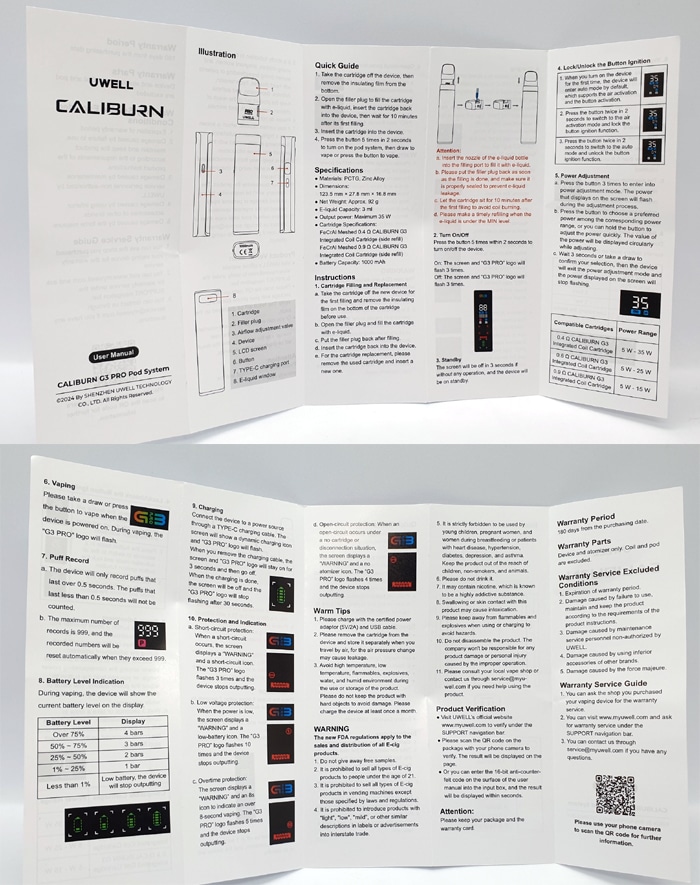
If you find the included instructions a bit small to read you can download a digital copy here.
Uwell Caliburn G3 Pro Mod
The first thing I noticed was how heavy this pod is!
It has the same battery capacity as the OXVA Xlim Go but the difference in weight is incredible! The Xlim Go weighs 41g and the G3 Pro is 92g!
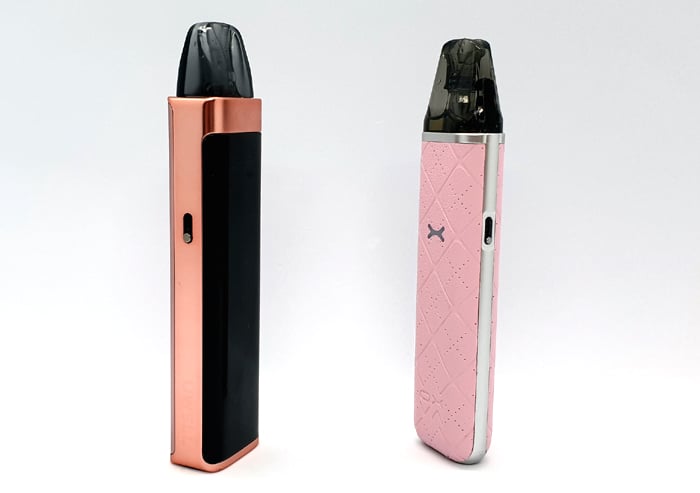
The main reason is because the G3 Pro is made entirely of metal – Zinc Alloy to be precise and it feels extremely robust in the hand.
Also of course that huge screen which takes up the whole length of the device!
A brushed metal shell is the skeleton of the main device and the front, rear and bottom panels attach to this.
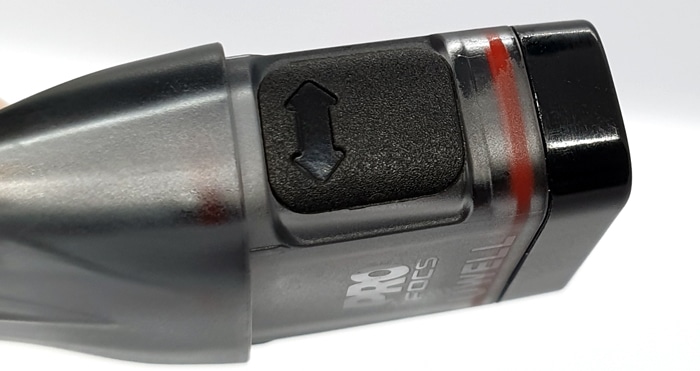
On the one side of the shell is the airflow adjustment slider. This has a rubbery action which makes it nice to move but not loose enough to move on its own.
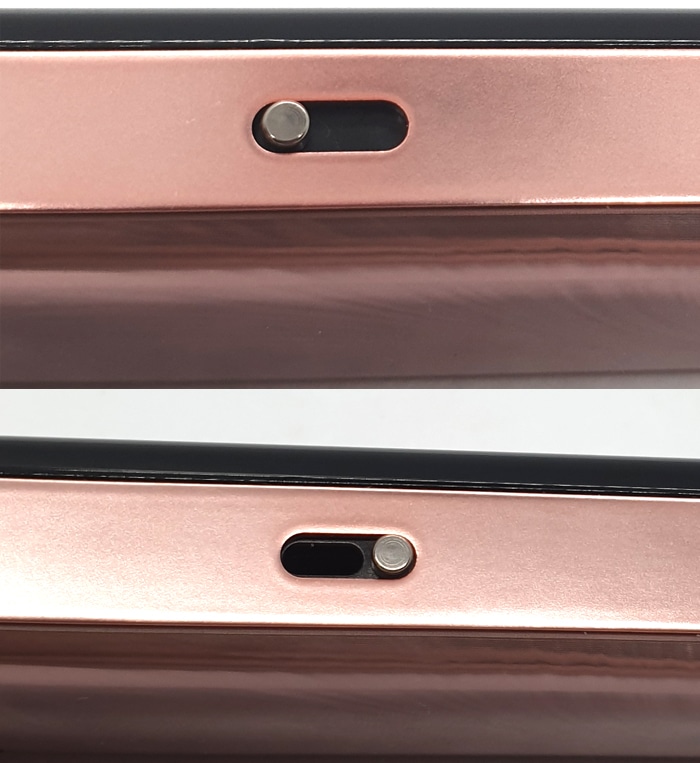
Also this side has the “Uwell” logo etched in.
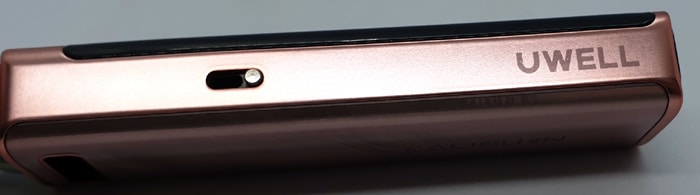
The opposite side houses the fire / operation button. This is a great size of around 12x7mm and it is quiet but super responsive.
Underneath that is the USB type C port which functions perfectly.
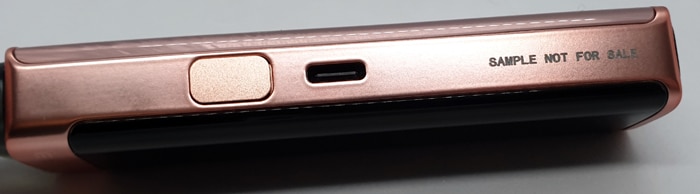
You will see the text “Sample not for sale” stamped into my kits – this will not appear on retail items!
The rear panels of the devices have a patterned finish. There are two styles. A swishy paintbrush style on the Pacific Blue, Emerald Green and Rose Gold devices. Or a kind of circuit board / geometric design on the Midnight Black, Space Grey and Stone Grey kits.
On this panel is the Caliburn logo in a shiny Silver finish. This panel really does look classy.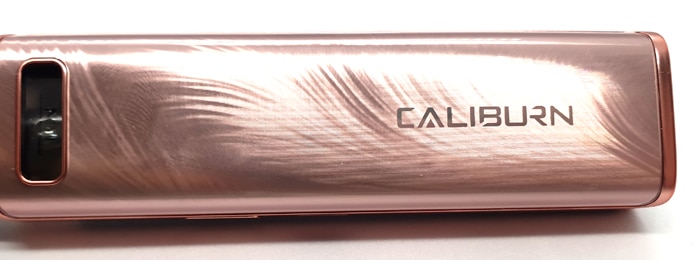
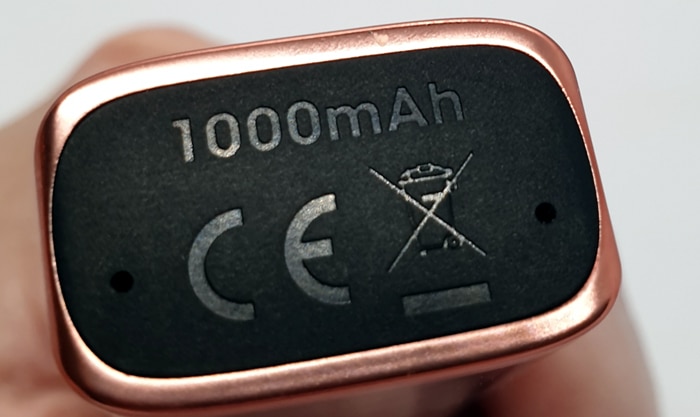
The base of the mod has a hard Black plastic finish with the required legal logos and battery capacity etched in. It stands up solidly and takes effort to push it over!
Inside the pod compartment you will find 2 spring loaded electrical contacts and 2 strong magnets. These are the perfect strength to ensure you can remove the pod when you need to but it won’t fall out either.
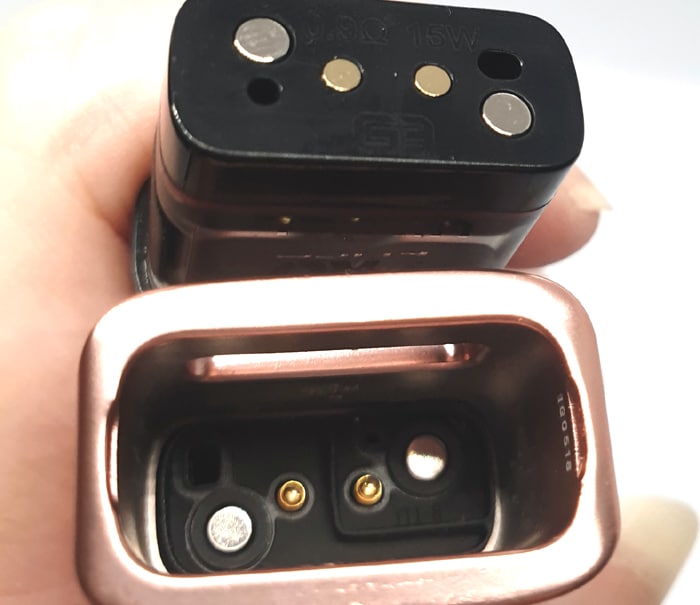
One down point is the e-liquid viewing window. This is cut out of one side of the mod only so it is very dark to try and view your e-liquid.
It is not too bad with the fully clear side fill pods but becomes very dark with the 2ml top fill pods.
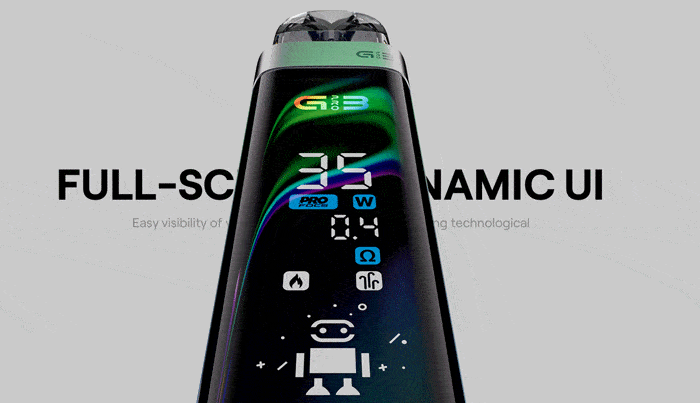
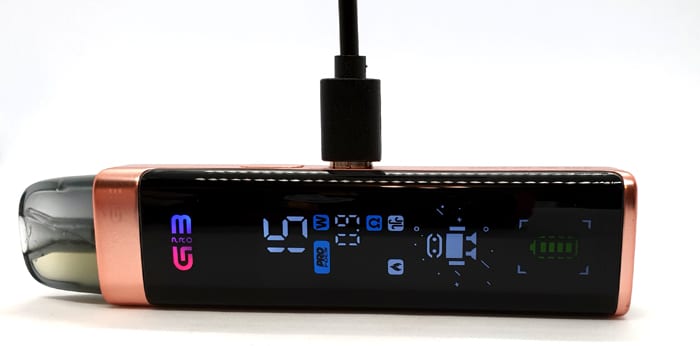
Screen
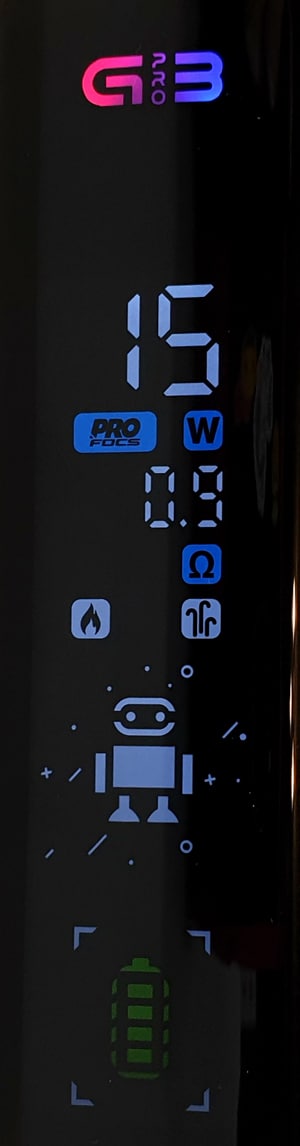 This takes up the whole of the front of the device!
At the top is the “G3Pro” logo which lights up when vaping, charging and to display warnings.
Below that is the current output level – in this case “15” for 15 Watts.
Underneath this you will see the “ProFOCS” logo which denotes the technology the pods use.
Then you will see the coil resistance with the “Ω” (ohm) symbol. This tells you the resistance of the pod installed. When vaping this changes to a puff counter with the “P” logo.
Next you will see the flame symbol as well as the icon which looks like walking sticks. These icons show the firing mode – auto (button or inhale activation) or inhale only. We tell you more about this in the quick start section.
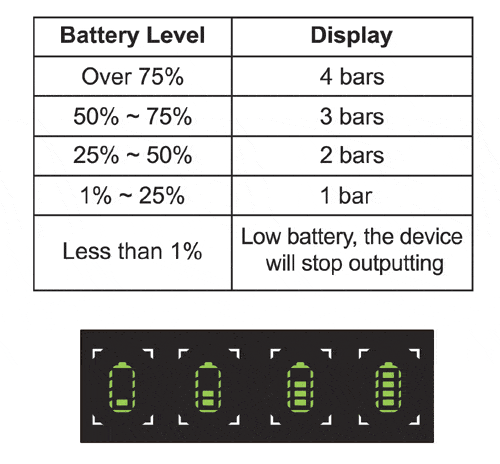
At the bottom of the screen is the battery charge display and each bar lit up represents 25% charge.
The screen is actually clearer and brighter than I could capture in the photos! It really is stunning!
When vaping or pressing the button there is a Robot figure which dances. I find it quite cute but it could be seen as being tacky or childish. It could ruin the otherwise classy appearance of the device.
Anyway I have videoed it in action so you can decide for yourself. It would be great if in future you could download new animations for it – please Uwell!
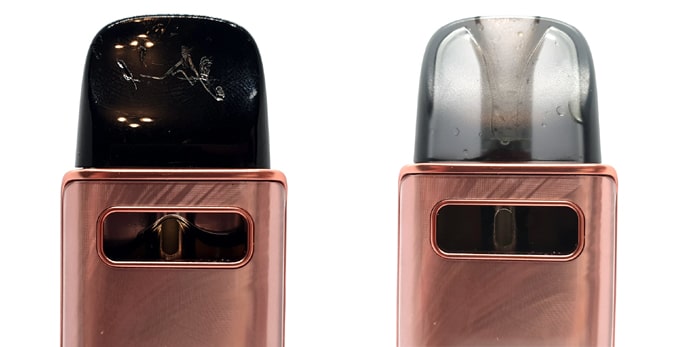
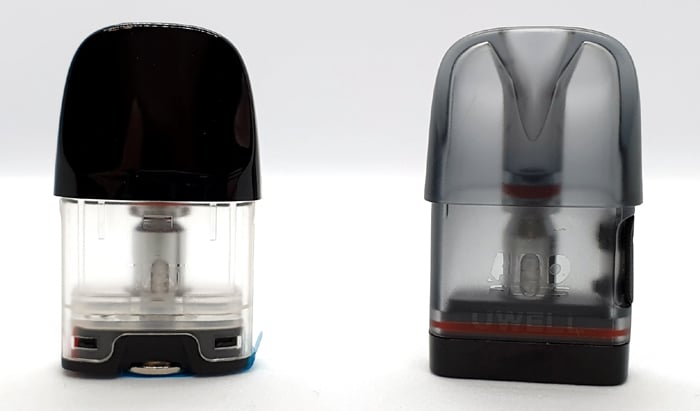
Caliburn G3 Pod
There are 2 styles of pod – top fill and side fill. The top fill pod is usually found on TPD regulated kits with a 2ml capacity. The 3ml pod is the side fill version.
 For this kit I received the side fill version but I have used the top fill in the past so will copy the details below.
Weirdly both pods included in the kit are a different height. The 0.4ohm is much taller than the 0.9ohm? I am not sure if the capacity is different or if it is just due to the size of the internal coil?
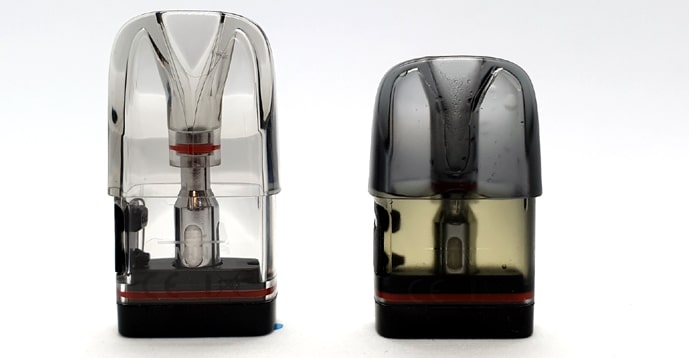
Side Fill Pods
Anyway these are a tinted Black colour all over but the e-liquid level is still nice and easy to see as the tinting is not too dark. On the 0.4ohm version though this is completely transparent with no tinting at all.
The mouthpiece is a very very smooth design and is super comfortable to use. The size of the pod width decreases with a small step below the mouthpiece area.
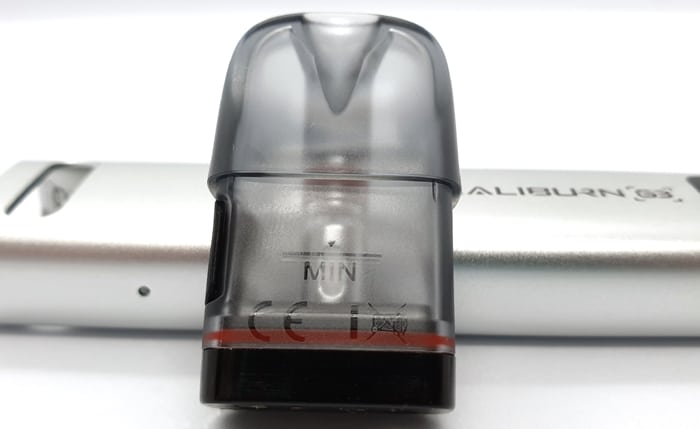
In the lower half of the pod you will find the minimum mark etched in plus the “Uwell”, “Pro-FOCS” and required legal logos. They are very faint so they do not look garish.
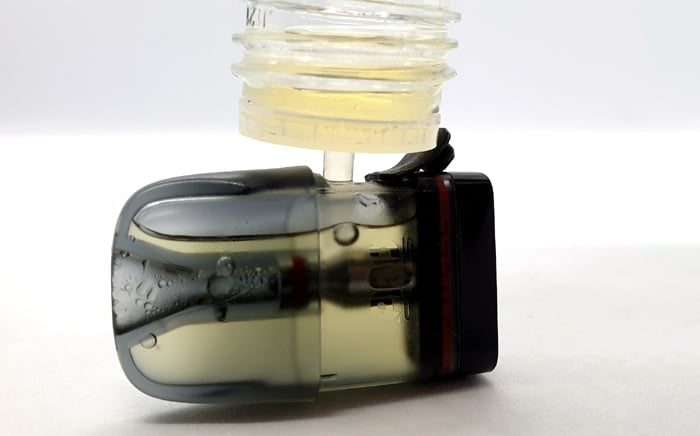
The base of the pod appears to be made from solid Black plastic which has a Red O-ring to seal between the outer pod and base.
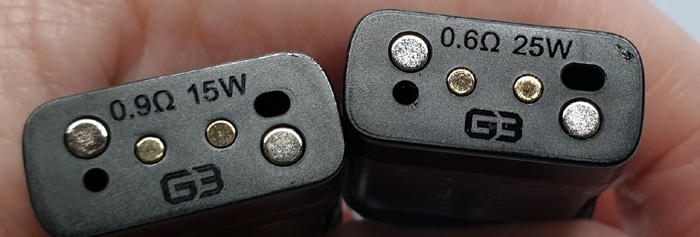
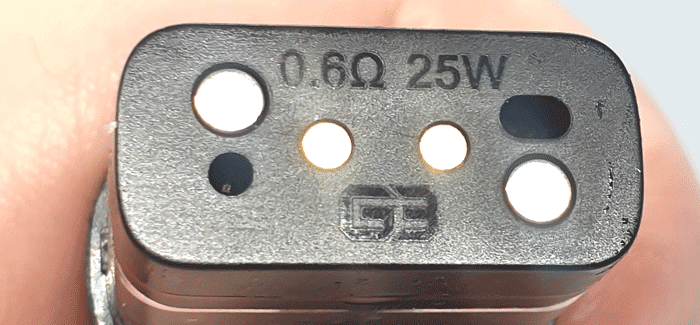
On the bottom of the pod you will find the coil resistance and optimum power level etched in along with the “G3” logo.
There are 2 Gold coloured electrical contacts and 2 magnets to connect the pod to the mod.
On the outer edges of this face are the 2 airflow inlet holes.
Filling is taken care of with the side fill port. The port has a Silicone cover with arrows marking the point where you lift it to access the port.
It is easy to lift but I did find it was a bit fiddly to close the port as you need to align the cover exactly. Also the cover does not rotate out of the way very easily for filling.
The port is a Rectangle shape and measures approx 5x4mm and I found it worked well and I didn’t get any airlocks when filling. I used 30ml and 120ml bottles and there were no problems at all.
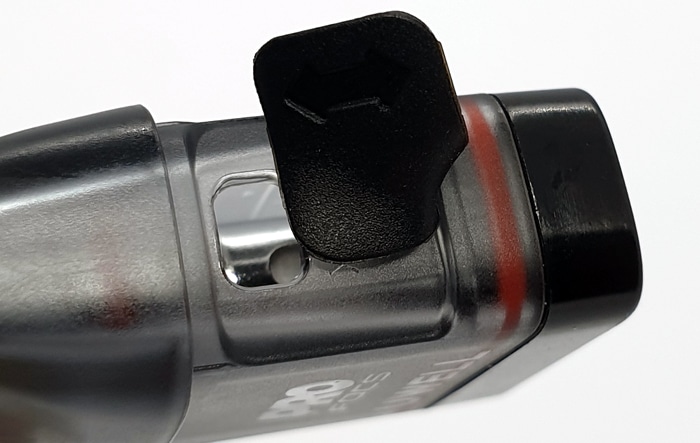
Top Fill Pods
You can recognise the top fill pods as they have a Black mouthpiece rather than the fully transparent pod with the side fill port.
The top fill is accessed by “snapping” off the mouthpiece. I found this difficult, but it is easier to keep the pod in the mod and push the mouthpiece across to remove it.
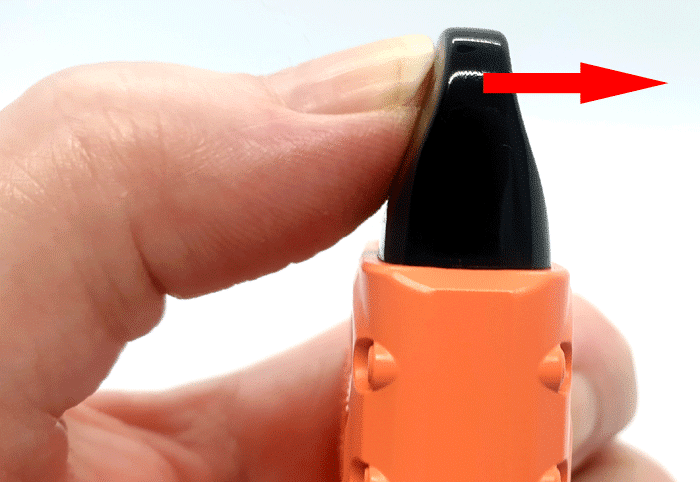
Sadly I resorted to biting it to remove it – hence you might see some teeth marks in my photos – sorry!
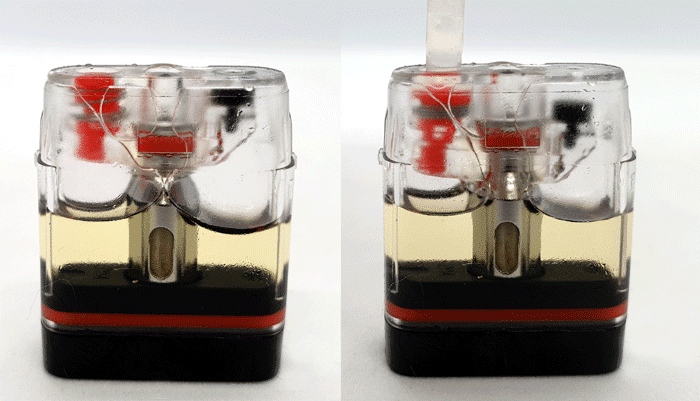
With the mouthpiece removed you are faced with what looks like 3 ports! The Red port is the fill port, the Black port is the air vent and the central port is where the vapour comes out.
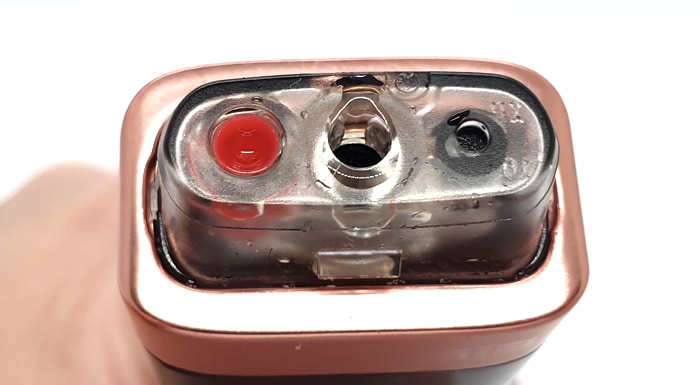
To fill you need to use the bottle nozzle to press down on the valve in the Red fill port. This is very clever as it also opens the vent port allowing air to escape and prevent air locks when filling.
When you remove the bottle nozzle both ports close. A very very good design which resulted in zero air locks!
The rest of the pod which is not covered by the mouthpiece is transparent and not tinted.
On the base of the pod you will see the “G3” logo, pod resistance and recommended power. But this is quite difficult to see as it is lightly etched into the Black plastic of the base.
As with the side fill pod this has 2 bottom airflow holes – one is bigger than the other. In other Caliburn G3 Kits you can rotate the pod 180° for 2 different airflow settings.
The pod base also features 2 magnets and 2 electrical connections.
Quick Start Guide
The kit comes with the 0.4ohm pod installed. Make sure to fill this before removing the isolator sticker at the base of the pod. If you vape before filling this will burn out the coil and the pod will need to be binned.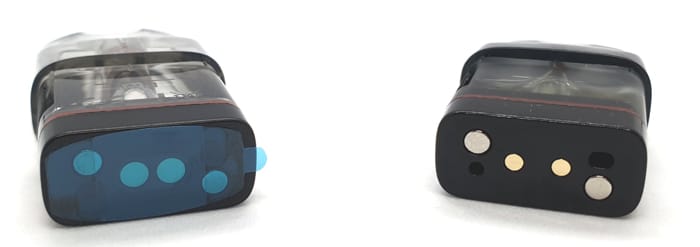
You will need to fill, charge and set up the device to get going – I will guide you through the steps below!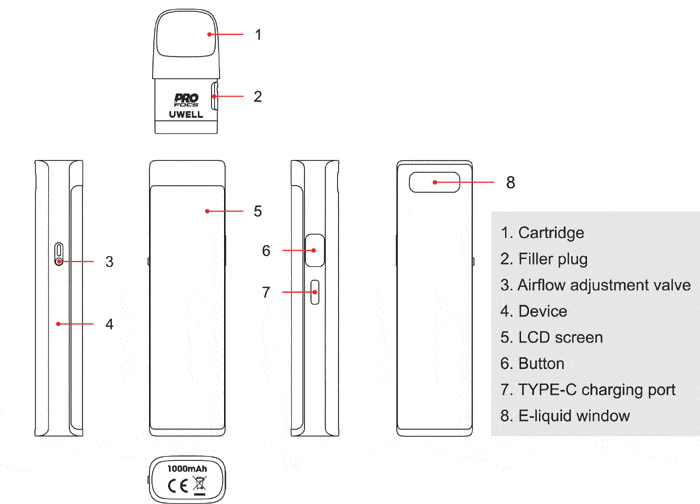
Uwell Caliburn G3 Pro Basic Operation
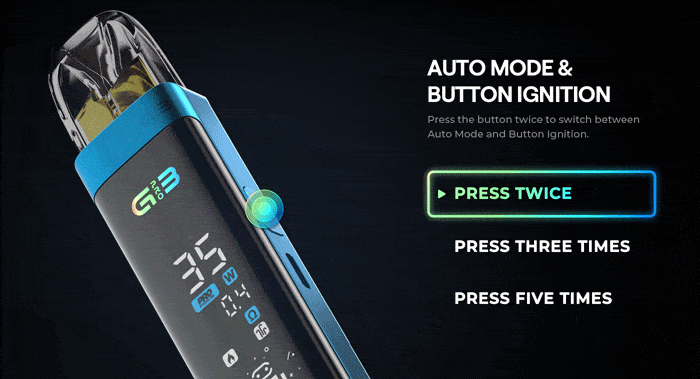
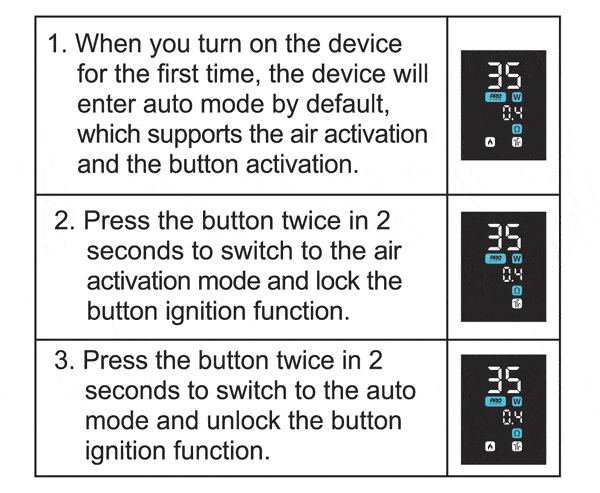
- Power On/Off = Press the operation button 5 times to turn on or off.
- Vaping = Simply inhale on the mouthpiece to vape or if manual firing is turned on you can press the button to fire.
- Battery indicator = The screen displays a battery icon and each bar lit up is equal to 25% charge. All 4 lit up = 100%.

- Battery indicator when charging = The battery icon will be displayed on screen and the “G3Pro” logo will pulse. When fully charged the screen will turn off.

- Turn on / off manual firing = Press the button twice to toggle between air activation (auto draw) or auto mode (auto draw or button firing). In auto mode you will see a “Flame” icon appear.

- Adjust output = Press the button 3 times to enter adjustment mode. The current power output figure will flash. Press the button to increase the power until the power you require is displayed. Once you have reached the maximum power it will return to the minimum so you can start again. Wait 3 seconds or inhale on the mouthpiece to confirm the power level selected.
- Puff counter reset = You cannot reset the puff counter. It will automatically reset after 999 puffs.
- Adjust airflow = move the slide switch on the side of the mod to increase / decrease the incoming airflow to your preference.
Uwell Caliburn G3 Pro Protections

- Low battery – The screen will display “Warning” and the low battery icon. The “G3Pro” logo will flash 10 times and the device will stop firing. To rectify charge the battery.
- Short circuit / too low resistance – The screen will display “Warning” and the short circuit icon. The “G3Pro” logo will flash 3 times and the device will stop firing. To rectify clean all pod and device contacts. If still not working try a new pod. After that if the issue persists the device may be faulty.
- Open circuit / no pod installed – The screen will display “Warning” and the open circuit icon. The “G3Pro” logo will flash 4 times and the device will stop firing. To rectify make sure a pod is installed. Clean all pod and device contacts. If still not working try a new pod. After that if the issue persists the device may be faulty.
- Over time – if you vape for longer than 8 seconds the screen will display “Warning” and the “8s” icon. The “G3Pro” logo will flash 5 times and the device will stop firing. To rectify simply inhale on the mouthpiece or press fire again.
How To Charge The Battery
The charging rate is specified as 2A.
- Using the included USB type C cable, connect the small end into the USB port on the mod.

- Connect the large end of the cable into a suitable USB outlet.
- The screen will display the battery symbol and the “G3Pro” logo will pulse whilst charging. When fully charged the screen will turn off.
I found it took around 40 minutes to charge from full.
How To Fill the G3 Pod
If using a new pod leave to stand for 5-10 minutes after the first fill to allow the coil to saturate with e-liquid.
Make sure to fill when the e-liquid level is above the minimum marking on the side of the pod.
Side Fill Pod
- Remove the pod from the mod.
- Tip the pod onto its side and lift up the fill port cover.

- Add e-liquid and watch the level through the side of the pod.

- Replace the fill port cover firmly.
- Insert the pod back into the mod.
Top Fill Pod
- You do not need to remove the pod for filling.
- Snap off the mouthpiece by pushing it to the side.


- Push down on the Red port with e-liquid nozzle.

Left = Valves closed, Right = Valves open - Fill whilst observing the e-liquid level through the side of the pod.
- Replace mouthpiece.
How Does The Uwell Caliburn G3 Pro Perform?
As there are 2 different types of pod on here, I will use different e-liquid to suit.
If any of these terms are over your head – have a read of our handy guides below!
- MTL V DTL – A Guide To Vape Styles
- VG and PG in E-liquid – all you need to know
- Beginners guide to E-liquid
- Nic Salt E-liquid
0.9ohm Caliburn G3 Pod
For this pod, I used my own e-liquid mix which is 50/50 PG/VG made from IVG Bubblegum Concentrate at 20% ratio. This is quite high a flavour ratio as I prefer plenty of flavour, but sadly this means it can be a coil killer sometimes.
I add nic salt to approx 6mg strength.
This is such a great pod it really is!
Even at only 15W (which is the default automatic level set by the mod) it is perfect.
Admittedly the first few vapes may feel slightly lack-lustre but hang in there and soon the flavour starts flooding through!
For a low power output this really does give a lovely warmth and flavour. As for vapour this is never going to be a cloud chucker but it is what I would expect.
I only use 6mg of nicotine so I am unable to comment on the throat hit. If that is something which is important to you I would suggest grabbing the 0.6ohm G3 pod as that will suit you much better.
Right now I have vaped 36ml (1022 puffs) and the flavour is still superb!
0.4ohm Caliburn G3 Pod
For this pod I used the Choppa Vapes Choppa Collection e-liquid in Blue Slush which has a 70%VG / 30%PG ratio. This is ideal for higher output pods and coils.
There is no nicotine added to this as I like my e-liquid flavour strong.
The mod immediately set the optimum output at 35W.
I have to say this little pod is pretty surprising.
Yes it is only 35W on a small coil but it performs blumming well!
There is plenty of heat and a very good quantity of vapour.
The flavour too is absolutely spot on!
Airflow
I have to admit to being a bit puzzled about the airflow.
On other kits which use the G3 pods there are 2 airflow settings which you choose by rotating the pod 180° in the mod. This chooses between the larger or smaller airflow hole on the base of the pod.
Of course this is the same with the G3 Pro – but here we also have an airflow adjustment slider. So I am very puzzled as to whether rotating the pod gives even more airflow options?
With the 0.9ohm I can barely notice any difference whichever way around I install the pod, so if there is any airflow alteration it is likely to be only very slight. I could not sense anything obvious. So I will just rate the airflow range according to the slider settings.
I use a rating system for airflow – 0= fully closed and 10= like breathing unrestricted fresh air!
For the 0.9ohm pod I would say it is around 1.5 fully closed (you can still trigger the auto fire) and 4.5 fully open. This means it is ideal for MTL and a more restricted RDL airflow.
For the 0.4ohm pod I would rate this around 1.5 fully closed and 5 fully open – again ideal for MTL and RDL vapers.
Leaks?
Not a dribble at all – perfect!
Mod Performance
The mod is very responsive and I have found the power stayed stable right until the last few puffs before the battery charge ran out.
The output felt authentic, i.e. 15W on here feels like 15W on similar devices. This is not under or overpowered in any way.
The charging is quick too which means you will be up and running in no time.
Robustness
Well I gave one of these kits to my neighbour. He could even break an Aegis – so vapes have a very tough life with him!
Anyway he ran over this vape with his Vauxhall Zafira and as you can see in the video below it looks pretty trashed!
But it still works! Obviously the screen is knackered, but you can inhale on the mouthpiece and it works perfectly!
That really shows the quality here, a lot of vapes and phones would not work after undergoing this treatment!
Battery Life
This will always rely on your own vaping habits and the pod selected. I am a very heavy vaper so this must be considered. Plus I think I have 3ml pods – not sure! For a guide these are my timings…
With the 0.8ohm pod at the standard 15W I got around 260-300 puffs and a whopping 9-10 hours from one battery charge!
Pros
- Amazing super clear screen
- Heavy but very robust
- Excellent quality
- Compatible with other Caliburn G3 pods
- Proper adjustable airflow rather than just the 2 settings (rotating pod 180°) on previous versions
- Caters for MTL and RDL vapers
- Quick charging
- Beautiful flavour
- Excellent battery life – 9-10 hours even for a heavy vaper like me!
Cons
- The dancing Robot thingy on the screen could look a bit childish / tacky to some
- E-liquid viewing window is only cut out of one side of device so not a great view
- Puff counter only displays when vaping and briefly after. It would be good to see this on the main display (subjective)
- Cannot reset puff counter (again only bothers me when reviewing – wouldn’t be an issue personally in normal use)
- The kit contains 2 very different pods and beginners may not know to use different e-liquid / nicotine strengths in each?
Final Review Verdict
This kit is funky and very chunky!
It feels super robust but it is quite heavy.
The screen is gorgeous and looks very technical and the overall appearance is pretty classy.
A couple of improvements which would make me happier are a fully cut out both sides e-liquid viewing window and the ability to change the animation theme. Some people might find the dancing Robot thingy a bit childish/gimmicky.
Oh and another – you can only see the puff counter when vaping and for a second after you stop. As you can’t really see the screen when vaping you have to be quick to catch it if you have locked the fire button. With all this space on the screen the puff counter could have been on the main display. But if I wasn’t reviewing this kit – I would only probably look at the puff counter when the pod died to see how many puffs I got. Plus you cannot reset the counter, this would only be an issue when I put a new pod in for instance.
The kit includes a 0.9ohm and 0.4ohm pod. Which is strange. I understand Uwell want to keep MTL and RDL vapers happy but these are two very different pods.
Those wanting to use strong nicotine e-liquid may accidentally use the 0.4ohm pod and find the output a bit harsh. Equally those wanting some low ohm vaping may be disappointed with the 0.9ohm pod.
So if you are MTL only or RDL only you will only have one pod in this kit which meets your expectations. I know Uwell want to showcase the full range of this pod but in practicality terms it doesn’t quite work. I have had to explain to people the difference between the pods. Starter vapers don’t need that added level of complication.
But pretty much all my whining can be dismissed by the performance of this kit. The flavour and vapour make this a joy to use. The Caliburn’s have had an excellent reputation for flavour and this kit just adds to that pedigree.
As quality pod kits go – the Uwell Caliburn G3 Pro is up there with the best. You won’t regret buying it at all!


hey michelle, very cool review ! i’m an avid user of caliburns, and this is such a great upgrade after breaking my caliburn A2 !! although I was wondering, I am located in Canada and the little robot isn’t showing up on the screen. I can see the outlines, but it doesn’t glow on the screen… any ideas why ?!
Hi Michelle,
Nice review. I have a G3 pro myself and it is indeed a very nice device, although as you wrote some improvements would be welcome. I really like the G3 pods as I never had a leaking one, unlike the Xros and Xlim V3 pods, and the G3 pods don’t leak even after being filled for months.
Let me give you a suggestion about how to remove the top piece from a top-filling pod. Snapping off the top piece by pushing it in the direction you showed in your review (push the long side of the top piece) is very hard work; I can see why you used your teeth for that. However, if you snap off the top piece by pushing on the narrow side of the top piece then it doesn’t take much force to remove it; just rotate the mod a quarter of a turn in your hand before pushing the top piece.
Nice one I will definitely try that the next time I get the top fill thank you!!