It seems like a very strange way to start the Vaporesso Target 80 review but it does feel like the Shenzen based manufacturer are stalling when it comes to innovation.
A brief look back on this series of devices will explain why I think this.
First there was the Target Mini using proprietary ceramic CCELL coils powered by a 1400mAh integrated battery. This was followed by the Target Mini II which upgraded the internal battery to 2000mAh, improved the CCELL coils and boosted maximum power to 50W.
Progression.
Then came the PM range consisting of the Target PM30 featuring three step voltage control, the Target PM80 with the built in AXON chip, 0.96in TFT screen and a 2000mAh internal battery.
Hot on its heels the Target PM80 SE arrived offering both direct and restrictive direct lung vaping options. More noticeable was the inclusion of a single external 18650 battery to power the 80W device.
Further progression.
Can We Expect Innovation?
The Target PM80 and Target PM80 SE both made use of the GTX Pod 26 and associated range of proprietary GTX coils. In fact the Luxe 80 and Luxe 80S opted to use them too.
There’s nothing wrong with cross compatibility, nor is there anything wrong with the progression and development of these devices. Up until now, maybe.
The Vaporesso Target 80 doesn’t seem to be pushing any boundaries when it comes to innovation. Haven’t we already seen and experienced what this range has to offer us?
What makes it stand out from previous Vaporesso pod kits?
It’s time to take a closer look and time to answer those questions.
What Can We Expect From The Vaporesso Target 80 Pod Kit?
The included GTX coils have lower resistance ratings so we can expect a true direct lung vaping experience when coupled with the GTX 26 pod ‘tank’.
The Target 80 is described as being ten times stronger. Compared to what is not made clear but I’m assuming previous kits within the series.
Although not IP67 rated we can expect it to be well suited to outdoor hobbies and interests.
Also expect backwards compatibility with all coils in the GTX range including the RBA section.
An improved internal battery capacity will increase the lifespan of a single charge so it’s fair to expect a full days use from either coil.
Finally, the AXON chip makes a return so don’t expect any convoluted menu screens just a tweaking of flavour and vapour performance when using the various modes.
Inside the Box
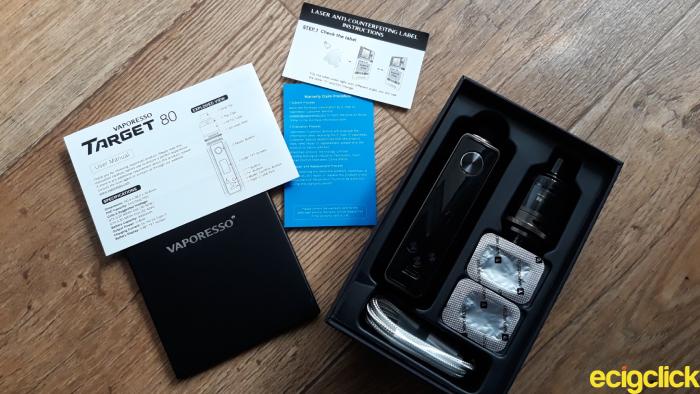
- Target 80 MOD
- GTX Pod 26 (5ml capacity)
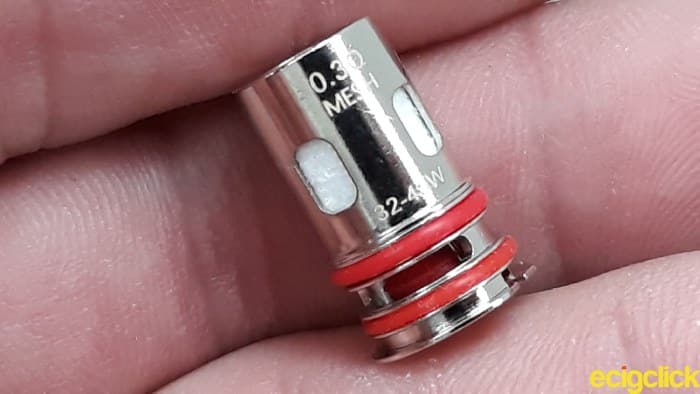
- 0.2ohm mesh coil
- 0.3ohm mesh coil
- Type C USB charging cable
- User manual
- Warranty card
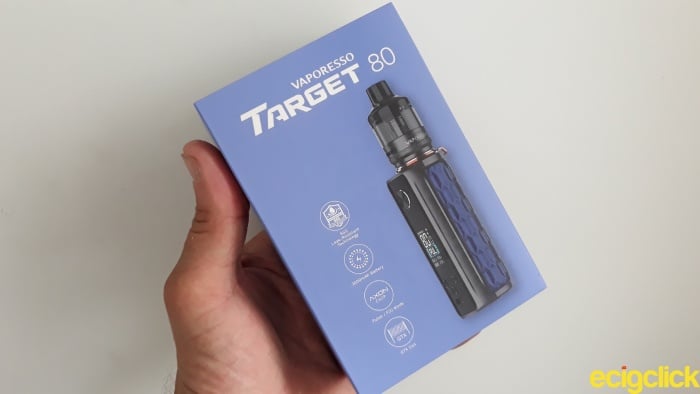
Vaporesso Target 80 Kit – Key Features
The Vaporesso Target 80 kit is more durable than previous versions in the series and very much designed for out and about use.
The AXON chip is once again providing subtle differences to power, flavour and vapour production when called upon.
The user friendly colour screen interface is large and clear helping to make the various modes easy to scroll through and work with.
The internal battery is the most powerful in the Target range featuring a 3000mAh capacity to rival a single 18650 battery and all GTX coils are compatible with the GTX 26 pod.
The top filling system makes a welcome return. Seals on both base of the pod as well as coils should ensure a leak free vaping experience. Fingers crossed on that one!
The pod spins freely within the 510 adaptor to provide a range of direct lung vaping styles from airy to semi restrictive thanks to fully adjustable airflow control.
There are two versions available. The standard edition (under review) and a TPD equivalent featuring a 2ml pod.
All other items in the respective boxes are the same.
A choice of colours are available. Black, Grey, Blue, Green and Red. The gunmetal of the frame is incorporated into all schemes.
Vaporesso Target 80 Kit – Specifications
- Material Zinc alloy/PCTG
- Size 130.9 x 30.8 x 38.3mm
- Weight 129.4g (battery only)
- Pod capacity 5ml/2ml
- Output 5-80W
- Charging current DC5V/2A Type C
- Display 0.96in TFT colour
- Resistance range 0.15 – 5.0ohm
Vaporesso Target 80 Kit – Design and Build Quality
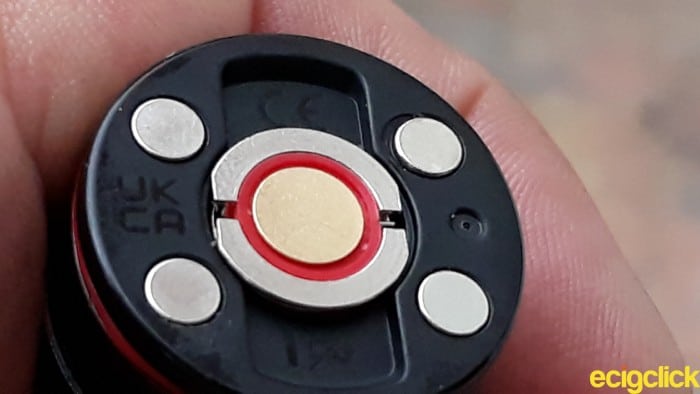
Battery section – 510 Base Plate
The battery measures 84.4mm from top to bottom with the pod removed.
Starting at the top the 510 plate measures 25.5mm in diameter. Unlike many pod system this means it’s possible to use a range of tanks, RTAs or RDAs of your choice.
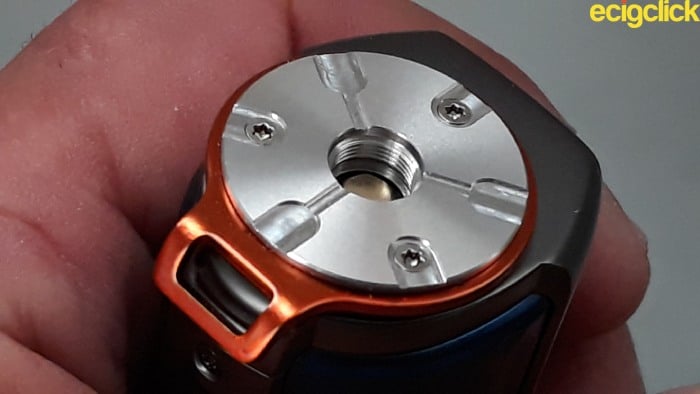
I attached a 24mm RDA and the orange coloured trim around the base plate is still visible. The chances are you’ll run into overhang issues from 26mm diameter on wards.
There’s also a trio of cut outs on the surface of the plate allowing old school air fed tanks to be used.
Are they still a thing? lol!
The orange trim around the 510 base plate extends out to include a lanyard clip that protrudes down towards the front of the battery.
We’ll find out if it gets in the way of everyday use. I’m not the biggest fan because it resembles a flip cap and to be truthful? Orange with this colour scheme? Nah..
Vaporesso Target 80 Main Body
However, if wearing pod kits around the neck is your thing don’t worry about being bogged down by weight, I was very surprised at how light the kit is. With the pod attached it’s not likely to weigh above 135g.
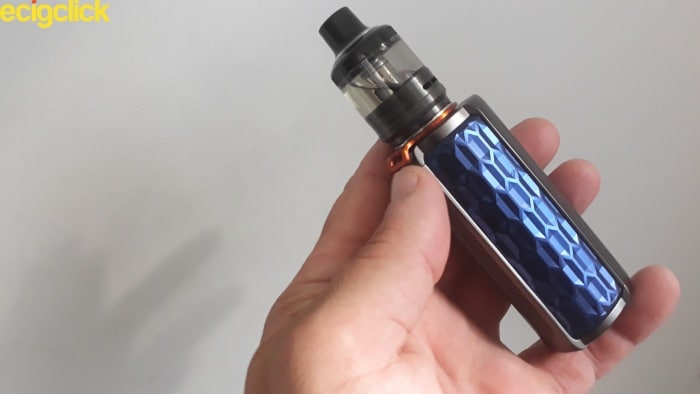
It’s not stated but I imagine the material to be zinc alloy, this would include the gunmetal frame and main body.
Despite being lightweight, Vaporesso claim the Target 80 Kit can be dropped from a height of 1.5M without suffering damage.
I’ll be putting that to the test – a short video will follow at some point…here you go:
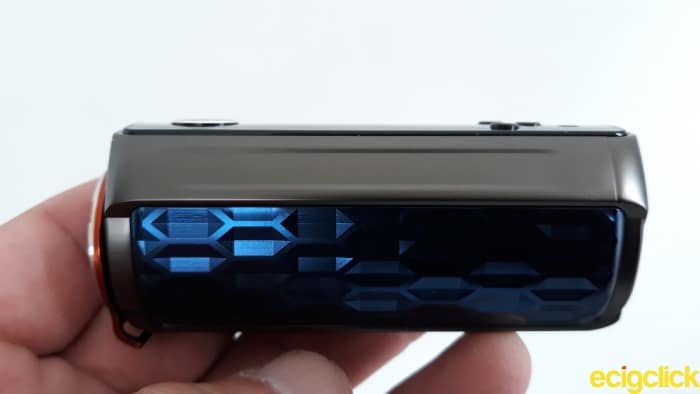
What do I think of the main body design? It’s certainly different and the Aspire Odan sub ohm tank springs to mind. It wouldn’t look out of place here.

They both share a similar diamond cut appearance, and the beveling of the side panels throw some very nice light refraction and against the metallic blue background a few 3D visual effects.
Although the beveling does provide grip the material still feels a little greasy in the hand.
The Base
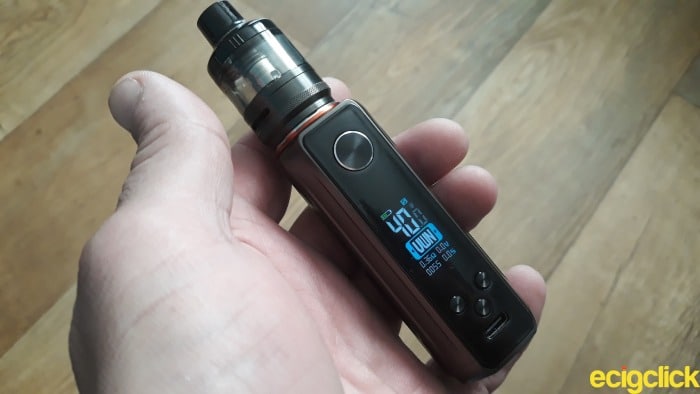
At the base we’re reminded of the integrated AXON chip, the battery capacity and the name of the pod kit.
The shape looks familiar and brings to mind a spring loaded battery door – ready to receive a single 18650 battery. Given the width of the device it could even house a 21700 – but I’m digressing… Again!

I’m always reassured by battery venting and Vaporesso hasn’t let us down. It’s very much appreciated.
The width of the base also means the Vaporesso Target 80 kit will sit and behave on any surface while being plugged into a wall socket thanks to the bottom mounted type C charging port.
Vaporesso Target 80 Front Panel
The gloss black front panel is made of plastic and is something of a fingerprint magnet.
Both fire and menu buttons have a little bit of movement inside their housings but nothing to get too worked up over.
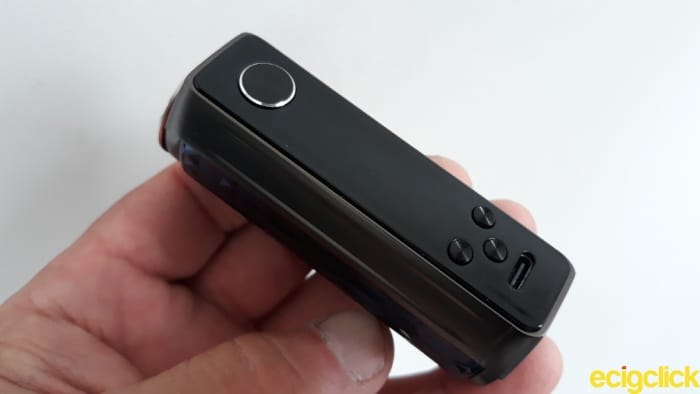
The 12mm diameter fire button has a base like click while the 4.5mm menu buttons have a distinctive treble sound when pressed.
The menu buttons are more elevated than the fire button which is a shame but I don’t anticipate any problems with day to day use.
An additional menu button has been included so let’s find out why with a look around the functionality of the Vaporesso Target 80 kit.
Functionality
There are three menu buttons underneath the 0.96in TFT colour screen. The left and right act to scroll through options while the one beneath selects them.
Five rapid presses of the fire button will turn the device on. Do this again to switch it off.
- Press the fire button three times to lock/unlock the device. The menu buttons will not function but it’s still possible to vape.
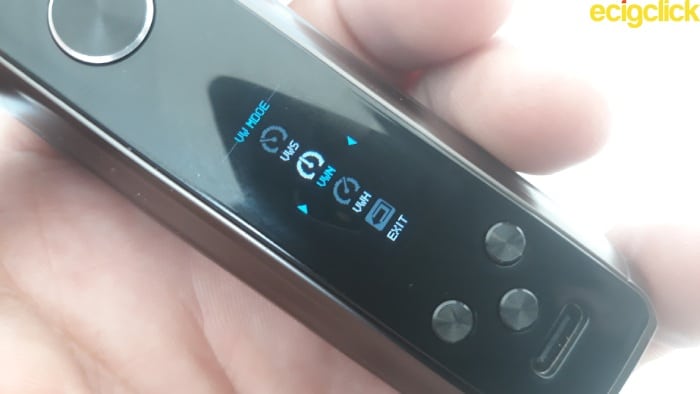
- Press and hold the lower menu button to cycle through the modes on offer. By default these are F(t) mode, PUL (pulse mode) and VWN (variable wattage normal) mode.
- Press the lower menu button three times for further options. Use the left or right menu buttons to select any of them. These include DIY mode, system mode and exit which takes you back to the main screen.
Vaporesso Target 80 DIY Mode
Selecting this mode will allow the device to work in variable wattage, variable voltage or bypass mode.

Selecting variable wattage will allow a soft (VWS), normal (VWN) or hard (VWH) edge to the vape.
The AXON chip effectively alters the voltage level to suit. For example, the battery will pull a constant 4.2V when selecting VWH, 3.7V for VWN and 3.1V for VWS.
Variable voltage does exactly what it says.
In this mode you can pull whatever voltage you require via the left and right menu buttons.
Choose from 0.0V (that would be silly) right up to 9V. Running at 9V is something you should definitely avoid doing.
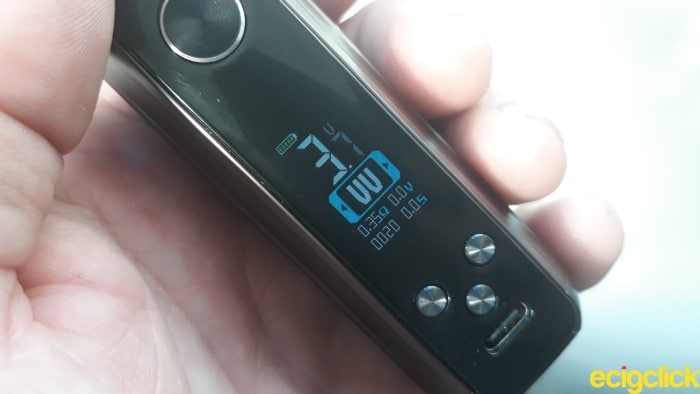
Use this mode with care. The maximum voltage I would suggest at any given time is 4.2V.
Bypass mode has a similar effect of using a mechanical mod in that power (voltage) is drawn directly from the battery. As the power of the battery decreases so does the available voltage and effectiveness of the inhale.
Personally I’ve never seen the appeal when variable wattage can hold the optimal voltage for your choice of vape.
Vaporesso Target 80 System Setting Menu
As well as DIY mode there’s the system setting menu.
Here it’s possible to restore the original ‘out of the box’ factory default settings, reset the puff counter, discover the firmware version of the device and probably most importantly of all, run the AXON chip in smart mode.
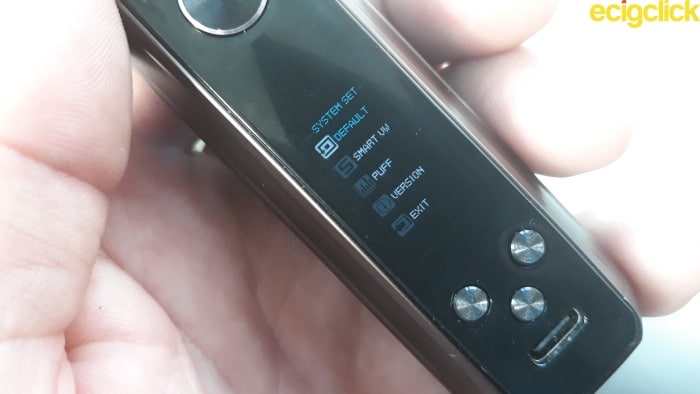
In smart mode the device recognises the optimal wattage for the installed coil, calculated as soon as the pod is attached to the battery section. It’s a very cool idea that’s perfectly suited to a new vaper.
However it’s still possible to make wattage changes up to a maximum of 80W.
For this reason I would have to class it as ‘semi smart’. It’s a shame Vaporesso never applied a maximum output limit in the way other manufacturers do.
Vaporesso Target 80 GTX Pod 26 Section
I’ve covered this with the Vaporesso Luxe 80 Pod kit. So if I’ve missed anything here refer back to that. I’m getting old now – memory like a sieve! lol
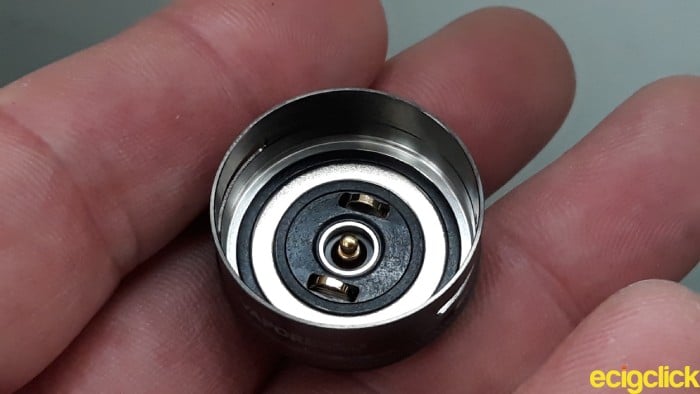
As the name suggests the pod has an overall diameter of 26mm and sits within the 510 adaptor plate with a very satisfying snap thanks to four strong magnets on the base.
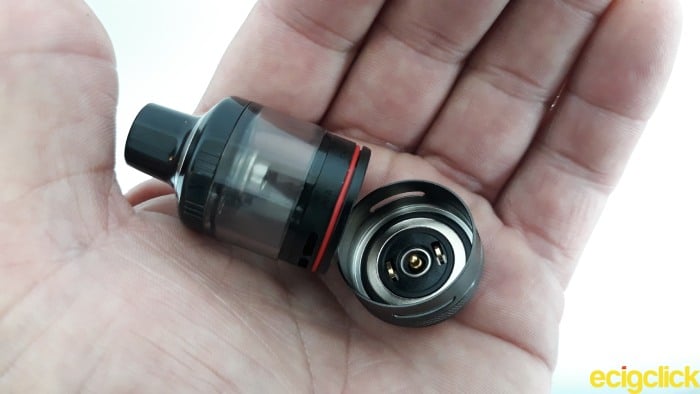
The gold plated spring loaded positive contact sits in the centre of the connector plate with negative coil contacts either side. It screws down firmly onto the battery with no side on side motion.
The pod is comprised of a very tough and durable PCTG material and the juice viewing window is very clear – another bonus. SSS leak resistant technology ensures it seals comprehensively, saturates properly and stores E juice safely.
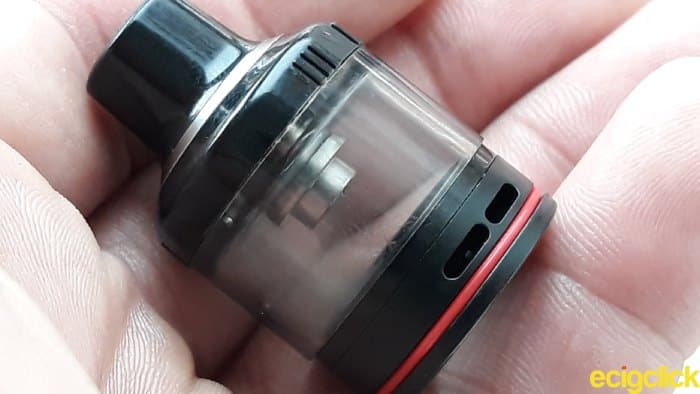
Dual fixed airflow slots each measuring 5mm wide are positioned either side of the pod at the base. The pod spins freely within the 510 connector plate thus allowing the fine tuning of airflow.
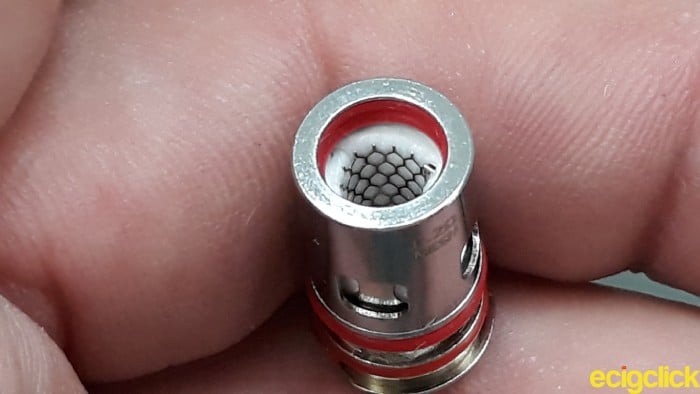
Underneath the fixed airflow of the pod is a red sealing ring designed to help prevent leakage.
Top Cap
The part I like the least.
Why?
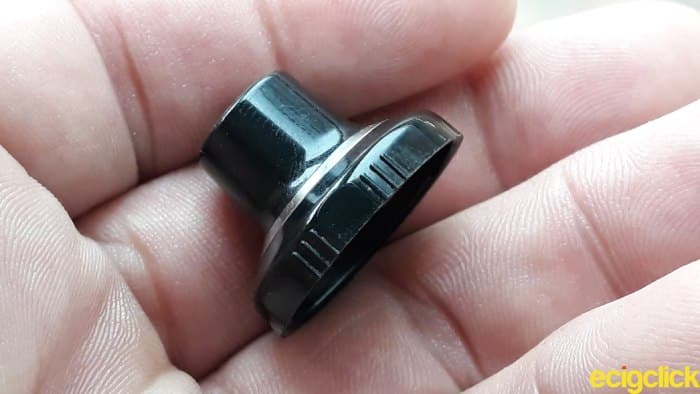
For one it feels cheap and tacky. It’s a bayonet style fit that just doesn’t work as well as steel threading. I guess that’s the nature of pods though. Just got to suck it up, buttercup!
Vaporesso has incorporated a few knurling points but I’m still not convinced by the integrity. You’ll certainly have issues trying to remove it while the pod is inside the battery section. The pod would rather spin than let you remove it.
That’s a design flaw design in my opinion but remember it is only my opinion.
Initially the moulded mouthpiece appears quite wide bore to accommodate those long direct lung pulls, in reality it restricts down to 6mm.
How this impacts on those airy vapes we shall see.
Installing the Coil and Filling the GTX Pod 26
Given the fill port works as a non return valve it could and maybe should have been made larger.
An oval shaped opening would have been beneficial to those wider bottle nozzles, as things stand you may have filling issues.
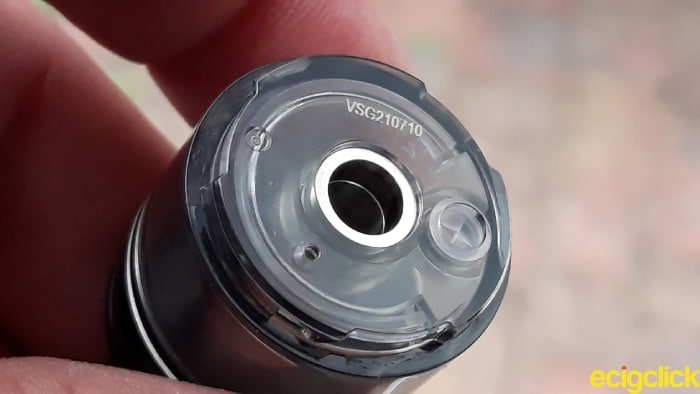
Vaporesso has included a small air release hole so that does help with avoiding airlocks. No one likes an airlock mid fill!
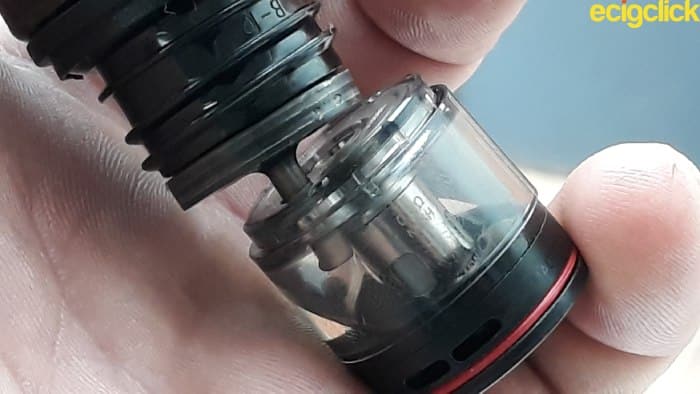
Before we even tackle the filling process it might be an idea to fit a coil first..
The GTX range of coils are plug and play so there’s no wrong way of installing them.
- Pull the pod out of the 510 connector plate
- Push the coil up and into the pod ensuring a good seal
I like to install in the way shown above. It’s not vital that you do though. I also like to prime the cotton of the coil with e juice before installing. Again not vital but it works for me.
- Unscrew the top cap/mouthpiece to reveal the fill port on the GTX Pod 26
- Insert the bottle nozzle through the fill gasket and gently administer E juice to a level well above the wicking ports
- Screw the top cap/mouthpiece back into place
Leave the E juice for five minutes before vaping so that saturation can take place…known as priming your coil.
I’ve been asked in the comments section before so here’s a reminder.
When juice levels falls below the wicking ports give the tank another fill. This will prevent possible dry burning of the coil and help extend coil life expectancy.
Vaporesso Target 80 Kit – How Does It Perform?
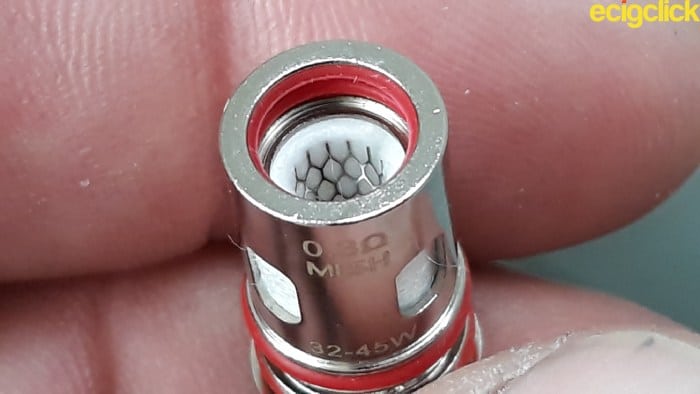
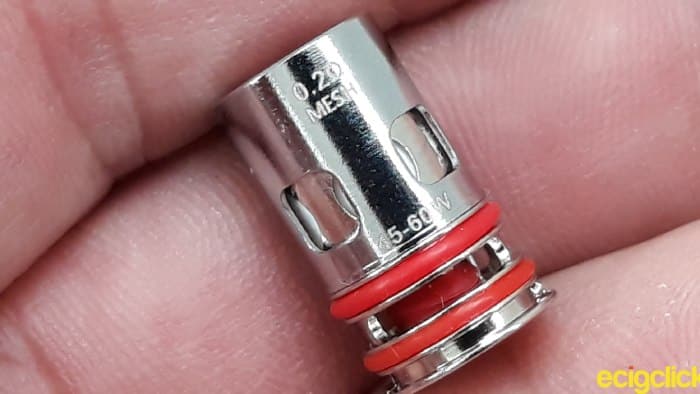
Both included coils are comprised of Ni80 mesh with antibacterial flax cotton and non woven fabric as wicking material. They share the same dimensions with a height of 18.6mm and diameter of 11.5mm.
I started with the 0.3ohm GTX coil and used Nom Nom Creme Anglais as my choice of flavour. It’s a 70VG/30PG juice ratio supplied as a short fill with freebase nicotine applied.
I used the AXON chip smart mode running at 40W, if only out of laziness to see if it indeed provided optimal flavour performance.
GTX 0.3ohm mesh coil (32W – 45W)
With airflow wide open there was an insane amount of vapour production.
It actually surprised me even though I’ve reviewed the coil elsewhere. It’s dense with plenty of volume during exhale. An extended inhale will provide just the slightest of throat tickles.
There was still the slightest of restriction but still on the side of a classic direct lung hit. Some warmth could be generated but those inhales needed to extend to around four or five seconds to capitalise.
The coil held up very well while chain vaping and with no turbulence of note. It was maybe on the noisy side but flavour properties more than made up for that.
All the dairy notes were intact from the very first vape. A decent level of sweetness kept flavour notes balanced and vanilla was omnipresent throughout the exhale. Custard tasted as if served from the bowl with an associated level of density and texture.
Further Restrictions
Cutting the airflow in half resulted in further warmth to the vape yet vapour production was the same as wide open.
It did seem flavour qualities were beginning to struggle a little. The restriction was having an adverse effect, creating less distinction between vanilla, cream and custard notes.
 In other words the experience wasn’t as natural tasting or enjoyable. It was still ok but not representative of a bowl of warm custard.
Further restriction actually crippled the entire flavour performance. A clear indication that the mesh coil craves airflow for optimal results.
GTX 0.2ohm mesh coil (45W – 60W)
This time I opted for Wick Liquor Boulevard as my e-liquid of choice. It’s an 80VG/20PG ratio which should work fine with this direct lung mesh coil. As a short fill I included a single 18mg freebase nicotine shot for a 3mg overall strength.
The AXON smart mode provided me with a pre determined output of 55W. That’s what I settled for throughout the test period.
It may have been the e liquid density but there actually seemed to be more restriction to the vape with airflow wide open. It certainly didn’t struggle to wick though and cloud production was very impressive.
Proof of the effective wicking could be noted during long and pronounced inhales. Chain vaping didn’t phase the ability of the coil either – all good stuff!
The exhale was proving to be slightly warmer with this coil helping to bring out the subtle flavour tones of the e juice.
All of the fruity tones and punch bowl ingredients of the e juice oozed out during exhale. Nothing was lost in translation and the mixture of wicking and airflow kept everything bright and vibrant.
Further Restriction
Reducing airflow to mid setting definitely had the effect of altering the direct lung vape into a semi restrictive one. Extended inhales caused the mouthpiece to warm up to uncomfortable levels.
However, the coil suffered no ill effects to those flavour qualities and if anything there was an increase to the level of sweetness. The smooth nature of the draw was also retained.
Is the coil any quieter? No not really – but there’s also no turbulence of note.
In fact the coil was able to deal with vast degrees of restriction without loss of flavour. It did enter into restrictive lung territory and wasn’t the most comfortable of vapes.
It felt very unnatural when restricting the coil to this extent.
Cloud production inevitably suffered as a consequence proving once again the coil craves airflow for best performance. With airflow set wide open I was pretty much in vape heaven.
Overall Coil Performance
Let’s cut to the chase. Despite claims, the coils do leak – and quite heavily. I noticed this after just a few refills and that’s a disappointment.
It seems the GTX coils crave as much airflow as possible. In both cases there’s still a level of restriction when wide open so if a more restrictive direct lung vape is your thing, don’t close the airflow down too much.
As for flavour? There really wasn’t anything to fault.
Admittedly it can take on a drier taste with the 0.3ohm coil but regular top ups solve that issue. It’s best not to let juice levels fall under the half way point.
The cloud production was quite surprising and actually very good, spilling out thick and dense with heaps of volume. On the same scale as a dedicated RDA? Certainly not far off if the un-approving scowl on the wife’s face was anything to go by!
Battery and Axon Chip Performance
I got a respectable nine hours use from a single charge. So we can safely say the battery will last for a full day considering I tend to chain vape.
The juice guzzling coils required numerous top ups and on average 245 puffs were recorded over the course of a single charge.
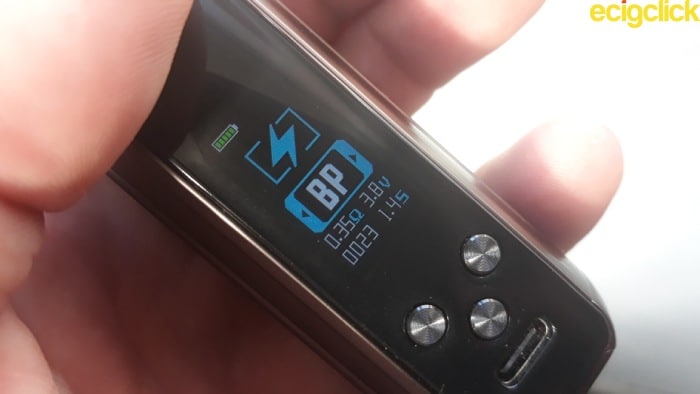
Type C charging also held up very well. 75 minutes to revive a flat 3000mAh battery is good going in my opinion.
For those impatient to wait there’s the option to vape while charging.
The AXON chip did a good job of boosting and holding voltage when using the VW modes. Whether soft, medium or hard it maintained respective voltage settings regardless of battery strength.
Pros
- Excellent flavour and cloud production from both GTX mesh coils
- Fast type C charging
- Quick and easy top filling
- Menu system isn’t over complicated
- Smart mode works a treat
- A light and pocket friendly pod kit
Cons
- Both coils leak after the first few refills
- The bayonet style plastic top cap can be difficult to remove
- The lanyard clip gets in the way (subjective)
- Display is difficult to read in direct sunlight
Final Review Verdict
To be honest I couldn’t tell the difference between F(t) and Pulse modes. They seemed to act the same as variable wattage in hard mode.
For the most part I used normal variable wattage in smart mode because that’s where I felt optimal performance was obtained. The flavour was great and so was the cloud production.
To conclude, the burning question still remains from the start of the review. Does the Vaporesso Target 80 kit offer anything new? The answer is simple…No…
However, it does perform like a trooper and much lighter than I anticipated.
Type C charging does an admirable job given an increased battery capacity.
The various modes of the AXON chip seem to act merely as a way of generating more warmth to the coil. I couldn’t say it did much to improve on what was already great flavour replication.
As always it comes down to performance and the Vaporesso Target 80 kit does that very effectively.
If you’re new to the manufacturer there’s no reason not to give the Vaporesso Target 80 kit a look. For anyone else already familiar with the GTX 26 pod and associated coils I’m not sure it’s worth fussing over.
Is this a vape kit you’re using or thinking of buying?
Please let me know your thoughts and opinions in the comments below!


