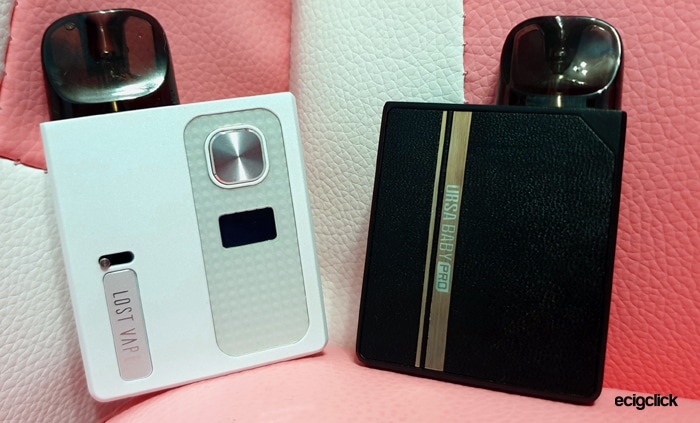
Time for me to get my hands on the cute little Lost Vape Ursa Baby Pro!
The Ursa family cover pod kits such as the Ursa Baby and Ursa Nano plus more advanced pod mods such as the Ursa Pod Mod and Ursa Mini Pod.

What To Expect From The Lost Vape Ursa Baby Pro…
This version takes the Ursa Baby and adds some upgrades.
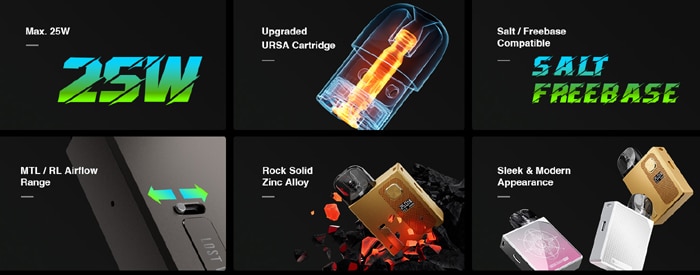
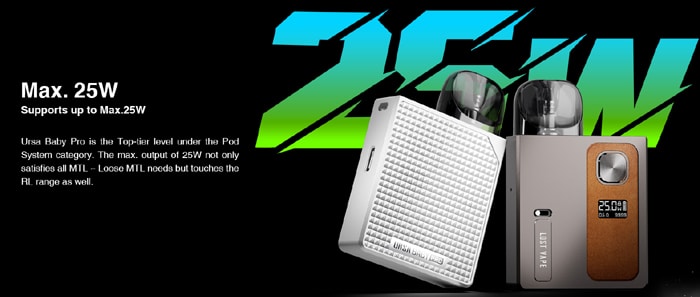
The main difference is the addition of the 0.42inch OLED screen. Plus using the fire button you can adjust the output from 5-25W.
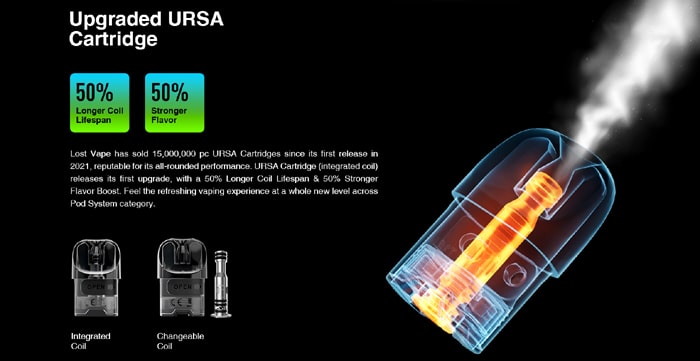
This has a great compatibility aspect too as it is supplied with a fixed coil Ursa pod which has a 0.6ohm coil plus a removable coil pod which uses the UB Mini coil range. You get the S1 0.8ohm coil in the kit too.
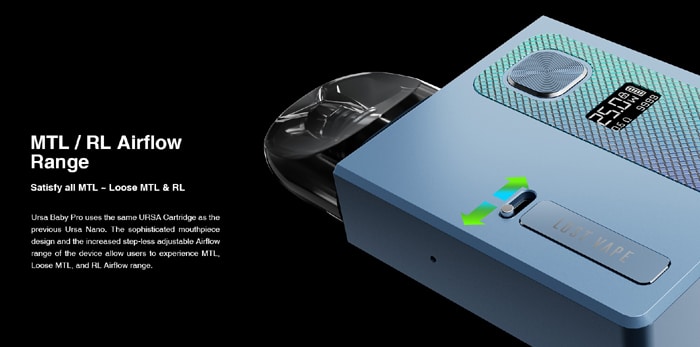
Plus even more compatibility is provided with the adjustable airflow which promises MTL and RDL vaping. We tell you what these terms mean in our Guide to Vape Styles.
Inside the device is a 900mAh battery which has USB Type C charging at up to a 2A charge rate.
I have struggled to find out how to fill the pod, there is nothing on the Lost Vape website or instruction manual – however one of the vendor sites who stock the pods show a side fill port.
Here is an introduction video from the Lost Vape YouTube channel.
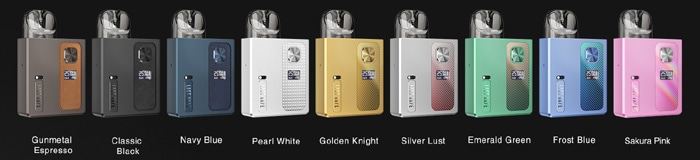
There are 9 colours to choose from: Gunmetal Espresso, Classic Black, Navy Blue, Pearl White, Golden Knight, Silver Lust, Emerald Green, Frost Blue and Sakura Pink.
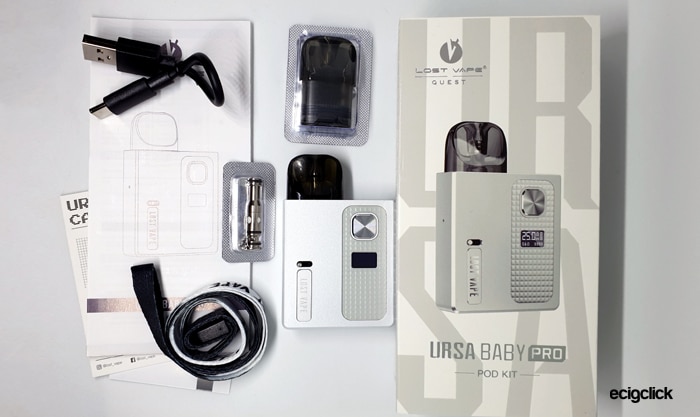
Kit Includes
- Lost Vape Ursa Baby Pro device
- 0.6ohm Ursa fixed coil pod
- Empty replaceable coil Ursa pod
- 0.8ohm UB Mini S1 coil
- USB Type C cable
- Lanyard
- User manual
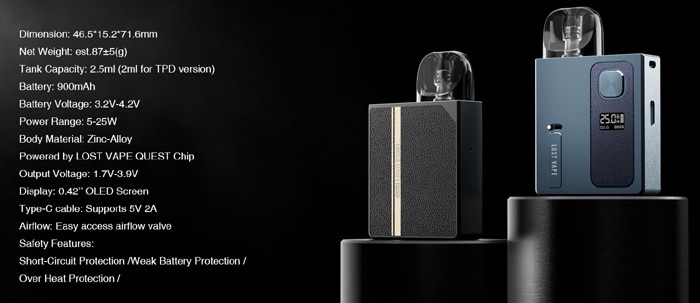
Lost Vape Ursa Baby Pro Specs
- Size: 46.5×15.2×71.6mm
- Output: 5-25W (1.7-3.9V)
- Battery: 900mAh (internal)
- Display: 0.42in OLED Screen
- Resistance range: 0.5-2ohm
- USB Type C port – 2A charge rate
- Pods: Refillable, fixed coil pods or Refillable replaceable coil pods
- Compatible with UB Mini coils and Ursa Nano fixed coil pods
- Capacity: 2.5ml (standard) / 2ml TPD
- Side fill port
- Lost Vape Quest Chipset
- Adjustable airflow
Design and Build Quality
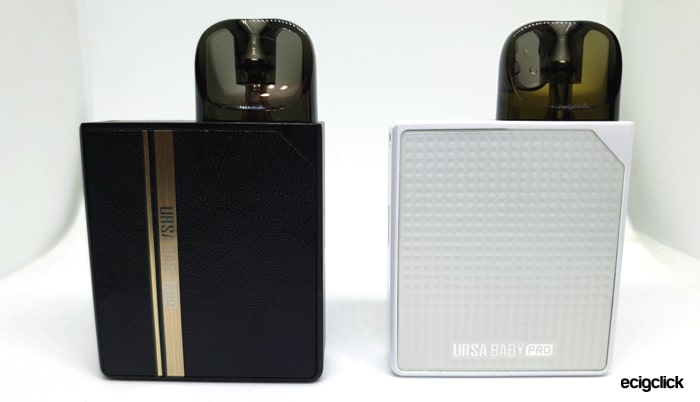
I received this in the Pearl White and Classic Black versions. It is worth noting as this is a sample I got the non TPD 2.5ml pods. If you buy this in TPD regulated areas this will only have 2ml capacity pods.

The packaging is great, even down to the tear off tape in the plastic shrink wrap – very nice touch Lost Vape!
Inside you will find a plastic platform which houses the device and accessories. There were no protective covers on the device but it must not need them as both kits arrived in pristine condition.
You get two information cards, one is the warranty details and the other is filling tips for the pod.
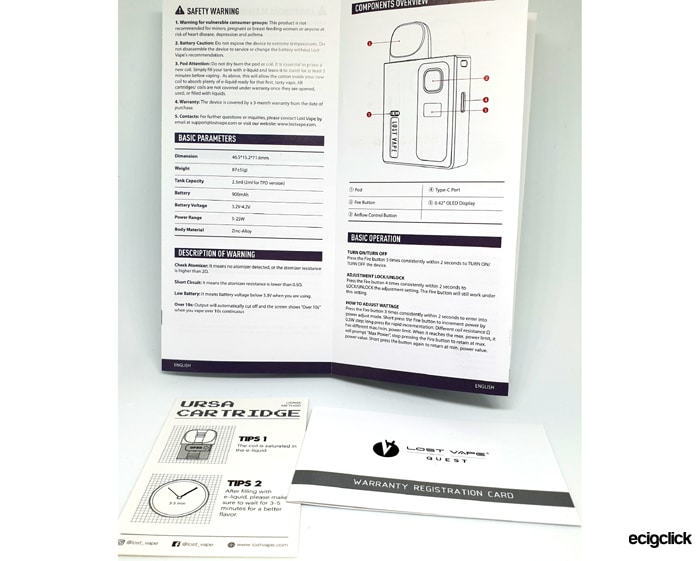
The instructions are a bit stingy, it is a pull out booklet with only 2 pages per language. It does cover fault conditions and all the operations so it is ok by me. You can also download a digital copy of the manual here on the Lost Vape Website.
Lost Vape Ursa Baby Pro Mod
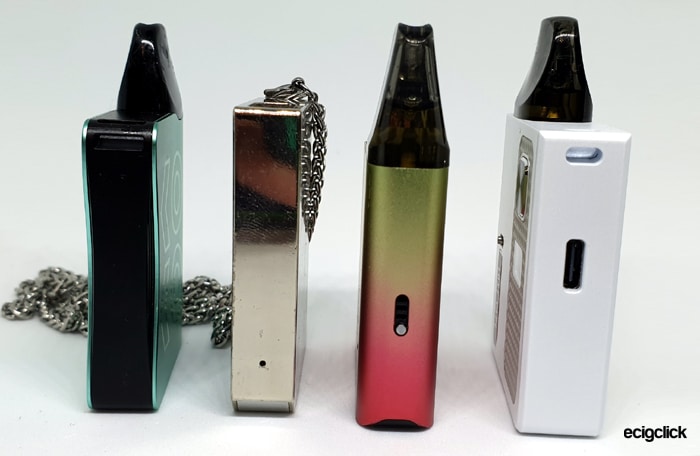
This is tiny, it is kind of like a thicker Voopoo Drag Nano and a chunkier Uwell Caliburn AK3. What a stunner!
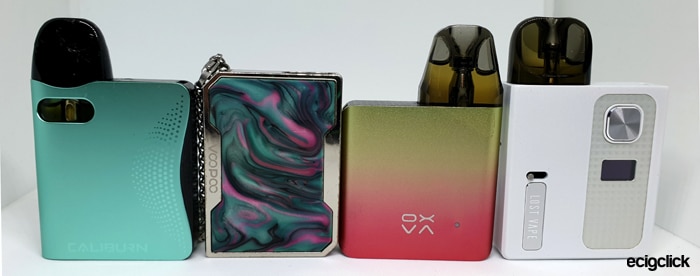
Pictured above and below with 3 similar devices!
Despite it being tiny it is bloody heavy – feels like a solid piece of metal – the metal used is stated as Zinc Alloy. I swear most of the body is solid!
Design
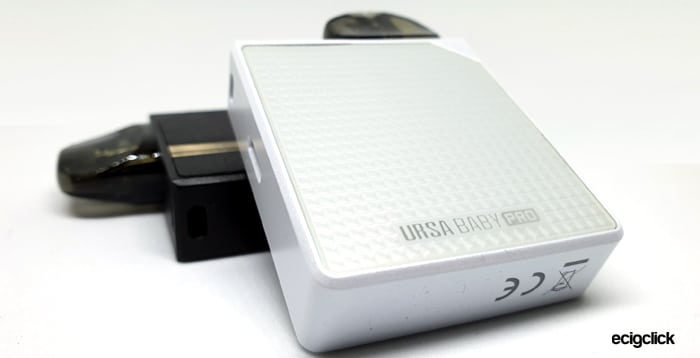
The Pearl White version is so pretty with textured panel areas on the front and rear which make you want to keep stroking it! On the rear is a small plate with “Ursa Baby Pro” printed in Silver.
The Classic Black version has quite a different design, the textured panels on this feel like Leather. The rear features a Gold stripe with the “Ursa Baby Pro” text in Silver.
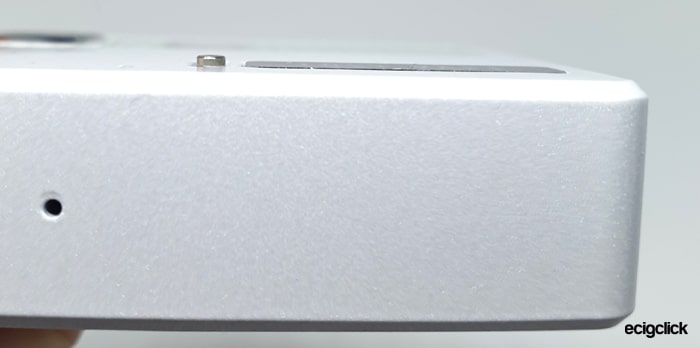
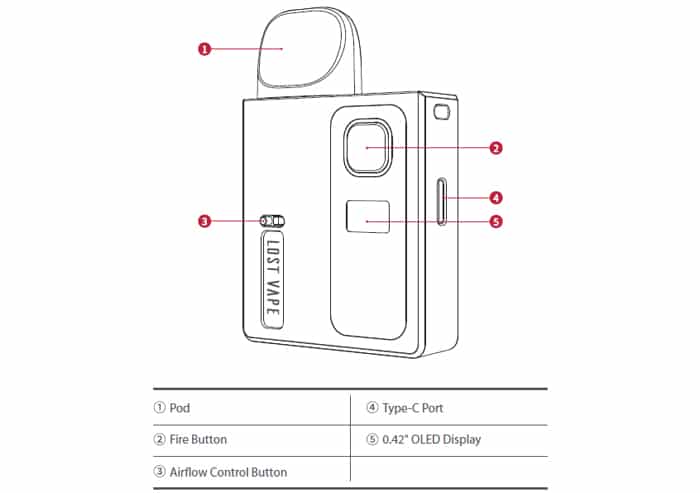
On the left of the front is the airflow adjustment slider, this only protrudes about 1mm from the body so will hopefully not catch on pockets and bags. It has a good resistance to movement so shouldn’t move on its own.
Below the slider is a plate with the Lost Vape logo stamped on in Silver.

Above the screen is the rounded square shaped fire / adjustment button. This only protrudes about 1mm from the face of the mod so should not be in the way.
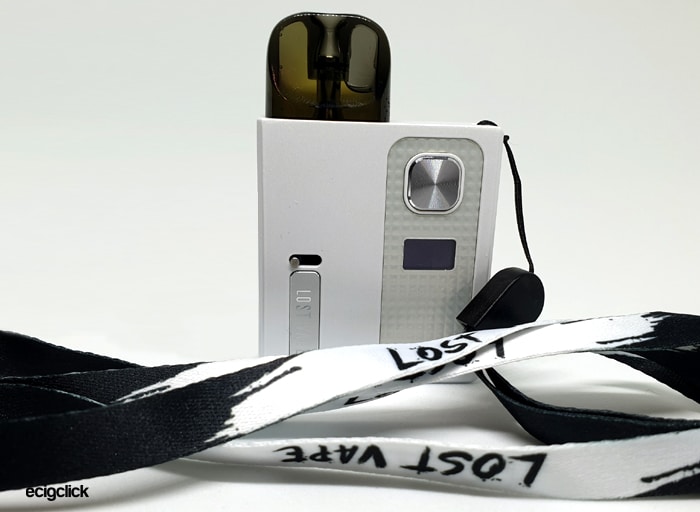
On the side of the mod is the USB port and the lanyard attachment hook – shown above is the lovely ribbon style lanyard in position.

The opposite side is plain with just a pinhole shaped air inlet.
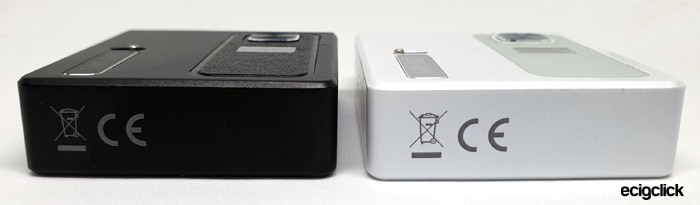
The base features the required legal logos.
Screen
On the right side of the front nestled within the textured panel is the small screen which is bright and clear but a bit crowded.
The display shows the wattage selected (this is variable wattage – I will tell you how to adjust further on in the review), to the right of the wattage is the padlock symbol and then a “W” to denote Wattage.

Below this is the coil resistance and puff count. I love how when you turn the device off it says “see you again” and when turning on the software version is displayed.
Pod Compartment
This is a very deep pod compartment which might be a pain in the arse to try and clean if you have a leak or condensation – it will be cotton bud time.
There are 2 spring loaded contacts, 2 strong magnets and some airflow channels.
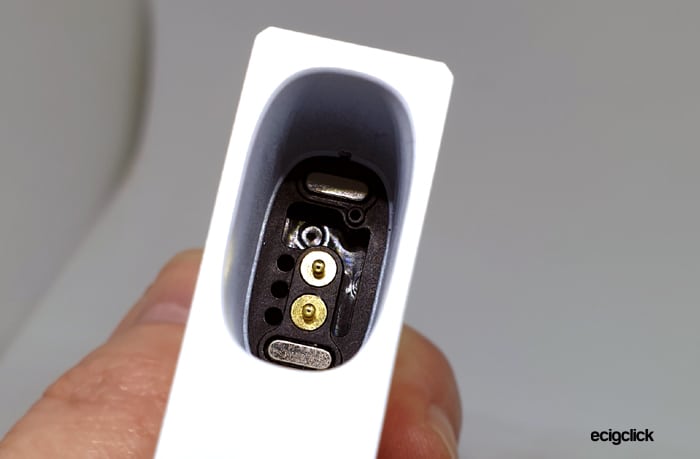
(note – the shiny-ness inside the compartment is not e-liquid – this was before I filled it, it appears to be a shiny rubber seal).
The pod is a tight fit in the compartment which I do not feel is totally due to the magnets as you can hear the pod scraping against the metal of the body.
Needless to say I believe this pod is going nowhere without a fight even if dropped!
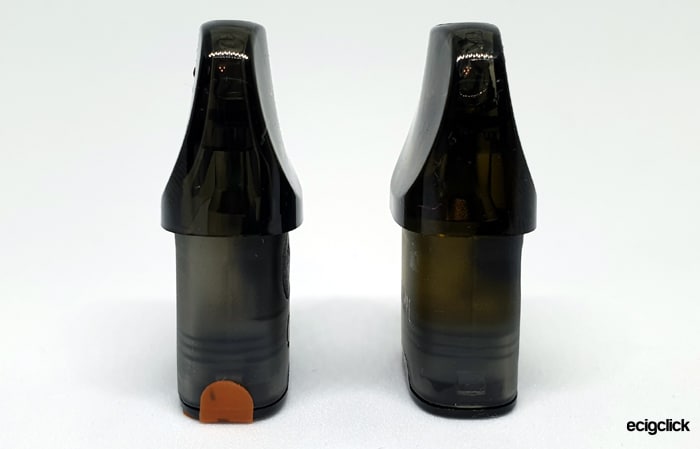
Ursa Baby Pods
There are 2 different pod styles included in the kit…
0.6ohm Fixed Coil Ursa Pod
This pod has a fixed coil, so this is ideal for those who don’t want to get their hands messy changing coils.

The pod is darkly tinted but you can still see the e-liquid level if you hold it up to the light. When installed in the mod only the mouthpiece section is visible but you can tip the device to get a good idea of how much e-liquid is left in the pod. The lower part of the pod is frosted but you won’t see this when it is installed in the mod.
It has a “Duck Bill” style flattened mouthpiece which is rounded and very comfy to use.
The rear of the pod has the “Lost Vape” logo etched into the frosted area and the coil resistance on the side of the plastic platform which seals the pod base.
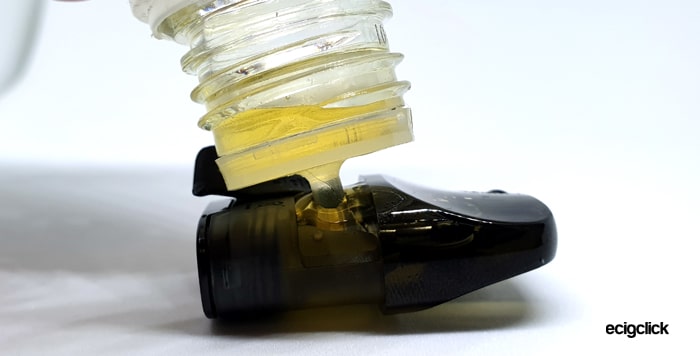
On the front of the pod is the oddly located fill port. It is covered by an easy to remove silicone cover which you lift up where the arrow points. A small cut out is provided to help lift up the cover and it can be swung out of the way.
The location is weird as you have to put the pod on its side to refill or else anything above the fill port will widdle back out again.

Measuring approximately 4x6mm the fill port has posed no issues with any of my e-liquid bottles and no airlocks either. I will mention it is hard to close the fill port cover, you really have to push.
Below the fill port the required legal logos are etched in.
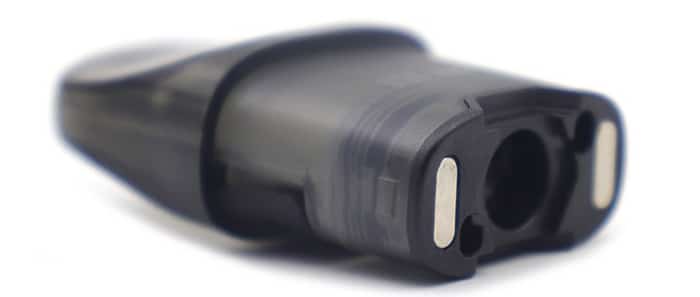
As the coil is fixed the base houses the contacts with the mod, 2 magnets and airflow ports. The pod can be inserted either way around in the device.
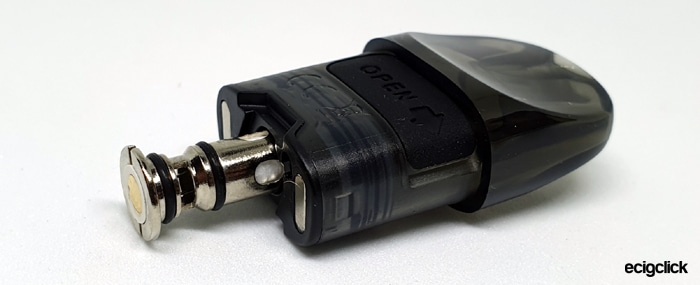
Ursa Replaceable Coil Pod
If you take a brief look at this pod you would think it is the same as the fixed coil pod.
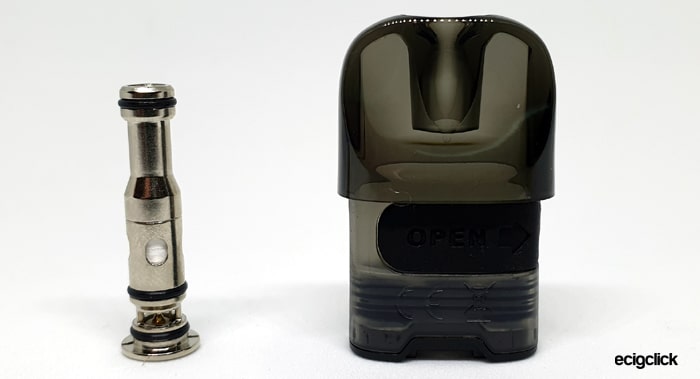
Which it is really apart from the base.

The coil is a push in / pull out style so looking at the pod base instead of contacts you have the actual base of the coil. A reminder – try not to pull the coil out with a full pod – I have just done it and e-liquid everywhere.
Lost Vape Ursa Baby Pro Quick Start Guide
This has an isolator sticker on the base of the 0.6ohm installed pod to prevent it being used before the pod has been filled.
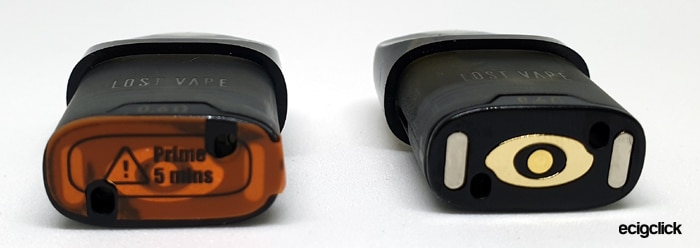
Using this before the pod has been filled will burn out the coil/pod and probably make you puke with the dry hit from hell! Therefore I suggest not removing the isolator or vaping until the pod has been filled and left for 10 minutes.
I will tell you how to get going below!
Basic Operation
- Power On/Off = Press the fire button 5 times to turn on or off. When turned on the screen will display.
- Vaping = you can either inhale on the mouthpiece (auto draw) or press the fire button (manual draw).
- Battery indicator = the battery charge remaining is shown on the screen in the form of an icon, when the icon is showing no lines inside the battery needs charging.
- Battery indicator when charging = as above and the screen will turn off when fully charged.
- Adjust output = Press the fire button 3 times to enter the adjustment mode, the wattage value will flash. Each press of the fire button increases the output by 0.5W up to the maximum of 25W. At 25W the screen will display “max power” and press the button again to return to the minimum value. Once the correct output is selected leave the device until the power value stops flashing and it is out of adjustment mode. Make sure to start at the lower recommended power range for the coil resistance. Do not exceed the upper power limit as this may damage the coil.
- Lock adjustment = press the fire button 4 times. The screen will display “locked” or “unlocked” – repeat to get the alternate setting. The fire / adjustment button is locked but the auto draw system still works.
Protections
- Low battery – the screen will display “low battery” and the device will cut out until charged.
- Short circuit – the screen will display “short circuit”. This could mean the coil resistance is below 0.5ohm or there is a fault with the device. Replace pod / coil, clean all contacts and if the fault continues the device may need replacing.
- Over Time Protection – “over 10s” will display if you have been vaping for over 10 seconds. The fire will cut out to prevent overheating. This is also helpful if the device accidentally fires in a pocket or bag.
- No atomiser (Pod) / open circuit – The screen displays “Check atomiser”, this could be due to contacts needing cleaning, faulty pod / coil or coil resistance above 2ohm. Clean the contacts, replace the pod / coil. If the fault occurs again the device may be faulty.
How To Charge The Battery
The charging rate is specified as 2A.
- Using a USB type C cable connect the small end into the USB port on the mod.

- Connect the large end of the cable into a suitable USB outlet.
- The screen will display the charging progress and will turn off when fully charged.
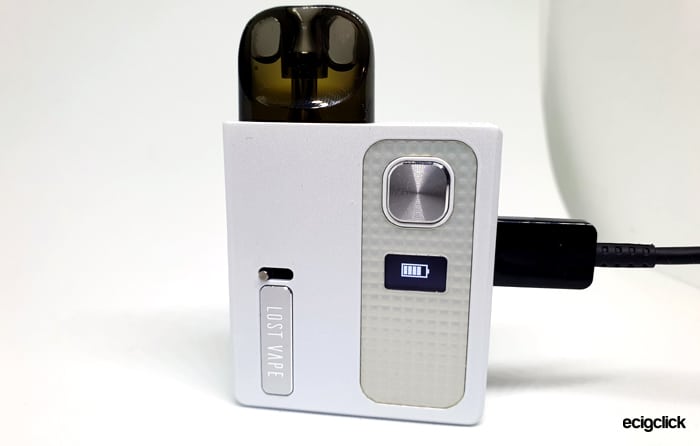
The charging time for me using a 2A charging plug/outlet was a consistent 59 minutes – round it up to an hour! Which is a bit slow to be honest – was expecting it to be quicker?
How To Fill the Pod
- Remove the pod from the mod.
- Tip the pod on its side with the fill port at the top.
- Lift up and swing the fill port cover out of the way.

- Add e-liquid whilst observing the level through the pod.

- Close the fill port firmly.
- If this is the first fill or a new coil leave the pod to stand for 5-10 minutes. Take a few dummy inhales on the mouthpiece before inserting the pod into the mod to help with the e-liquid flow.
- Replace the pod in the mod.

How to Change The Coil (Replaceable Coil Pod Only)
I would recommend emptying the pod before changing the coil as the e-liquid will spew out the second the coil is removed. Alternatively make sure there is loads of tissue around when you do this.
- Remove the pod from the mod.
- Pull out the existing coil from the pod base (if installed).

- Push a new coil into the pod base until it is fully pushed in – it will be flush with the pod base. There is no specific orientation for the coil.

- Fill the pod as described above. Leave the pod to stand for 5-10 minutes to prime the coil with e-liquid.
- Take a few dummy inhales on the mouthpiece before inserting the pod into the mod to help with the e-liquid flow.
- Insert the pod into the mod and set the correct output for the coil resistance.
How Does the Lost Vape Ursa Baby Pro Perform?
I mainly used my own e-liquid mix which is 50/50 PG/VG made from IVG Bubblegum Concentrate at 20% ratio. This is quite high a flavour ratio as I prefer plenty of flavour, but sadly this means it can be a coil killer sometimes.
I add nic salt to approx 6mg strength.
If any of these terms are over your head – have a read of our handy guides below!
- MTL V DTL – A Guide To Vape Styles
- VG and PG in E-liquid – all you need to know
- Beginners guide to E-liquid
- Nic Salt E-liquid
0.6ohm Ursa Fixed Coil Pod
I am struggling to find a recommended power for this coil but the mod automatically set the output to 16W.
I found no urge to change this to be honest it was spot on! But for the purposes of review I tried it at 15W which was still pretty decent and 17W which felt a lot warmer and closer to dry hit territory.
The flavour is flooding through but I will say it feels quite a dry vapour. This is ideal for ex / soon to be ex smokers as this dries your mouth out like a cigarette would so feels a lot more authentic. It did make me very thirsty!
The throat hit is excellent again combined with the dry vapour it gave a smoking sensation.
As this has a puff counter I got around 70 puffs per full pod. I did refill just as the level was at the top of the wicking ports so approximately 2ml each fill.
I have filled this over 10 times (roughly 20ml in total) and the flavour has not dropped at all.
What a great pod this is!
0.8ohm UB Mini S1 Coil
The recommended power for the S1 mesh coil is 12-17W .
So as I am a good girl I started at 12W, already the flavour is just about there but it is overpowered by a weird backnote – a cottony chemically taste…
Moving up to 14W I can already feel this getting a bit warmer, the vapour output has increased massively wow!
Am a bit nervous of heading up to 16W due to this weird aftertaste. I was right to be nervous because my Bubblegum e-liquid now tastes of Caramel? Is this coil faulty?
The device wouldn’t let me go any higher than 17W it gave me the “Max Power” message – which is good as it should stop the power going higher than recommended. This is tasting a bit burnt now? Am very confused.
Have gone back to 14W and will persevere to see if this weird taste clears? But I think the vapour output is crazy good!
I will add this pod has been sat for several days with the coil and e-liquid installed so it isn’t a case of a dry burn. This makes me a bit disappointed right now.
I tried the new coil and pod in the second kit (the Black one) and this was just as bad? Very strange – I did try to vape a full pod full on both kits but the flavour was too horrible.
Airflow
The airflow is thankfully adjustable!
I rank the airflow from 0 (fully closed) to 10 (like breathing fresh air).
On the fixed coil pod fully closed is still quite airy. I would say it is about 2 and when fully open it is around 4.5. This pod is apparently designed for RDL vapers so it makes sense it is the more airy pod. However I class RDL as around 5-6 in terms of resistance so it may still be a bit too restricted for true RDL vapers. It is suitable for MTL in the fully closed or only partially open position.
On the removable coil pod the airflow feels more restricted. Fully closed is about 1.5 and fully open it manages about 3.5.
Mod Performance
I did find the last few vapes before the “low battery” warning popped up to be a bit weak, but otherwise the output felt consistent. The resistance readings of the coils has also been spot on.
The firing performance was exactly the same using either the fire button or auto draw. Whatever airflow position it was in the auto fire was super responsive.
I also like the fact that it won’t let you exceed the maximum recommended power for the coil/pod resistance. That also bodes well if there was an accidental adjustment/firing in a pocket or bag – it shouldn’t let the coil get burnt out in theory.
I didn’t have any issues at all with the device during my time of testing!
Leaks
I had zero leaks or condensation from the 0.6ohm Ursa fixed coil pod.
But I noticed a lot of “wetness” around the pod body, this appears to be from the filling port. As the location of the fill port is in an odd place, you can sometimes overfill and some dribbles out of the port. So keep an eye on that, if it happens just wipe the pod with a tissue before installing into the mod.
Battery Life
This will vary according to your own vaping habits, coil resistance and power output selection.
For a guide…
With the 0.6ohm Ursa Pod I got around 4-5 hours at 16W. I was averaging 150 puffs 2-3 pod fills per charge.
Sadly as there was a revolting flavour from the 0.8ohm replaceable coil I was unable to continue testing the battery life.
Pros
- Stunning looking device – I do prefer the Pearl White design to the Classic Black.
- Feels solid and weighty – should be pretty rugged!
- Airflow and output adjustment
- Replaceable coil or fixed coil pods to cater to all
- Fire button / airflow lever only protrude about 1mm from the face of the device so less chance of accidental knocking or getting caught on bag/pocket.
- Easy to fill and change coil
- Lockable fire/adjustment button, still operates with auto draw
- No leaks
- Prevents over powering – it won’t let you exceed the maximum recommended power, perfect if it accidentally fires/adjusts in a pocket or bag.
Cons
- Only one button for adjustments is a bit fiddly
- Can be a bit messy to fill and change coil
- Slightly slow charging – 1 hour which should be quicker for only 900mAh battery at 2A?
- UB Mini 0.8ohm coil had a yukky taste and felt like burning below the recommended maximum output?
Final Review Verdict
This is absolutely stunning! I do prefer the textured pretty panels of the Pearl White compared to the Leather panels of the Classic Black. I would love the Sakura Pink too!
It is surprisingly heavy for its size so it appears most of the mod is solid Zinc Alloy! I can see this being pretty rugged and I wouldn’t want to drop it on anything breakable! Alternatively you could use it as a paper weight or to hold down Ice Lolly wrappers when you are sunning yourself outdoors.
The fact this is compatible with fixed coil Ursa pods and UB Mini removable coils makes this so versatile. Plus having airflow and output adjustment again gives you so many options to get the perfect vape from this kit.
Unfortunately the supplied UB Mini coils both gave off a horrible flavour, so I was unable to vape these. I gave this a score of 2 as the vapour was surprisingly good. Maybe a dud coil?
I would be perfectly happy just using the 0.6ohm Ursa pod – in fact I have actually bought some more so I can continue using this!
Obviously this won’t please a DTL vaper, but it does cater for RDL and MTL vapers quite happily.
The single button adjustment could be annoying, especially to technophobes – this might put them off the kit. To be fair once you have found the sweet power level you shouldn’t need to adjust it again.
For the price, the sheer versatility of this kit is unbeaten – excellent value for money! I have seen more expensive kits without the features packed into the Lost Vape Ursa Baby Pro!
What do you think? Have you tried this kit or have any questions? Let me know in the comments below!


 The Limits?")


The cartridge of this model is durable or not. How many days can it last?
Hi there
The fixed coil pod is also found in the Lost Vape Ursa Nano S. At 12 refills the flavour was still excellent – however due to a queue of products for review I was unable to keep using the pod until the coil burnt out.