The OBS Cube FP Kit is based on the Cube X mod.
It’s now using a removable 18650 battery and a variable wattage output of 5-80W.
This is another family member in the popular range of “Cube” kits.
What To Expect From The OBS Cube FP Kit…
The kit consists of the Cube FP Mod and the Cube tank.
The tank was found in the original Cube kit and the Cube X Kit.
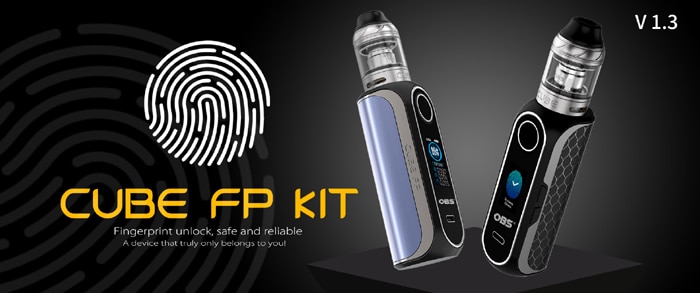
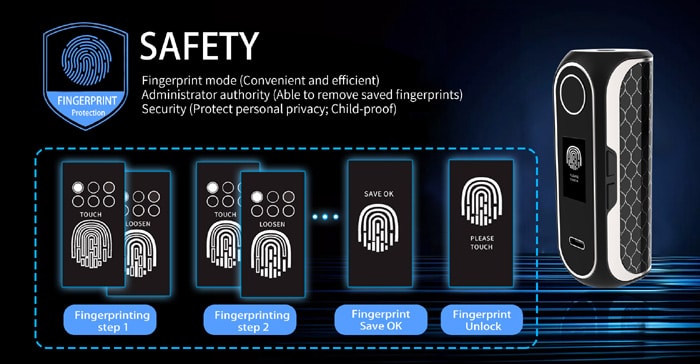
However the main marketing feature is the addition of “fingerprint recognition” to prevent unauthorized use of your vape.
For instance to stop children experimenting with it.
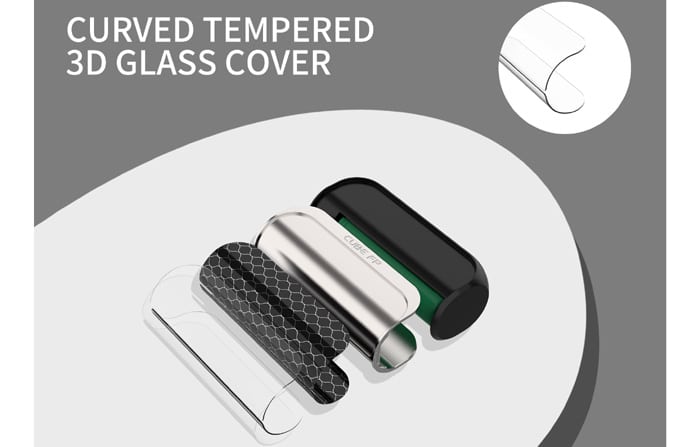
The mod has a tempered glass 3D removable battery compartment and the rest of the mod is made from Zinc Alloy.
There is a colour screen but the size of the display is not stated.
A USB Type C port is included on the device with a 1.6A charging rate, and OBS say this can charge a battery fully in 1.5 hours.
The tank has adjustable airflow on the base and uses the existing Cube M1 coils.
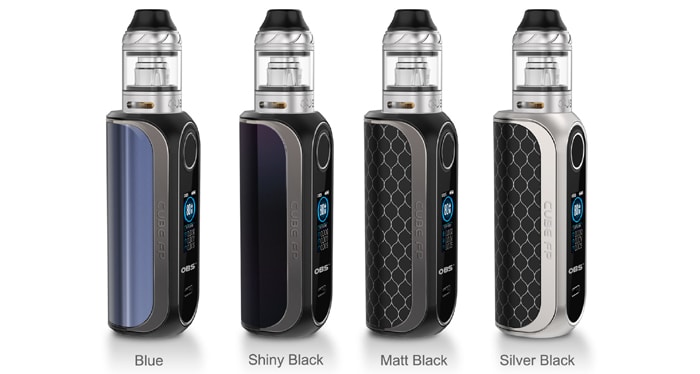
There are 4 colours to choose from: Blue, Shiny Black, Matt Black and Silver Black.
As usual I will report back honestly on my findings of the kit I have in my hand – thank you to New Vaping for sending this over to me!
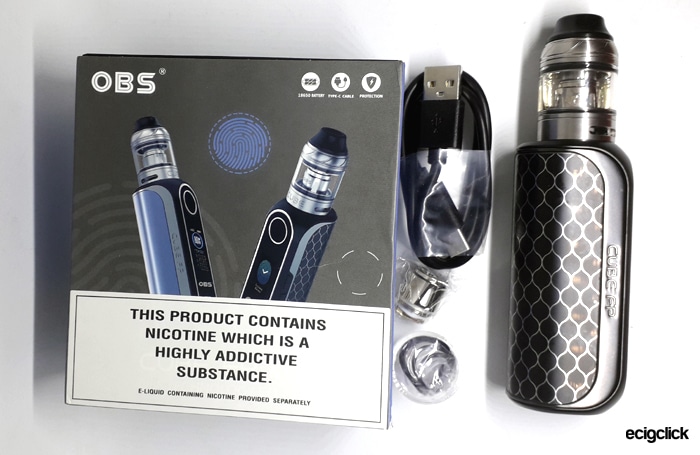
Inside the Box
- OBS Cube FP Mod
- Cube tank
- 2xM1 Mesh Coils (1 installed)
- Spare Glass
- Spare O-rings
- USB cable – Type C
- User manual
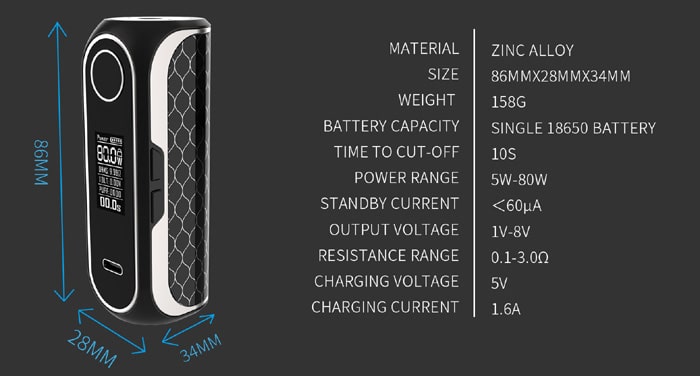
OBS Cube FP Mod Specs
- Size: 86x28x34mm
- Output: 5-80W
- Battery: 1×18650 (Not included)
- Display: LED screen (Size not stated)
- Resistance range: 0.1-3ohm
- USB C Charging at 1.6A rate
- Fingerprint lock system
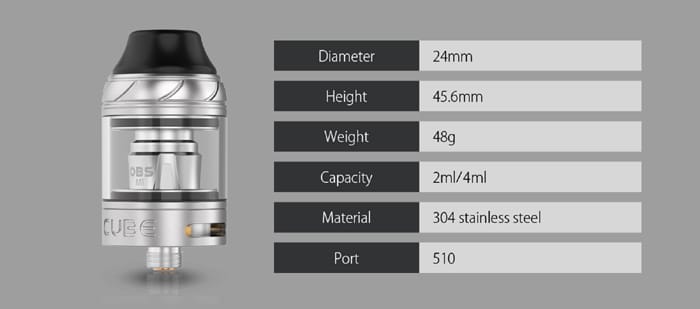
OBS Cube FP Tank Specs
- Size: 24×45.6mm
- Capacity: 4ml (standard) / 2ml (TPD)
- Coil range: M1 coil (0.2ohm)
- Adjustable airflow
- Screw top fill cap
OBS Cube FP Kit Build Quality and Design
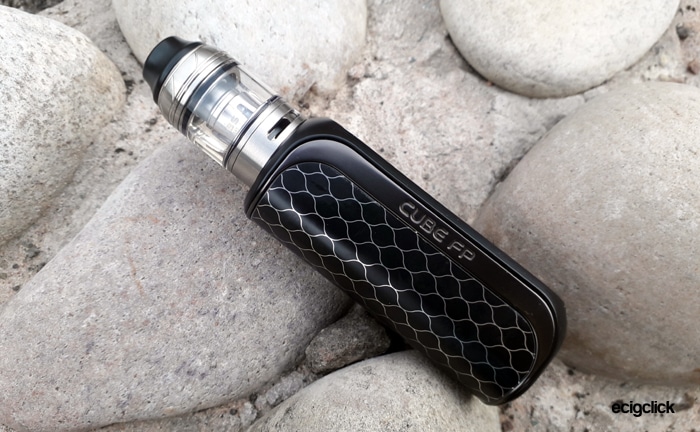
I received the 2ml TPD OBS Cube FP Kit in the Matt Black colour.

The packaging is great and no damage occurred to any of the kit contents.
I do have one huge moan…
The instruction manual is total pants…it really is.
So far I haven’t worked out how to use the fingerprint stuff, there are diagrams in the book which relate to bugger all on the actual device.

Worse than that the wattage is locked, not a single mention in the manual of how to fix this.
I ended up going on YouTube and found out you have to press the “-” (Down) adjustment button 3 times to unlock the wattage control.
It does automatically re-lock itself again afterwards.
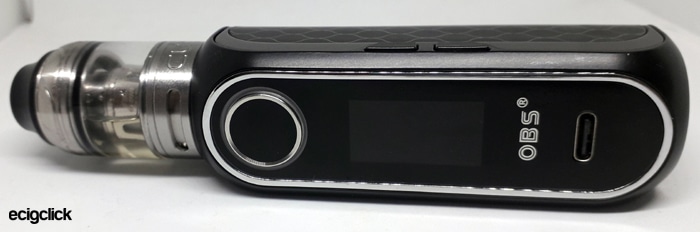
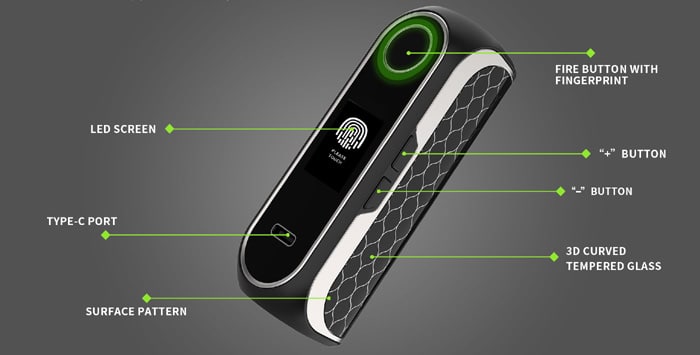
OBS Cube FP Mod
This is a stunning looking device and just gives off a huge whiff of quality everywhere you look.
One particularly beautiful feature is the screen – the display is bright, clear, uncluttered and really pretty colours.
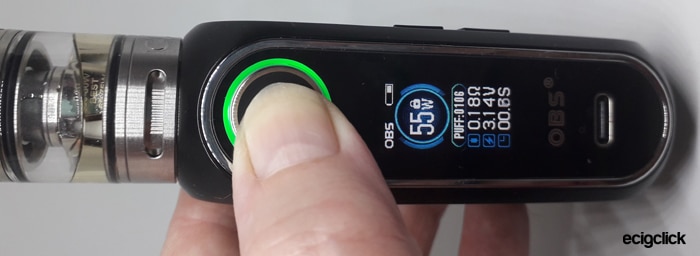
On the screen panel is also the fire button which has an LED indicator circling it which changes colours according to status of fingerprint stuff and when firing.
The button is almost flush with the surrounding panel so doesn’t exactly give off any clicky sensations but seems perfectly responsive.
Below the screen is a silver OBS logo which matches the surround of the fire button and front panel.
A USB type C port is below the logo and the adjustment buttons are just to the side of the screen.
The base of the mod features the legal logos and “Designed by OBS” text.
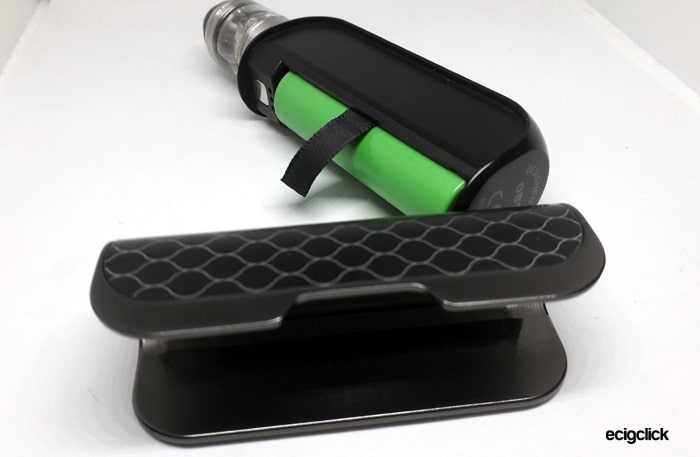
The metal part of the device body is matte black and the removable curved cover has a lovely honeycomb pattern.
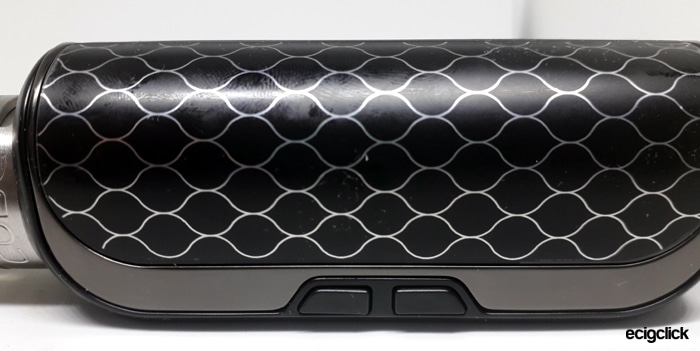
There is plenty of magnetic resistance when removing the curved cover plate and this seems really sturdy, and it has a glass cover protecting the graphics.
On the inside of the cover is a strip of what appears to be insulating material – this is at the point where the cover could contact the battery. So this is added protection if your battery wraps are not totally isolating the battery.

The only slight whinge is that there is a seam at the rear of the cover which does spoil the aesthetics slightly.
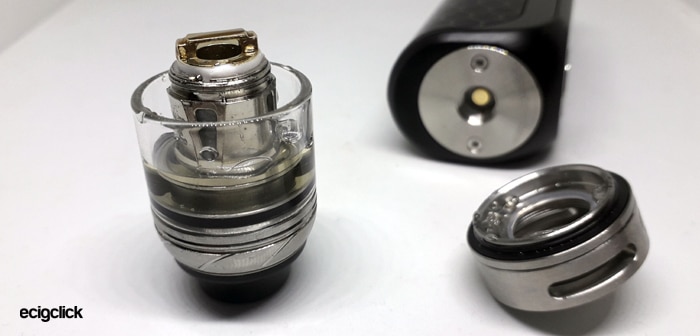
Looking in the battery compartment this is pretty basic, with etched + and – marks and a lovely ribbon for pulling out the battery.
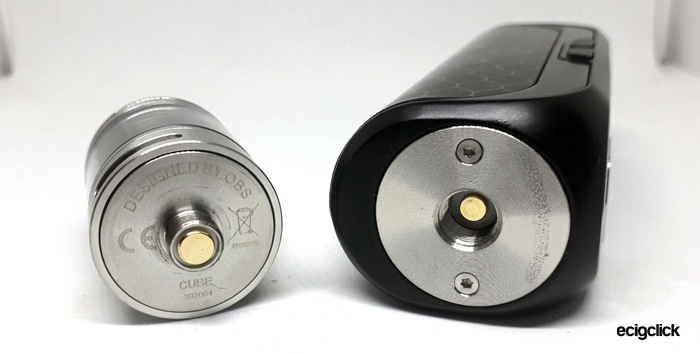
The 510 connector is virtually flush with the top of the mod and the included tank sits perfectly with no gap visible.
There is a circular protection plate which should stop any wear to the top of the mod from your tank and this is secured with 2 small screws.
All of this assembly is super shiny and looks well made.
I think a 24-25mm tank should sit on here OK – there might be slight overhang where the screen panel slightly tapers off.
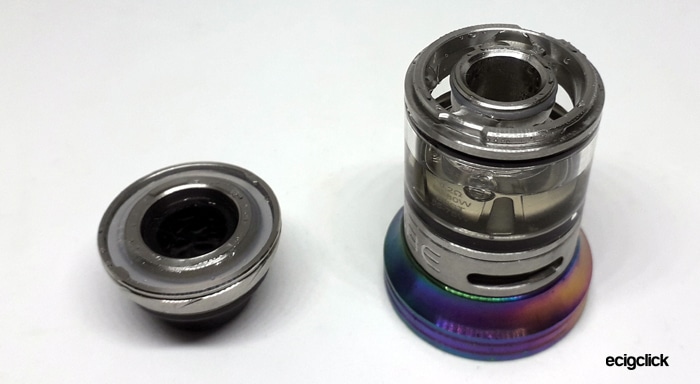
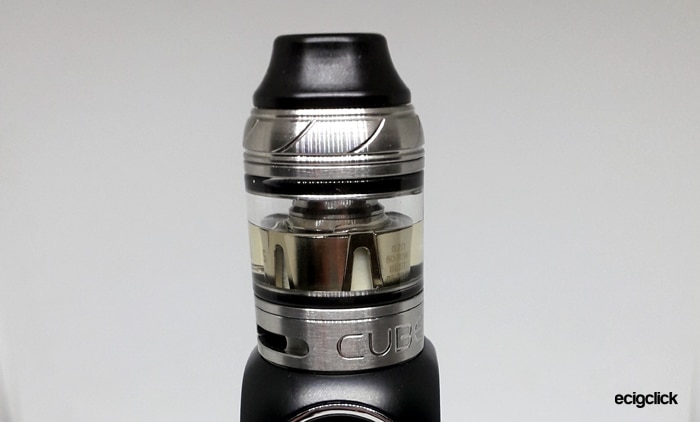
OBS Cube FP Tank
The tank has been used before in OBS kits but this is the first time I have used this tank.
The top screws off with a push down and around 1/4 turn.
This is easy to grip and the fill ports circle around most of the top of the tank.
A kind of conical 810 drip tip sits on the top which I think looks lovely. I have tried 2 different 810 drip tips (With O-ring and Without O-ring) and both fitted perfectly.
There is little branding on the actual main part of the tank apart from the “Cube” logo on the airflow ring.
The base of the tank has the legal logos and “Designed by OBS”, “cube” and what appears to be a serial number stamped in.
You can adjust the incoming airflow by rotating the control ring and this turns smoothly.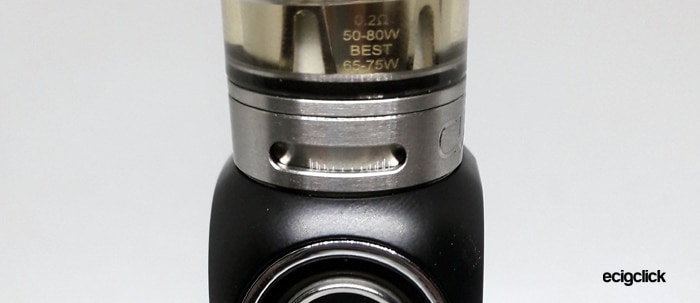
Like the mod the tank just ooozes quality.
I had no leaks at all from the tank itself or the airflow. I did have some issues when changing the coil but I will cover this further down the review.
Plus the tank base is hard to grip for changing the coil.
OBS Cube FP Kit Quick Start Guide
The kit arrives with the tank and mod separate. You will need to install an 18650 battery, screw the tank to the mod and fill up.
A coil is already installed but it is always worth just checking it is installed correctly before filling!
OBS Cube FP Basic Operation
As mentioned above the instruction manual is pretty crap.
It does tell you some things but there is a lot missing or not explained properly.
Fear not I have been playing with my Cube FP extensively and can guide you how to get up and running!
- Turn On / Off = press the fire button 5 times quickly.
- Unlock wattage adjustment button = press the “-” (Down) adjustment button 3 times.
- Adjust wattage – use the “-” and “+” buttons after unlocking.
- Fingerprint entry = press the fire button and the “+” (up) adjustment button at the same time to enter the fingerprint menu. Make sure the adjustment buttons are unlocked!
- Turn off fingerprint entry = press the “+” and “-” buttons at the same time. This will only work after the correct fingerprint has been used. Again you will need to unlock the adjustment buttons.
- Remove stored fingerprints = press the fire button and “-” at the same time. (oh and unlock the adjustment buttons yeh!)
OBS Cube FP Fingerprint Menu
Enter the fingerprint menu as stated above.
The device will then ask you to “Please touch“.
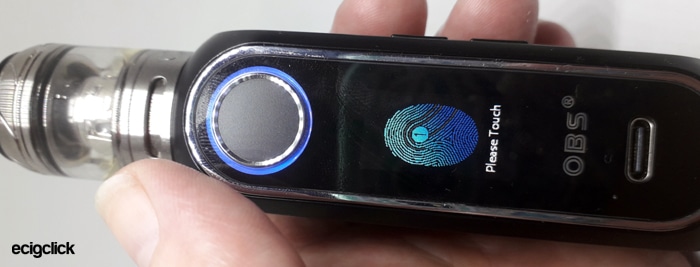
This does not mean touch the screen (which I had been trying for ages) it means touch the fire button with the finger you will use mostly to fire with – in my case it is my thumb.
The screen will tell you to “loosen” – i.e. remove your finger from the fire button.
It then repeats the touch and loosen instructions until your entire fingerprint has been read successfully.
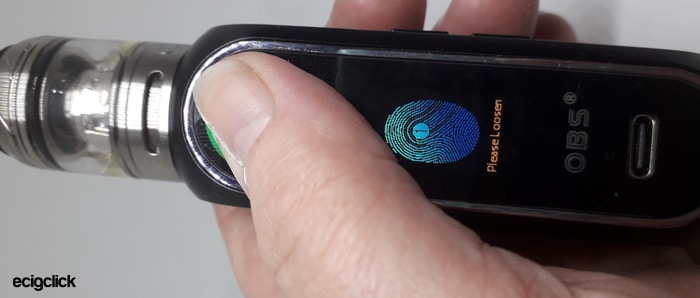
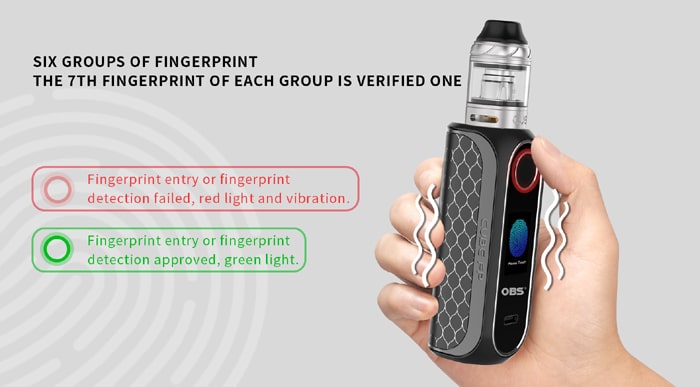
After this has been stored the device will recognize your finger when you press fire and the button light will turn from blue to green, and a small vibration is also emitted when successful.
If a fingerprint is not recognized the button light will turn red.
I tried to unlock with my little finger and got the red light and “please retry” displayed on the screen.
I basically played with this a couple of times then turned it off!
Fault Conditions
- Low Voltage = device vibrates twice – the battery is below 3.3V install a new battery or recharge.
- Short circuit = device vibrates twice = check atomizer and battery connection.
- Check atomiser = open circuit, faulty coil or no tank installed – device will vibrate twice.
OBS Cube FP – How To Remove/Install The Battery
Make sure to use a 18650 battery which is in good condition and suitable for the output required.
- The cover plate just pulls off from the main body, there is a slight resistance due to the magnets.

- Install the battery with the ribbon underneath and poking out the side following the polarity markings on the device.
- Replace the cover plate by just sliding into position.
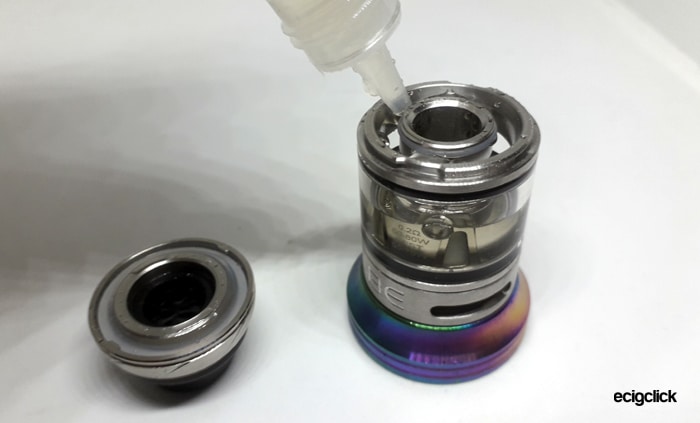
How To Fill The OBS Cube FP Tank
- Slightly push down on the top cap and unscrew around 1/4 turn and the cap should lift off.
- Add e-liquid through the fill ports whilst observing the level through the tank glass.

- Replace the top cap.
How To Change the OBS Cube FP Coil
If the tank is more than around 1/3rd full there might be some liquid leaking when you remove the tank base – so make sure to have plenty of mopping up apparatus around!
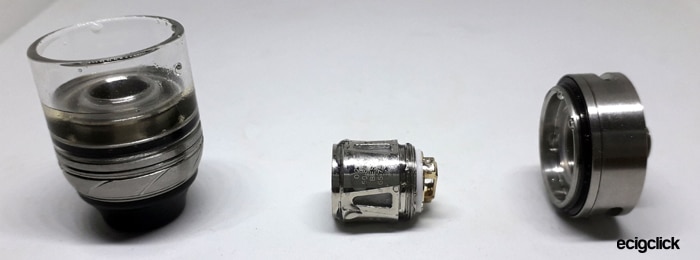
- Remove the tank from the mod.
- Turn the tank upside down and unscrew the tank base.
- In theory the coil should still be screwed to the tank base – if so unscrew the coil.
- In reality I found the coil did not stay attached to the tank base but was attached to the inner chimney instead.

- Using tweezers unscrew the coil from the chimney – don’t hold onto the end part as this will just pull off the coil. Make sure to grab the coil body.
- Screw a new coil onto the tank base – make sure all O-rings are positioned correctly. When I unpacked the spare coil the O-ring had become detached from the coil – so always check before installing.
- Replace the base onto the main tank.
- Refill as described above – leave the coil for 10-15 mins to soak up the e-liquid before use and check level.
How Does the OBS Cube FP Kit Perform?
As this is a sub ohm tank I used my favourite 80%VG e-liquid at 3mg nicotine strength – the coil friendly Stika Bombz Fruit Salad.
As the Cube tank has already been covered in a previous review I can only add how I got on with the tank.
OBS Cube FP – M1 Mesh Coil
So the Cube M1 coil is a mesh type which can be used from 50-80W and OBS suggest 65-75W as the best power level.
I will be honest here, since giving up smoking in June 2019 I have been vaping MTL (Mouth To Lung) kits with nicotine salts.
Apart from the odd review device I haven’t had much to do with DTL (Direct To Lung) tanks.
If you are unsure what DTL and MTL mean we tell you more in our Guide To Vaping Styles.
So with my wussy non-cloud loving lungs accustomed to lower power vaping I found 55W to be absolutely perfect for me.
At 65W there is a lot more flavour but the vape feels drier and me being a chicken I was constantly worrying there would be a dreaded mesh burnt hit. Told you I was a wuss.
At 75W again the flavour ramps up more and so does the warmth of the vapour but I still felt uncomfortable at this level. I am sure many other people would find this to be optimum.
This chucked out a steady flow of horizontal clouds from 55W onward and increasing the power didn’t seem to affect vapour production. I forgot how quickly you can cloud a room up!
There were no wicking issues at all with 80%VG e-liquid the mesh and cotton seem to be perfectly suited.
So far I have refilled the 2ml tank 8 times and the flavour is still perfect.
OBS Cube FP – Airflow
On the closed setting this does what it says on the tin – fully closed. In the fully open position this is pretty airy but also a bit noisy.
I tended to use this in around 1/3rd open position for a restricted DTL vape.
OBS Cube FP – Mod Operation
In general the mod itself worked well, quick to fire (with FP turned off) and the power level seems to be accurate compared to other devices with the same tank.
My main gripes are the output when the battery charge is low – the “Low Battery” warning should display a lot earlier as there comes a point where the mod can barely heat up the coil and you have to change the battery with what appears to be 10-15% charge remaining.
My other main issue is the Fingerprint security stuff.
I do understand it helps with safety and stops some robbing git using your vape, but it got annoying very quickly.
If you put your mod down for a short while and pick it up and just vape – nothing happens. You have to wait for the fingerprint confirmation then press fire again to fire the device.
This got on my knockers to put it bluntly.
Also setting up the fingerprint function took a bit of fiddling as the instructions were not clear.
I also found when vaping regularly the mod did get quite hot.
Bear in mind I was only vaping at 55W which is well below the max output and upper recommended power limit of the coils.
Battery Life
As always your battery life will vary according to your vaping frequency, the coil you have installed and the power level selected.
But to give you a guide I used 2 Samsung 25R (2500mAh) batteries and did 2 timed runs with the FP scanner turned off.
At 55W I got 213 puffs and 5 hours vaping out of the first battery I tried and 209 puffs and just under 5 hours vaping from my second battery.
One massive issue is that when the battery charge drops to around 10% on the display the mod doesn’t have enough power to provide a decent vape.
When the battery is fully charged and the mod is set to 55W – the voltage reading when vaping is around 3.3V.
However this reduces as the battery discharges and when only about 10% charge left this output drops to around 1.5V and there is not enough power to heat up the coil sufficiently.
Pros
- Stunning looking kit – really looks quality.
- Screen is beautiful and clear.
- Fingerprint recognition does work – it can be fiddly to set up.
- Beautiful flavour even at the lower power range of coil.
- Horizontal streams of clouds from 55W and upwards!
- USB Type C charging is useful.
- Mod and tank are both really well made.
Cons
- Coil often became detached from the tank base and needed tweezers to unscrew it from the chimney.
- I did end up turning the fingerprint sensor off as I got annoyed with the delay in firing.
- The instructions are not great to be honest.
- Mod got quite hot at only 55W
- When battery charge level is low the mod struggles to output any power – way before the “battery low” warning displays.
Final Review Verdict
All in all this is a gorgeous looking kit which is very well made.
I cannot fault the flavour or vapour from the Cube tank and I used it well below the maximum rating, so it can only get more intense above that!
The mod has a few niggles – the fingerprint delay was easily solved by turning the scanning mode off completely, but the heat in the mod and the power drop were disappointing.
A poor instruction manual did add to my woes – the FP setup and things like the wattage lock were not adequately covered – this would really confuse a newbie.
If you already have one of the Cube mods – unless you want to change for more power or a removable battery I wouldn’t bother just buying this for the fingerprint security.
But saying that – if you did buy the OBS Cube FP Kit you wouldn’t be upset, it is by no means a stinker, it performs well and looks the part – but isn’t quite perfect.
Is this a vape kit you’re interested in buying?
Are you already using it?
Any questions ask away in the comments below.


There’s no battery indication of charging when charging through the usb, received it on 2 bars and down to 1 bar when on charge, just seeing if that’s common when charging that it doesn’t indicate?
I try to avoid charging removable batteries in the device – it is usually best to use a stand alone charger – so sadly I didn’t notice any of the display when charging. Grab yourself a cheap XTar single battery charger usually less than £5 and that should see you right.
I unfortunately let a colleague at work use my vape and her print is now locked on it and I can’t get in contact with her can I remove it without her finger
Hmm difficult one this – as the instructions for the kit are awful.
I found you can remove stored fingerprints by pressing fire and “-” however you need to unlock the screen first with the fingerprint!
I am not sure how you can get round this – might be a case of getting in contact with OBS – here https://www.obsvape.com/contact-us/
Sorry I am not much help – I struggled using the fingerprint system as the instructions were not very informative.
What does it mean if it says On My vape check sener connection can any one help please thanks
Sound is heared while using obs fp as continues clicking ….
How exactly do you turn off the fingerprint security
Ooh it is really “trial and error” to be honest but I will try to describe it…
So you will need to “unlock” it first with the fingerprint so that the fire button works, then unlock the adjustment buttons (press – (down) button 3 times), then hold down the + and – buttons at the same time. It should then turn off the fingerprint.
Easy peasy huh! Not…