Ooooh goody – I have the new OXVA Xlim SQ Pro in for review.
 Yes I admit to being a Xlim fangirl, I own every model and blummin love them. I currently mainly use 3 of the Xlim Pro daily with the 0.8ohm V2 pods.
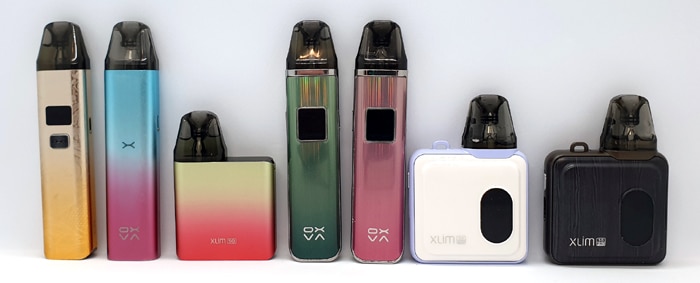
The Xlim range have given us some iconic pod kits right from the Xlim V1/V2, Xlim SE, Xlim C and Xlim Pro.
The Xlim SQ Pro is based loosely on the original Xlim SQ but with some added features…
Thank you to OXVA for sending two of the Xlim SQ Pro devices and a bundle of pre-filled pods for me to review! I will report back honestly on the devices in my possession.
The Pre-filled pods will be covered in a separate review.
What To Expect From The OXVA Xlim SQ Pro…
Although the square design resembles the Xlim SQ, the features are more reminiscent of the Xlim Pro.
You get a funky 0.96 inch colour TFT screen, which has a selection of themes and what appears to be animated graphics?
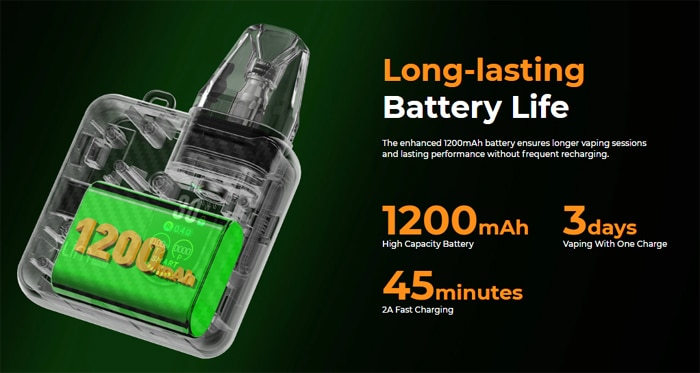
The battery capacity is the biggest of the Xlim range at 1200mAh and will charge in 45 minutes using the USB Type C at a 2A charge rate.
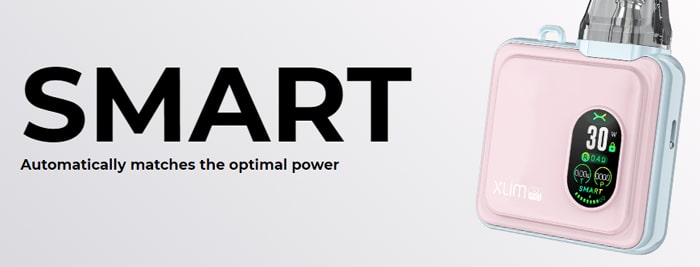
You have two user modes…
- Smart: the device automatically selects the optimal output depending on the pod installed.

- Power: this is a standard variable wattage output ranging from 5 to 30W.


A slider is located on the side of the device to adjust the airflow to your preference.
There is a fire button for making adjustments and if you prefer – manual firing.
Moving on now to the pods, this is compatible with all previous Xlim pods – the V1, V2 and new top fill V3. Plus there are pre-filled pods to make this even easier to use – hopefully catering to the Disposable Vape market.
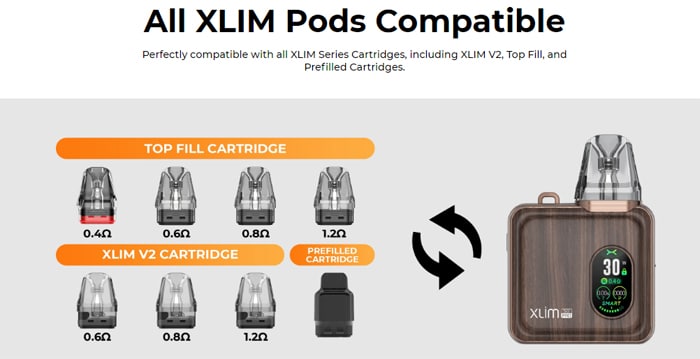
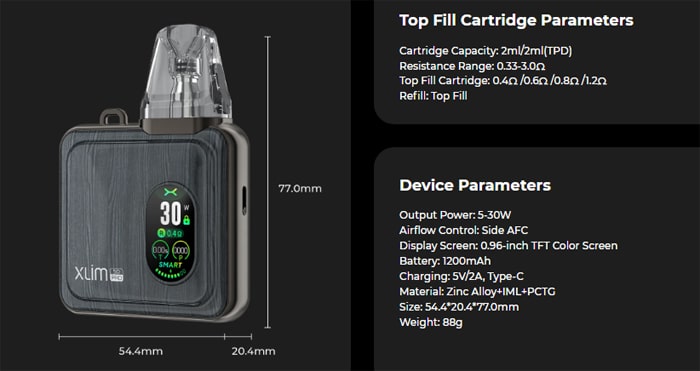
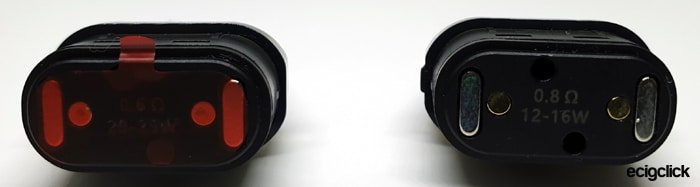
You get the 0.6ohm and 0.8ohm V3 pods included in the kit.
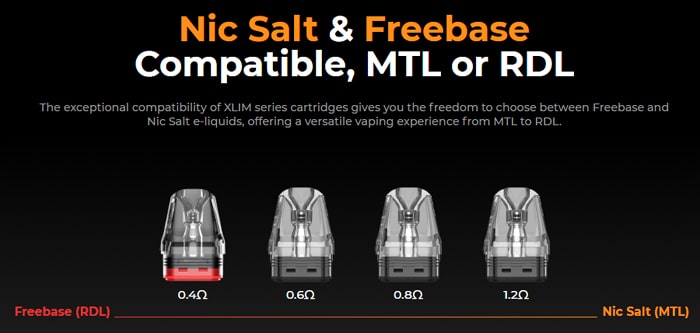
The pods will hold up to 2ml of your own e-liquid and there are optional 0.4ohm and 1.2ohm resistances available separately in the top fill style.
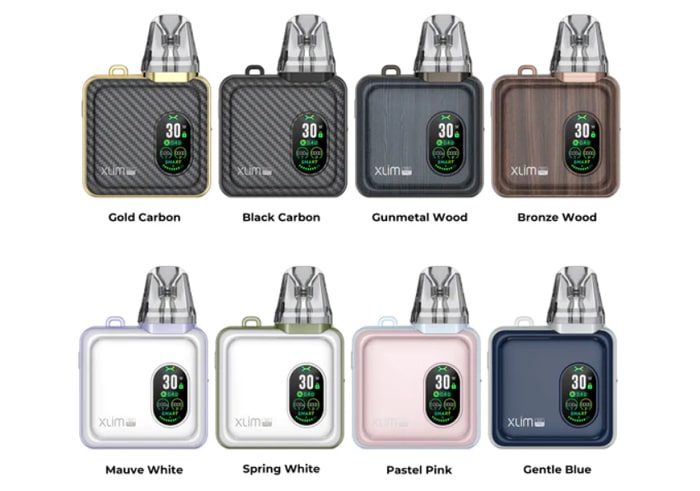
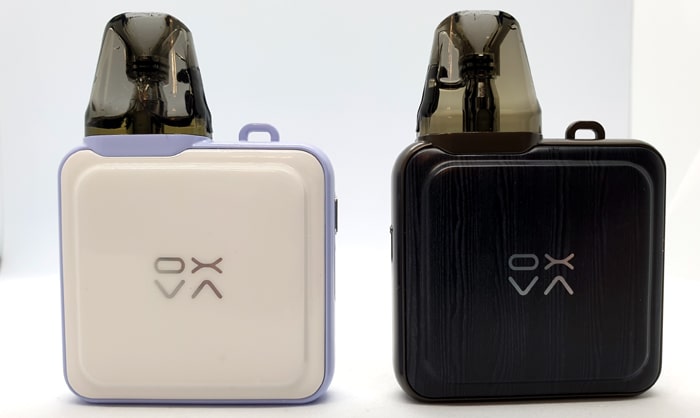
There are 8 colours to choose from: Gold Carbon, Black Carbon, Gunmetal Wood, Bronze Wood, Mauve White, Spring White, Pastel Pink and Gentle Blue.
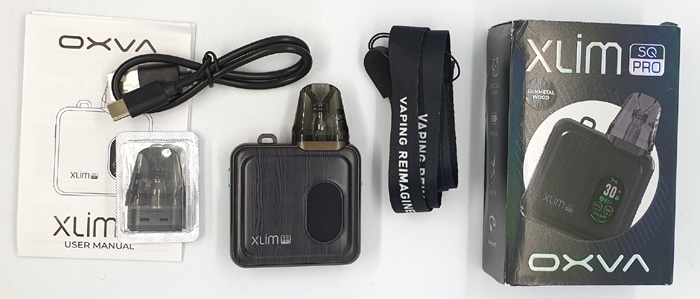
Kit Includes
- OXVA Xlim SQ Pro device
- 0.6ohm top fill Xlim V3 pod
- 0.8ohm top fill Xlim V3 pod
- Lanyard
- USB Type C cable
- User manual
OXVA Xlim SQ Pro Specs
- Size: 54.4×20.4x77mm
- Battery: 1200mAh (internal)
- Display: 0.96in Colour TFT screen
- Output: 5-30W
- Modes: Variable wattage, smart
- Type C USB charging – 2A charge rate – 45 minute charge time
- Resistance range: 0.33-3ohm
- Capacity: 2ml
- Coils: OXVA Xlim V1, V2 & V3 pods plus pre-filled pods
- Adjustable airflow
- Top fill
- Optional dynamic screen themes
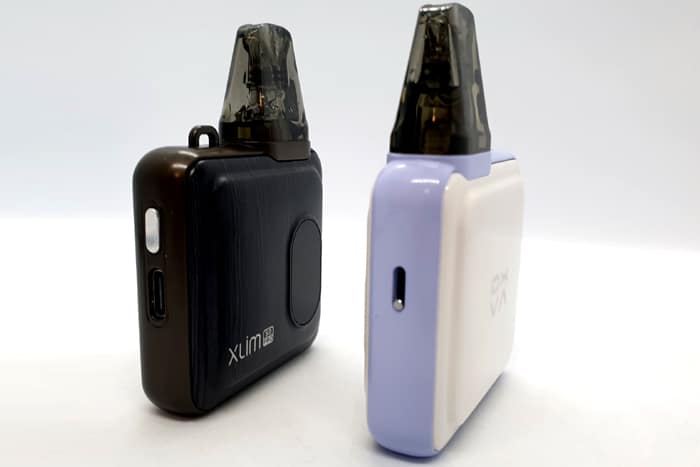
OXVA Xlim SQ Pro Design and Build Quality
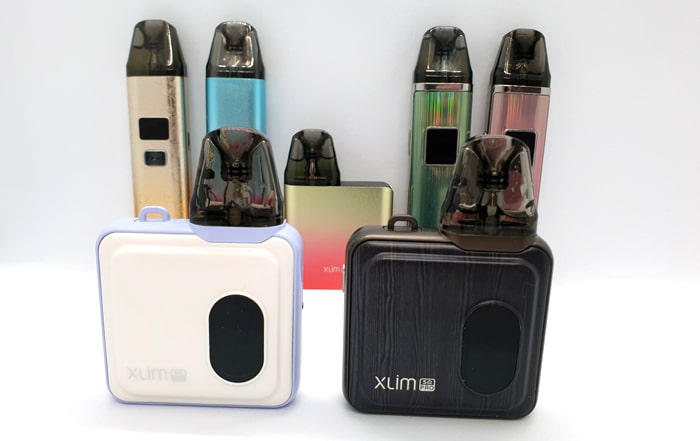
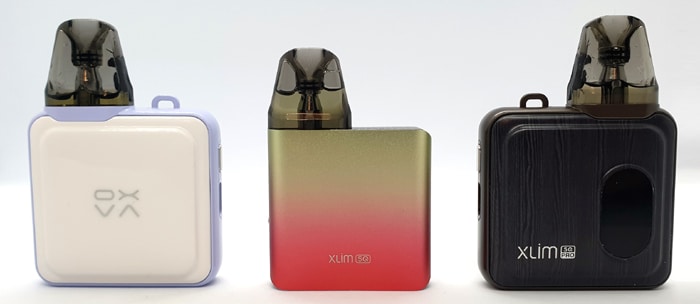
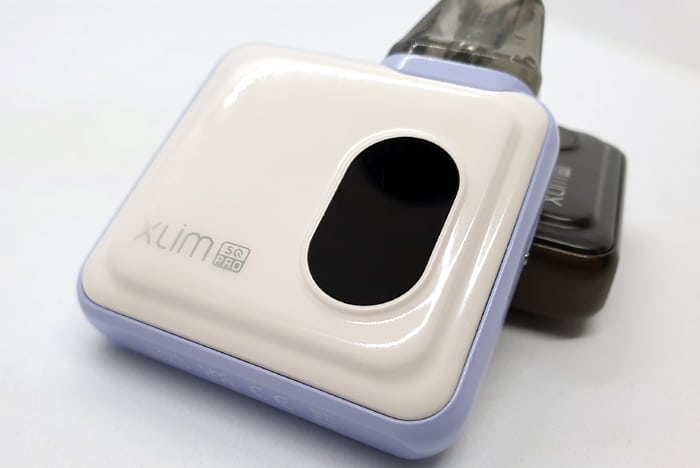
I received the Gunmetal Wood and Mauve White versions.
Sadly one of the boxes was a bit battered during transit, but the device was not damaged in any way.
The outer box has a great design with Black and holographic elements.

You open the box and slide out the plastic tray. Be careful when removing the tray as some of the components are tucked up underneath it and will drop when you pull it out.
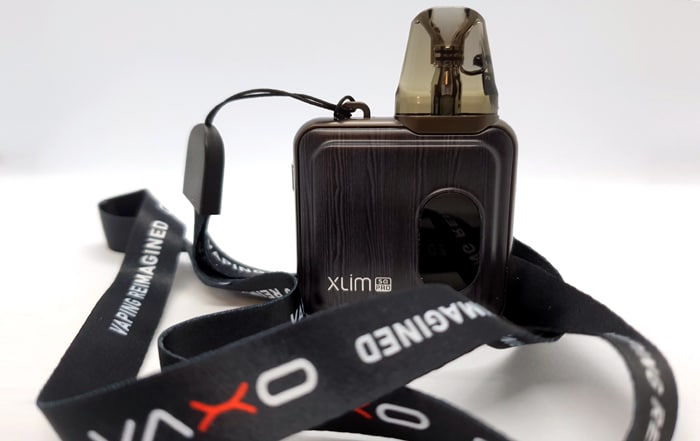
The mod and installed pod are nestled snugly in the plastic tray. Underneath you will find the Lanyard, spare pod, instructions and a short-ish USB Type C cable.
The instruction manual is pretty chunky but sadly there are only 2 pages per language. To be honest it did tell me most of what I needed to know but the details of the display and charging were missing.
OXVA Xlim SQ Pro Mod
I am “fangirling” again as I love the design of this mod!
The Gunmetal Wood version is gorgeous. The side panel finish is similar to the flooring in my kitchen being a Black wood effect.
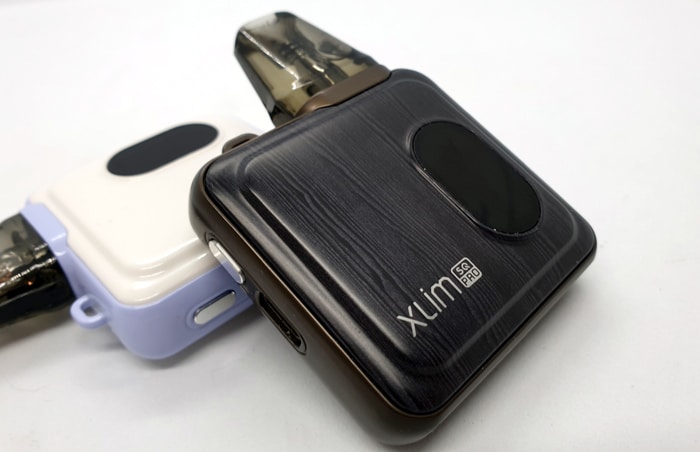
The main outer shell of the device is a Gunmetal coloured metal.
On the Mauve White version this has glossy White/Cream (depending on the light!) side panels and the outer shell is a Mauve Purple colour.
On the front of the device is the “Xlim SQ Pro” logo in a Silver print. The OXVA logo is printed on the rear in the same Silver.
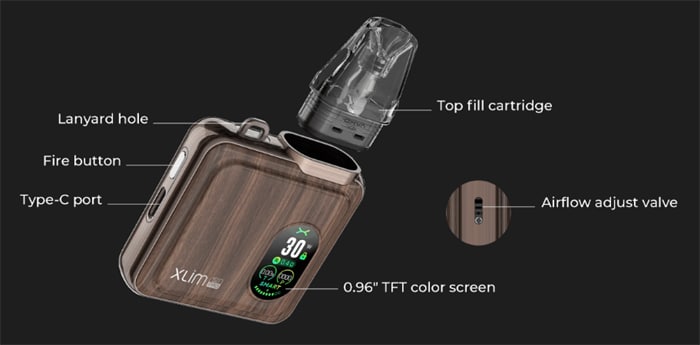
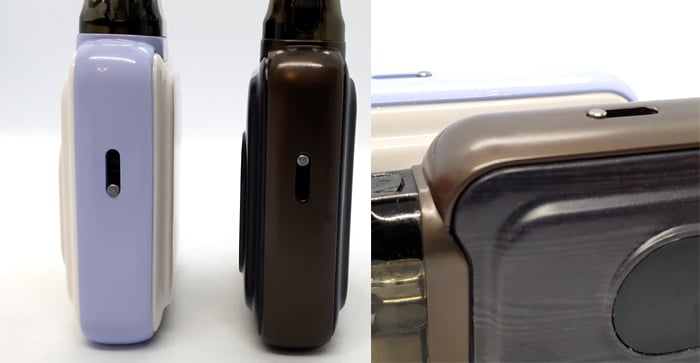
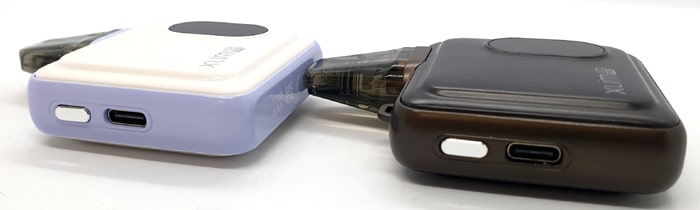
Looking at the front of the device – on the left side you will find the fire / operation button and the USB Type C port.
The USB port is sat in a recess so there should be little risk of damage to the contacts. The cable fits in here firmly with no wobble.
On the opposite side is the airflow slider. The pin only sticks out a millimetre maximum so you may need a fingernail to move it. This is a bonus though as it is unlikely to catch on anything. It does slide easily but it is not loose enough to adjust itself.
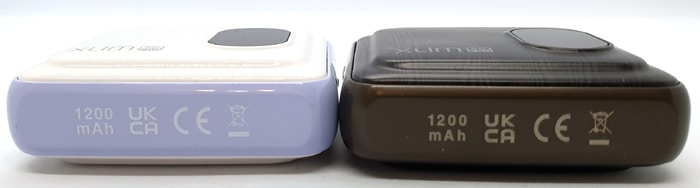
On the base are all the legal logos and battery information. The printing is clear and precise.
You will find a loop on the top face to attach the lanyard. The included lanyard is of excellent quality!
Inside the pod compartment are 2 strong magnets and 2 spring loaded contacts. It is quite a shallow port and the shape of the pod does make it look like it isn’t fully inserted!
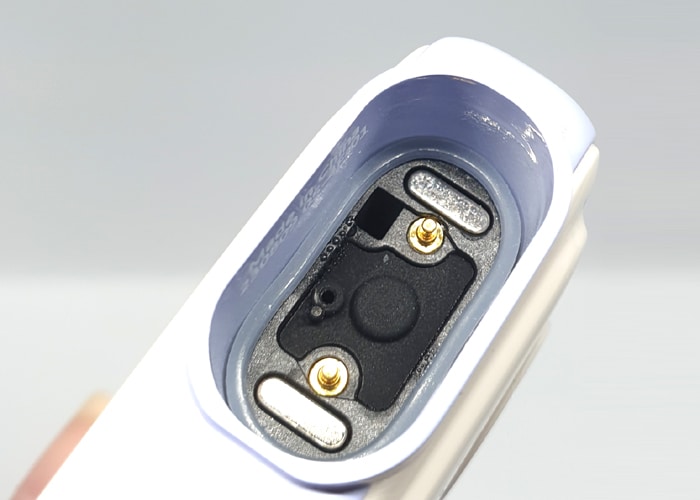
The magnets are strong and pull the pod in firmly with a nice snap.
It feels lovely in the hand with all the smooth curves and feels substantial enough to cope with everyday life. I have dropped the Gunmetal Wood one a couple of times on soft flooring and hard flooring and it has been fine.
I have found I often cover the airflow inlet when holding in my hand – which can be a bit annoying, but easily solved.
Screen & Controls
The screen is an elongated oval shape and is absolutely crystal clear – it is stunning.
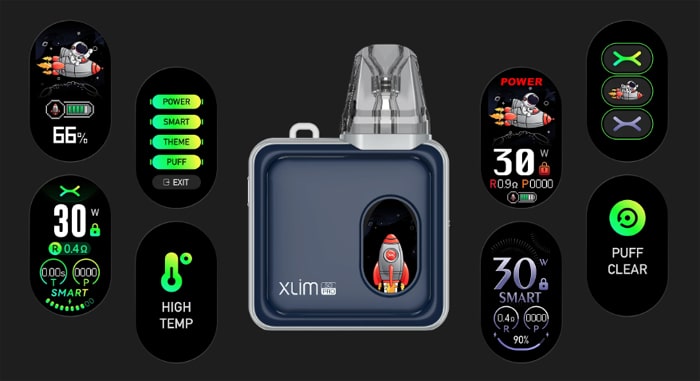
The graphic quality really shows and you have 3 layout themes to choose from.
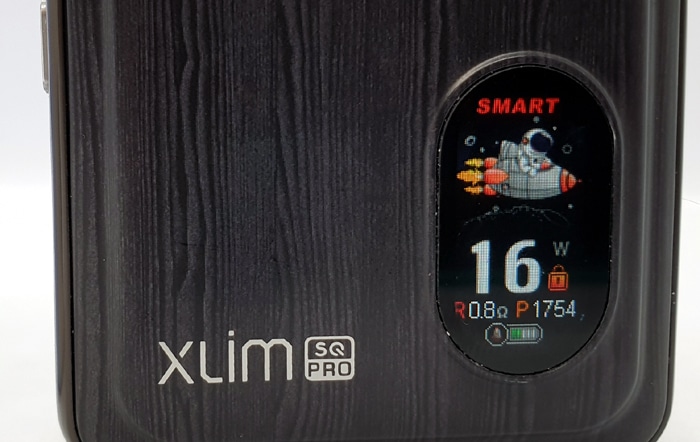
Of course I will be choosing the animated Spaceship – it is soooooo ace! It takes off when you vape!!
Also when charging the spaceship hovers!
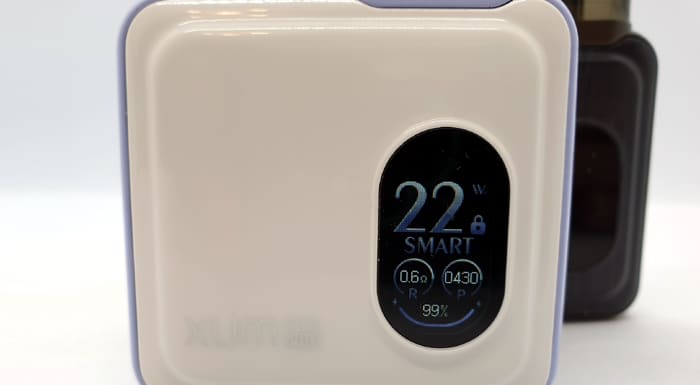
But you can also choose the Green or Purple themes. The Green is slightly more advanced with a bit more information. If you choose the Purple screen you will actually get a battery percentage figure as well as the visual icon.
In the Spaceship theme the battery display is a lot smaller – as the Spaceship does take up the majority of the display – but I don’t care – I flipping love it! I wonder if OXVA will offer alternative themes in the future? That would be amazing – are you listening OXVA??!
If you look at the screen, the left side of the device features the power/fire/operation button. This has multiple uses and can be locked when not in use.
The button is quite tiny at 7mm long and around 3mm wide. If I was using it for firing I might find it difficult to hit the right spot! Especially as it only protrudes from the body about 1mm and sits in a recess. But I do like the fact there is a manual fire – just in case the auto draw fire ever fails – you have a back-up.
OXVA Xlim V3 Pod
This is the same as you would get with the OXVA Xlim Pro kit – so I have blatantly copied and pasted the details here.
Apart from the fill port location the pod is exactly the same as the V2 pod used on other Xlim kits.
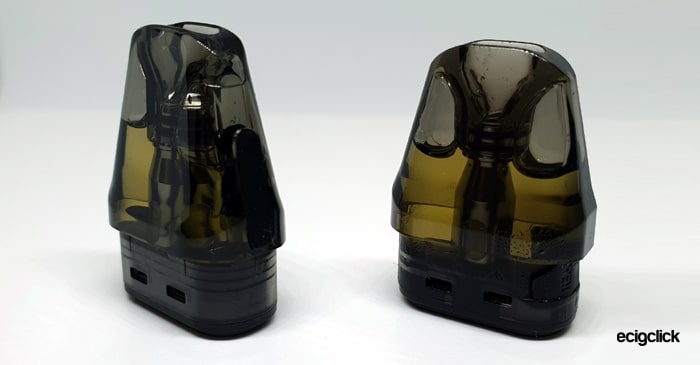
The base is exactly the same with 2 magnets and 2 contact areas. There are also 2 airflow holes which means the pod can be installed either way around. The pod resistance and recommended power levels are printed on the base too.

Although darkly tinted, the e-liquid level is always visible, in fact even when installed in the mod as the coil base sits level with the top of the mod.

You get the same comfortable “Duck Bill” style mouthpiece which is always a pleasure to use.
The fill port cover is located on the side of the pod and when you do your first fill it can be a bit of a puzzle as to how to access the port.
Simply lift up the bottom edge of the port cover and it will lift up to reveal the port. You can also swing the cover out of the way too.
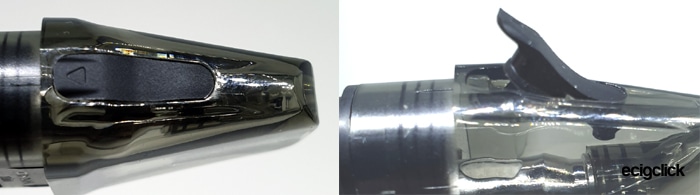
It might be a bit fiddly to open if you have short fingernails as it is one you will need to prise up. But it is far easier to close than the V2 pods which I found sometimes leaked if you couldn’t push the cover fully in.
The fill port size is generous at 5mmx3mm and I had no issues with small bottle nozzles when filling.
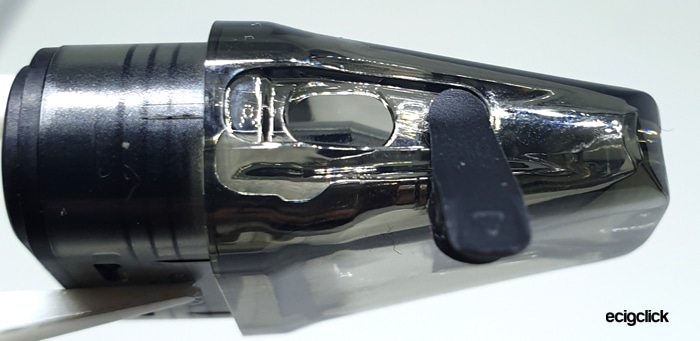
I would recommend installing the pod with the fill port on the outside just to make it easier to access.
Quick Start Guide
The device arrives with the 0.6ohm pod installed.
However you will need to fill the pod and then remove the isolator sticker from the pod base. This is there to protect the coil so the device does not fire before there is e-liquid in the pod. Also this prevents accidental firing in transit.
I will guide you through the steps you need to get started below!
Basic Operation
- Power On/Off = press the fire button 5 times.
- Vaping = either press the fire button to manually fire or you can simply inhale on the mouthpiece for the auto draw fire.
- Battery indicator = the screen will display the battery charge remaining.
- Battery indicator when charging = The screen will display the charging progress and will turn off when fully charged.
- Lock / Unlock fire button = press the fire button 4 times.
- Enter Menu = press the fire button twice. To scroll through the options press the fire button. To confirm an option press and hold the fire button. The menu gives you the following options…


| Power | Variable Wattage Mode |
| Smart | Device automatically selects the output according to the pod installed. |
| Theme | Choose a screen display theme |
| Puff | Clear the puff counter |
| Exit | Return to the home screen |
- Adjust output = press the fire button 3 times to enter adjustment mode. Each press of the fire button will increase the output. When you have reached the maximum output it will return to 5W and you can start again. When the output you require is displayed on the screen stop pressing and leave the device until it returns to the home screen.
- Adjust airflow = move the slide switch on the side of the mod to increase / decrease the incoming airflow to your preference.
Protections
- Low battery – The screen will display “Low Battery”, the device will not work until charged.
- Short circuit – The screen will display “Short Circuit” and stop working. You will need to clean all the contacts on the pod and device. If the fault persists try a new pod. If this is still not rectified the device may be faulty.
- High temperature – The screen will display “High Temp” and it will stop working until the device has cooled down.
- Time Out – if you vape for longer than 8 seconds the screen will display “Time Out” and the fire will cut out. You can continue vaping by inhaling or pressing the fire button again.
- No Pod – If the device does not recognise the pod or there is no pod installed, the screen will display “No Pod”. Insert a pod. If pod still not recognised clean all the contacts on the pod and device. If the fault persists try a new pod. If this is still not rectified the device may be faulty.
- Locked – The screen displays “Locked” when trying to use the fire button if it has been locked. Press the button 4 times to unlock.
How To Charge The Battery
The charging rate is specified as 2A.
- Using the included USB type C cable, connect the small end into the USB port on the mod.

- Connect the large end of the cable into a suitable USB outlet.
- The screen will display the charging progress and will turn off when fully charged.

I found this to take around 50 minutes to charge from empty.
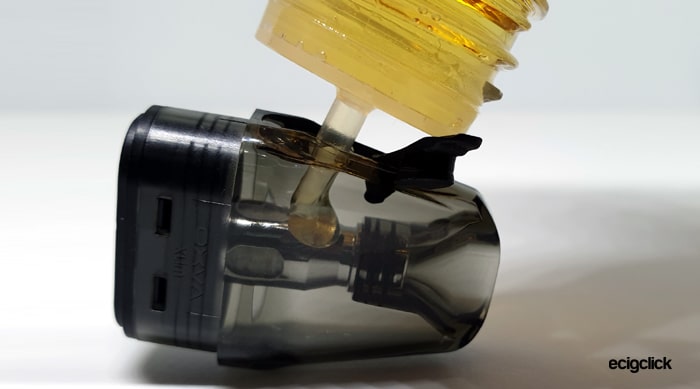
How To Fill the Pod
- You don’t need to remove the pod to refill. I removed it to make it easier to take a photo!
- Lift up the cover of the fill port and add e-liquid through the port.

- Watch the e-liquid level through the clear side of the pod.

- Replace the fill port cover firmly.
- If this is the first fill allow the pod to stand for 10-15 mins to allow the e-liquid to soak into the coil. This is called Priming and is a very important step. If not fully primed you could burn the coil out and your throat lining in the process!
How Does The OXVA Xlim SQ Pro Perform?
I used my own e-liquid mix which is 50/50 PG/VG made from IVG Bubblegum Concentrate at 20% ratio. This is quite high a flavour ratio as I prefer plenty of flavour, but sadly this means it can be a coil killer sometimes. But the OXVA Xlim pods usually have no issues at all with it.
I add nic salt to approx 6mg strength.
If any of these terms are over your head – have a read of our handy guides below!
- MTL V DTL – A Guide To Vape Styles
- VG and PG in E-liquid – all you need to know
- Beginners guide to E-liquid
- Nic Salt E-liquid
Xlim V3 0.8ohm Pod
The recommended power settings for this are between 12-16W.
This pod is just perfection. I have used it before in the Xlim Pro and got epic life from it – over 5000 puffs!
The flavour is pure and clear and at 16W (which is what the mod suggests) it is perfect.
I love this pod, my Bubblegum flavour is sweet and juicy and it is warm without being too hot.
You are not going to get epic plumes of vapour here, but it does chuck out what I would expect from the combo of coil resistance, power and e-liquid type.
Highly recommend.
So far I am at 1800 puffs and the flavour is still incredible! I will try to update when the pod finally needs replacing!
UPDATE: 4-1-24 – I am just starting to get dry hits. The puff count of this pod is at 5299! I am very happy with that coil life!
Xlim V3 0.6ohm Pod
The recommend power settings for this are between 20-25W.
The device selected 22W automatically and this was perfect so I did not adjust the power at all!
This is a similar vape to the 0.8ohm with amazing flavour and warmth but it is slightly more fierce!
The throat hit is more apparent and you do take shorter inhales with this pod.
I wouldn’t recommend using higher nicotine strengths in here as they could be a bit harsh. Anything over 10mg nicotine would be better in the 0.8ohm pod. I am using 6mg nic salt in here and it is good, but anything higher could be a bit too harsh.
I still prefer the 0.8ohm but the 0.6ohm is still an incredible vape and surprisingly efficient on e-liquid consumption too.
So far I have used this for 430 puffs and 9 refills and the performance has not dropped at all.
Yet again both pods push out such a beautiful pure flavour. It is rare for both variants of a pod in a kit to be winners – but with OXVA they are!
Airflow
To rate how restricted the airflow is, I use a scale – where 0 = fully closed, no airflow – up to 10 = breathing fresh air.
For the 0.8ohm pod – the airflow slider fully closed results in a very restricted airflow – just enough to trigger the firing but pretty uncomfortable at around 1. This means it should satisfy those who like a really tight MTL vape. With the airflow fully open I would rate this around 5 which is a loose MTL or RDL setting.
The 0.6ohm pod has a slightly looser airflow. It is possible to get a vape with the airflow fully closed so I would rate it around 1.5 to 2. However when fully open this is comparable with the 0.8ohm at around 5.
This should keep even the tightest MTL vaper happy and even is suitable for RDL vapers.
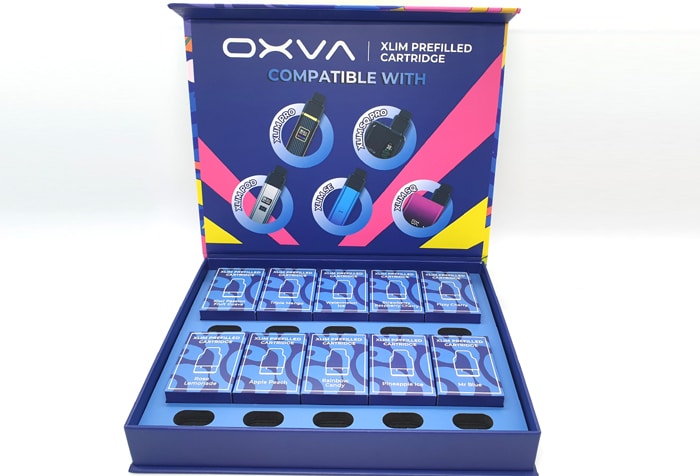
Pre-Filled Pods
OXVA kindly sent me a selection box of pre-filled pods.
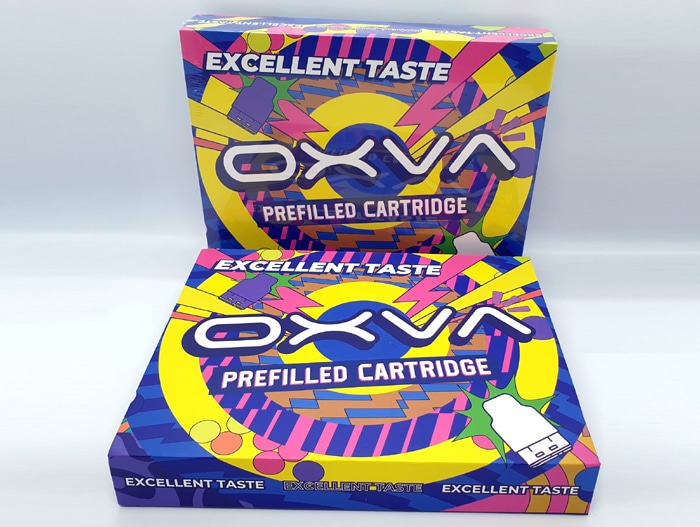
I will cover these in a separate review as they are universal for all of the Xlim fixed coil kits – not the Xlim C.
Mod Performance
The auto draw even with the airflow fully open is super quick and reliable. It doesn’t stutter or misfire.
Power wise this seems to be accurate and the smart mode selects the perfect output setting to suit the pod installed. I did not have to adjust the output as it was spot on automatically.
The last few puffs are a bit weak just before the battery conks out – this is pretty much the norm and it is rare to find a device which doesn’t do that.
Plus you know I am going to rave about that screen! The animation is ace, but even on the other themes the display quality is excellent with crystal clear characters.
Having the button lock feature is very useful as it ensures you won’t accidentally trigger the fire in a pocket or bag.
Leaks
This is the only downside with the top fill pods.
However the issue only occurred with the 0.8ohm pod – no idea why? The 0.6ohm did not seem to have this problem.
They can have a tendency to dribble after filling. I have been careful to not overfill and make sure the port area around the bottle nozzle is not obscured to allow air to vent out.
But there is still some dribbly dribbly in the pod compartment. Also this can impact the auto draw inhale as there can be e-liquid in the airflow sensor. To fix this I would wipe inside the pod compartment and blow through the airflow intake where the airflow adjustment slider is. Plus wrap the pod in tissue and blow down the mouthpiece to clear any further e-liquid.
This was also a problem on the Xlim Pro. I overcame this issue by simply using the V2 0.8ohm pods. They perform the same but they have a side fill port which means removing the pod for filling unfortunately.
Once you wipe up the e-liquid in the pod compartment it will stay dry until you refill – so it doesn’t seem like a failure of the seals – it seems more to do with pressure? Perhaps I am increasing the pressure by squeezing my e-liquid bottle when filling? I wish I knew!
But it is bloody annoying and meant I didn’t take this kit out and about with me as I wouldn’t be able to keep wiping the pod compartment out. I will continue using this kit with the V2 pods.
Battery Life
This will vary according to the power level, pod and your own vaping habits. But as a guide…
With the 0.8ohm pod at 16W I get between 6 and 7 hours of vaping. Approximately 300 puffs per charge and 5 refills! This is a big increase compared to the 4-5 hours I got from the Xlim Pro. This does have 200mAh more battery capacity but the screen is more complex. So I assume the screen is not that power hungry.
With the 0.6ohm pod at 22W I got a similar time – around 7 hours. The puff count was lower at around 220 per charge.
Pros
- Crystal clear high quality screen
- Love the themes and hope there will be new ones to add in future?
- Stunning looking device
- Smart mode makes life easy for those who want a simple to use vape
- Variable output to tailor the vape to suit the pod and your own preference
- The flavour, vapour and warmth is just epic from the best fixed coil pods you can buy!
- Compatible with all previous fixed coil Xlim pods with plenty of resistance options
- Can purchase pre-filled pods for those transitioning from disposables
- Super tight MTL up to RDL airflow adjustment
- Auto draw firing works seamlessly
- Fire button back-up in case auto draw fails
- Lockable fire button to prevent accidental activation
- Sturdy build quality and is comfortable in the hand
- Longer battery life
- 5299 puffs from first 0.8ohm pod!
Cons
- The top fill pods can dribble after filling. I am not sure if it is due to pressure when squeezing e-liquid in?
OXVA Xlim SQ Pro Final Review Verdict
It seems every time I fall in love with an OXVA Xlim kit they bring out one that is even better!
Luckily they are compatible with all the fixed coil pods (apart from the Xlim C) in the range – for which I am relieved.
This Xlim SQ Pro has now overtaken the amazing Xlim Pro as being my favourite kit. I have the two sent to me for review and I am even tempted to purchase another in the Pastel Pink – that is how good they are!
Yes the screen is very fancy but I did not notice that impacting the battery life at all and you are getting a bigger battery capacity anyway!
I recommend the OXVA Xlim range all the time and this will be another one I suggest.
It is a bit more technical and complex than the easy peasy Xlim SE but if you leave it on Smart Mode (which of course is the default) then it is super simple!
Also you can buy the pre-filled pods to make it even easier! Perfect for those who are just starting vaping or who are swapping the wasteful expensive disposable vapes for something more sustainable.
I did drop marks on build quality due to the dribbly 0.8ohm pod – but there has to be something I am doing wrong here as others do not appear to have this issue? I may be squeezing air into the pod when filling perhaps? Plus this did not happen on the 0.6ohm pod – so strange?
Otherwise I absolutely love it – perfection!!
Have you tried the OXVA Xlim SQ Pro Kit? Let me know in the comments below!


I have went through at least 50 different kinds of cigs and the oxva xlim pro and the oxva xlim sq pro are def the best vapes I’ve ever had, long lasting batteries, full flavour, and so easy to deal with, I would never go back now, absolutely brilliant!
In my experience I’ve had more dribbling issues with the v2 pods than with the v3… this is the best pod I’ve ever used, once I learned how to handle it and don’t cover the airflow..