The OXVA Xlim SE Pod Kit is the update to the Xlim V1/V2 which I reviewed previously.
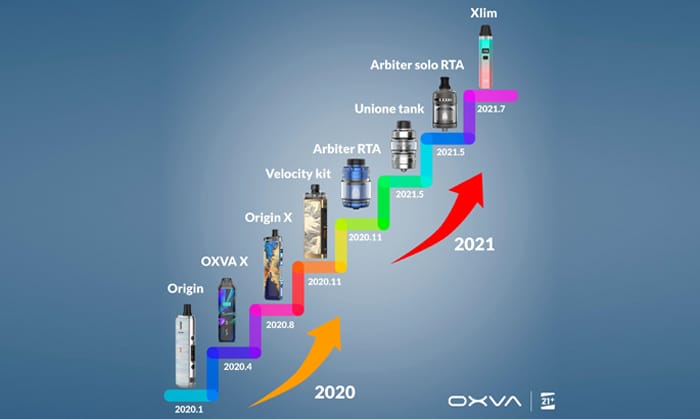
 OXVA may be a new brand but they have really created a name for themselves in such a short time with devices such as the Origin, Origin X, Arbiter RTA, Velocity and the Arbiter Solo RTA.
What Can We Expect From The OXVA Xlim SE Pod Kit…
I reviewed the original Xlim and after a shaky start and an update it really became a perfect pod kit. So what is different about the SE version?
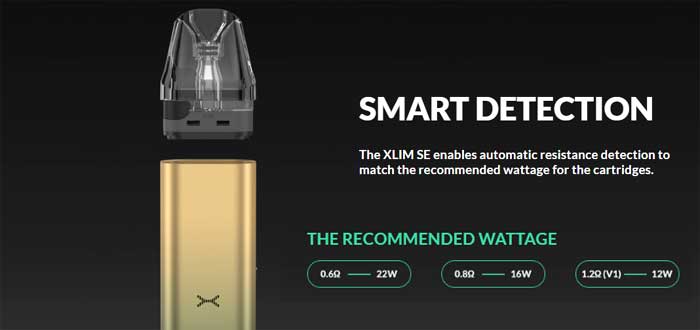
Well the first main difference is the lack of screen, instead you get an “X” shaped LED indicator.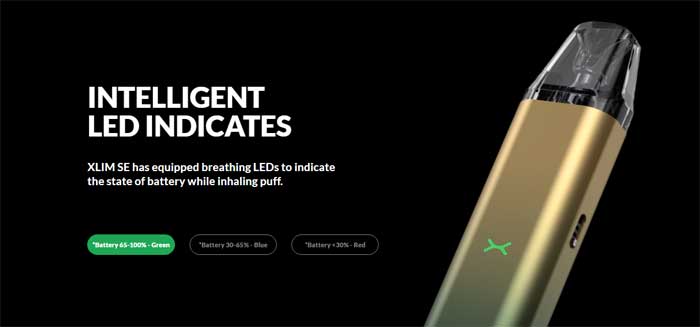
Also there is no fire button on this version, it is only auto draw activated.
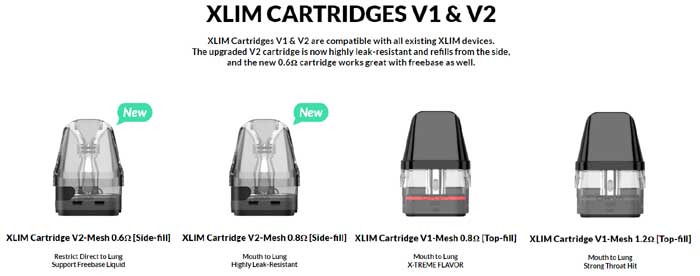
The good news is that this version uses all the existing Xlim pods – including the V1 and V2. They are refillable but the coil is fixed – so when the coil conks out you replace the whole pod.
Inside the device is a 900mAh battery which is charged via the USB Type C port at 1A charge rate. It is worth noting there is no charging cable included – so make sure to have one at hand.
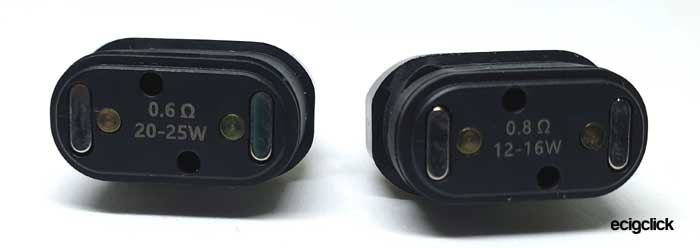
Another cost saving is the fact that only one pod is included – this is the 0.6ohm V2 pod.
Output wise instead of being user controlled this is automatically controlled and the device sets the appropriate output for the pod that is installed:
- 0.6ohm V2 pod = 22W
- 0.8ohm V2 pod = 16W
- 1.2ohm V1 pod = 12W.
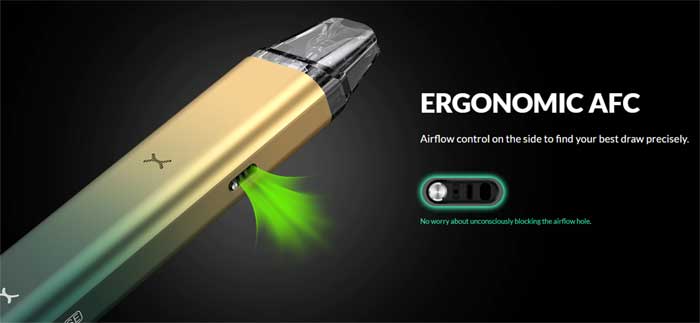
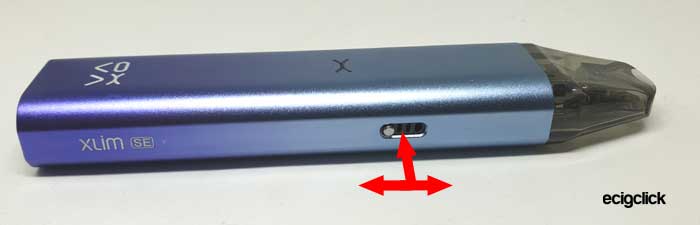
The great airflow control slider has also been carried over – phew am pleased about that.
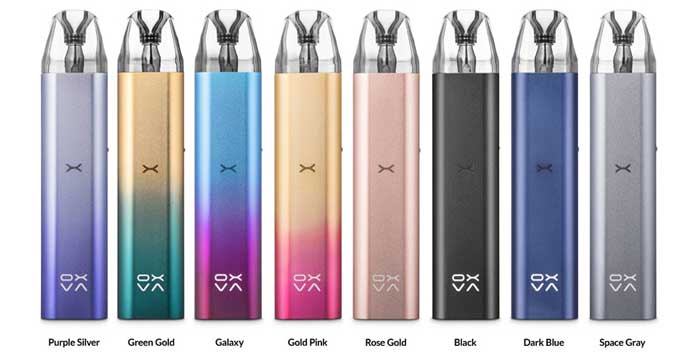
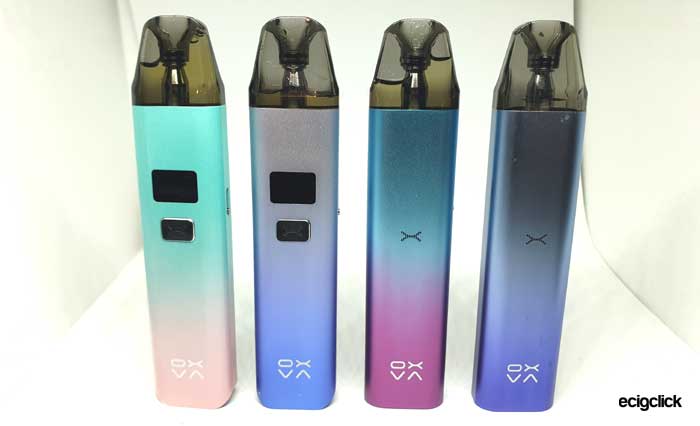
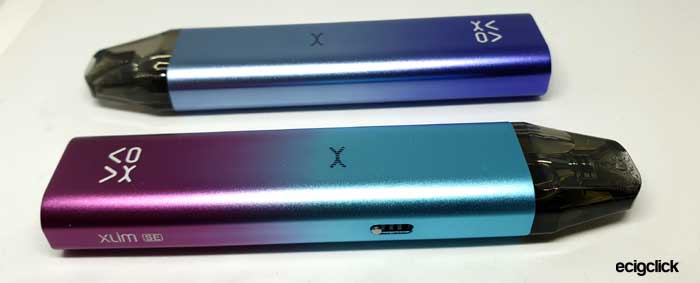
There are 8 colour options to choose from: Purple Silver, Green Gold, Galaxy, Gold Pink, Rose Gold, Black, Dark Blue and Space Grey.
These were provided free of charge for review purposes and I will report back honestly on my findings of the devices in my possession!
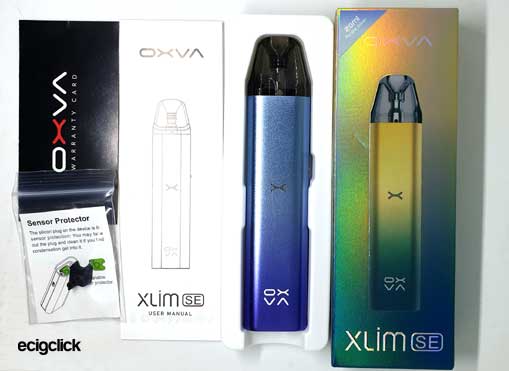
Inside the Box
- OXVA XLIM SE device
- 0.6ohm V2 pod
- Spare Gasket
- User manual
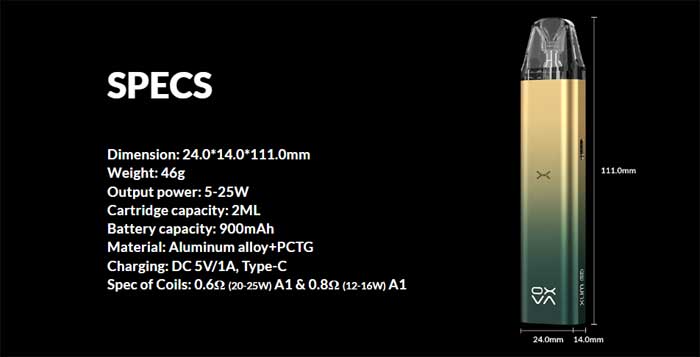
 OXVA Xlim SE Pod Kit Specs
 OXVA Xlim SE Pod Kit Specs
- Size: 24x14x111mm
- Output: 5-25W
- Adjusts wattage automatically according to pod resistance 0.6ohm = 22W, 0.8ohm = 16W, 1.2ohm = 12W
- Battery: 900mAh (internal)
- Display: LED indicator
- Resistance range: Not specified
- E-liquid capacity: 2ml
- USB Type C – 1A charge rate
- Pods: Refillable fixed coils
- Pods: 0.8ohm, 0.6ohm – compatible with Xlim pods
- Airflow adjustment
- Auto draw activation
- Side fill port
OXVA Xlim SE Design and Build Quality
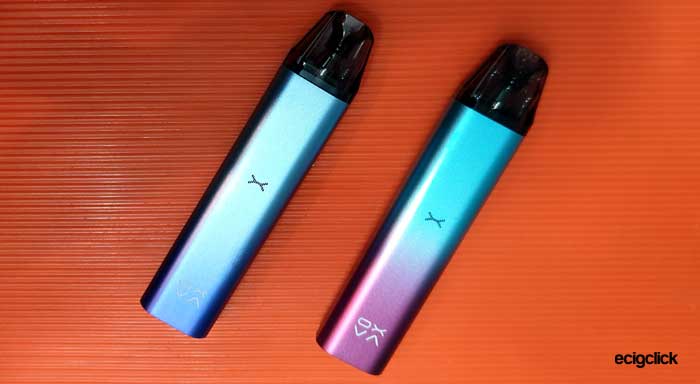
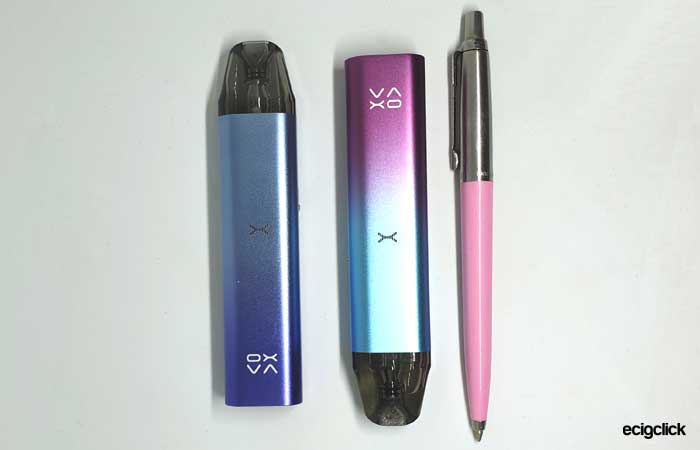
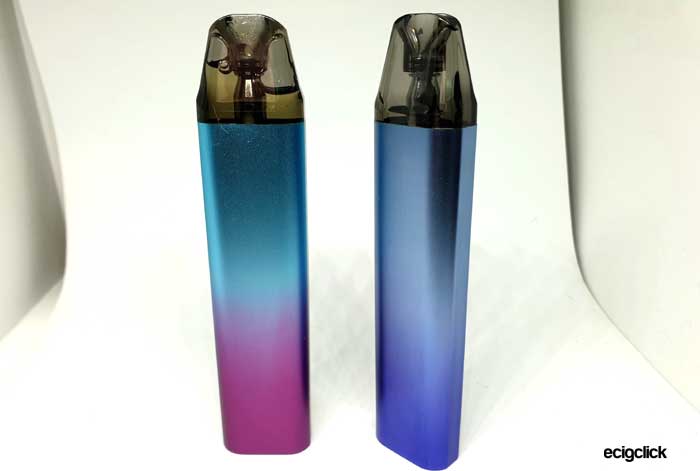
I received 2 of the kits in the Galaxy and Purple/Silver colours.
The packaging was small and well laid out, but it is worth reminding of the scant contents – there is only 1 pod and no charging cable. I understand this is to keep costs to a minimum but a new user might bugger up the pod accidentally and have no replacement.
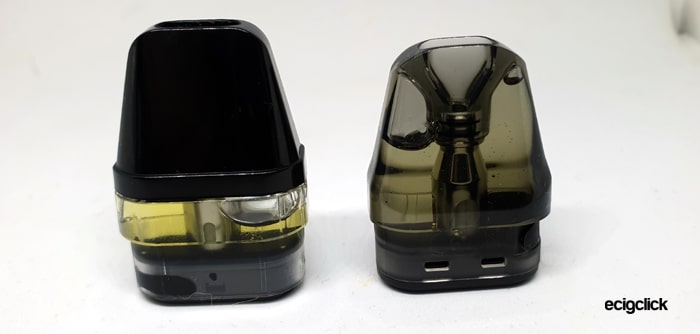
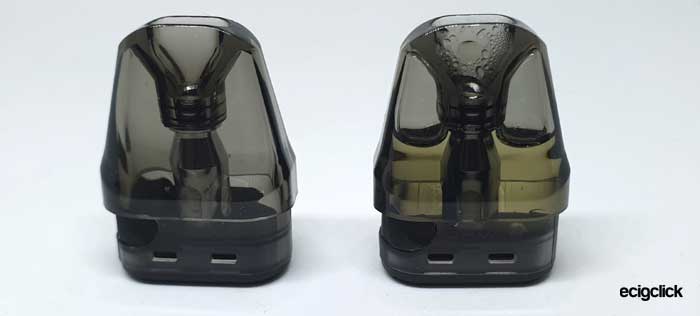
Luckily in my parcel OXVA also sent me 2x 0.8ohm pods separately – but although I have reviewed these as well – they are not included in the kit. They are widely available if you search for “Xlim V2 Pods”. There is also a 0.8ohm V1 pod – try and avoid that as the V1 pods leaked and the coil life was terrible.
You can tell them apart by looking at them – the V1 has the black removable mouthpiece and the V2 has a fixed mouthpiece which is clear.
The instructions are decent, cover most things but are only a couple of pages per language.
OXVA Xlim SE Mod
This is so similar to the original Xlim – which you can see below.
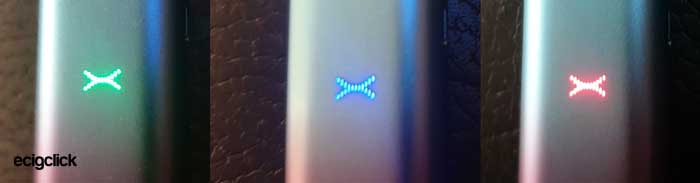
There is no screen so a bright breathing LED in the shape of an X is provided and it does look great.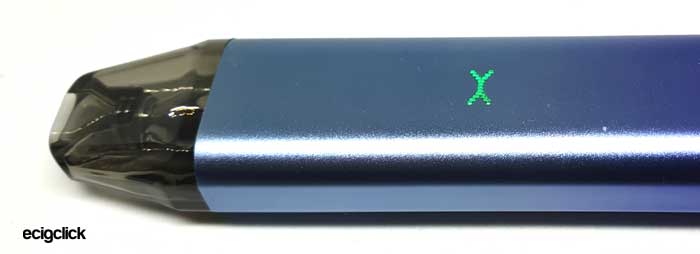
The painted finished has a graduated blend of the colours and looks sharp and metallic.
On the front is the OXVA logo and the side has “Xlim SE” in the same white print.
The side airflow adjustment slider works great with a good resistance, but as it is in exactly the same place as the original you might sometimes block the airflow with your hand.
A USB Type C port lives on the base and I had no issues with this – apart from obviously you have to charge the device with it laying down – which could be a problem if you have leaky pods.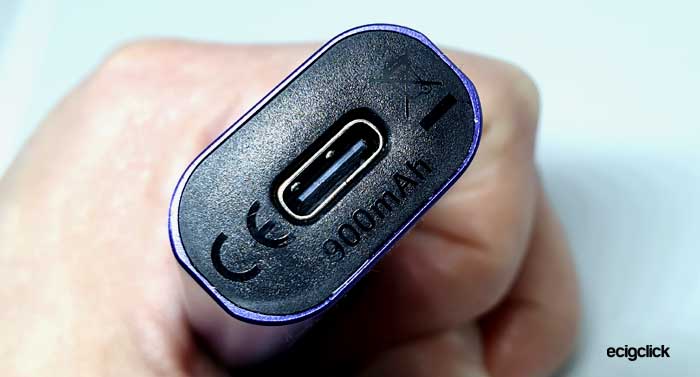
Also on the base are the required regulatory logos and the battery capacity stamped in.
The rear of the device is just plain.
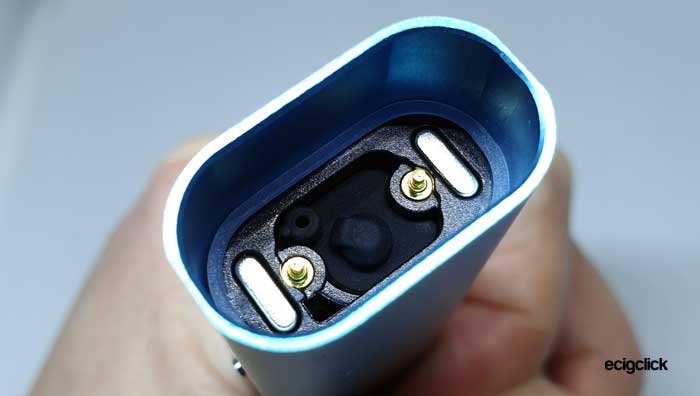
The pod is held in magnetically and is held in well with a small resistance to removal but you can also shake the device around and the pod doesn’t move at all.
Inside the pod port the connections are exactly the same as the original Xlim with two strong magnets, the airflow hole, two spring loaded connectors and the sensor protector.
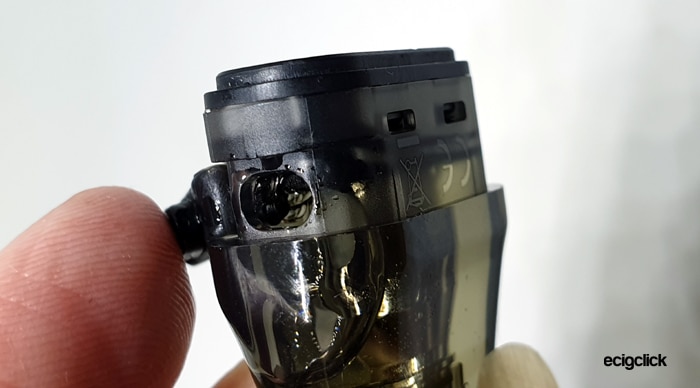
OXVA Xlim Auto Draw Sensor
As mentioned above there is a spare “Sensor Protector” included in the kit.
This did intrigue me as to what it was for.
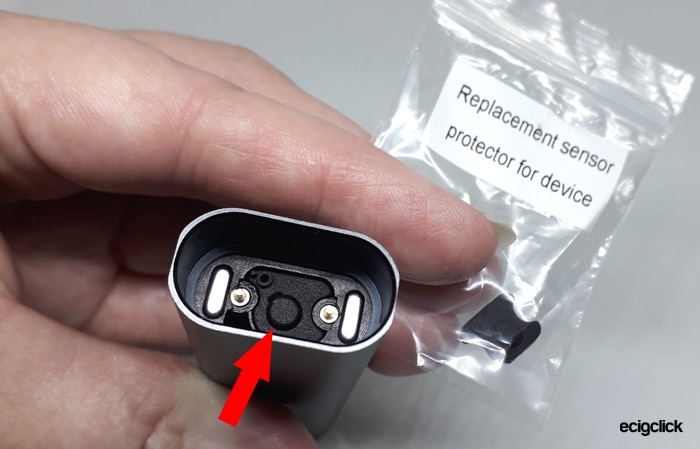
If you have a leaky pod on auto draw devices it can damage or short out the draw sensor and either prevent it firing properly or constantly fire.
Now this little cover is there to protect the battery and contacts from damage due to liquid ingress, there is already one installed and you get a spare in the kit.
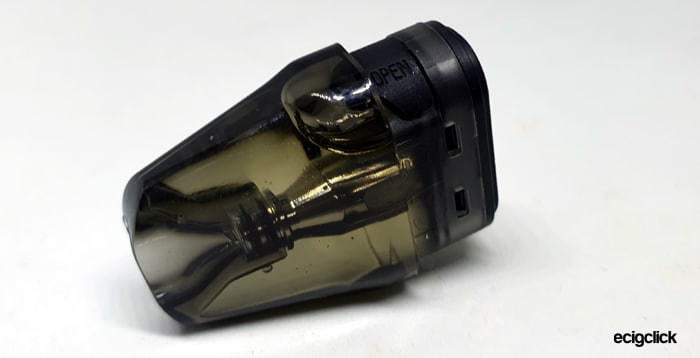
OXVA Xlim SE Pod
The pod design is the same as with the V2 Xlim kit – so I have pretty much copy/pasted my views from that.
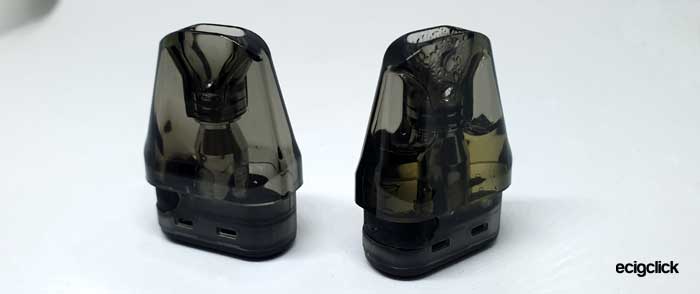
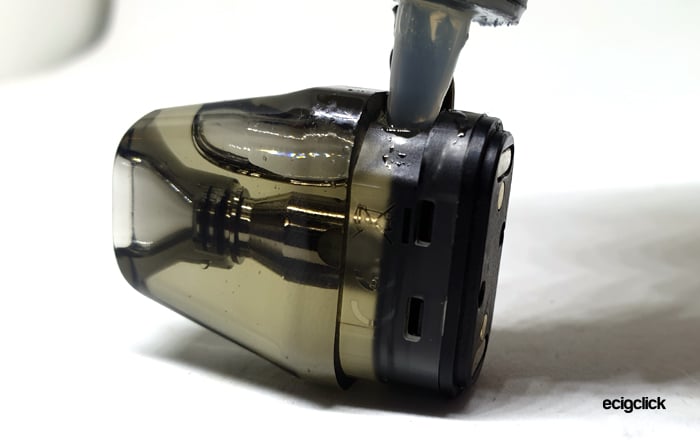
The fill port is on the side of the pod with a silicone cover.
Yes it is tiny and not easy to open without nails – but it is still a massive improvement on trying to remove the mouthpiece on the V1.
I found the fill port to be OK with 10ml bottles with slim nozzles. Anything bigger is just going to result in you pouring e-liquid everywhere apart from the place you actually want it to go!
So the filling port is not great – I have had to decant my e-liquid into small nozzle 10ml bottles as none of the larger spouts will fit into the port.
Also you can get airlocks where you are just pushing air into the pod and pushing liquid out which can be annoying.
The clear mouthpiece makes viewing e-liquid much easier as you can tip the pod upside down and see if there is liquid in the mouthpiece area without having to remove the pod.
Speaking from experience as a user of these pods in my Xlim V2 – there can be a slight leak from the fill port as it is often difficult to push fully closed. This can allow small leaks from the port which drip down the pod.
But the pod life of over 4000 puffs for every 0.8ohm pod I have used makes up for the filling niggles.
On the pod base is the resistance and recommended power level, plus magnets, contacts and airflow holes. You can install pod either way around and it works fine.
OXVA Xlim SE Pod Kit Quick Start Guide
The device arrives with the 0.6ohm pod installed. Do not inhale on this until you have filled it with e-liquid and left to stand for 10 minutes. If you do you will get a horrific dry hit and ruin the only pod you get with the kit – which will really pee you off.
An isolator sticker is attached to the base of the pod to prevent firing before filling so make sure to remove this before use.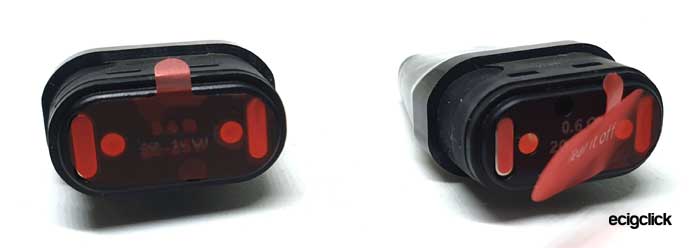
So charge, fill up and away you go – I tell you how to do all this below!
OXVA Xlim Basic Operation
- Power On/Off = you cannot switch this on or off.
- Vaping = inhale on the mouthpiece to trigger the auto fire.
- Battery indicator = illuminates when vaping – Green light = 65-100% charge left, Blue light = 30-65%, Red light = less than 30% and when fully discharged will flash Red and will not fire.

- Battery indicator when charging = the battery level colours pulse slowly from Red to Blue and then Green. When fully charged the LED turns off.

- Adjust airflow = move the slide switch on the side of the mod to increase / decrease the incoming airflow to your preference.

OXVA Xlim Protections
- Low battery – the LED flashes Red 10 times and the device will cut out.
- Short circuit / too low resistance – Red LED flashes 3 times.
- No Atomiser / open circuit – Blue LED flashes 3 times.
How To Charge The Battery
The charging rate is specified as 1A.
- Using the included USB type C cable connect the small end into the USB port on the mod.

- Connect the large end of the cable into a suitable USB outlet.
- The LED will display through the colours and turn off completely when fully charged.
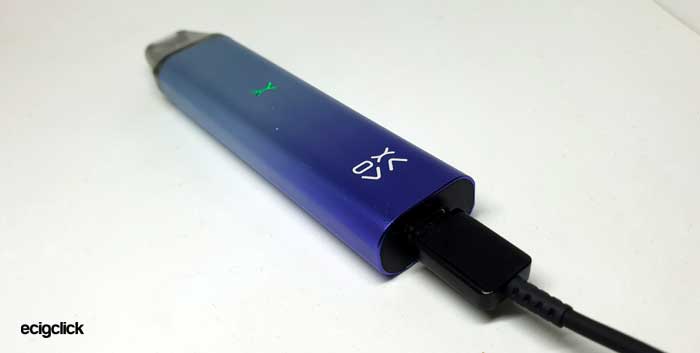
The charging time for me using a 1A mains plug was just under 1 hour – 56 minutes to be exact!
How To Fill the OXVA Xlim SE Pod
- Remove the pod from the mod.
- Lift up the cover of the fill port and add e-liquid through the port.

- Watch the e-liquid level through the clear side of the pod.

- Replace the fill port cover firmly.
- If this is the first fill allow the pod to stand for 10-15 mins to allow the e-liquid to soak into the coil. This is called Priming and is a very important step. If not fully primed you could burn the coil out and your throat lining in the process!

How Does the OXVA Xlim SE Pod Kit Perform?
I mainly used my own e-liquid mix which is 50/50 PG/VG made from IVG Bubblegum Concentrate at 20% ratio. This is quite high a flavour ratio as I prefer plenty of flavour, but sadly this means it can be a coil killer sometimes. But the OXVA Xlim pods have no issues at all with it.
I add nic salt to approx 6mg strength.
If any of these terms are over your head – have a read of our handy guides below!
- MTL V DTL – A Guide To Vape Styles
- VG and PG in E-liquid – all you need to know
- Beginners guide to E-liquid
- Nic Salt E-liquid
OXVA Xlim V2 0.6ohm Pod – 22W KA1
The device sets the power automatically to 22W for this pod.
50/50 E-liquid…
I used my own bathtub brew e-liquid for this pod and the flavour is immense.
It is a bit harsher than the 0.8ohm pod obviously and I can really feel the throat hit of my 6mg nic strength!
Also the vape is warmer and slightly drier than the 0.8 pod.
This is a lovely vape – but for me I prefer the 0.8ohm as it is less harsh and the lower power required means your battery will last longer too – in theory! I will test this out later in the review!
In my other OXVA Xlim review I used the same pod spec and had recorded over 600 puffs and the coil was still going strong. I swapped back to the 0.8ohm as it was my preference.
For this review I have filled this pod 8 times so far (approx 16ml) and the flavour is still going strong – which is good for my coil enemy e-liquid!
70/30 E-Liquid
As I rarely use this ratio of e-liquid I will refer back to my original OXVA Xlim review as the V2 0.6ohm pod is exactly the same and the power level (22W) is the same too.
I chucked a tankfull of the lovely Choppa Collection Bully Iced into the pod to see if it would handle this and set the power at the 22W.
The flavour yet again was excellent. In fact the higher VG gives an even better and clearer flavour!
The ability to use 50/50 Nic Salt or higher VG (70%) in this pod makes it super versatile!
OXVA Xlim V2 0.8ohm Pod – 16W KA1
I am very familiar with this pod as I have used it for months on my Xlim V2. Admittedly on the V2 I set the output to 15.5W whereas the SE sets it to 16W automatically.
The flavour is still as wonderful as with the Xlim V2 and these pods are excellent. I have been regularly getting over 4000 puffs from each pod with my coil killer e-liquid which is pretty epic.
You won’t get massive clouds from this as it is a low power MTL kit, but there is plenty of warmth, throat hit and just a beautiful clear flavour. I honestly love these pods so much they have become my daily kit and they get used heavily. I am over the moon that they are still compatible with the SE version and just a bit sad they are not included in the kit!
OXVA Xlim SE Airflow
Like with the original this is a super tight airflow on the tightest setting. To the point you get hardly any vapour as you have to suck so hard to get a vape and run out of breath!
I use this on the fully open setting which is still a good MTL draw and pretty tight. If you are a restricted DTL vaper you will find this airflow way too tight even at the fully open position.
Mod Performance
The auto draw is super quick and responsive whatever setting the airflow is in.
I had no issues at all with the device, it charged and operated perfectly.
Battery Life
It is always difficult to report on this as everyone’s vaping habits are different and the coil resistance of the pod installed will also affect this.
As this version has no screen all I can do is time how long I get to each battery charge.
The battery is exactly the same capacity as the Xlim V1/V2 but obviously the power output is different. Plus without a screen hopefully the battery charge will last longer?
Using the 0.8ohm pod I got around 8.5 hours of use and the output was pretty much consistent until the Red LED flashed and the device wouldn’t fire.
Using the 0.6ohm pod I got 5.5 hours of use – and same output until the red light flashed.
Pros
- Very well made
- Beautiful paint work – the Galaxy colour especially
- 0.8ohm V2 Pod life – over 4000 puffs to each pod
- 0.8ohm V2 pod has immense flavour, warmth and throat hit
- 0.6ohm V2 pod compatible with 50/50 and 70/30 VG/PG e-liquids
- Airflow adjustment included
- Very inexpensive to buy and packs of replacement pods are great value
- Great battery life
- Clear view of majority of pod contents
- No massive leaks
- Super simple to use (apart from filling!)
Cons
- Airflow is very tight, even in the fully open setting, Restricted DTL vapers will find it too tight.
- Often get airlocks when filling pod making refills pretty messy.
- Pod fill port is small and bigger bottle nozzles would not fit and spill e-liquid everywhere!
- No USB cable included and only 1 pod – but this does make the kit cheaper to buy.
- No fire button – if the auto draw sensor fails you cannot fall back on using the fire button as you could with V1/V2
- Liquid can sometimes dribble out of the fill port when closed. I am not sure if the port plug degrades or some are a bad fit? Make sure to push it in firmly after filling to try and eliminate the chance of this.
Final Review Verdict
For me this performs just as well as my favourite Xlim V2 and I will be using it regularly.
As you can tell the 0.8ohm pod is my favourite and the flavour and coil life make it an absolute winner and thankfully I can still use this pod on the SE!
The 0.6ohm pod is also a great performer being able to use from 50%VG up to 70%VG quite happily. I did find this was a bit harsh on the throat with my 6mg nic salt though!
So if you are using that nic strength or higher grab a pack of the 0.8ohm pods if you feel this is a bit hurty on your throat! In all honestly I would just grab some of them anyway when you buy the kit! They are only around £10 for 3 and will keep you going for months!
Oh and make sure to avoid the V1 pods – not good at all!!
The filling is still messy and awkward and is really the only downside to this kit.
Otherwise the performance, flavour and coil life is just epic and I highly recommend this for nic salt or high nicotine vapers who like a tight airflow.
If a restricted DTL vape is what you are after – I would buy a different kit to be honest as this is super tight even when adjusted to fully open.
If you use disposable vapes – just buy this kit instead. It is just as easy, you can refill with your own choice of liquid and charge too. Much more choice and environmentally friendly – not to mention so much cheaper in the long run. You will only need to purchase replacement pods and e-liquid and the coil life of 4000 puffs makes this even more cost efficient!
Would I Buy This Kit Myself?
I have been using the Xlim V2 since I reviewed it in January 2022 – in fact I have 2 of them on the go – one in use and one charging.
So for me the crossover to the Xlim SE is no issue at all.
I do prefer the V2 as it has more adjustment with the Variable Wattage control – but even then the SE is using pretty much the same power setting as I would choose for the V2! But for people who want things super simple the SE is a perfect choice.
If I could no longer get the V2 I would 100% buy the SE version!
Please let me know your thoughts and opinions in the comments below!


 The Limits?")


I am a heavy smoker and new to vaping. I just found that mtl is more like having cigarette. I’ve been seeing xros is great for mtl. Which one do i get xlim se or xros 3 since they’re minimalist. I’ll be glad if you reply me.
Sadly I have not tried the XROS devices. I reviewed the Xlim’s and Neil C did the XROS kits!
So I can only comment on the Xlim range – I totally recommend the Xlim V2 or Xlim SE with the V2 pods – they are just my perfect MTL vape and I have 4 I use daily! Also I enjoy the Xlim Pro but I use it with the V2 pods as I found the top fill V3 pods did leak for me.
Plus the pod life with the 0.8ohm V2 pods is over 4000 puffs – hence why they are my daily kit and I have tried a LOT of pod kits!
But saying that a lot of people are enjoying the XROS kits – so I don’t think you will be disappointed if you purchase either of them.
These sell incredibly well in my shop, perfect for beginners or people transitioning over from disposables! Would highly recommend.
How long does a cartridge usually last before it burns?
I have the earlier models of the Xlim which had a screen and puff counter and found the 0.8ohm V2 pods were over 4000 puffs before they conked out which is epic coil life!
I haven’t studied the other resistance pods as I only use the 0.8ohm V2.
oxva xlim se or ursa nano which should i buy?
I have not tried the Ursa Nano sadly – but I still love the OXVA Xlim SE – just make sure you get the V2 pods and they are excellent. The pod life has been over 4000 puffs with the 0.8ohm pod and I personally have not tried another pod kit with as much flavour. (And I get to try a lot!)
Our Neil C reviewed the Ursa Nano and you can read his review here…
https://www.ecigclick.co.uk/lost-vape-ursa-nano-pod-kit-review/
V1 pod guide: fill on half, open airflow and do some long puff, cotton soak the liquid properly and next fill to full. I think the cotton is the prblm when fill full the doesnt absorb all in one fill and then leak like hell but its only my opinion. I dont have any prblm with this, lost my vape in june-july and after 2 week i find it on car hidden like rabbit in the hole. 30-35 degrees Celsia outside , put the pod out and…. dry like sahara desert, any leak there, all liq still on the pod. My daughter was witness and after that she stole and change her drag2 to my Xlim :-))). That my experiences with this V1pod. Maybe somebody help this.
How to care for the cartridge? should i empty my juice if Im not using it? or should I leave a juice if im not using it? Hope you answer my question
does this xlim se work with any flavor
Yes it will, just try and make sure the VG % of the e-liquid is not greater than about 70% to be on the safe side.
We explain more in our Guide To VG and PG.
Hi Kierra, yes it does.
I have same here, but it’s blinking red 5 times when I’m vaping and it’s not firing, please someone message me, thanks for help.
I have several of these kits on the go at the moment and there is nothing in the manual about 5 blinks of the LED so it might be worth you dropping an email to OXVA to ask. I often find messaging companies on their social media accounts gets a quicker reply?
I used this pod to. nice articel 😊, if you have trick and tips for this product please send to me 😁.
I got mine for over a month now. Believe or not but I’m on my first coil. Yup, still going strong, not to mention I was using all different liquids. Even after using tobacco liquid, I put some sweet fruit in the pod, two, three puffs and flavour changed for fruit nay bother! Absolute winner this one, 100%!!
The pod life is pretty epic isn’t it – and they are so cheap to buy too!
Oh yes! And thing is, if somebody got stuck on elf disposables, these flavours are now available in bottles, so win win!
And the flavour is majorly superb comparing to disposables
It really is a beauty – well worth the price, the low price of the pods, the flavour and the fact you can choose your own e-liquid make it a perfect substitute for disposables!
I have blue flashing light, what can I do to repair the vape
Blue flashing LED is usually the “No atomiser / Open circuit”.
You can remove the airflow sensor gasket and clean beneath it, clean the pod base and contacts too.
That should sort it