The Eleaf Pico Compaq review, and this a new pod kit that gives more than just a nod to the Pico range.
Other Pico kits have included, the Original Classic 75W Pico, Pico Squeeze, Pico X, Pico S and loads loads more!
Having at one point owned/reviewed all of the above – I can say some are more successful than others!
What To Expect From The Eleaf Pico Compaq…
So this is another “Pod Mod” which is shorthand for a small device with an easy to use pod instead of a tank.
The device itself uses a single 18650 battery for power – but as usual the battery is not included in the kit.
A USB type C port is provided with a 2A max charge rate for emergency recharging.
On the side of the device is a OLED screen but Eleaf does not specify the actual size.
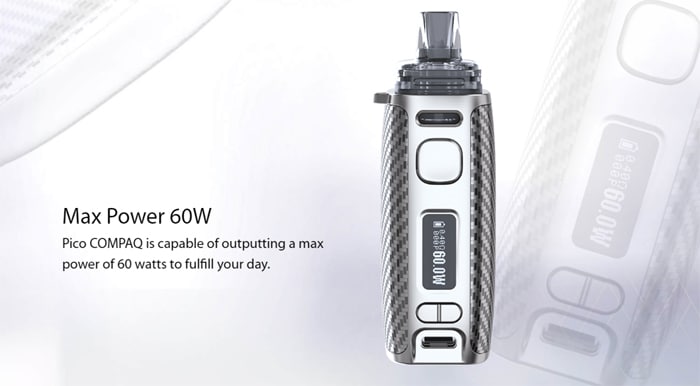
You can adjust the wattage to your preference from 1-60W.
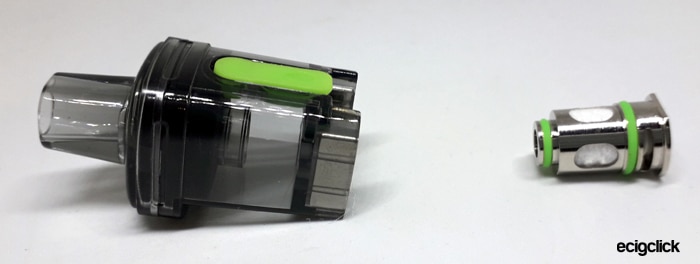
The pod is removable and refillable via a side fill port.
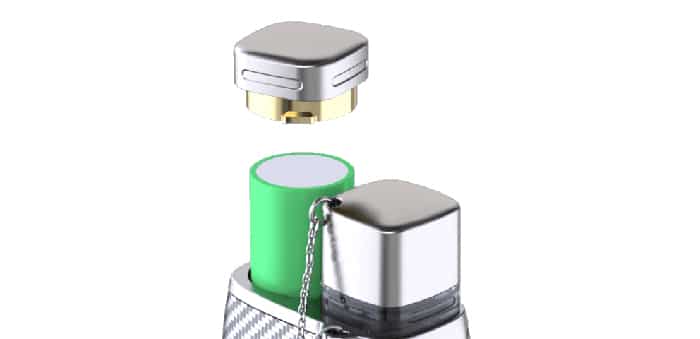
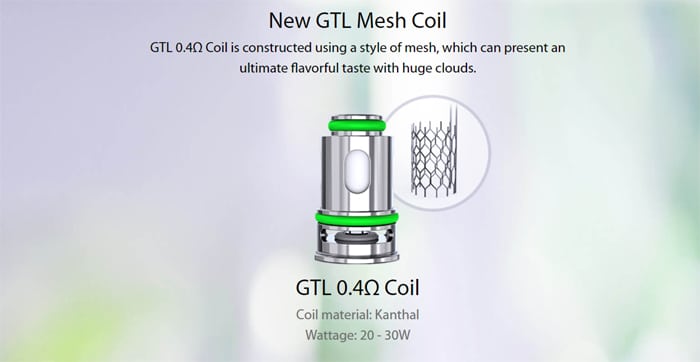
The coil has a push pull installation – there is only 1 compatible coil – the 0.4ohm Mesh GTL coil, and you get 2 of these in the Eleaf Pico Compaq kit.
The coil is also compatible with the iJust AIO pod kit.
A handy little cover cap is included with the which also matches the shape of the pod and the battery cap.
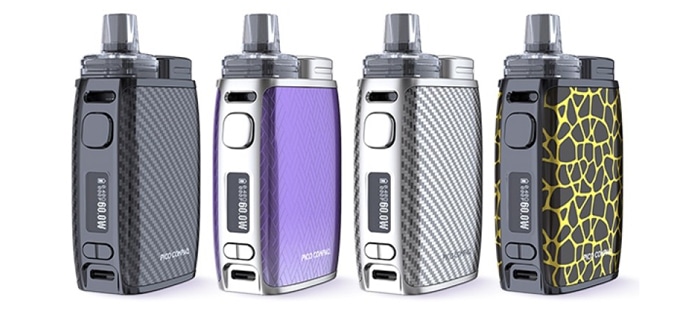
There’s are 4 colours in the Eleaf Pico Compaq pod kit to choose from: Carbon Black, Gradient Purple, Carbon Silver and Gold Ripple.
Thank you to UK Vape Brands for sending this kit for review and I will report back honestly on my findings…
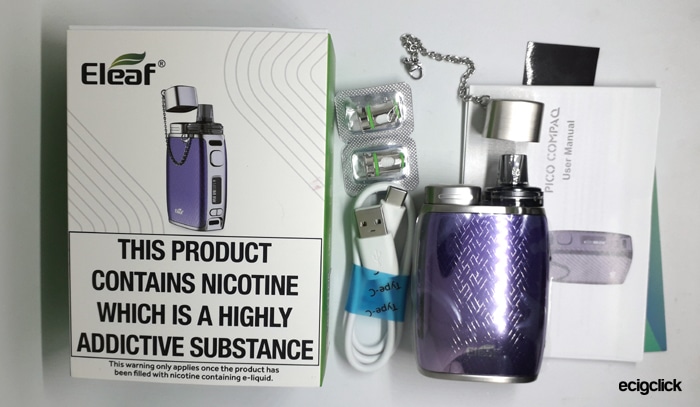
Inside the Box
- Eleaf Pico Compaq Mod
- Pod
- 2×0.4ohm GTL mesh coils
- Type C USB cable
- User manual
- Weird black plastic thing
- Warning cards
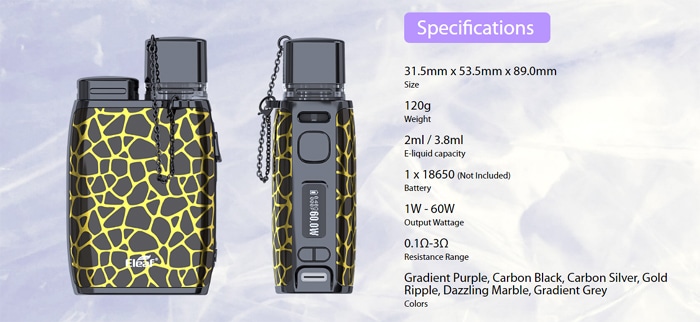
Eleaf Pico Compaq Specs
- Size: 31.5×53.5x89mm
- Output: 1-60W
- Battery: 1×18650 (not included)
- Display: OLED Screen – size not stated
- Resistance range: 0.1-3ohm
- E-liquid capacity: 3.8ml (Standard) / 2ml (TPD)
- Pods: Refillable, replaceable coil
- Coil options: GTL coil 0.4ohm mesh – compatible with iJust AIO pod kit
- Type C USB – 2A charge rate
Design and Build Quality
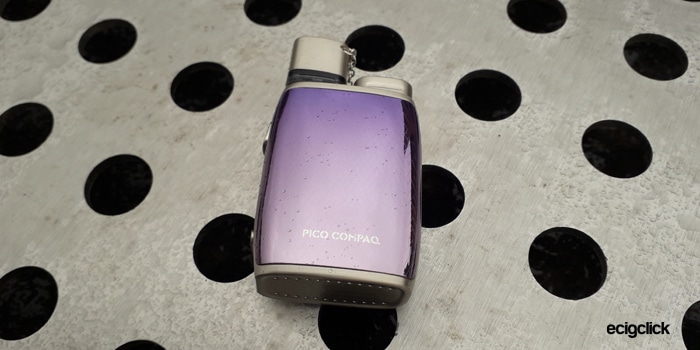
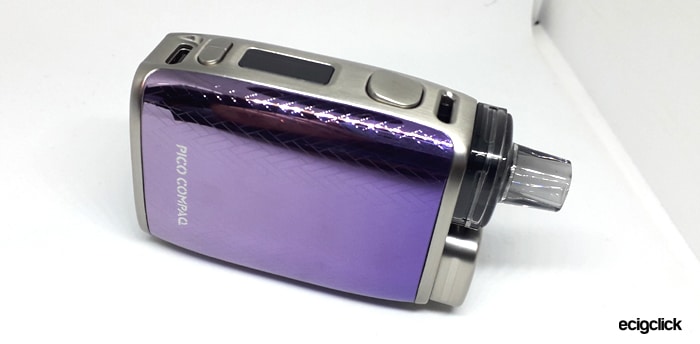
I received the Eleaf Pico Compaq in the Gradient Purple version and it sure is blingy!
The packaging is really well laid out and both sides of the mod have protective stickers fitted.
Also a battery warning sticker is located on the battery cap – ideal placement to remind people of their battery safety.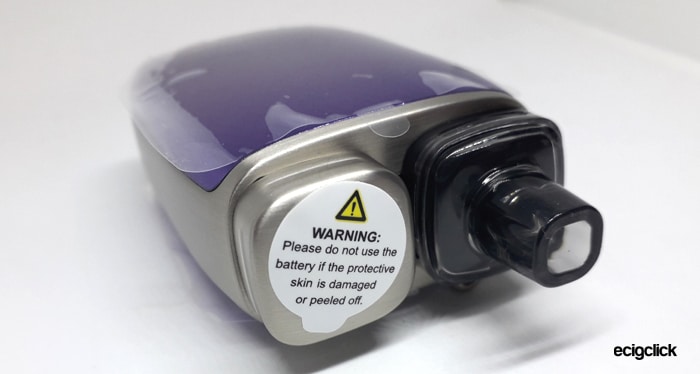
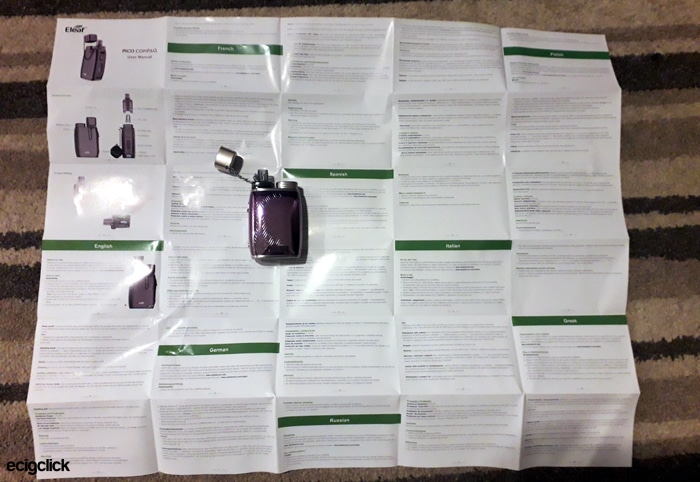
A huge instruction booklet is included but with multiple languages covered – there is not much information for each language.
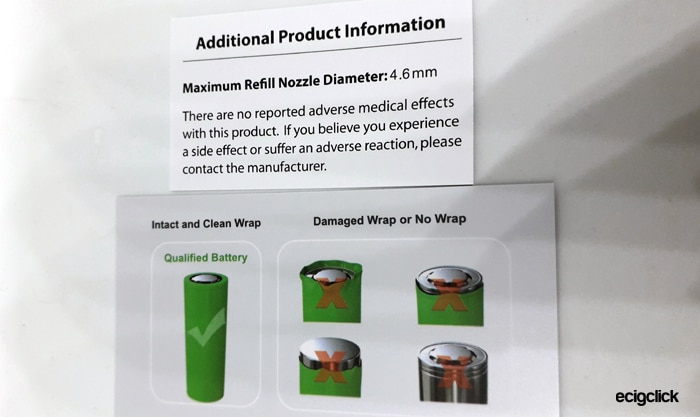
Also included are 2 warning cards which again warn of battery safety and also the maximum size of e-liquid bottle nozzle the refill port can accommodate…
Eleaf Pico Compaq – Battery Compartment
The mod is similar size to the standard Pico range – with the height of a 18650 battery being the minimum size it could be.
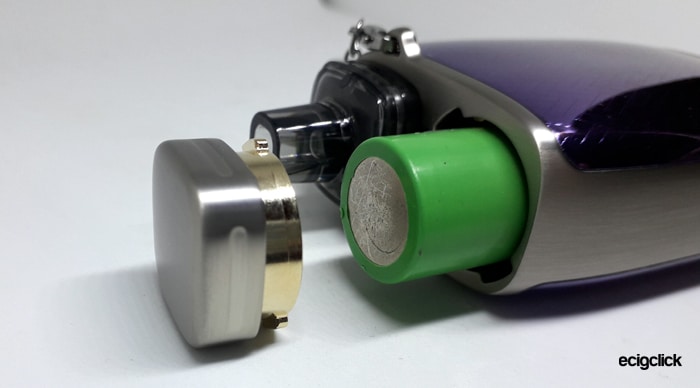
To reduce the height the battery slides into the mod and is secured by a 1/8th turn screw top cap.
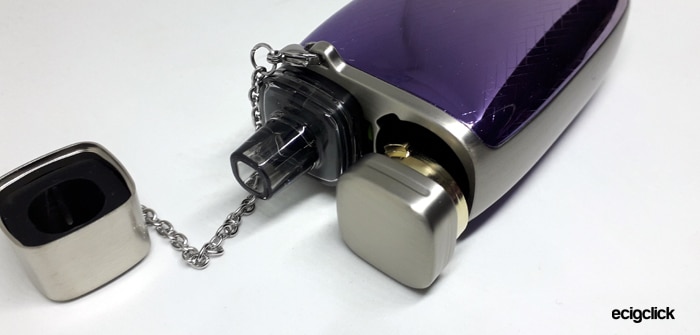
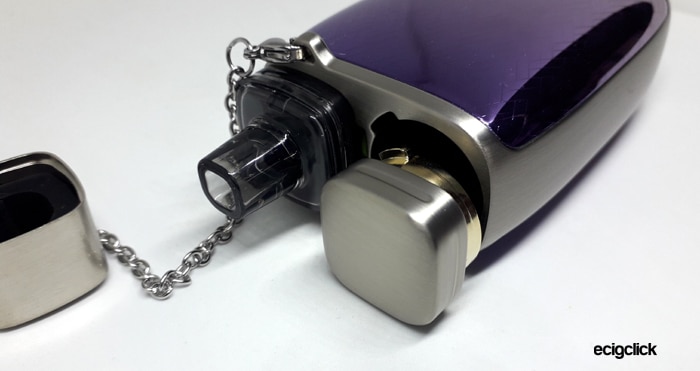
The cap is a square profile which matches the square shape of the pod and the pod cover cap.
You only have to slightly turn the cap in the unscrew direction and it boings up – spring loaded by the terminal located inside the mod.
On the underside of the screw cap the – terminal is clearly marked and the + terminal inside the mod has a red plus sign.
Installing the cap is slightly trickier as the tabs on the cap underside need to align with the slots in the top of the mod.
Then you press the cap down and turn to lock in position.
There is zero rattle from the battery – or any other part of the mod to be honest- well the chain holding the pod cover cap rattles like a knackered bike but you don’t have to install that.
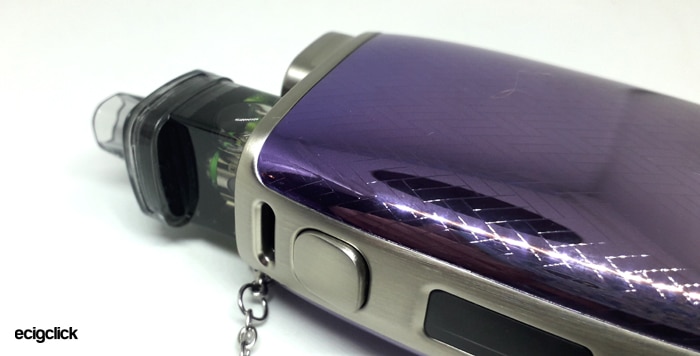
Eleaf Pico Compaq – Buttons & Screen
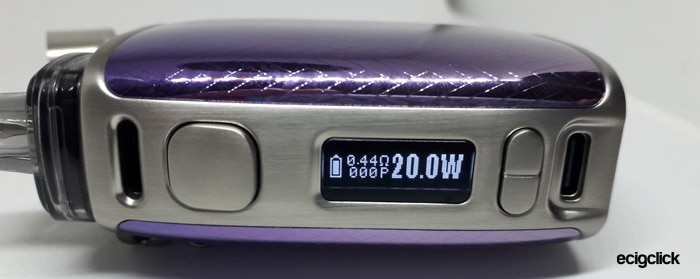
The panel on the side of the mod houses all the controls and the display.
The fire button has a protruded profile – almost like a rocker switch where the base protrudes more than the upper part, and has a nice responsive motion.
Below that is the OLED screen – the official size is not stated but it is pretty small – looks standard Pico fare though measuring approx 20mmx5mm of actual display area.
I know years ago this size of screen was amazing, but I have seen smaller devices with bigger screens which are laid out much better.
It does look cluttered but it still does the job perfectly.
The screen displays the battery charge icon on the left side, to the right of that is the coil resistance and the puff counter. The right side of the display shows the power output selected in watts.
Below the screen are the adjustment buttons – these have a very slight protrusion from the face of the mod but are perfectly responsive.
At the base of the side panel is the USB Type C port – I have used this briefly to make sure that the mod will charge so it does work.
I am not sure if you can use this port for firmware updates, the old Pico’s allowed you some customisation and logo changes.
The firmware on the Eleaf Pico Compaq is scaled down a lot and there is no menu so there might not be any customisation available.
Eleaf Pico Compaq – Mod Styling
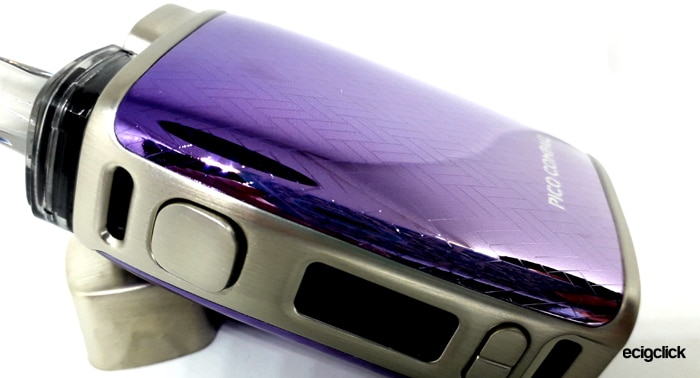
The Eleaf Pico Compaq mod has a curved shape with a brushed stainless steel (style? The materials are not specified) main frame.
You can see the main frame on the top and base of the mod plus each side edge.
The front and rear of the mod have coloured panels – which in my case have a metallic textured finish of a herringbone style weave – it really does look pretty.
As the panels are completely flat with a coating or laminate layer they will not attract dust and gross sticky stuff on the mock texture area.
The front and rear panels also feature the branding of “Eleaf” and “Pico Compaq” which are not massively prominent and also fit with the SS finish of the rest of the mod frame.
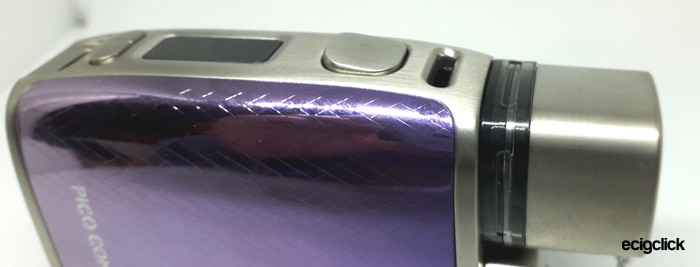
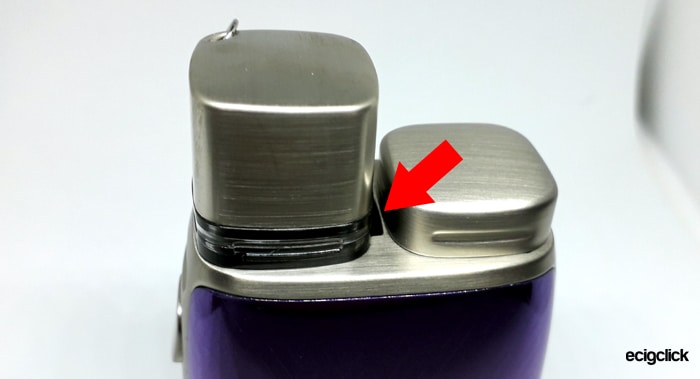
The top of the mod features the square top caps and pod with a cut out visible next to the pod – I have no idea what this cut out is for?
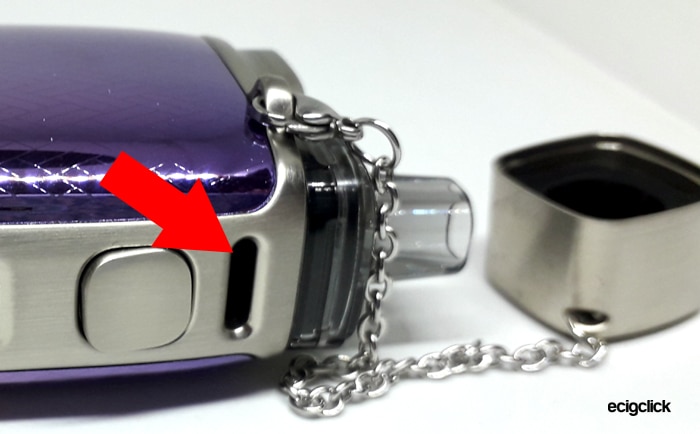
On the control panel side of the mod is the airflow inlet which is not adjustable – which is a shame.
Eleaf Pico Compaq Device Base
The base of the mod has the brushed stainless finish and follows the curved shape of the mod.
Etched into the base are the required legal logos.
8 venting holes are located just below the battery compartment and the rest of the base has mock holes to follow this pattern.
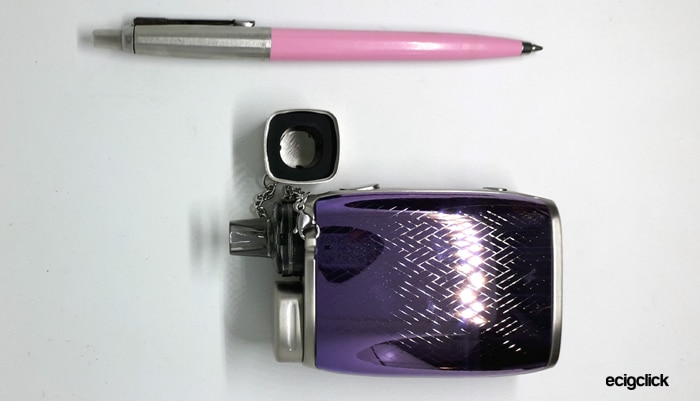
Eleaf Pico Compaq Cover Cap
Included in the kit is the cover cap to keep your mouthpiece nice and clean and sparkly.
It is attached via a clip on the chain to a lug on the mod.

If you didn’t want to use the cover cap the lug might start to annoy you!
I usually dislike cover caps as they are easy to loose but this is a quality bit of kit.
The chain keeps the cap attached to the mod when not in use, plus the internal rubber padding keeps the cap located on the pod.
There doesn’t appear to be any magnetic attraction between the pod and cap so this might become looser as the rubber in the cap becomes more worn.
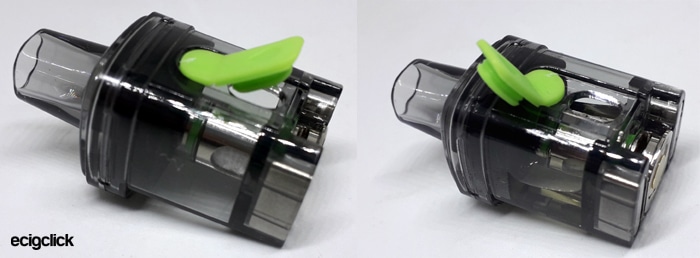
Eleaf Pico Compaq Pod
I received the 2ml TPD compliant pod kit – there is also a 3.8ml version available to non TPD regulated areas.
The profile of the pod is a kind of square shape but there is a sort of lip on the one edge of the pod.
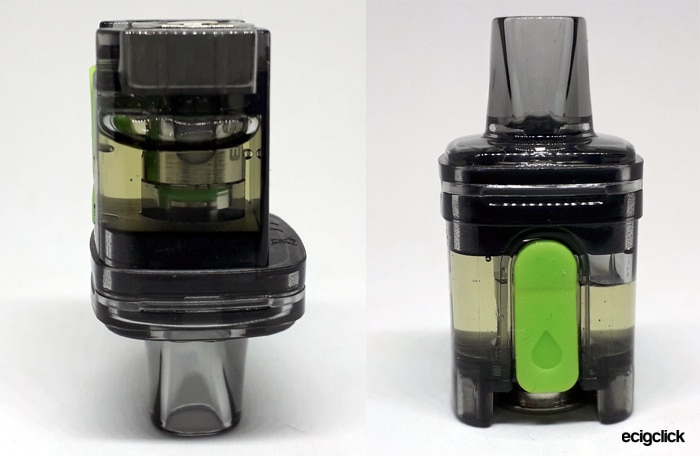
Looking at the mouthpiece this follows the square theme but thankfully in a nice smooth rounded manner and not spiky!
The pod is super transparent but sadly most of the pod is concealed when installed in the mod.
There is a small area of pod visible but there is little hope of trying to gauge the e-liquid level at all so you will be pulling out the pod to check.
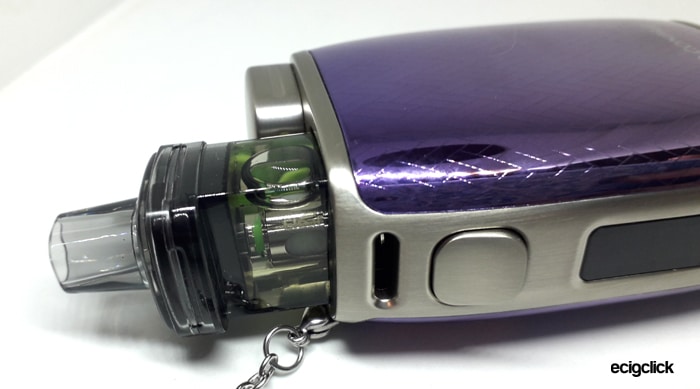
It is held in magnetically with 2 strong magnets located on the pod base and in the mod compartment.
There is no rattle or movement of the pod when installed. There is only one way the pod will fit in the mod and that is with the fill port adjacent to the battery compartment.
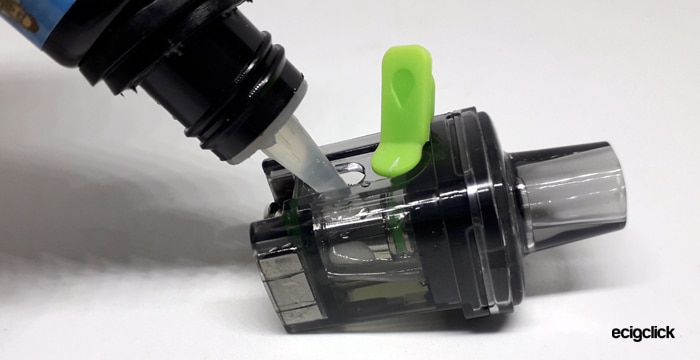
A really good size fill port is provided and I had no issues with refilling. Another great bit of design is that the fill port cover is so easy to open and will swing out of the way when refilling.
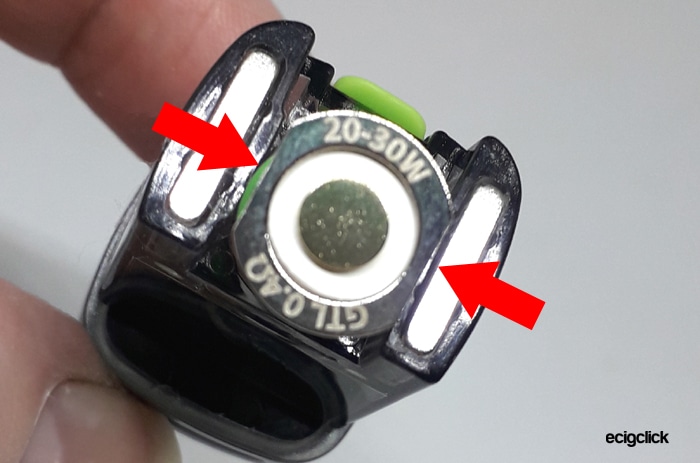
At the base of the pod is the coil access, the coil is easy to install by just pushing in – cut outs in the edge of the coil base allow for correct location.

It is quite easy to remove the coil too but you might need a finger nail or some prise-y thing (technical term) to get the coil to come out.
The coil is also compatible with the iJust AIO pod kit. However the 2 coils supplied with the iJust AIO are not compatible with the Compaq sadly.
Eleaf Pico Compaq Quick Start Guide
The Eleaf Pico Compaq is supplied with the pod installed.
However there is no coil installed so you will need to pop in a coil, fill up the pod and install a charged 18650 battery.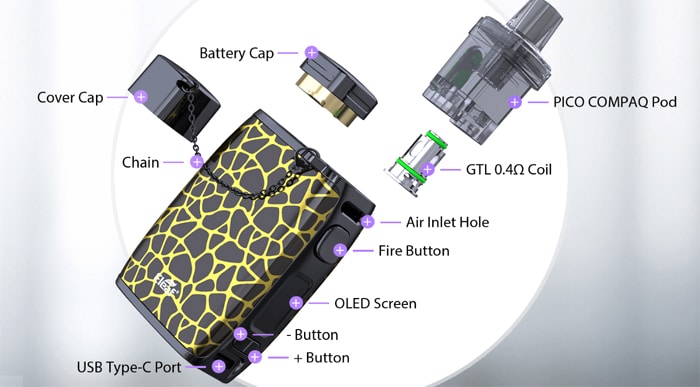
No worries though as I will guide you through these procedures below!
Eleaf Pico Compaq Basic Operation
This is pretty simple
- Turn On/Off – 5 clicks of the fire button
- Adjust power – use the +/- adjustment buttons – the power available will depend on coil installed – lower than 1ohm resistance = 1-60W, higher than 1ohm resistance = 1-20W.
- Vaping – press and hold the fire button whilst inhaling
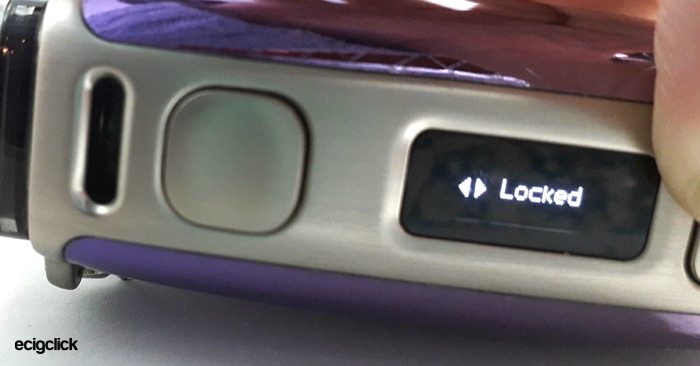
- Lock / Unlock adjustment buttons – hold down the + and – buttons until the display shows the status you require.
- Rotate display – hold down the fire and – button
- Puff counter reset – hold down the fire and + button (press the + button first or it will just fire!)
Device Protections
- Resistance range = 0.1-3ohm
- Over time = if the fire button is held down for over 10 seconds the display will say “Over 10S” and the fire operation will cut off.
- Short circuit = if the device senses a resistance which is too low the display will show “Atomiser short”. Check for short circuits or replace coil.
- No atomiser = if the resistance detected is too high the display will show “Check Atomiser”. This will happen if no pod installed or if the coil or connections are faulty.
- Low voltage = when the battery power is below 3.3V the screen will display “Low voltage” and the fire will not operate. Remove battery and recharge or replace.
How To Install The Battery
- Remove the battery cover cap by simply slightly turning anti-clockwise and the cap will seem to “pop” up – you can then remove the cap.
- If a battery is installed you can pull this out of the mod.
- Install a battery with the positive end going into the mod and the negative pole on the outside of the mod.

- Place the battery cap in position with the locating tabs aligned with the cut outs in the mod body.

- Slightly press the cap down and turn clockwise until it locks in position.
How To Remove the Pod
- The pod is held into the mod magnetically.
- Pull the pod out of the mod and a slight magnetic resistance will be felt.

- Install the pod making sure that the fill port is next to the battery cover cap.
- Push the pod into the device fully.
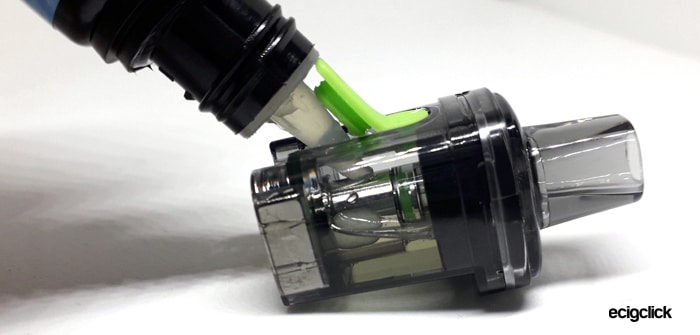
How To Fill the Pod
- Remove the pod from the mod.
- Turn the pod on its side with the fill port at the top.
- Lift up the fill port cover – you can turn this slightly to allow better access for filling.

- Add e-liquid through the fill port whilst observing the level through the side of the pod.

- Replace the fill port plug firmly.
- Install the pod into the mod.
- If the first filling or a new coil has been installed allow to stand for 10-15 minutes before vaping to allow the coil to soak up sufficient e-liquid.
How To Replace the Coil
- Remove the pod from the mod.
- Turn the pod upside down.
- Using a nail or some other prising type implement lift the coil away from the pod base. The coil will then pull out.

- Install a new coil making sure the cut outs on the coil base align with the shape of the pod.

- Push the coil fully into position.
- Fill the pod as required.
- Replace the pod in the mod.
How Does the Eleaf Pico Compaq Perform?
As Eleaf does not indicate what style of vaper this kit is aimed at, I used 2 different types of e-liquid.
I used CrazyCloudzzz CrazySaltzzz Bubblegum 50/50 VG/PG with 11mg Nicotine Salt strength to see if this was capable of giving the nic hit a pod kit should.
But as the coil is quite low resistance with a lot of power to play with I also tried DTL vaping with Stika Bombz Fruit Salad, 80%VG and 3mg nicotine strength
- VG and PG in E-liquid – all you need to know
- Beginners guide to E-liquid
- Guide To Nicotine Salts
- Guide To MTL and DTL vaping styles.
There is only one coil available for this kit and this is Kanthal Mesh 0.4ohm resistance with a recommended power rating of 20-30W.
50/50% VG/PG E-liquid – MTL Style
Basically I tried vaping this from 20-33W and the flavour was not good.
Almost a “fishy” taste which when mixed with Bubblegum is not remotely pleasant. I will keep persevering as some coils do take a few tank fulls to really shine – but this is not nice.
After 2 tank fulls I had to give up as this still is very unpleasant plus the fact you get e-liquid in your mouth due to the thinner liquid.
I am getting a warmer and tastier vape from my Innokin Sceptre pod at 10W (1.2ohm coil) with the same e-liquid.
If the airflow was more closed at 30-33W this might be acceptable as a MTL vape but still doesn’t perform to me.
However repeated vaping at 33W started to give a dry taste – a warning that a horrible mesh dry hit could be imminent!
Looking on the Eleaf website there is also a 1.2ohm GTL coil which might be more suitable for MTL vapers if that is compatible with this kit.
My conclusion is that this kit isn’t designed for MTL and thinner e-liquids sadly.
80/20% VG/PG E-liquid – DTL Style
So I installed the other coil included in the kit and filled up with 80% VG e-liquid.
Starting at 20W there is way more flavour but a very “cottony” taste. This is a very cool vape at this setting.
At 25W the flavour is already loads better but it still feels under-powered as I am getting some e-liquid coming back through the mouthpiece, usually a sign that the device is not atomising the e-liquid thoroughly.
Banging it up to 30W and this is brilliant. The flavour is more prominent – although sadly with the “Cotton” aftertaste. Hopefully after a few tank fills the cotton taste should wear off – will update!
The vapour output at this setting is brilliant too when you realise this is only 30W and 0.4ohm coil. It is never going to chuck out what the Freemax Mesh Pro for instance chucks out at 70W but it does a great job.
I went up to 32W and the flavour really is great – I probably wouldn’t stay at this setting as it is over the recommended ratings and might reduce coil life.
Again this is a really gentle DTL experience, low power, good flavour but not the full DTL vape I usually love.
Eleaf Pico Compaq Airflow
This kit does not do MTL very well. The airflow is was too open and the thinner e-liquid was not at all happy in here.
For DTL vaping the airflow for me seems spot on – I like a slightly restricted DTL vape.
This might be too restrictive for some, but at a max of 30W for the included coils this isn’t really tailored for sub ohm cloud chucking vapers anyway.
Airflow adjustment would be a good improvement on this kit in my eyes.
Eleaf Pico Compaq Battery Life
So this is always variable depending on your vaping habits and power settings etc.
I will add the battery life data when I get the battery to run down!
As I mainly vape MTL kits (Innokin Sceptre my current favourite) I didn’t do the battery timing in one go. It was a series of sessions when I least needed high nicotine delivery – usually chilling in an evening.
Pros
- Stunning finish and pretty design
- Excellent build quality
- Lots of warnings – stickers and cards
- Well packaged
- Simple to use – few options to adjust
- Cover cap is actually useful!
- Replaceable coils is always a pro for a pod kit
- No leaks
- Fill port is a great size and cover is easy to remove.
- A very gentle DTL vape experience – ideal as second device or for those transferring from MTL to DTL.
Cons
- Instruction leaflet huge – with not much detail per language
- Only 1 coil type available and no indication what sort of vaper / liquid type this is designed for.
- Screen is perfectly functional but slightly small and crowded
- With a 60W maximum power output – you are only going to be using 20-30W with the 1 coil type available.
- Adjustable airflow would make this a lot more versatile
- Have to keep removing pod to check e-liquid level
- This doesn’t really function as an MTL vape with thinner e-liquids.
- DTL vaping is smooth and great flavour but doesn’t have the punch most sub ohm vapers would crave.
- The pod is pretty thirsty as you would expect – having to refill this a lot!
Final Review Verdict
I’m not quite sure who this kit is aimed at.
The MTL performance is useless really. The DTL performance is not up there with some of the DTL pod kits on the scene right now.
Where I do think this kit stands is as a second kit for a DTL vaper when out and about or as a transfer from MTL to DTL kit.
As a second kit for out and about this is very “Compaq” and easy to carry.
With a max wattage of 30W for the included coils the battery life should serve you well and it is easy to carry – well far easier than a box mod and sub ohm tank anyway!
If you are transferring from MTL to DTL vaping on lower nicotine and higher VG e-liquid again this kit is great. It is a gentle introduction to DTL vaping, not fierce, scary and easy to operate.
It seems strange when the device can output up to 60W that there is only one coil available for it. The 0.4ohm coil has recommended power settings of 20-30W. I am seeing that there is a 1.2ohm MTL GTL coil which might be compatible with this kit. As I didn’t have this coil supplied I cannot review how it would perform.
The reason I rated this low in the Replace If Lost or Damaged section, is that I am not in the above categories so this kit really doesn’t suit me.
I have box mods and cloud chucking sub ohm tanks for DTL vaping and some excellent MTL pod kits when I need high nicotine (which is most of the time!)
If you are buying this expecting a nice starter kit for high nicotine or a cloud chucking sub-ohmer – then you will be disappointed.
So…is this one for you..?
Any questions or thoughts please let me know in the comments below 🙂


The little ‘cutout’ between the pod and the battery cap is a second airflow the same as the one on the side of the mod.