I love a nice pod kit me – so I am very pleased to get my grubby hands on the new Freemax Autopod50 Kit!
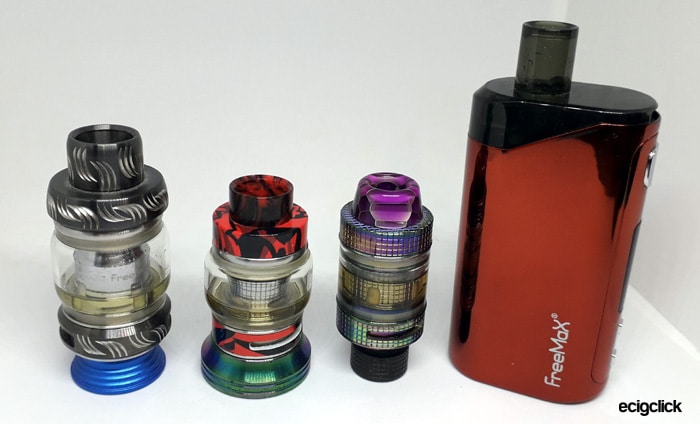
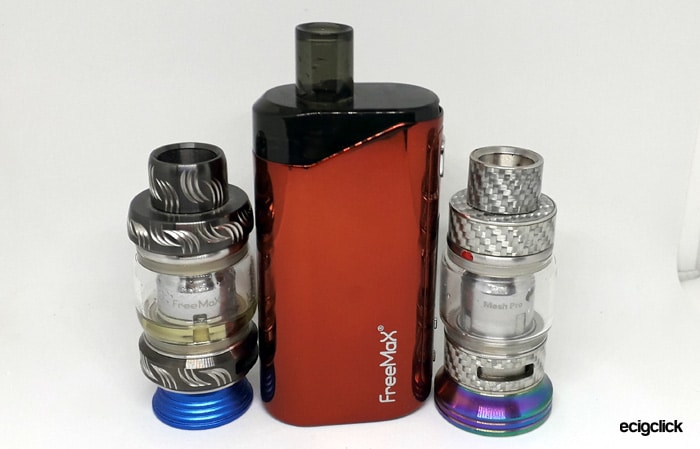
I have been a huge fan of Freemax since the Fireluke Mesh tank changed my life.
I still own three of them plus the Twister Kit, Mesh Pro Tank (2 of them) and the Maxpod Kit.
So there will be no favouritism here, in fact loving all their previous releases gives the poor Freemax Autopod50 pod kit big shoes to fill as my expectations are high when I see the Freemax logo…
Is the Autopod fit to wear the Freemax badge? Let’s give it a good run and see how I got on!
What To Expect From The Freemax Autopod50 Kit…
Freemax has a huge reputation for knocking out flavour with their range of mesh coils and the Freemax Autopod50 was actually designed to be a pod kit to chuck out the flavour.
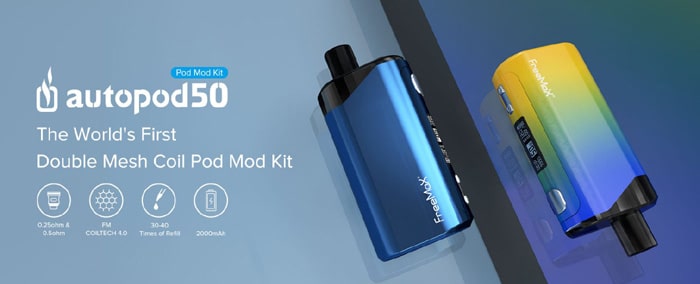
In fact this is apparently the first double mesh coil pod kit – I haven’t researched that BTW, it is what Freemax has told me!
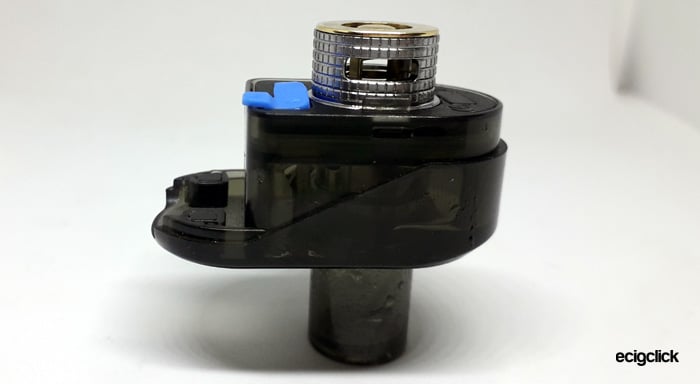
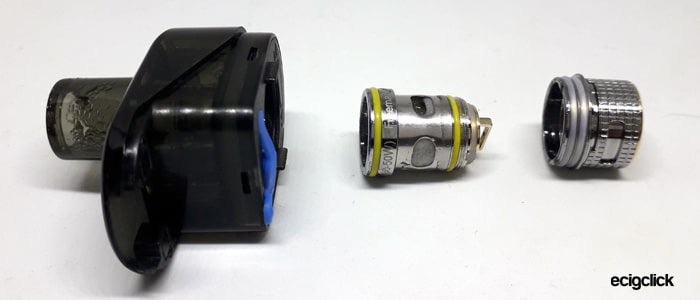
The device consists of the battery component and the removable and refillable pod component.
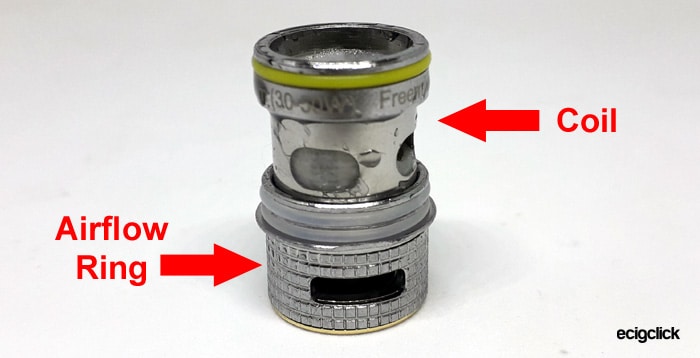
The pod is refilled via the bottom fill port and at the base of the coil is the airflow adjustment ring.
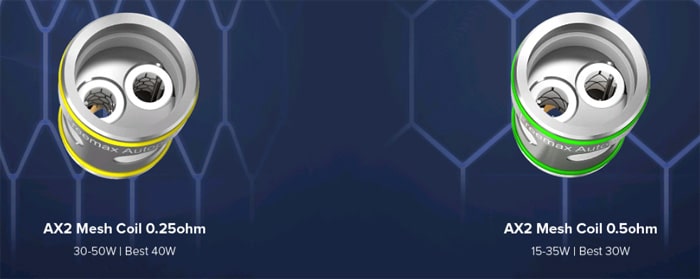
There are 2 different coil options and both come in the kit – the new Coiltech4.0 AX2 dual mesh – 0.25ohm and the AX2 dual mesh – 0.5ohm.
Both coils have tea fibre cotton wicking and SS904l (stainless steel) mesh elements. Apparently these coils are designed to give a good coil life at 30-40 refills.
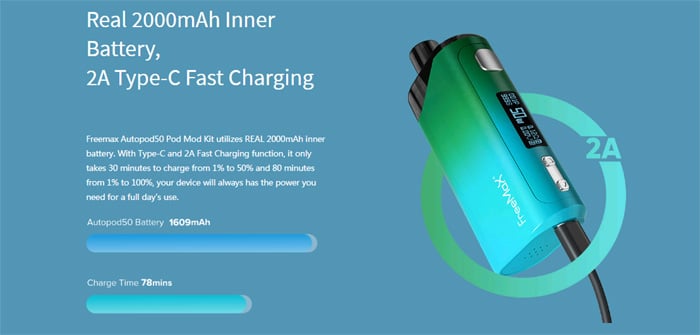
Looking at the battery part of the kit – this houses a 2000mAh battery which has a 2A charging rate via the USB type C port. Freemax state this will charge in around 80 mins at 2A.
There are 6 colours to choose from: Blue/Yellow, Black/Red, Blue, Gunmetal, Coral and Green.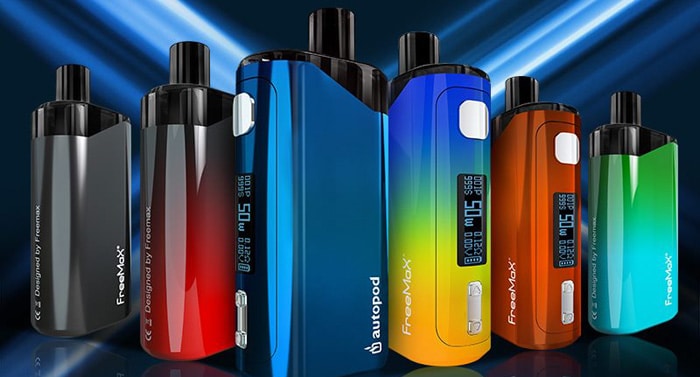
You can adjust the wattage output between 5-50W and your vaping data is displayed on the OLED screen.
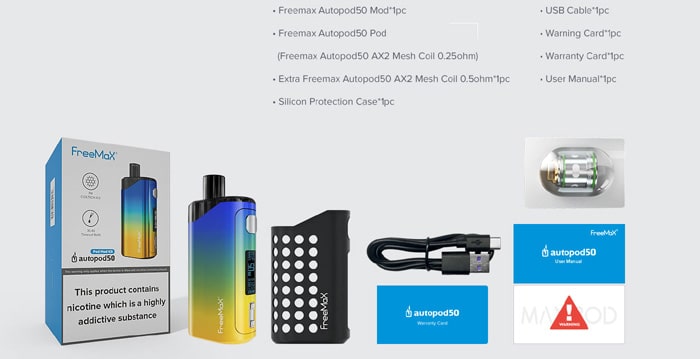
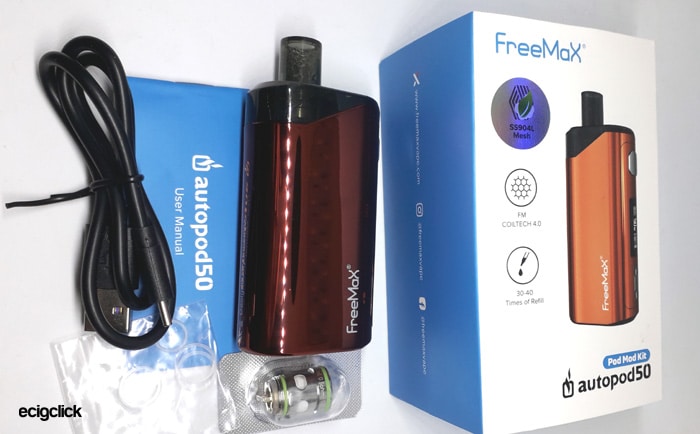
Insider the Box
- Freemax Autopod50 device
- Pod
- AX2 mesh coil – 0.25ohm (installed)
- AX2 mesh coil – 0.5ohm
- Silicone case (listed on the packaging – but not received?)
- USB cable – type C
- User manual
Freemax Autopod50 Kit Specs
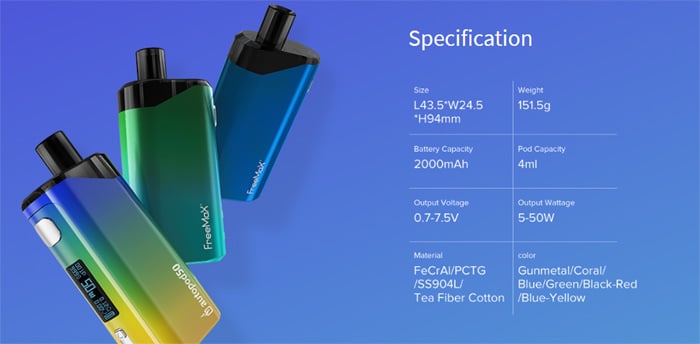
- Size: 43.5×24.5x94mm
- Output: 5-50W (VW)
- Battery: 2000mAh (internal)
- Display: OLED screen
- E-liquid capacity: 4ml
- Pods: Refillable, replaceable coil
- Coil options: Double mesh coils AX2 0.25ohm, AX2 0.5ohm
- 2A fast charging via Type C USB port
- Adjustable airflow
Freemax Autopod50 Kit Build Quality and Design
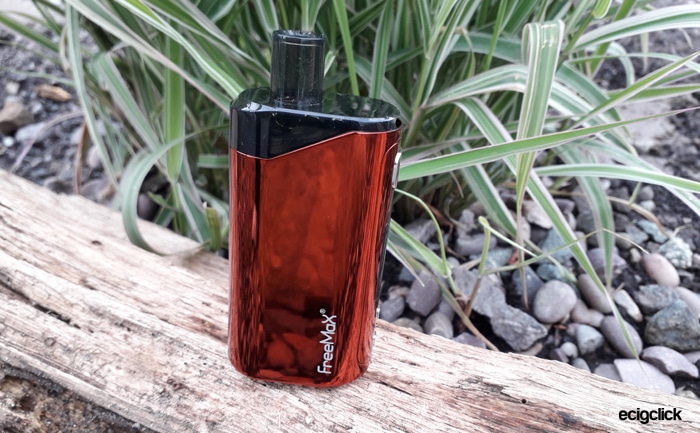
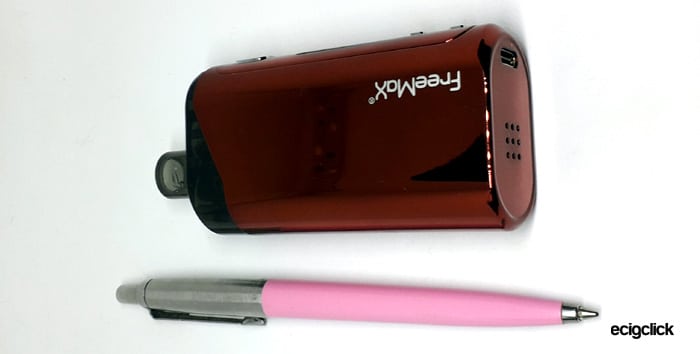
I received the Freemax Autopod50 kit in the Coral colour.
It is packaged well but I didn’t receive the silicone protective case which is stated on the contents on the package and website?
The instruction leaflet was pretty thick but only a few pages for each language and tiny writing!
Whilst most things are covered there are a few omissions including how to enter the menu mode and how to change the coil. I am fine with these jobs but a total newbie or someone who would rely on the instructions would be annoyed at these tasks not being described.
Freemax Autopod50 Kit – Device
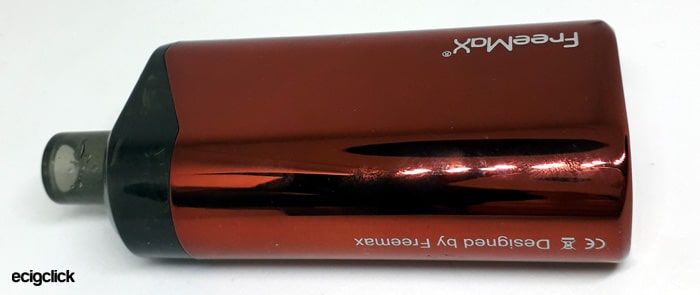
This is very pretty – the finish is highly polished in a coral colour and you can even use it as a mirror haha!
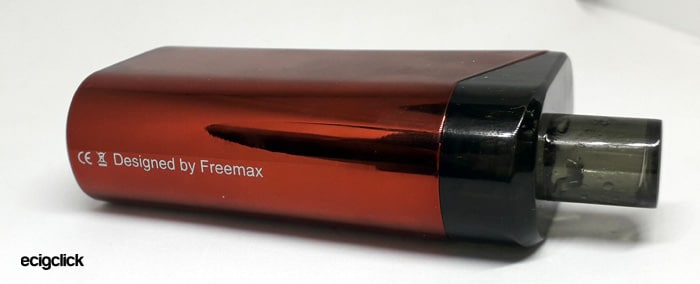
The mirror finish covers the whole of the device with the pod being the only visible component without this finish.
The rear of the device has the legal logos and “Designed by Freemax” etched into it.
One side panel is plain and the other has the “Freemax” logo.
The front panel is where all the exciting bits live!
The buttons have a silver finish – sadly the Freemax website does not state what materials the device is constructed from but the buttons do feel metallic and cold – rather than plastic.
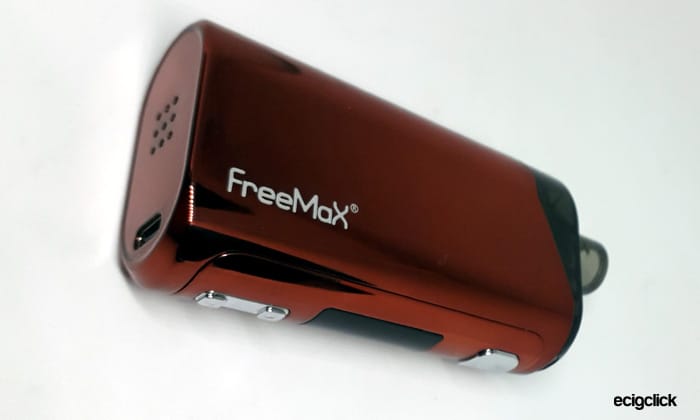
At the top of the front panel is the fire button which feels robust with a nice click.
I have found a bit of a “creak” in the screen panel area and when you press on here there is a creak and some slight movement. Not a deal breaker but the only build quality flaw I could find.
Below that is the OLED screen – the size is not stated but it is a simple black and white jobby which is clear to see and displays power level, puff counter, vaping time, resistance, voltage and battery icon.
It would be nice to see a battery remaining percentage on here – but it is already using up every bit of space there is!
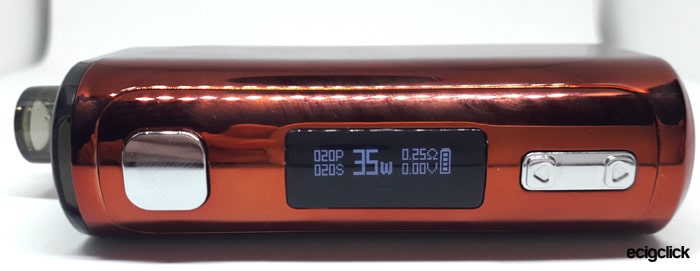
Below the screen are the adjustment buttons marked with up and down arrows.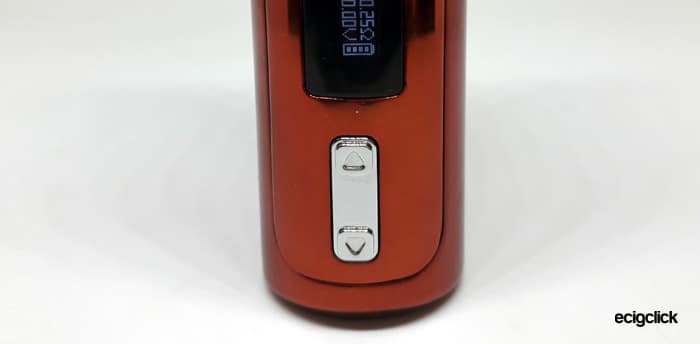
The base of the device features the USB type C port which works perfectly and 9 battery vent holes.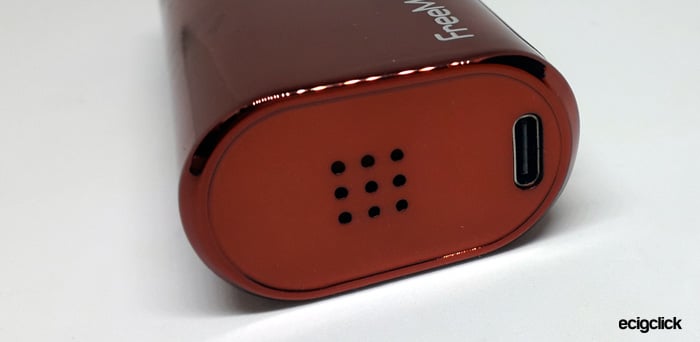
Inside the pod compartment are the spring loaded contacts and the magnets which hold the pod very securely but it is still easy to remove.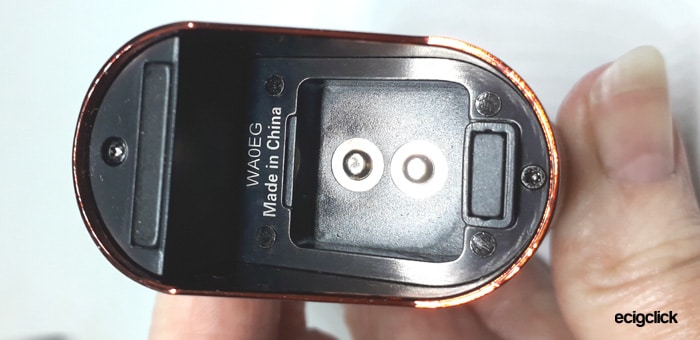
The whole device looks amazing – the mirror finish really is classy, it has a fair weight and can get a bit slippy in the hands at times – Oh, and obviously it is a dust and fingerprint magnet.
Perhaps the silicone case would help with this – hmm I didn’t get one…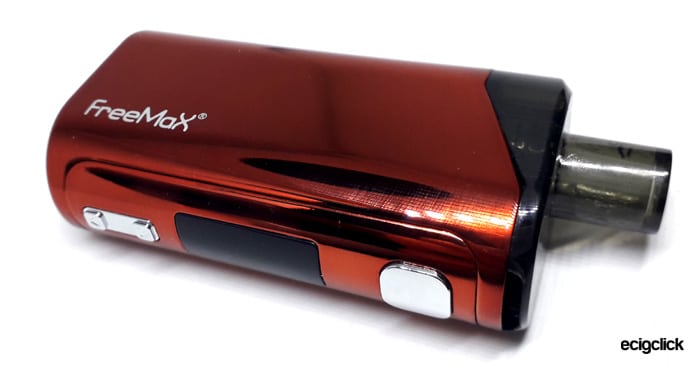
Freemax Autopod50 Kit – the Pod
I was sent a review sample for this kit so I have the non TPD version which has a 4ml pod capacity.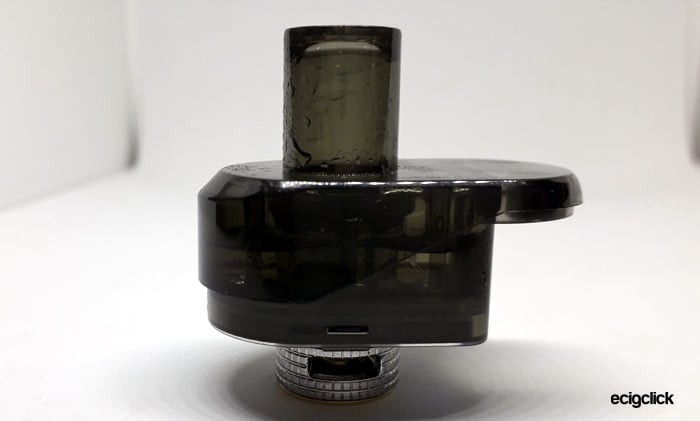
The pod is securely housed in the device by magnets and no rattle at all, but the pod is still pretty easy to remove.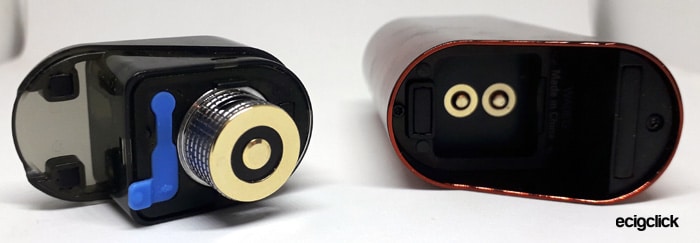
The drip tip is moulded into the pod so you will not be able to replace this.
On the base of the pod is a slightly flimsy fill port cover, which is “stretchy” if that makes sense and doesn’t feel like it will last very long – but we shall see! Personally I think Freemax should chuck a few spare fill port covers in the kit!
The fill port is a great size but you do have to tip the pod about a bit to fill it fully.
It has a dark tint which does require pointing the pod at a light source to gauge the liquid level but this is slightly better than some pod kits.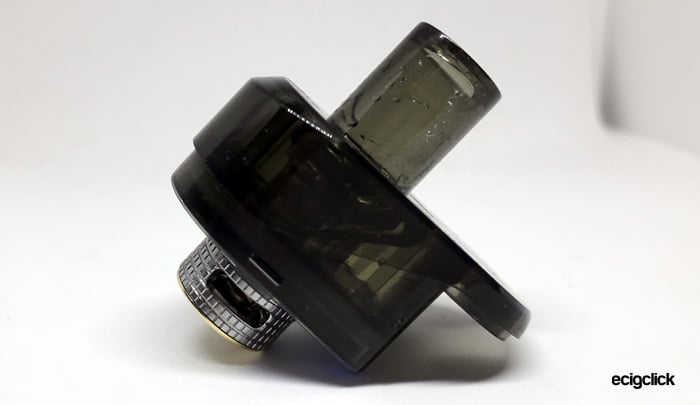
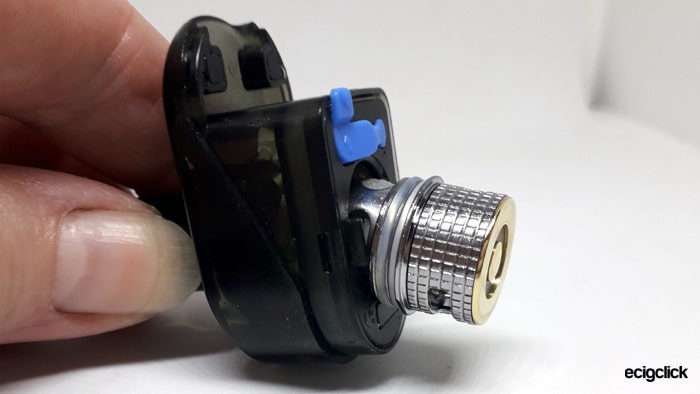
At the base of the coil is the airflow adjustment, I know it is slightly annoying to have to remove the pod to adjust the airflow – but I still prefer this to no adjustment – the airflow ring turns smoothly.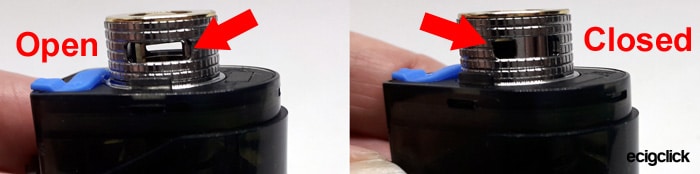
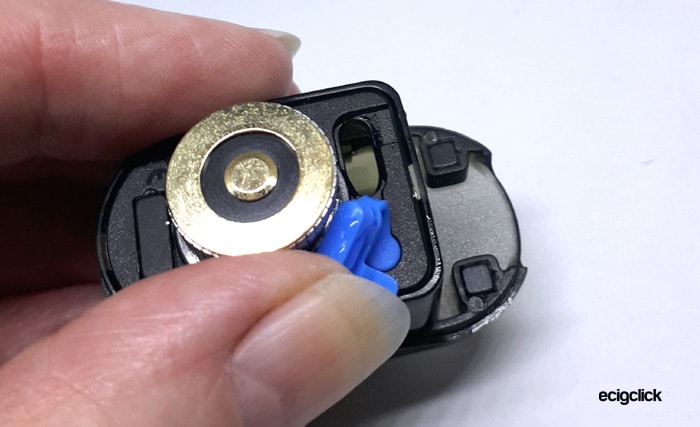
The coil is easy to remove and replace with a little twist.
Freemax Autopod50 Kit – Quick Start Guide
The kit is supplied with the 0.25ohm coil installed in the pod.
There is an isolation sticker on the base of the coil to prevent firing in transit.
Also, do not remove this sticker until you have filled the pod with e-liquid and left to stand for 10 minutes. This will prevent you burning out the coil and making you cry at the loss of a new coil.

Basic Operation
This device has some adjustments and settings to get your head around.
The instruction manual doesn’t cover all of these – so I have explained this below.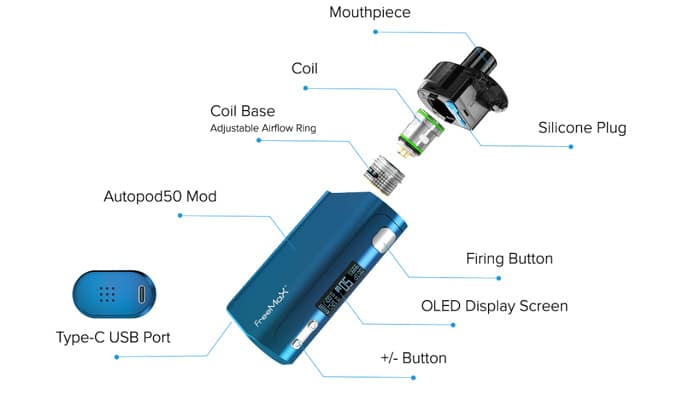
- 5 clicks of the fire button = turn device on/off
- Hold fire button = to fire (vape)
- Use the adjustment buttons to scroll through the power settings you require.
- Hold down the up and down adjustment buttons to lock / unlock
- Press fire and down button at same time to rotate the display
- Press the fire button quickly 3 times to enter the “Menu”…
Menu
Use the adjustment buttons to move through the menu options and the fire button to confirm.
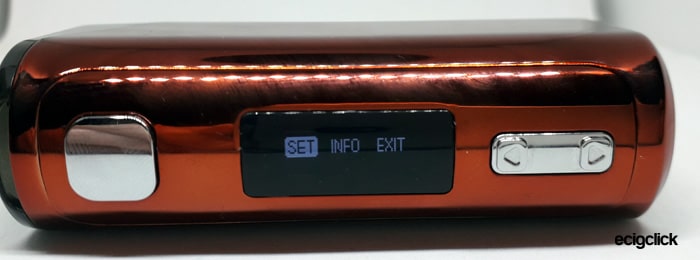
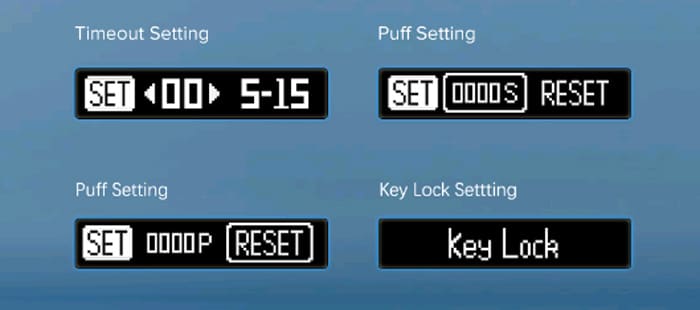
“SET”…
- Timeout – select the vaping time cut off from 5-15 seconds. The default is 10 seconds.
- Puff – clear puff counter
- Time – clear total vape time counter
- Factory Reset – return to default settings
- Exit – returns to the menu screen
“INFO”
- Battery -displays battery voltage remaining
- Version – displays firmware version
- Temperature – displays device temperature
- Exit – returns to the menu screen
“EXIT”
This will exit the menu screen.
Fault Conditions
- “Atomiser Shortcut” = coil installed is below 0.1ohm resistance – this is the lower limit or a short circuit has occurred. Try replacing the coil and check the contacts are clean between the device and coil.
- “10s (or 5-15) Protection” = the fire button has been held down for the maximum time limit (this is adjustable up to 15 seconds)
- “No atomiser” = no coil / pod installed or open circuit / coil fault. Also this warning is displayed if using a coil with a resistance above 3ohm which is the maximum resistance limit.
- “High Temp protection” = device has reached maximum temperature limit allow the device to cool
- “Weak battery / Charge Battery” = device requires recharging.
How To Charge The Freemax Autopod50 Kit Battery
This device has a USB Type C port and is able to be charged at up to 2A charging rate using a suitable plug or device.
- Install the small connector from the supplied cable into the port on the base of the device.

- Install the larger connector into a suitable USB outlet.
- Leave to charge – the icon on the screen will display the charging progress and the screen will turn off when fully charged.

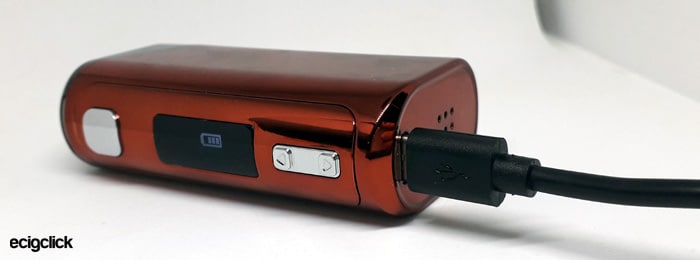

On the Freemax Website they state this takes around 80 mins to charge at 2A. I used a 2.4A charging plug and after 2 hours it still hadn’t charged – will try again using my PC USB port.
How To Fill The Freemax Autopod50 Kit Pod
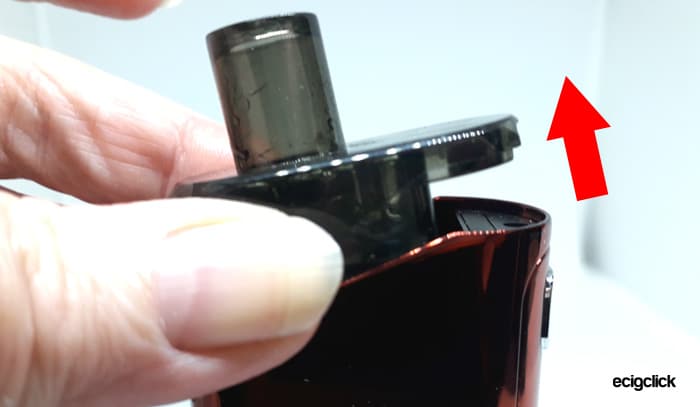
- Remove the pod by lifting it at the airflow inlet side. There will be a slight resistance from the magnetic connection but this is easily overcome.

- Turn the pod upside down and lift up the fill port cover.

- Add e-liquid through the fill port and observe the level through the side of the pod.

- Replace the port cover firmly.
- Leave the pod to stand for 10 minutes if first use or a new coil.

How To Change the Freemax Autopod50 Kit Coil
I have found however I try to angle the pod – it will leak e-liquid when the coil is removed.
So either wait until pod is almost empty or have plenty of mopping up equipment at hand!
- Remove the pod by lifting it at the airflow inlet side. There will be a slight resistance from the magnetic connection but this is easily overcome.
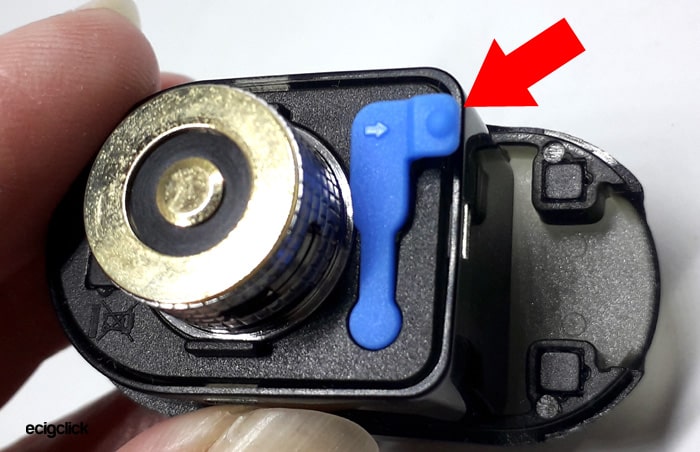
- Twist the airflow ring until it stops turning, twist a little more and pull at the same time to remove the coil.

- Unscrew the airflow ring from the coil as you will need the ring for the new coil.

- Screw the airflow ring onto the new coil.

- Push the coil assembly into the pod and secure by twisting until fully installed.

How Does the Freemax Autopod50 Kit Perform?
This is a sub-ohm kit so I will mainly be testing this using higher VG lower Nicotine e-liquid.
My liquid of choice is my favourite Stika Bombz Fruit Salad, which is 80%VG.
I have found over my years of using this e-liquid it really is kind to coils and gets the best possible coil life. I have tried some e-liquids which can kill a coil in days.
I will test both coils separately and report back on the performance of each!
AX2 0.25ohm Mesh Coil
My first vape really surprised me – this was the first coil I tried and I just sat there for a few seconds nodding and looking admiringly at this little device in front of me.
This device is not much bigger than the Freemax Mesh Pro tank on its own!
I am getting the flavour, heat and vapour I would be getting from a box mod and a proper sub-ohm tank, but in a tiny pod kit at 35W!
The Mesh tanks from Freemax I find give epic flavour but you are having to go to at least 60W to get this, so for something to perform so excellently at 35W is incredible.
The power rating from Freemax for this coil is 30-50W and they suggest the best setting is 40W.
I started at 35W and already was totally in love with this kit…just wow.
So far after 6 (x4ml) refills the coil is still chucking out the flavour it was to start with. The Freemax tanks had excellent coil life with a “coil friendly” e-liquid.
AX2 0.5ohm Mesh Coil
The rating for this coil is 15-35W and best at 30W according to Freemax.
I used the same e-liquid as with the 0.25ohm coil and the device set itself to 20W as the default when the coil was installed.
Even at 20W I can feel there is a much stronger throat hit with this coil, a slightly “drier” vape.
At 30W the flavour is great but it is a lot cooler vape than the 0.25ohm. But still my throat feels like I have just swallowed a drink that was slightly too hot!
I decided to be brave and up the power to 35W and wow – the warmth is coming through now, the flavour seems really clear and the throat hit didn’t get any harsher.
At 35W the flavour is great but that dry sensation feels like the warning you get when a dry hit is on the way soon.
At 32W this seemed a good compromise between warmth and flavour.
The fact is that both coils in this kit are flavour monsters but I personally would swap the 0.5ohm for another 0.25ohm coil!
Freemax Autopod50 Kit Airflow
Comparing this to the Fireluke Mesh I am finding the Fireluke airflow setting at 1/3rd open is equal to the Maxpod fully open.
With the Maxpod I have had the airflow adjustment on the fully open setting, which gives me a nice restricted DTL which is my own preference. So it might be slightly tighter airflow than some people would expect.
You can pretty much close the airflow totally but from fully closed to fully open doesn’t seem like the range you would get from a full size sub-tank.
It works perfectly in this setting and you get epic flavour and clouds – but for some it still might be quite restrictive.
I did think the drip tip on the Autopod was small, but measuring it against an 810 tip it appears to be the same size internally.
Freemax Autopod50 Kit Operation
I genuinely love using this kit but over time have noticed a couple of niggles.
If you remove the pod simply to refill – when you replace it the wattage setting reverts back to the default.
This is cushty if you are using it in the default setting – i.e. the 0.25ohm coil makes the device revert back to 30W.
However I preferred to have this set to 35W and it did catch me out a few times after refilling.
The screen is great but quite small in the scheme of things.
I do feel it is a bit cluttered, for me the “puff time” is not something I need to see on the main display.
Also the battery icon is very small and there is no percentage reading. I think they could have ditched the puff time and increased the space allocated for battery info. Or even better offer a firmware update or screen customization tool so you can choose how the info is displayed.
One thing I did notice that using at 35W (way below the maximum output) with repeated vapes the mod did get quite hot, but not unbearably so.
Freemax Autopod50 Kit Battery Life
As with any kit your own vaping habits, coil resistance, power settings etc can alter the battery life.
Using this regularly as my main device at mainly 35W (I got caught out on the 30W “Default” power level after filling a couple of times) with the 0.25ohm coil I got 364 puffs / 7 hours.
Pros
- Gorgeous well made kit
- Airflow adjustment is a great addition
- Pod is easy to remove without being loose when in the device
- 0.25ohm coil gives the flavour and vapour of a huge sub-ohm tank and box mod running at 60+W!
- USB Type C quick charging
- Surprisingly economical on e-liquid – I did have the 4ml standard size pod – so I might have found it thirstier with a 2ml pod and filling more often.
- Coil change is really easy
- No leaks or malfunctions – worked straight away
Cons
- The fill port plug is a bit flimsy and annoying to try and hold out of the way when refilling.
- The pod tint is dark – not as bad as some I have seen but you do have to hold it up to the light to get a good view of the e-liquid level.
- I didn’t get the silicone protective case (probably because mine is an early review release) so I did cover the whole thing in fingerprints and it can feel slippy in the hand at times.
- Instructions are omitting a few details and the writing is extremely small – would be hard for some to read.
- Having to remove the pod to adjust the airflow isn’t the best design – but it does work and I am pleased it does have the option
- When you remove the pod even for filling the device reverts back to the default wattage setting.
- The front panel on mine does creak a bit.
- I think the screen display is a bit crowded and the battery icon is small.
- Airflow is slightly more restrictive than you would find on a full size sub-ohm tank. I found it perfect but might not suit everyone.
Final Review Verdict
I love this kit – but I will be honest it isn’t flawless.
I have found a few niggles during use but not enough for me to want to abandon it.
Where this kit does shine is in sheer vaping pleasure.
I often find myself looking at this tiny little device shaking my head. I am almost shocked at how much flavour and vapour it kicks out!
The performance is not far off a proper sub tank and box mod combo!
So is this a pod kit you’ve vaped on or are thinking of buying?
Any thoughts or opinions do let me know in the comments below 🙂


