The Innokin Proton Mini AJAX kit is the latest release from one of the biggest vape companies on the planet.
A couple of months ago I briefly played with the Innokin Proton kit, and I liked it a lot, so when I received this kit I was super excited.
I always think Innokin doesn’t quite get enough attention.
Maybe it’s just me or maybe it’s because they don’t do as much PR or advertising as other ‘big vape brands’.
However Innokin is certainty a big brand, in fact, they are so big that they currently have 27 Invention Patents, 91 Design Patents, 179 Patents for Utility Models and 136 Processing Patents.
Their catalogue currently hosts 6 Pod systems, 8 Tanks and 20 Kits.
Many of which are very well known, like the T18 Tanks and kits, the Endura series (which come with the T18 / T18II / T20 tanks) as well as the DV Pod System and the EcigClick Award winner – the Zlide MTL tank, to name just a few.
That’s a lot of patents and products from a company that is only 8 years old. Founded in 2011, Innokin have gained over 54 patents a year on average, mathematically speaking.
Innokin are based in Shenzhen in China with after sales services and repair centers in the USA and the UK.
Although all the above is pretty impressive, quantity of patent and products does not guarantee quality.
So lets take a closer look at the Proton Mini Kit.
The kit was sent to me free of charge for the purpose of this review and my thoughts and opinions are my own.
What Can We Expect From the Innokin Proton Mini Ajax Kit?
Let me just put it out there, I expect it to be awesome, and nothing less.
If I find something I don’t like I’ll be deeply disappointed.
The Innokin Proton and this Mini version are like computers, they have a lot of settings, they have a joystick and you can even set a custom screensaver!
Mini always means less.
Sure we expect it to be smaller in size (and it is) but we also expect to make other sacrifices.
In this case we loose the ability to change the batteries and we also lose out on power, with the max wattage setting falling from 235W on the original Proton to 120W on the Proton Mini.
Integrated batteries are a massive downside for me, and is often the reason I won’t purchase a device.
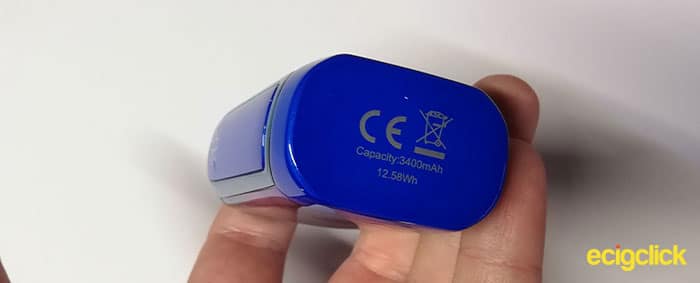
For Innokin to get my approval, the integrated battery (3,400mAH) has to last a good long while, and ideally a fast charging system.
Let’s hope at the end of review I still feel like a proton….(positive)…
Checkout my video review:
In The Box
- 1 x Proton Mini Mod
- 1 x AJAX Tank 2ml
- 1 x 0.16ohm AJAX Plex3D Coil (Pre-installed)
- 1 x 0.35ohm AJAX Plex3D Coil
- 1 x Extra Glass (bubble Glass)
- 1 x Spare O-Ring Set
- 1 x Micro USB Cable
- 1 x Quick Start Guide
- 1 x Warning Booklet
Innokin Proton Mini Ajax Specs
- Kit Size = 120 x 45 x 30mm
- Mod (battery) size = 73 x 45 x 30mm
- Tank size = 47 x 24mm (excluding 510 pin)
- Battery Capacity = 3,400mAH 3.7V (internal battery)
- Power Range= 6W – 120W
- Max Voltage = 7.5V
- E-liquid Capacity = 2ml / 5ml with bubble glass
- Resistance Range =0.1 – 3.5Ohms
- Charging rate = 2A
Features
- Custom TCR -Temperature control
- Custom Wattage curves (per 0.5 seconds)
- Bypass mode
- 3 Coil Setting Memory
- Custom Screensavers (Free PC software Needed
- Adjustable overtime Cut-off Protection
- Adjustable screen brightness/ timeout / Dim time
- Adjustable temperature: Celsius / Fahrenheit
- Time and Date display
- Over-heat protection
- Over-discharge protection
- Short Circuit Protection
- Joystick Navigation button
Design and Build Quality
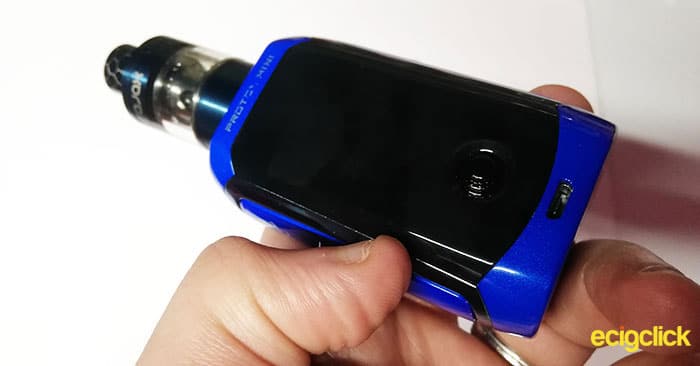
Apart from the size of the mod/battery, the kit looks very much like the original Innokin Proton – which I don’t think is a bad thing.
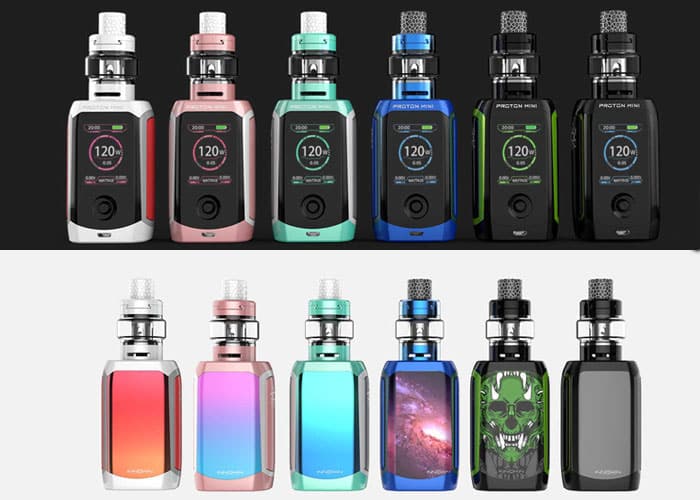
The Proton Mini Kit comes in 6 awesome colours.
The Mod | Battery
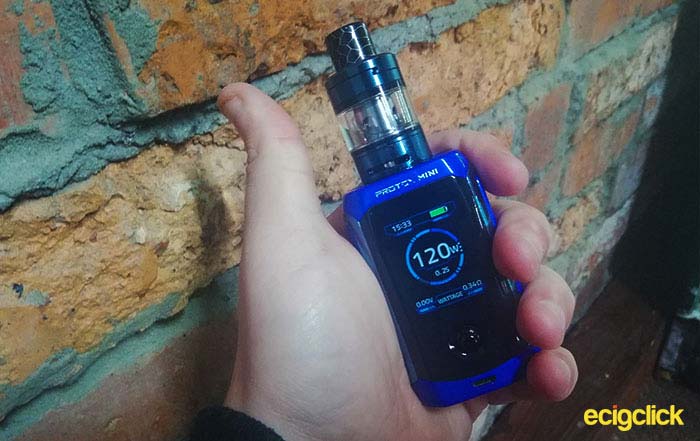
In hand the Proton mini feels great.
The oval shape of the body fits the hand great, no matter which way you like to hold it or which finger (or thumb) you like to fire with.
The shape it’s self isn’t unique, there’s a few devices (like the SMOK Alien) that have a similar shape, however it seems to be more curvy with less joints than other devices with a similar shape.
The overall finish of the device looks great.
The top, bottom and side panels (including the fire button) are plastic with a really smooth and shiny finish.
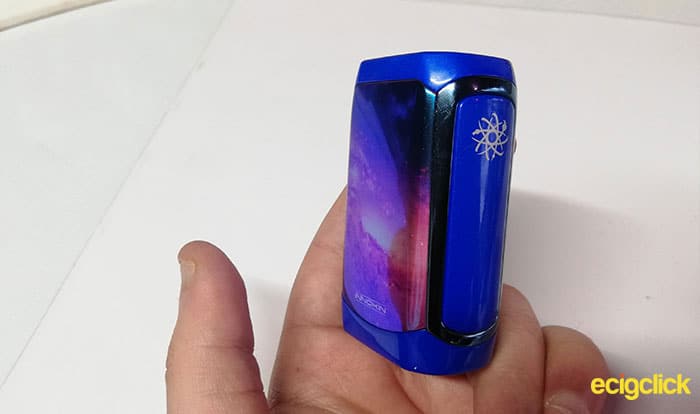
Furthermore the back panel (which on some designs is an image), the surround of the button and the surround of the side panel have a reflective finish.
I also think the Proton Mini Mod feels quite light, weighing in at 188g (255g with the tank).
AJAX Tank
I have to say the Ajax tank looks similar to the Zlide tank, which is also an Innokin Product.
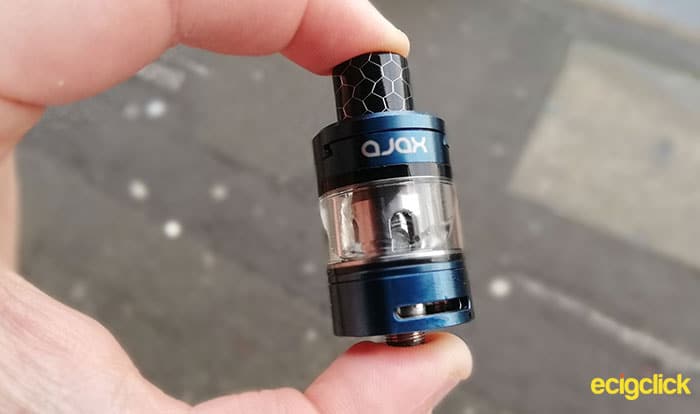
Maybe, it’s just the colour that I received and the top fill design that’s the same, but initially I thought it was the same tank, just a bit bigger.
One major difference is the AJAX tanks top fill does not lock shut.
I was impressed with the Zlide tank, as it uses the drip tip (mouthpiece) to lock/ wedge the top-fill closed, but although the AJAX take uses the same top-fill design, the drip tip isn’t designed or shaped to lock the sliding system closed.
You may also notices the AJAX tank has 2 screws in the top, originally I thought these were to tension the sliding top-fill, that’s not the case.
Partially removing the screws enables you to fully remove the sliding top fill cap.
This allows you to replace the anti-leaking silicone piece around the fill hole, making the tank fully maintainable and fixable, I like that.
Connection
The Proton Mini Mod and the AJAX Tank use a 510 Connection pin.
The Tanks connection pin comes directly from the coils.
By that I mean, the tank it’s self doesn’t have a connector, it is built onto the coils.
Which isn’t a rare design when looking at Innokin Tanks but it is less common in the sub-ohm tank world.
From both the coils I used, the threads on the connectors were nice and smooth and so was the connection threads on the mod, making connecting and disconnecting the tank nice and easy.
I do have a little bit of annoyance here.
Firstly the connection plate is smaller than the bottom of the AJAX Tank.
For me that’s not a major problem, but I know a lot of people don’t like that because over time the tank tends to mark the top of the mod.
Secondly, due to the connector coming from the coil rather than the tank, the positive pin on the tank/coil (in the center of the connection pin), isn’t always flat, meaning the tank cannot stand up straight without a stand.
Okay, that doesn’t seem like much, after-all it’s not usually easy to get a tank to stand on its pin anyway, but I find it a little bit annoying.
Charging Port
The Proton Mini Kit, uses Micro-USB, surely at this stage, I don’t need to express how the lack of USB-C in new vapes, really annoys me!
The charging port is placed on the front of the device, exactly in the middle, quite low down.
It’s also upside down, again, this doesn’t actually affect anything, but it does annoy me a little bit.
The kit does have a 2A charge rating, so it’s not all bad.
Innokin Proton Mini Ajax Airflow
The airflow is really decent on the AJAX tank, by decent I mean big.
Quite typically for a sub-ohm tank, it has adjustable airflow which is (quite typically) located at the bottom quarter of the tank.
It has two rather big holes; one at either side, when fully open the airflow is very generous.
In fact I’ve had RDA’s and RTA’s with tighter airflow.
When fully closed, it’s not completely airtight, but it is close and obviously, the airflow can be set anywhere in-between.
Screen
The kit has a very elegant 3.7” screen (by my measurements), which looks great, the picture and colour quality of the screen can’t be faulted.
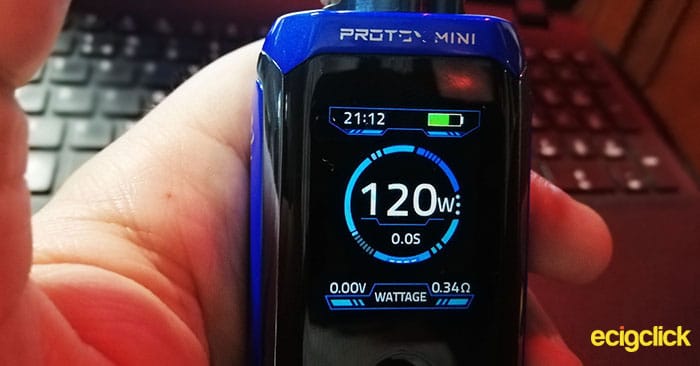
The battery level indicator is displayed in the top right of the screen and the current time (if set) displays on the top left of the screen.
I think those two things give the system, especially the screen, a look similar to the layout of a phone.
In the bottom left of the screen is the voltage, with the ohms reading in the bottom right, with the current usage setting in-between the two.
I did also test the screens quality with a multi-coloured smoke/vape picture, and it looks impressively good, but I’m not going to show you because my camera made it look awful!
Buttons
The Proton mini has a side bar fire button.
However, the Proton’s button set is made quite unique by the toggle button, which is placed below the screen on front of the device.
I quite like the toggle button, it’s not awkwardly placed, making it easy to reach and use and doesn’t get in the way or cause any problems.
Something I did notice, if you change the power settings a lot (for example, from 20W to 100W), you just push the toggle button up, if you hold it up, it will just keep going up and that’s fine but if you push it up too hard, it results in the button being pressed down and therefore stops going up in power.
That isn’t really a design fault, it’s quite standard with toggle buttons, but it’s worth mentioning, because I did it a lot when I first started using the kit.
Innokin Proton Mini Ajax Quick Start
To turn the device on, click the fire button (side bar) 3 times.
How To Fill The Innokin AJAX Tank

Filling the tank is as simple as it can be, but to cover all bases…
- Look at the top of the tank, notice the arrow.
- Place your thumb/finger on the arrow.
- Push in the direction that the arrow is pointing.
- Fill the tank with E-Liquid though the hole that appears.
- Close the top of the tank buy pulling it back.
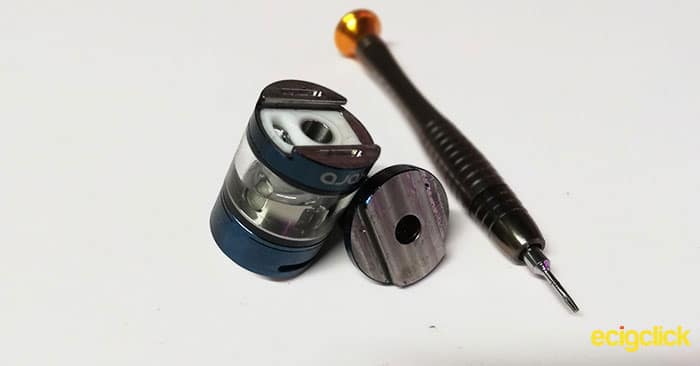
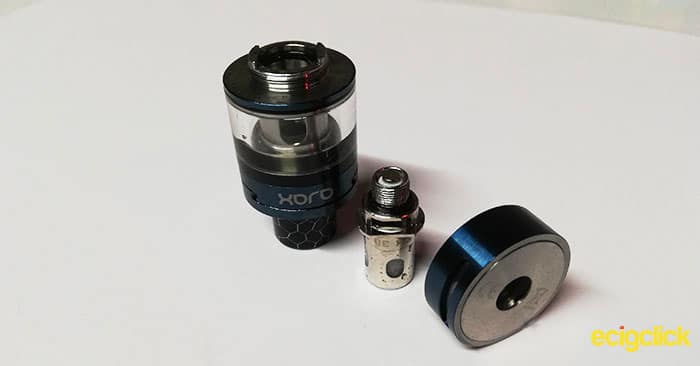
How To Change The Innokin Proton Mini Ajax Coil
Liquid loss: look into the tank, you’ll notice 4 arches / holes around what looks like the coil.
That’s not actually the coil, it’s part of the tank.
While the tank is upside down, whatever is not below the arches will leak.
- Turn the tank upside down
- Grip the “top half” of the tank (the side now facing down)
- Grip the adjustable airflow and unscrew it (turn it anti-clockwise).
- Grip the bottom of the coil and pull it out.
- Push the new coil fully in.
- Replace the bottom of the tank (the adjustable airflow)
- Fill the tank and leave it for 5 minutes before using to allow the liquid to soak into the coil.
Innokin Proton Mini Ajax Operation and Settings
There’s a lot to go through, so instead of doing an in depth run through, I’m just going to run through the menu layouts, changing the screensaver and button shortcuts.
To access the main menu press the toggle button 3 times and use the toggle button to navigate and select.
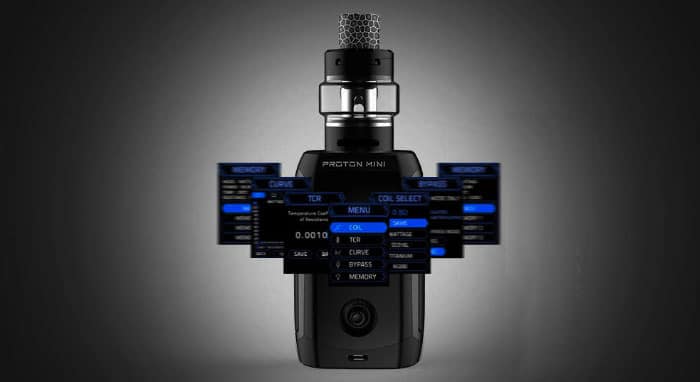
Menu Navigation
- Coil
- Same (Use the latest usage settings)
- Wattage
- SS316L (temperature control)
- Titanium (temperature control)
- Ni200 (temperature control)
- TCR- Temperature Coefficient of Resistance
- Curve – Lets you set custom wattage curves per 0.5 seconds (Like soft or hard but however you want it – for example 10W, 20W, 30W, 40W, 50W, 50W, 40W…), the feature also has 4 memory settings so you can go back to normal, then back to you preferred curve, as and when you like.
- Bypass – uses ohms law, to set the power (uses the maximum voltage the battery can provide). This setting informs you the device is unregulated and asks you to confirm. If you are not familiar with Ohms Law and Mech Mods, I suggest keeping away from this feature unless you know more.
- Memory – 3 memory slots to save coil preferences.
- Settings
- Vape CutOff ( choose auto-cut off protection between 3 seconds and 18 seconds)
- Screen (Settings include Dim Time, Timeout and Brightness)
- C/F (TC users can choose between using Celsius and Fahrenheit)
- Color (change the theme colour – Blue, Pink, Red, White, Purple, Green)
- Puff Count (show and/or reset)
- Time Set
- Date Set
- Screensaver (Activate, Deactive, loop)
- Update.
Read more: A Guide to Volts, Ohms and Resistence in E-cigarettes
Button Usage
- Power on = fire button x 3
- Access Menu = toggle button x 3
- Lock / Unlock = push the toggle button to the right and press the fire button
- Info Screen = push the toggle button to the left and press the fire button
- Wattage increase = push toggle up or right
- Wattage decrease = push toggle down or left
- T.C. Increase = push toggle right
- T.C. Decrease = push toggle left
- Preheat (T.C. Only) = push toggle down
Setting Custom Screensaver
The First time you do anything like update the mod or add a custom picture you need to download and install the software.
To do this head over to the Innokin Proton Mini Ajax page – download the software and extract the file.
- Connect the device to the PC via the Micro-USB lead.
- Go to the extracted file and launch the ‘HIDBootloader.exe’ file.
- On the Proton go to: Menu > Settings > Update > Update > Yes
- At this point, on your PC, the software should say connected (in the top left corner).
- Click ‘UPLOAD’ on the left side.
- In the new window that opens click ‘add’
- Browse your computer for the image you want to use and upload it (BMP images only).
- Enter the custom message and font.
- Press upload
NOTE: only .bmp images can be used, I used an online converter to convert my JPG image to BMP.
Also after clicking the final upload button, on my computer, nothing seems to happen, but if you click on the other screen (the first window) you’ll see the percentage bar saving the new settings.
Also, after completing the above my Proton automatically disconnected from the PC.
I turned my Proton on and the screensaver was the same as before… so I turned the screensaver on; by going to Menu- Settings – Screensaver – Activate – up/down on the mod, and it worked.
How Does The Innokin Proton Mini Ajax Perform?
0.16ohm AJAX Plex3D Coil
This coil is recommended to be used at 50W-80W.
I filled it up with Juccier Strawberry Mango Crush, which I’m obsessed with at the minute.
It is a 70VG/30PG liquid with 3mg nicotine.
Read more: VG VS PG In E Liquid: All You Need To Know
At 30W there isn’t much given, very little flavour, very little vapour (but still more than you’d get from a standard MTL device) and to be honest I think the vapour feels a little bit dry at the back of the throat.

40W provides a fair bit of vapour, there isn’t tons of flavour but you can definitely taste it.
I still think it’s a little bit dry on the back of the throat – not hot or harsh, just dry.
I know a lot of sub-ohm vapers that would be happy with the 40W results.
At 50W we are in the recommended range.
The tank is starting to show its potential, although the flavour doesn’t flood your mouth, it’s certainly prominent.
You can feel the smooth vapour running down your throat and the ‘dry sensation’ is lessened.
Mid way between the recommended wattage, 65W provides a mouthful of flavour, plenty of vapour (which is nice and smooth) and it doesn’t give a dry sensation… at first, (I’ll talk more about the ‘dry sensation’ in the summary).
For the majority of the time, that I was using this coil, I was firing at 80W (the maximum recommend wattage).
At 80W the flavour is awesome! It generates a nice thick cloud and the vapour is nice and smooth.
I did try it at 90W and as expected, you get more vapour production.
However I think the flavour production peeks at 80W. The coil didn’t seem to burn at 90W but I constantly felt like I was one puff away from a dry hit.
0.35ohm AJAX Plex3D Coil
This coil is recommended to be used at 30W-55W.
Using the same liquid (Strawberry Mango Crush), I set the mod to fire at 20W and took a long puff.
As expected, nothing exciting happened, I got a little cloud and not much flavour, although I didn’t get the dry sensation.
30W doesn’t give a give vapour production, although with a 3-4 second puff you get a fairly impressive cloud.
The flavour isn’t much to brag about, but you can definitely tell what the flavour profile is.

42.5W is the middle of the recommended range, so I went straight there.
There seems to be a fairly big difference between 30W and 42.5W.
The flavour is bumped up a lot, it doesn’t necessarily flood the mouth, but it is very prominent and in 2 seconds you get the cloud vapour production that you get in 4 seconds when firing at 30W.
After the 42.5W results, I got my hopes up a lot for 55W…
Damn!!!
The flavour did improve a little bit, but not by a great deal.
Obviously the vapour production was heightened to produce a fairly decent cloud.
Wondering about the dry sensation? I haven’t really had it with this coil yet, in fact it’s really nice and smooth.
65W is pretty great, the infused strawberry and mango flavour fills the mouth nicely, and the vapour production is as expected, heightened.
Although it’s still a smooth vape I’m starting to get the dry throat sensation but still no dry, burned hits.
Pushing the limits, when a coil can go above and beyond, it makes me curious of how far it can go…
It didn’t take me long to find out…I bumped the mod up to 75W and took a nice big hit.
The vapour and flavour production was there, but it was accompanied by the subtle burning taste you get in the background, when you’ve push a coil that little bit too far.
I would recommend sticking at 55W with this coil, purely because Innokin recommend it, so going over it will more than likely result in your coils burning out faster and plus 55W is good enough, so why waste your battery faster for the sake of a little more vapour.
However it’s your call 65W still provides decent vape.
Coil Summary
Am I allowed to mention the Freemax Mesh Pro?
Who cares, I’m going to anyway!
The Freemax Pro is a great tank loved by many, but many of you will know what I mean when I say after using it a bit, you get a dry feeling at the back of your throat.
For those of you who don’t know what I’m on about, it’s like the feeling you get if you wake up thirsty – and no, I don’t mean it’s harsh.
This occurred with both coils, but more so with the 0.16ohm coil.
As the cloud and flavour chaser that I am, I preferred the 0.16ohm coil for it’s flavour and vapour production.
However, we’re using integrated batteries, I vape a lot and I vape as high as I can, in regards to power, so I have to take power preservation into account.
Leaving aside the screen and energy loss for a moment, if you use the kit at 80W you will get just over 2 thirds of the vaping time you would get from vaping at 55W (412 x 2 second puffs compared to 283).
The battery life loss is far greater than the loss of the production of vapour and flavour, so it’s worth gaining the extra battery life.
In short, If I’m going to be out all day and night, I want to use the 0.35ohm coil, if I’m lounging around at home or work, or even in the car (anywhere I can chuck it on charge for half an hour) then I want to use the 0.16ohm coil.
Innokin Proton Mini Ajax Curve Function
You probably shouldn’t, it can’t be good for the battery or the mod… but I like to set the curve to… well spike.
Yes, spike!
I like to set the mod to go from as low as possible, to as high as possible, then back to as low as possible every 5 seconds.
Like I said you probably shouldn’t, but you can’t give me such capability and not expect me to play with it!
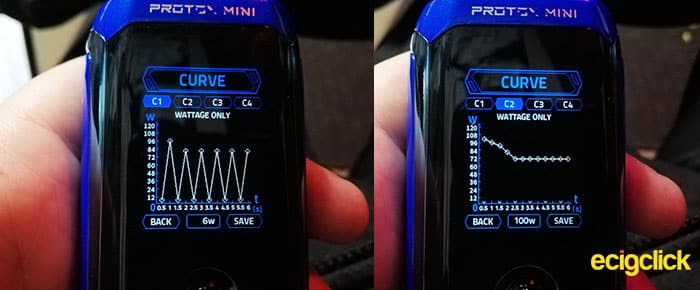
On a professional note, I think it shows how fast the mod can fire, and its pretty fast, although I think the original Proton performed it better, but that’s to be expected, it is a more powerful version after all.
I should probably also mention, that the curve feature is a customizable version of the ‘Hard’, ‘Soft’, ‘Normal’ settings you often see on mods.
Those settings allow you to decide what wattage the mod will (or should) fire at, for each 0.5 seconds of your puff.
Read more: Power / Temp Curve Guide For Vape Mods
Airflow
It’s great!
The adjustable airflow on the Ajax tank is perfect in my opinion.
Fully closed it’s close to airtight and when it’s fully open it has huge airflow, and when I say huge, I mean huge, there is very little restriction.
Quite often on tanks the airflow band is too tight and it’s awkward to adjust, on others it’s too loose to the extent it moves on its own accord.
Neither are true on the AJAX, the grip (or resistance) of the band is ideal, making it easy to use.
As daft as it sounds, the AJAX (sub-ohm) tank can provide a more restrictive draw, than a lot of the MTL devices that I’ve used.
Daft, of course because you shouldn’t ever need such restrictive airflow from a sub-ohm tank (especially one that has a minimum recommended wattage of 30W).
Read more: Mouth To Lung (MTL) VS Direct To Lung (DTL)
Innokin Proton Mini Ajax Battery and Charging
So here we are, at the beginning of the review I said this could be the make or break factor…
I like it, I can live with it and I haven’t once found it frustrating.
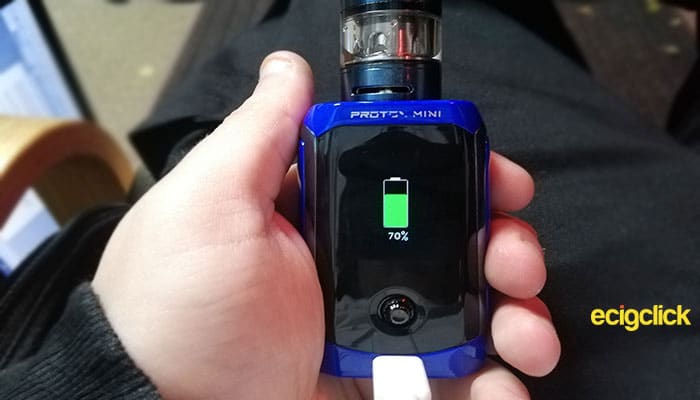
At first, when I put the mod on charge, I thought in order to check the charge level, you had to press a button to activate the screen and wait for the little battery icon (in which the charge level moves up and down to show its charging) to know the current charge status.
That’s not the case, if you turn the mod off before (or while) charging, it actually tells you what percent the charge level is at.
Charge Time
The Proton Mini is powered by a 3400mAH battery and has a 2A charge rating.
I was skeptical it would be fully charged in 1hour 45minutes, but it did – almost, with each charge taking between 1hour 40 minutes and 1hour 50 minutes – so far so good…
Innokin Proton Mini Ajax Battery Life
Well that depends on a lot of factors…
- Screen Brightness
- Screen Dim Time
- Screen Time out
- Power settings
- Coil Resistance
To be fair, the screen settings wouldn’t really make a huge difference and if I tried to work out even half of the scenarios, this review would beat a few world records.
But what I can tell you is what it has done for me…
I’ve been prominently using it as follows:
- Power = 80W
- Screen Dim Time =14s
- Screen Timeout = 30s
- Screen Brightness = 100%
With those settings the battery has lasted me all day.
If you remember the coil summary I calculated the battery would perform 283 x 2 second puffs (a puff every 2 minutes for just under 9 and a half hours).
Well that’s about right it has been lasting me between 8-11 hours.
FYI my average puff time is usually between 1 and 2.5 seconds.
And like I said if that’s not enough, chuck the 0.35Ohm coil in and the battery will last you a good few hours more.
One Annoying Downside
I’m used to my mod giving me my 170W, then when it no longer has enough power, it tells me, I turn down the wattage to 80W and continue to use it for another 10 minutes or so before it tells me that it doesn’t have enough power.
The Proton Mini doesn’t do this.
It continues to pretend it is giving you what you want… even when it’s not.
Obviously you can see the low battery icon in the top right corner, but the wattage setting stays at 80W, no warnings or indicators pop-up and you get what feels drastically less than 80W.
It’s not an issue, when the battery is too weak, but it really annoyed me.
In my opinion, if the system doesn’t have enough power to fulfill its settings, it should say so.
It’s a mod, not a torch.
I would still rather have a removable 18650 battery though…
Innokin Proton Mini Ajax Coil Life and Leaking
I used both coils for 7 days each, predominately at the highest recommended wattage and they are both still vaping as nicely as the first day.
In the two weeks I’ve used the AJAX tank for, there has been no leaking worth mentioning and despite the fact the top-fill doesn’t lock closed.
Pros
Mod
- Looks great
- Feels good in hand
- Easy to navigate & operate
- Fairly light in weight
- Customisable Screen
- Seems sturdy and fairly durable
- Customisable Wattage curves that work
- Decent battery life
- Fast charging
Tank
- No leaking
- Huge Airflow
- Supports coils for 30W-80W
- Top-fill
Cons
Mod
- Integrated (not changeable) batteries
- Connection Plate is smaller than the AJAX Tank
Tank
- ‘Dry’ sensation
- No top fill locking system
Final Review Verdict
If you haven’t noticed, the majority of negative things I’ve said about the Proton Mini, have been little bitty things.
The truth is I’ve thoroughly enjoyed using the kit.
It has a charming look a bit it, not once has it felt uncomfortable in my hand, the menu and the features are easy to operate and the tank better than many.
As I’ve said a few times I would prefer a removable battery, but the integrated battery hasn’t put off, the battery life and charge time is efficient enough.
And lets face it, if you’re looking for huge (or changeable) batteries you should never look at anything called ‘Mini’ anyway.
The tank and it’s “dry sensation”, if you’ve been on the internet over the last 2 years you’ll probably know how well sought after the Mesh Pro is.
My point being the dryness doesn’t really put people off that much, and although it’s not a desirable trait, it’s also not a big enough trait to put me off the tank.
The Proton Mini AJAX Kit has proven to be a worthy adversary to all kits on the market.
So…are you using or thinking of buying this one?
Let us know your thoughts and opinions in the comments below!


Nevermind with some fiddling I figured it out.
Glad to hear, enjoy 🙂
Great review. I am very interested in setting up my own curves. But for the life of me I cannot figure out how to set them and I dont see instructions online or in the manual. I see from your review you set a custom curve…how in the world did you do it?
Hi Nicholas,
Enter the menu by clicking the fire button 3 times in quick succession.
Toggle down to the “curve” option and press the toggle button to select.
I can’t fully remember the detail after this bit but I’m pretty sure you…
Use the toggle to select c1, c2, c3 or C4 (just memory slots) press toggle to select.
use the toggle up and down to set the wattage
I’m not sure if you use the toggle sideways or press it to move to the next time frame.
Then navigate to the save button.
Hope that helps.
Hey Katie, I believe they are T2/T3 Torx Screws.
I think they are officially T2 but i know people have had problems with getting T2 to do the job, I suppose it depends on the quality of the screwdrivers.
Hope you get it sorted. If you have any other problems free free to contact me on instagram for instant chat @vapemilluk
The anti drip silicone has somehow slipped out and won’t let me close the tank. What screwdriver would I need to use to loosen the 2 screws