Ooh goody I have been looking forward to getting to grips with the new Rev Tech Phantom Kit.
The styling of all the Rev devices is inspired by motor racing – just take a look at the Rev Sport, Nitro and GTS mod to see what fires them up…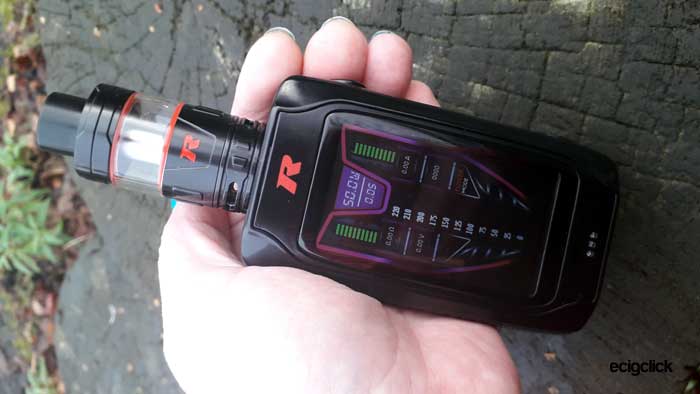
As you can see the mod has a massive 2.8in LCD colour screen – protected with “Quartz Level Hard Panda Glass” – have you ever seen a “Hard Panda”? They all look cuddly to me.
There are plenty of “Dashboard options” – that you can choose from and pick the colour too. Apparently inside the mod is a 32mb memory just to store all these dashboards – more than was in my massive Commodore 64k a few years ago!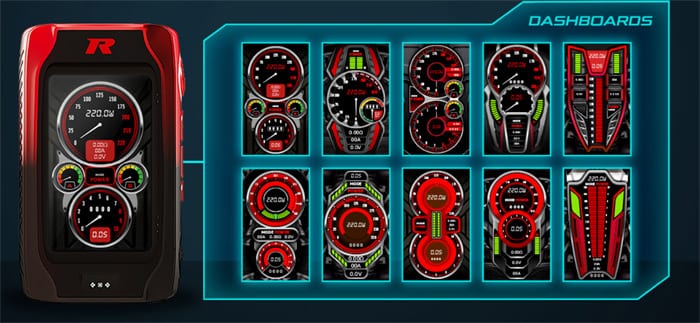
It is a dual 18650 battery vape mod – the batteries are not included and the mod will output up to 220W.
There is a vibrate motor inside which activates when you confirm menu choices and you can change the “glowing” light pattern and colour around the fire button too.
In the kit version comes the Drift 2 sub ohm tank. Oh and this has been “souped up” a bit too with single, triple and quad mesh or standard coils. You get the Single and quad mesh coil heads included. The tank is also compatible with coils from other brands.
There are 2 tank capacities available – the 2ml capacity for the EU due to the TPD regulations or the standard 5ml capacity. Apparently there is a conversion kit for the 2ml to increase the capacity.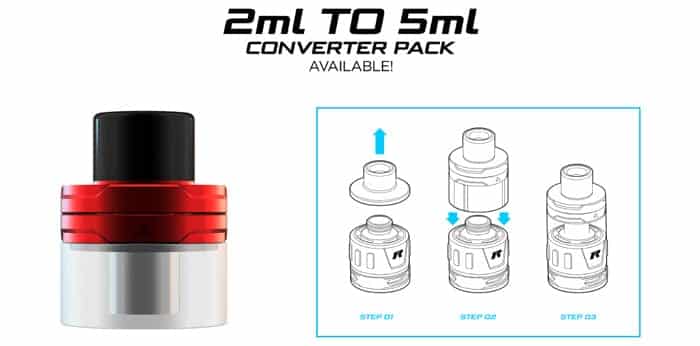
There are 9 colours available: Red/Black, Black/Green, Blue/Black, Rainbow, Blue, Lemon, Red, Black and Orange.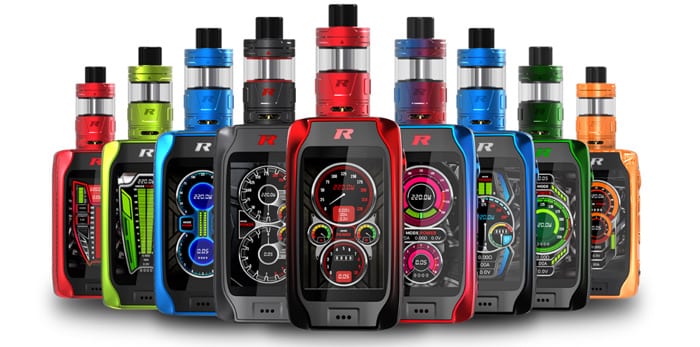
As always although I received this device free for the purposes of review – I will report back honestly on my findings with the device in my possession.
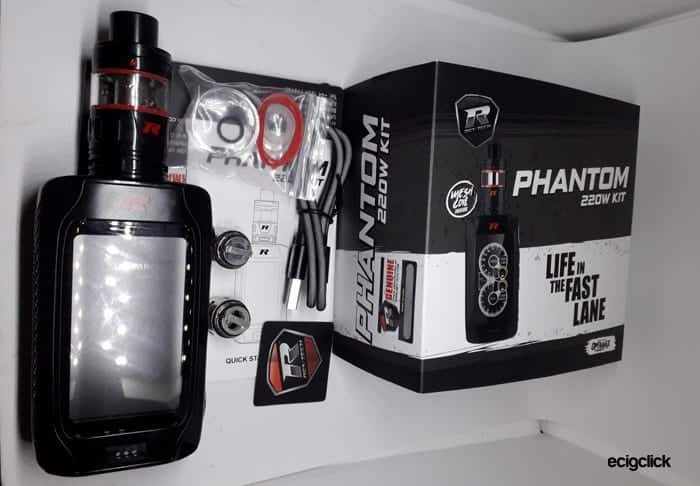
What’s In The Box
- Rev Tech Phantom mod
- Rev Tech Drift 2 tank
- M1 coil
- M4 coil
- Spare parts
- USB Cable
- User manual
Features
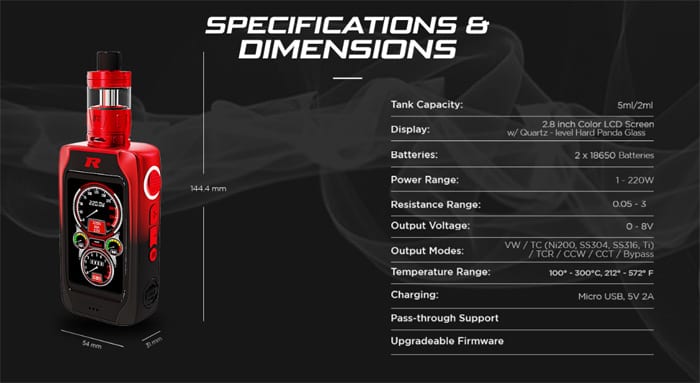
Rev Tech Phantom Mod Specs
- Size: 54x31x144.5mm (including standard tank)
- Battery: 2×18650 (not included)
- 2.8in colour LCD display
- Quartz level hard panda glass screen cover
- Output: 220W max
- Resistance range: 0.05-3ohm
- Modes: VW, TC (Ni200, SS304, SS316, Ti), TCR, CCW, CCT, Bypass and 6 memory storage slots
- Temperature range: 100-300°C / 212-572°F
- Micro USB 5V/2A charging
- Passthrough
- Firmware upgradeable
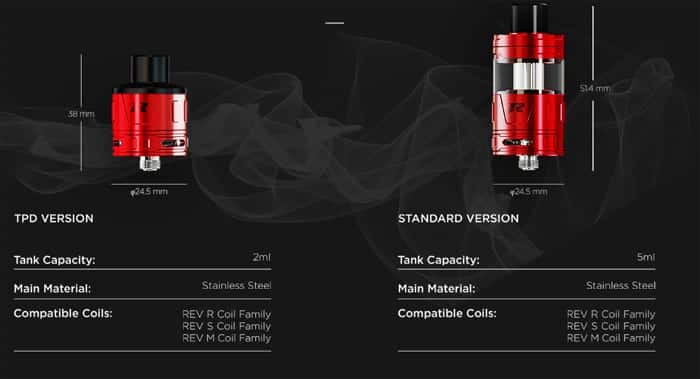
Rev Tech Drift 2 Tank Specs
- Size: 51.4×24.5mm (Standard Version) / 38×24.5mm (EU Version)
- Capacity: 5ml standard / 2ml EU
- Coils: Rev R, Rev S and Rev M coils (Plus Smok TFV8 Baby, Eleaf HW, Vaporesso GT).
- Top fill
- Triangular bottom adjustable airflow
- Converter kit available for 2ml to 5ml capacity
Build Quality & Design
I received the Rev Tech Phantom Kit in the Black version.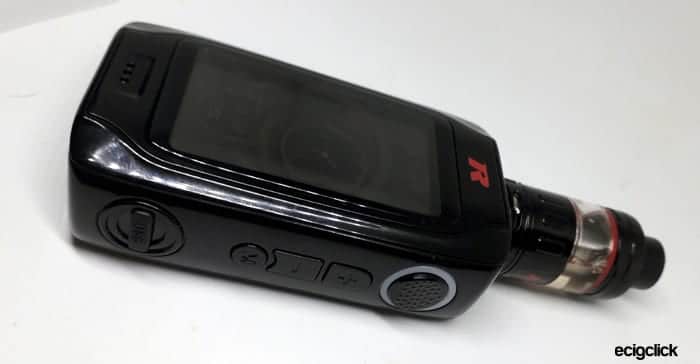
The whole kit is surprisingly light when you consider the size of that screen and the big tank sat on the top.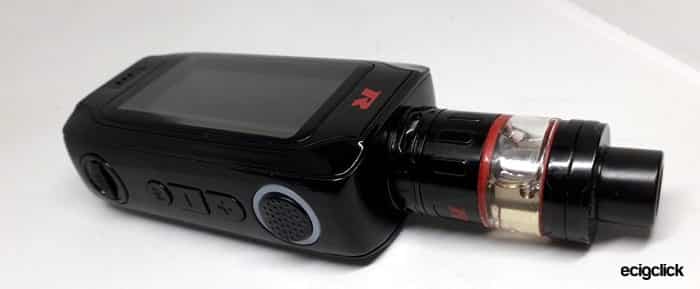
I can’t really comment on the colour match as I have the black version so it looks perfectly fine from here!
Rev Tech Phantom Mod
This is a larger sized mod – but isn’t as heavy as you would expect.
The first thing you notice is the massive screen nestled in the centre apparently covered with hardened glass.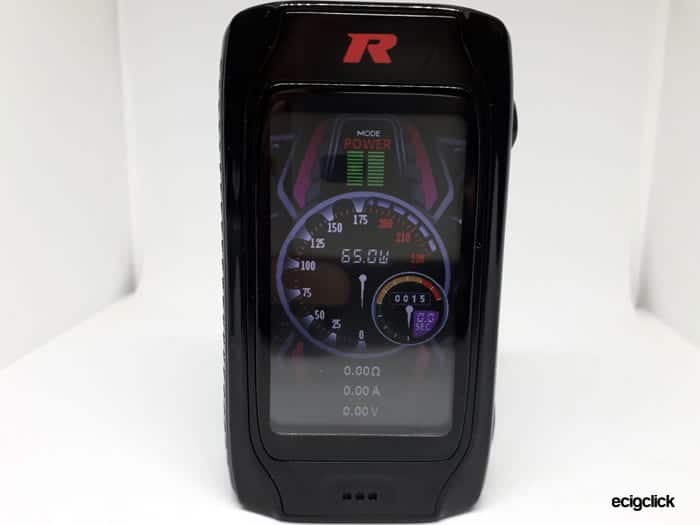
Obviously this is going to be a massive fingerprint magnet but it is as clear as anything and you can change the display colours, screen timeout and brightness level too.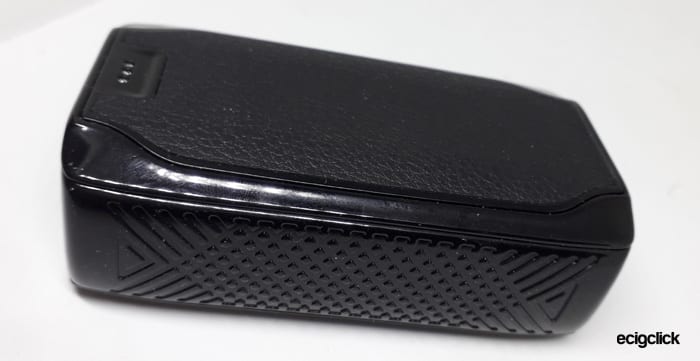
On the side of the mod is the fire button, this has an LED light ring around it and you can change the colour of this light. The fire button has the same textured finish as the grip side of the mod.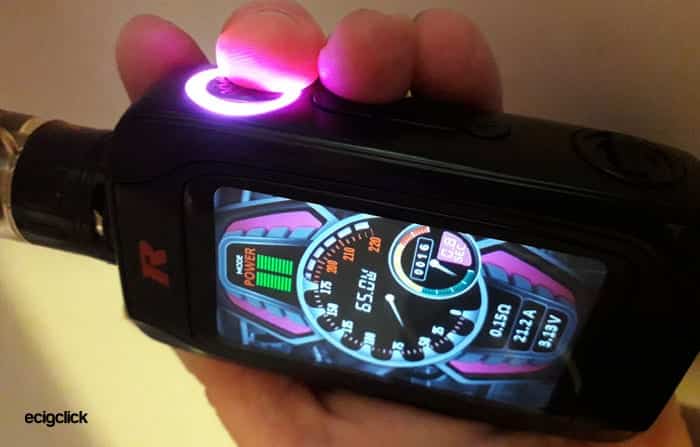
Below the fire button are the + and – adjustment buttons and below that is the “M” for “Menu” button.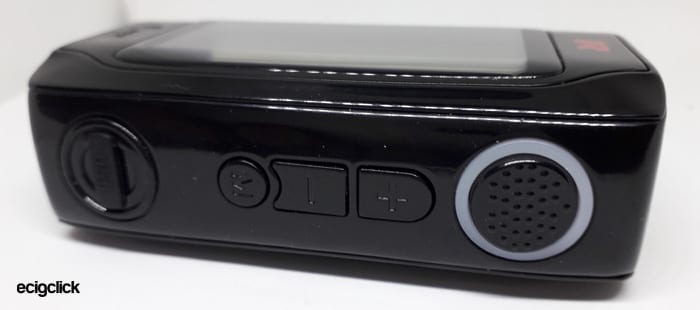
The USB connector at the bottom is located behind a pull out plug and I think this looks great too.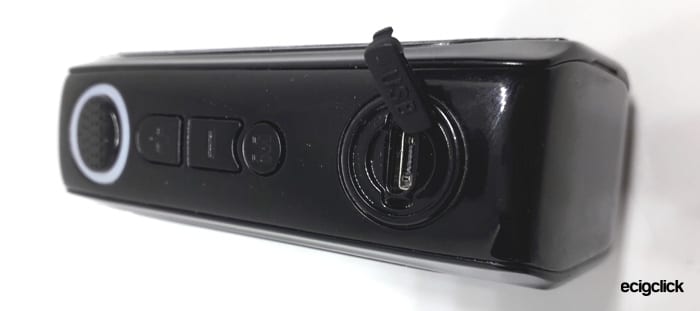
The opposite side to the fire button has a textured grip area and the rear has what looks like a leather finish panel with 3 battery vent holes at the base.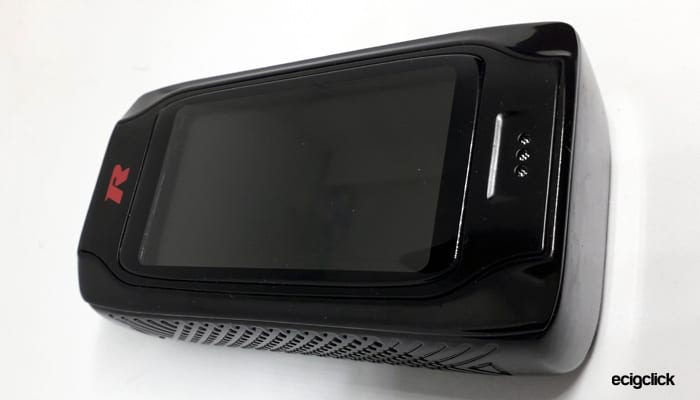
On the bottom of the mod is just the Rev logo and the required legal icons.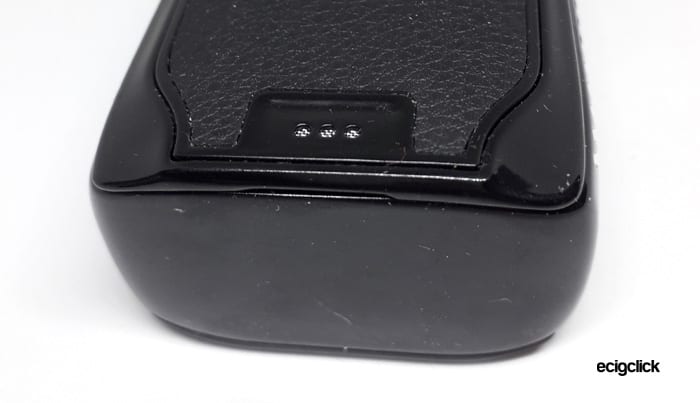
510 Connector
The 510 connector is located in the centre of the top panel and has a nice decorative effect around it.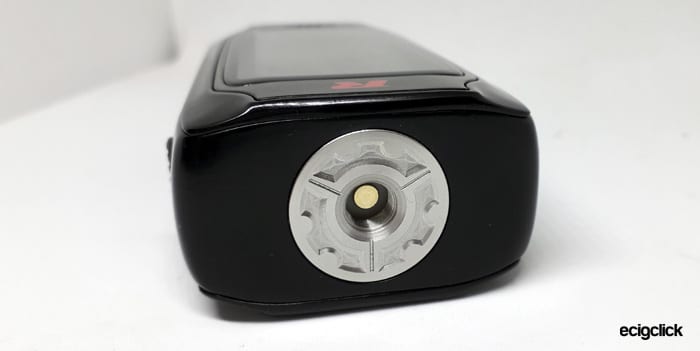
I tried the biggest diameter tank I have – the Freemax Mesh Pro – which in the Resin Version is around 28mm where the airflow ring sits and that fitted fine. A measurement with my cheapo ruler makes it look as though 30mm tank should go on here without overhang.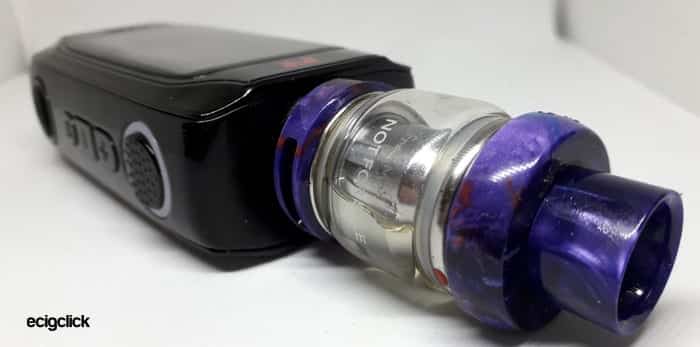
Battery Compartment
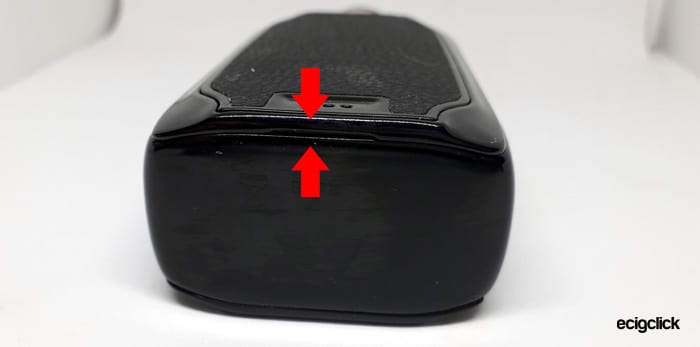
To access the battery compartment the rear cover pulls off and this is held on by magnets you could use to hold an Anvil up to your kitchen ceiling with… Well not quite but you get what I mean! They are strong enough to make removing the cover require some effort and not a single wobble when the cover is installed.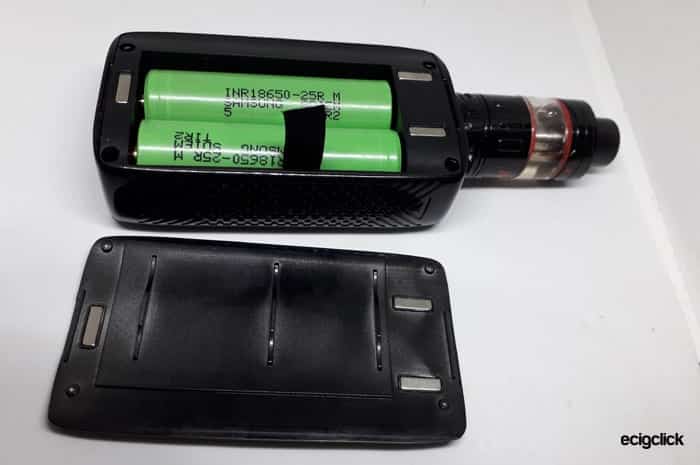
A very neat and clean battery tray with polarity markings and a removal ribbon give this another hint of quality. The bottom battery connectors are the solid spring loaded type and it does take a bit of effort and tilting the batteries to remove and install them.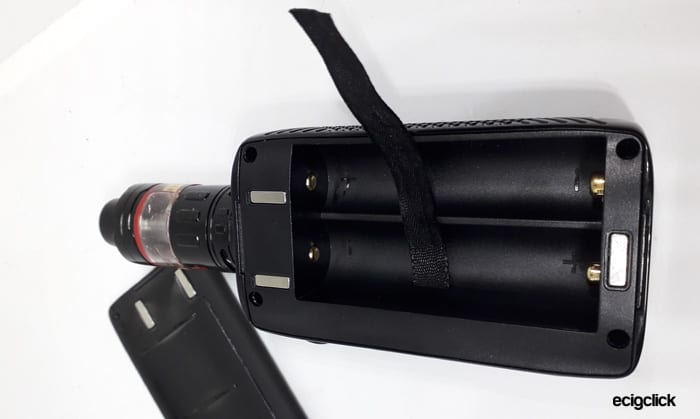
The mod just feels excellent quality – nothing is loose or rattle-ly and it is blemish and flaw free.
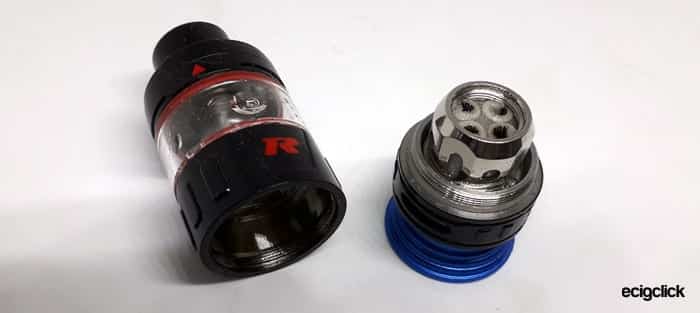
Rev Tech Drift 2 Tank
This is the 2nd generation of the Rev Tech Drift tank.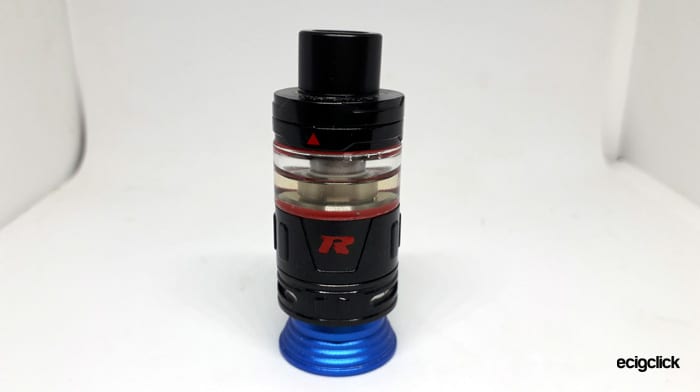
It is a strange looking tank – almost looks like an RDTA with a huge metal base and then a small top glass.
But the metal part is also a liquid container, in fact on the 2ml version you actually don’t get the glass part.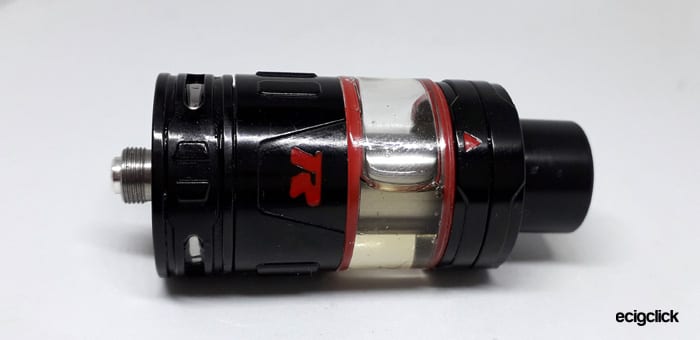
There are red O-rings on my glass which match the red Rev logo and top cap arrow.
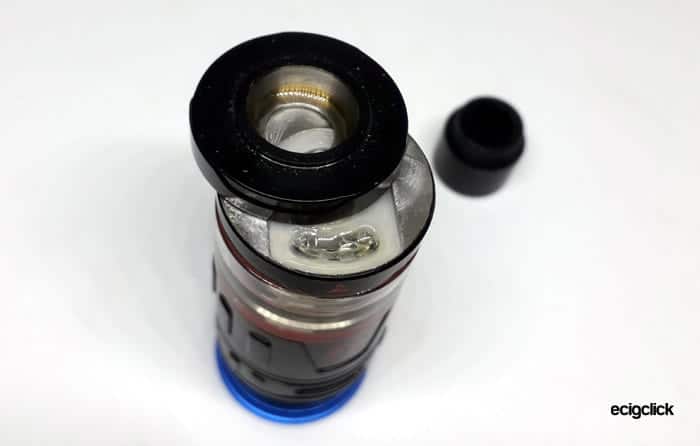
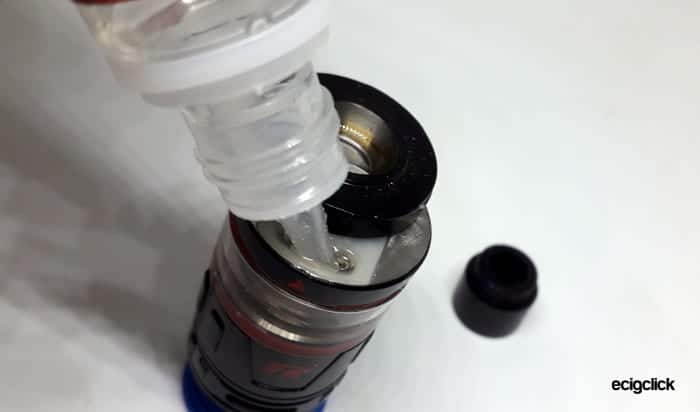
This is a slide top fill tank which does work OK – I did find with chubby style bottles I couldn’t get the nozzle in fully so had to remove the drip tip to make it easier. But even then it was difficult to fill – I resorted to only using the 10ml bottles of my e-liquid as bigger bottles were a struggle.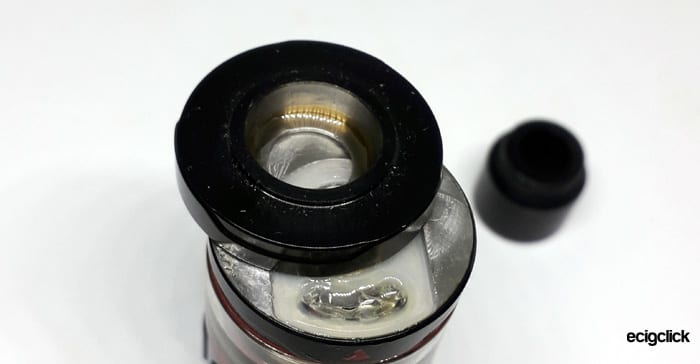
There is a “flappy membrane” fill hole – which you open up with the nozzle. Some people don’t like them. Before you slide the top cap shut make sure the gasket is installed properly as mine kept popping out and I had to push it in before the cap would close again.
I got the drip tip out but no 810 will fit in it – the drip tip hole is less than a mm smaller? So it looks like a non-standard drip tip fitment.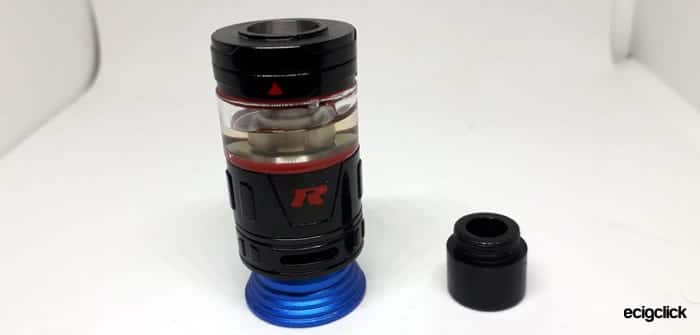
At the base is the airflow adjustment ring which turns smoothly.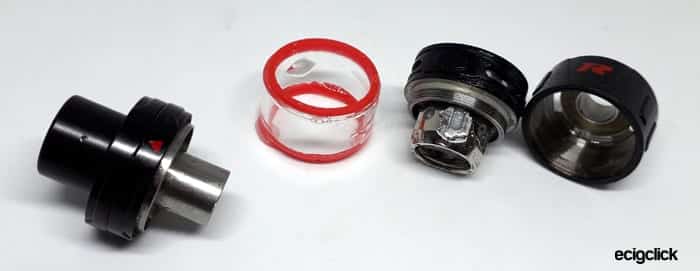
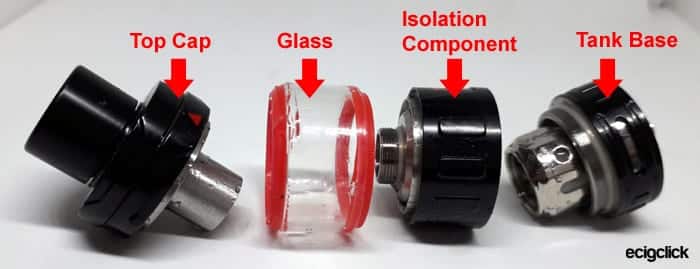
You can dismantle the tank into all its component parts – the threads felt a bit “squeaky” but it did screw up fine.
Trying to just remove the tank base on its own to change a coil is annoying. The tank just automatically starts unscrewing at the glass part – meaning you get covered in e-liquid. The tank base and isolation component part are very hard to grip.
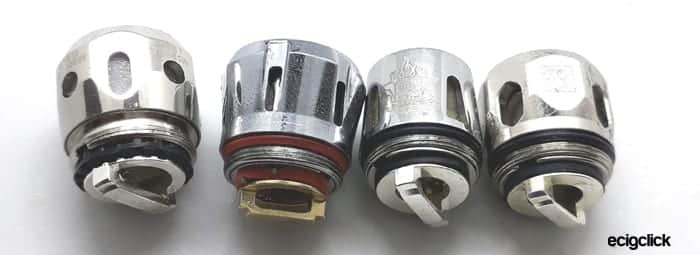
Rev Drift 2 Tank Coils
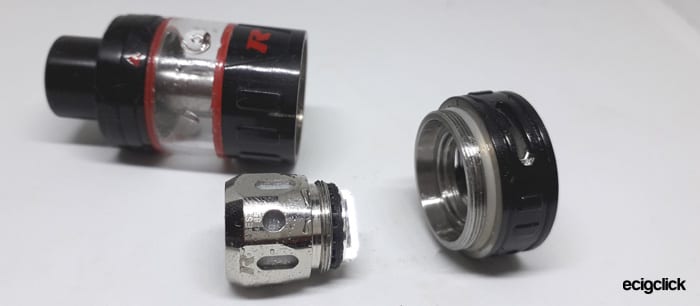
You can use the coils from the original – Rev R, Rev S and the new Rev M coils. Also the Rev Tech website says this tank is compatible with coils from other manufacturers. These do look a lot like the Smok TFV8 Baby, Eleaf HW, Vaptio Frogman and the Vaporesso GT coils. I have some of the above so I will try them in after I have finished with the included coil heads.
Yep they fit – shown in the photo below is the Smok TFV8 Baby coil installed.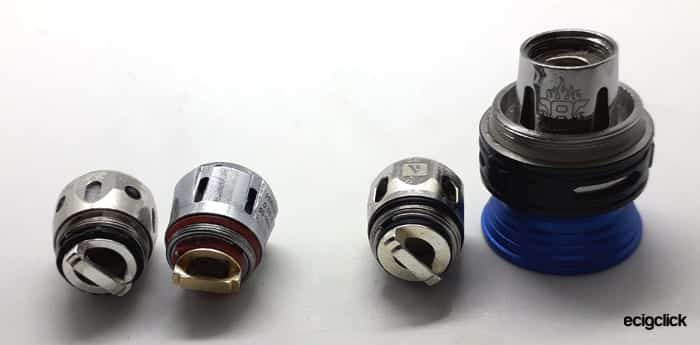
Set-up Guide
The kit will arrive with the tank and mod packaged in the same box but not connected together.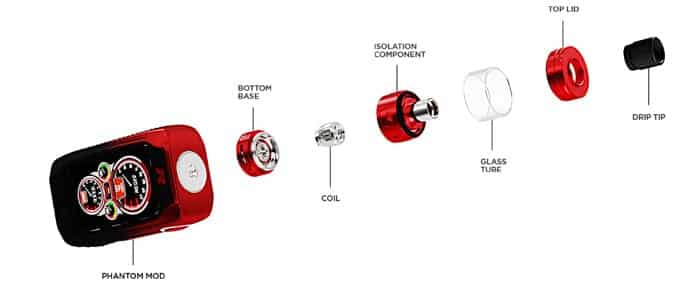
You will need to install the tank, fill it, install a battery and away you can go.
Mod Basic operation
Display
Although this might look super complex – it can be as complex as you make it.
For instance if you just want an adjustable variable wattage mod – like a simple Eleaf Pico etc then this will act exactly like that – only with higher power settings available.
Basically everything on the screen is really telling you pretty much the same as your Pico would – power settings, battery life, coil resistance etc – but it is presented in a very glamorous way. It might even be frivolous to some as that huge screen is going to be draining away the battery quicker. I do like a bit of frivolity now and again though and this really does look the part.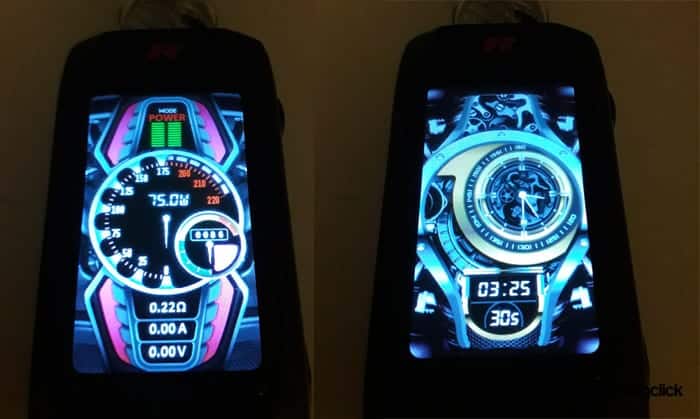
Depending on which dashboard you choose the current temperature/wattage setting will be displayed, the power level of each battery (A and B), the current user mode, the coil resistance, Amps and Volts (when you press fire) and the dials will show you the power ramping up and also the puff duration in seconds.
When you leave the device a few seconds a clock screen saver will appear just press any button to take that off. After a longer time stood idle the screen will go black again just press any button to fire it up again.
Mod Settings
I have dabbled little in temperature control and to be honest I don’t know anyone who uses it so I will try and stick to using the mod with the tank and coils it was supplied with.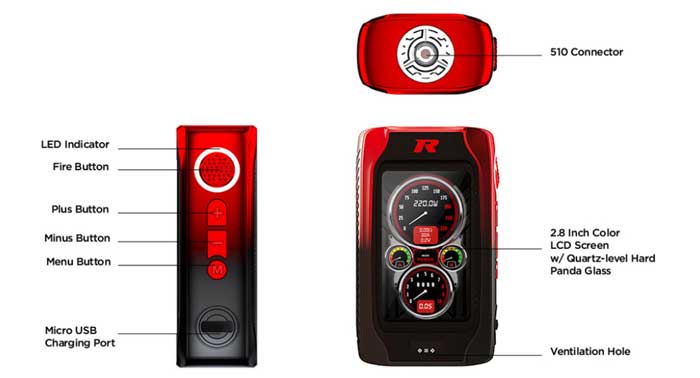
- Power On = press the fire button 5 times quickly – the screen will power and a vibrate will confirm.
- Power Off = press the Menu button and navigate to the “Turn off” sub menu, scroll to “Yes” and press fire. After performing the Firmware Update you can turn the mod off with simple 5 clicks of the fire button.
- To vape = press the fire button down – over 10 seconds held down and the mod will cut the fire off to prevent damage or overheating.
- Enter the menu = press and hold the “Menu” button
- Make adjustments / navigate = use the up and down buttons
- To confirm / select = press fire
- To enter different sub menus = press the menu button.
- Lock device = press fire quickly 3 times
Menu System
Enter the menu system and use the adjustment buttons, fire button and menu button to navigate through and select.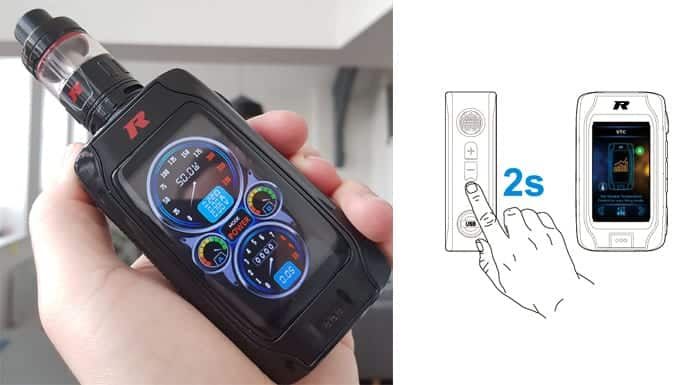
When you confirm a selection the vibrate will activate to tell you it has been stored.
- Mode: Select from Power (Variable Wattage), Stainless Steel (TC), Titanium 1 (TC), Nickel 200 (TC) and TCR.
- Bypass: Allows the full battery power to go straight to the coil – make sure to know Battery Safety and Ohms Law before using this mode.
- VTC/ VPC: You can set variable temperature/power curves and store them in one of the 6 memory slots.
- Colour Mode: Set the screen theme colour
- Dashboard: Choose the screen display theme
- Display mode: Set the screen timeout time
- Brightness: Customise the screen brightness setting
- Light Mode: Customise how the light on the fire button operates
- Vibration: Turn vibration on or off
- Time settings: Adjust the time on the display
- Pin lock: Set a pin to lock and unlock the device – say for child safety purposes – like you would on a mobile phone.
- Puff reset: As it says on the tin – reset the puff counter.
- Factory reset: Again like a mobile phone will return the device to the factory defaults.
- Turn off: Erm turn off the device!
How To Install The Battery
It is not recommended to charge removable batteries whilst they are in the device. Make sure you are clued up on your Battery Safety.
Remove the batteries and charge in a good quality external charger. Also whilst handling your batteries have a feel and a good look round for any damage or torn/worn battery wraps. Replace if anything looks a bit dodgy.
- On the bottom of the mod is a slight lip to put your finger nail in and flip off the rear cover. These magnets are strong!

- If batteries are installed use the removal ribbon to remove them – again it can be quite tight as the terminal springs are strong too.
- Install 2×18650 batteries according to the polarity markings on the battery tray with the ribbon sat underneath them.

- You may need to install the battery at the bottom terminal first and push down against the spring to get the top of the battery to fit into the tray.
- Replace the rear cover.
How To Fill The Tank
- On the top cap of the tank is an arrow marked – find this arrow.

- At the point of the arrow push the top cap across and this will reveal the filling port.

- Squeeze liquid into the filling port. It has like a membrane seal so you will need to insert the nozzle or dripper into the filling slot. If it is difficult remove the drip tip to allow the bottle to get closer to the slot.

- Make sure the filling slot seal is pushed in fully. Mine kept coming out slightly meaning the top cap would not close properly.
- Slide the top cap closed.
- For first time use or a new coil – leave the tank to stand for 10-15 minutes. These are mesh coil heads so the wicking is quite dense and takes a while to fully absorb the e-liquid. You may need to refill the tank again once the coil has soaked up some of the liquid in the tank.
How To Change The Coil Head
- Remove the tank from the mod.
- Turn the tank upside down and unscrew the tank base. (Make sure to unscrew the base – if you have the larger capacity tank – do not unscrew the isolation component part next to the glass).

- If there is a coil installed this simply unscrews from the tank base.

- Screw a new coil into the base.

- Replace the base onto the tank.
- Fill and leave to stand as described above.
How Does the Rev Tech Phantom Kit Perform?
Flavour & Cloud Production
This is a sub ohm tank – so it is designed for use with higher VG proportion e-liquids. I used 80% VG liquid in here. We tell you all about liquid proportions in our guide to PG and VG in e-liquid.
Also with this being a higher powered tank you don’t need high nicotine levels, high VG e-liquid generally is only 6mg at the strongest nicotine strength.
I am using my usual Stika Bombz Fruit Salad e-liquid which is 6mg nicotine strength.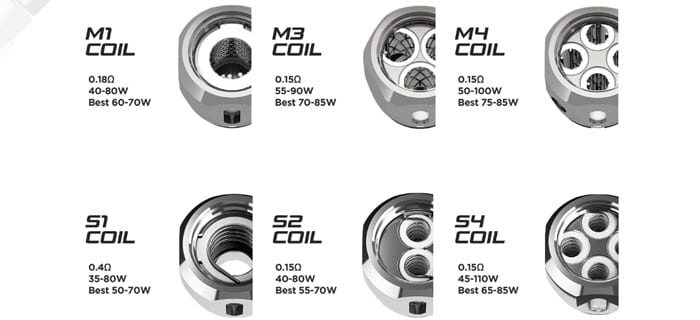
M4 Quad Mesh Coil
This is the first coil I tried in the tank! It is 0.15ohm – rated 50-100W – best at 75-85W.
The airflow in the fully open setting has zero restriction – and in fully closed it is pretty much fully closed too so you do have a wide range of adjustment.
I generally had my airflow set in the mid position.
So I started off at 50W which wasn’t bad – plenty of vapour and the flavour was there but a bit muted. Moving up the power settings at 60W this already felt a lot better, at 70W this was a lot better but not mind blowing.
At 75W the flavour is coming through a lot more – at the moment it is slightly cottony tasting still so I have turned it back down to 70W and will run a couple of tank-fulls through it to bed in before I take the wattage any higher.
So after the 3rd tank-full this is still very “Cottony” so I have had to take the power down to 65W. Plus the flavour hasn’t improved greatly to be honest. Plus trying to run this at the “best” recommended wattage is giving a slightly dry taste – on the verge of dry hit territory sadly.
So far this is pretty disappointing flavour wise I am afraid to say. For instance compared to the Dual Mesh coils on the Freemax Mesh Pro and the Geekvape Alpha this is pretty poor. In fact the single coil Fireluke Mesh is way better for flavour.
M4 Quad Mesh Coil – Number 2!
As I had an extra M4 coil I thought I would try that but sadly more of the same.
Above 65W and it starts to taste very dry like if you continue at this power it is going to start burning.
So I have been using this coil on and off for over a week – I would say about 5-6 tank-fulls and still not much better sadly.
Look it isn’t terrible but seems well below the standard of other single or multi mesh coil tanks you can buy now.
In fact I keep picking up the Smok Mag Grip as the flavour from that is far preferable sadly.
M1 Single Mesh Coil
The M1 single mesh coil is 0.18ohm, rated 40-80W – best at 60-70W.
So I filled the tank and left it to sit for 15 minutes. The resistance on the mod is showing as 0.19ohm.
As with the M4 coil the airflow resistance can be shut down to no airflow and then very open airflow so plenty of adjustment.
Starting at 50W this does give out a lot more vapour than the M4 coil. But not much taste -but it is early days and this is thick wicking.
This coil feels a lot “smoother” than the M4 but the cottony taste is still there sadly and not picking up any “fruit-salady-ness” at all.
Like with the M4 I am reluctant to go much higher power-wise as this cottony taste just warns me this coil wanting to start dry hitting soon and a mesh dry hit is something nobody ever wishes for.
I will try a few tank-fulls of e-liquid through it before I adjust the power see if there is any chance of the coil “bedding in”.
The more I vape on this the worse the flavour is becoming sadly. Almost a tinge of a Burnt Rubber Bouquet now – Mmm yummy.
I did try to up the power to 55W but Oh man its nasty.
Rev Tech Phantom Mod Performance
The Phantom mod is beautiful and performs really well.
As I really didn’t like the supplied tank and coils I used my Freemax Mesh Pro tank on here to do the performance and battery tests.
75W on the Phantom on a 0.2ohm coil felt exactly the same as 75W on my Voopoo Alpha One and the coil resistance on there was showing 0.21ohm so pretty close. I do have to say the fire speed on the Phantom matches the Voopoo mod as well!
Everyone who I show this mod too loves the screen and although it is a bit busy there is all the info you need. Even down to the Amps you are drawing when you fire – which is nice to know for battery safety too.
I did notice as you have separate displays for each battery capacity that they sometimes didn’t discharge equally – i.e. one bar showing more than the other. But within a few vapes it seemed to equal out again.
Firmware Upgrade
Looking on the Rev Tech site I have just noticed a Firmware update.
You can find out the current firmware version you have by entering the “Factory Reset” option in the menu. It is displayed on the bottom of the screen. Mine is V0.14 – the site seems to have V1.00 as the most current.
How to Upgrade
Download the upgrade file and unzip it to your computer. Open the program and it does give you the instructions.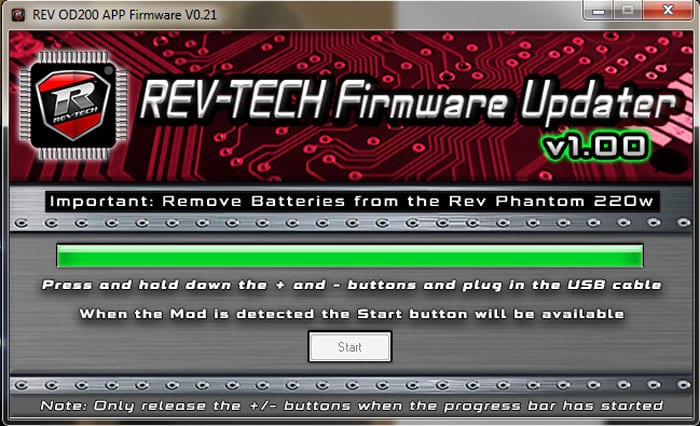
It is usually recommended to only use the USB cable which came with the mod. There also may be a delay when connecting as sometimes Windows is trying to find a driver for it.
- Remove the batteries from the mod.
- Press and hold down the + and – adjustment buttons and then install the USB cable to the mod and your PC.
- When connected press “Start” – only then release the adjustment buttons when the progress bar starts moving.
- The mod was making some really odd noises it has to be said!
- Nothing on the software tells you when it has completed other than the progress bar fully turns green – so I assume it has updated?
After Firmware Upgrade
When I switched the mod on it had reset back to defaults of Dashboard and colours etc. But I think there are some added dashboards now. There are some quite plain just digital display dashboards without the dials.
I just popped back into the “Factory Reset” menu and it is saying V1.00 so it has updated successfully.
Now when you press fire it vibrates and also seems to fire up a lot quicker. I did turn the vibration off though!
Also the ability to turn off the mod with 5 clicks of the fire button has been added – phew – rather than having to go into the menu each time to switch it off!
Battery Life
I used a pair of matched 18650 batteries and had the screen set to just slightly lower than full brightness.
Obviously the screen settings, power mode and level and your own vaping habits will cause a variation in battery life.
But to give you a rough guide I got around 10 hours in total vaping at 75W which equated to 290 puffs.
Pros
- Gorgeous clear huge screen
- The grippy textures on the mod and fire button feel really nice in the hand
- A lot lighter in weight than I was expecting.
- Love being able to customise the screen themes, colours and the light on the button.
- Quick firing time
- Upgradeable firmware
- Display shows Amp rating when firing – useful if you want to make sure you are not pushing your batteries too hard.
Cons
- Huge screen – may seem frivolous to some as it doesn’t display anything that a normal digital LCD screen wouldn’t display.
- I did have a few small leaks from the airflow on the tank when I tipped it over.
- No idea what the coil material is – people might want to know if they want to use in Temperature control modes.
- M4 coil head never seemed to “Break In” i.e. a lot of cotton taste even after several tank-fulls and had to keep turning the power down.
- M1 coil head was even worse – resulting in a burnt rubber taste.
- Trying to fill the tank with anything other than a 10ml bottle makes a huge mess.
- Annoying to turn off – you have to go into the menu, select “Turn Off” then “Yes” and click to confirm…urgh… (However after the firmware update this was rectified!!)
- When you try to change the coil you end up unscrewing the glass section 9 times out of 10 and get covered in e-liquid. Hard to grip just the base and the isolation component part.
Final Review Verdict
The Rev Tech Phantom mod all day long is beautiful, no performance issues, no rattles or wobbles and works wonderfully.
I personally love the huge screen and the dashboard options. However I can understand some people thinking they are a bit gimmicky and pointless. The fear would be the battery life – but I found it to be pretty good even with the flashy screen, fire button light and vibration all enabled!
The tank was a massive let down for me. I love mesh coil sub tanks – I have either reviewed or owned most of them. The Rev Drift 2 tank is poor by comparison to most of them sadly.
If it was my money I was spending on this I would totally buy the mod on its own. The tank isn’t worth the extra price of the kit. Buy the mod and grab a better mesh coil sub tank.
When I put the Freemax Mesh Pro tank on the Phantom mod – I really enjoyed using it. With the Drift 2 tank I kept leaving it sat on my desk and picking up other devices. With the Mesh Pro tank on it was in my hand all the time.


Great review Michelle
I upgraded firmware on mine to v1.00 and did not get any dashboards with the plain white digital display. Hopefully there will be more updates that include those.
Hiya thank you so much!
The new dashboards did come up on mine – they are right at the end of the dashboard menu just plain digital ones – I think that was a great move as some people don’t want the dial style displays.
Hope you are enjoying using the Phantom I love the mod it is gorgeous!
Shell