Ooh goody today I am reviewing the Voopoo Argus Pro 2!
This is my first encounter with any of the Voopoo PnP coils – my previous Voopoo kits have all been pod kits.
The Argus range is very varied – including box mods such as the Argus GT II, advanced pod kits such as the Argus XT/MT and plenty of simpler pod kits such as the Argus Z, Argus G, Argus SE and Argus P1S.
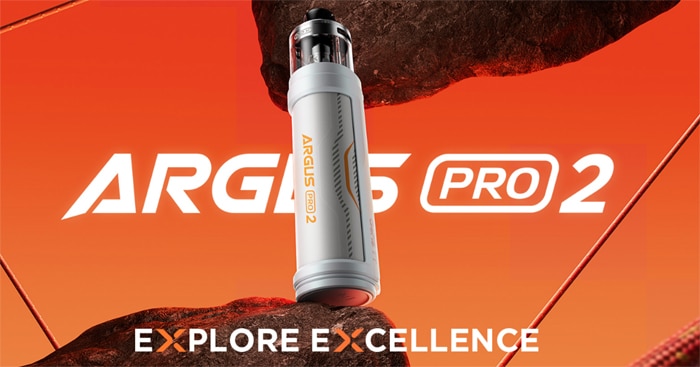
The Voopoo Argus Pro 2 fits into the advanced pod kit category – so let’s get stuck in and see what it has to offer!
What To Expect From The Voopoo Argus Pro 2…
As the name suggests this version is an update to the Voopoo Argus Pro and at first glance does look quite similar!
The kit consists of the main body (mod) and the tank (pod).
Looking first at the device, this houses a whopping 3000mAh battery which is charged via the USB Type C port at a 2A charge rate.

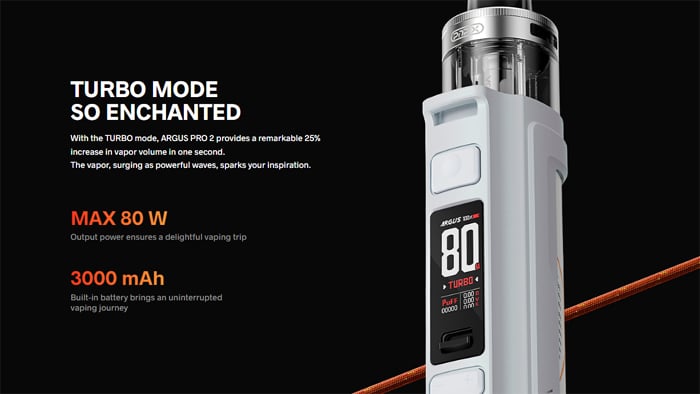
The output is specified as 5-80W (3.2-4.2V) and you have different user modes to extract that power!
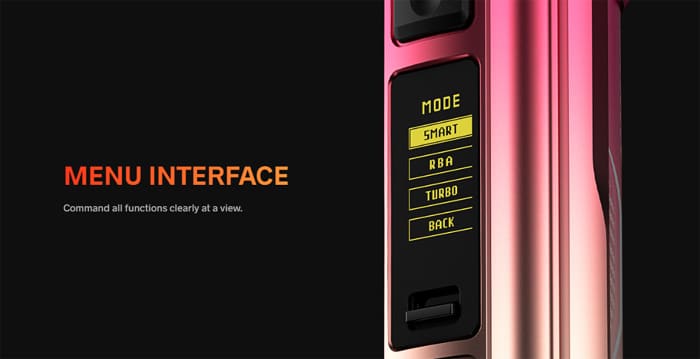
Firstly you can use the “Smart” mode – where the GENE.TT 2.0 chip inside the mod automatically adjusts the output to suit the coil installed.
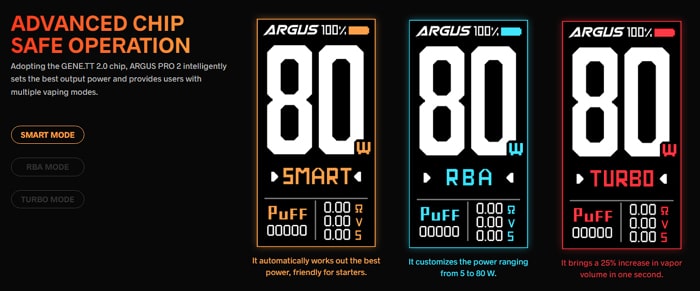
Or if you like to adjust the output yourself the “RBA” mode acts as a standard variable wattage mode.
The “Turbo” mode promises a 25% increase in vapour volume in one second.
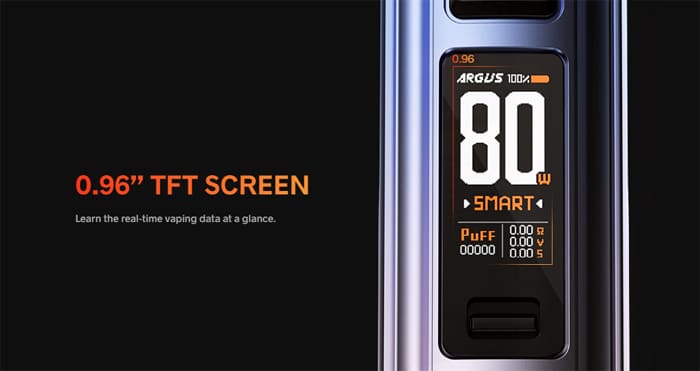
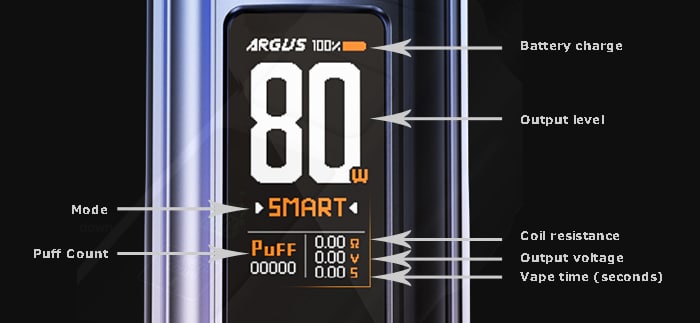
Your data is displayed on the 0.96in colour TFT screen.
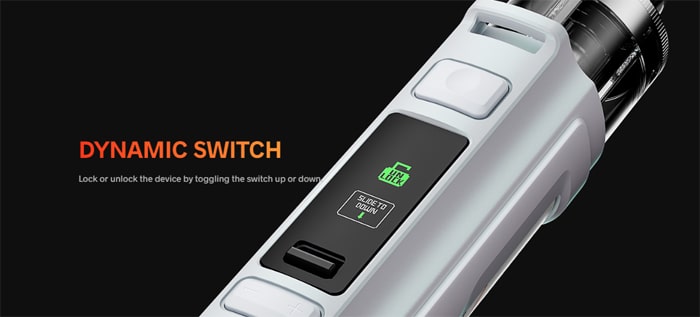
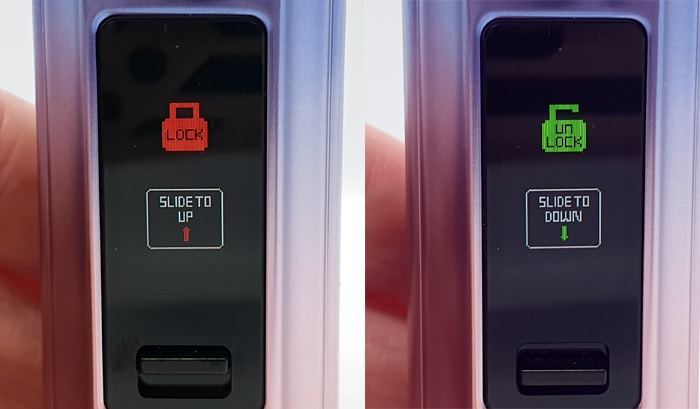
Below the screen is a manual locking switch. This allows you to lock all buttons to prevent accidental activation when carrying the device.
Looking now at the pod (or tank) section. This is the PnP X DTL cartridge. The DTL stands for “Direct To Lung” – which is a vaping style favoured by those who like high power and lots of clouds. We explain this further in our Guide To Vaping Styles.
In standard format the pod will hold up to 5ml of your own e-liquid which you refill using the fill port located on the pod base. For those in TPD regulated areas (such as us in the UK) this capacity is reduced to 2ml. But of course both pods are interchangeable so you could always try and get hold of the larger capacity pod at a later date.
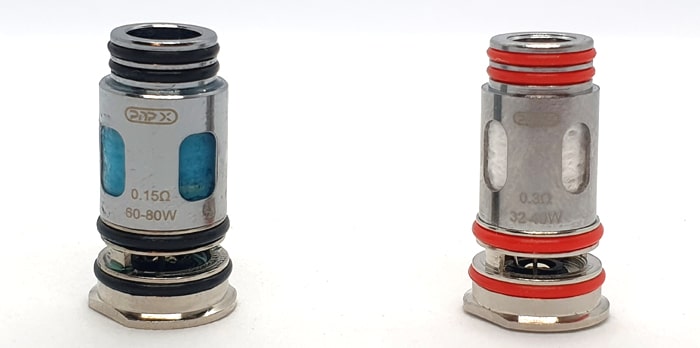
The coils are replaceable and are the PnP X range. Sadly the original PnP standard coils are not compatible.
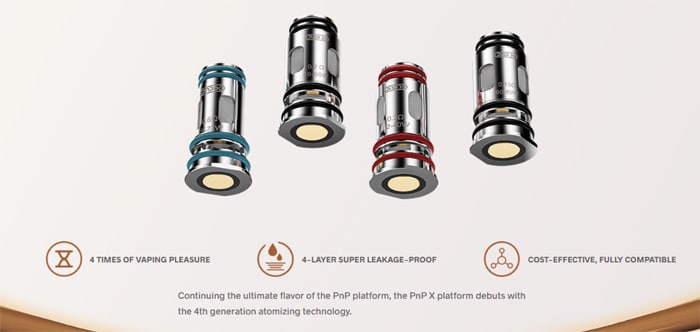
There are 4 coil resistance options: 0.15ohm (included in the kit), 0.3ohm (included in the kit) plus the 0.2ohm and 0.6ohm which are available separately.

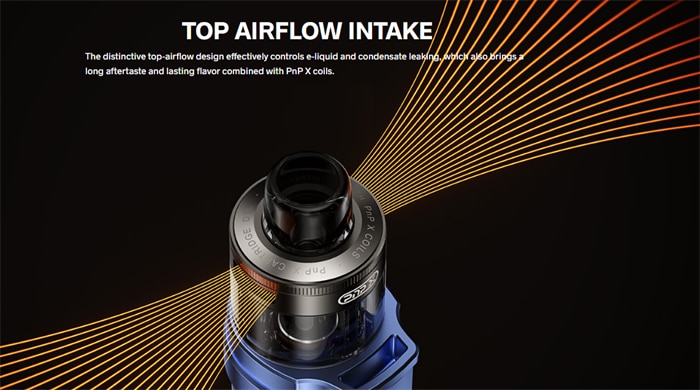
At the top of the pod is the airflow inlet which is adjustable. Having the airflow inlet located above the e-liquid level reduces the chances of leaking.
Here is an unboxing video from the VOOPOO YouTube channel.
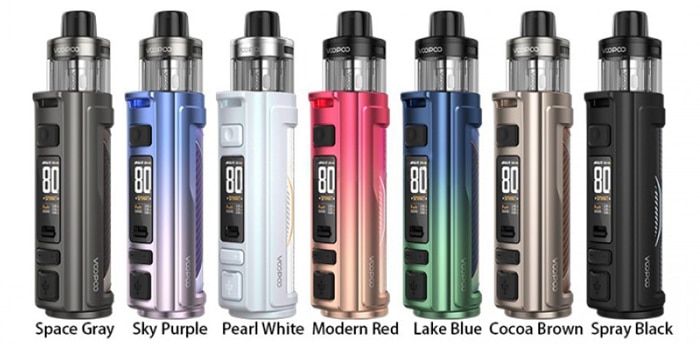
There are 6 colours to choose from: Space Grey, Sky Purple, Pearl White, Modern Red, Lake Blue, Cocoa Brown and Spray Black.
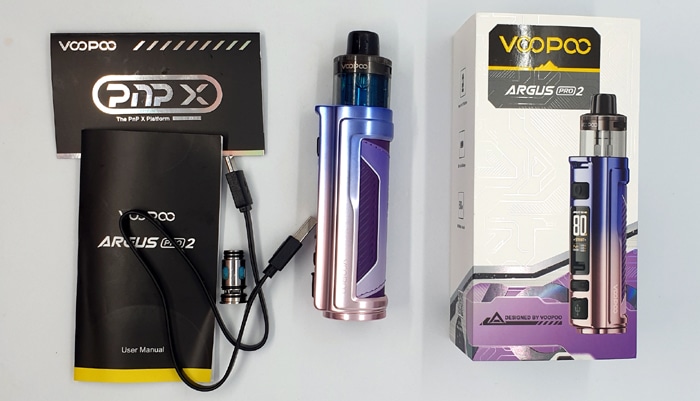
Kit Includes
- Voopoo Argus Pro 2 device
- PnP X pod DTL
- 0.15ohm PnP X coil
- 0.3ohm PnP X coil
- USB Type C cable
- User manual
Voopoo Argus Pro 2 Specs
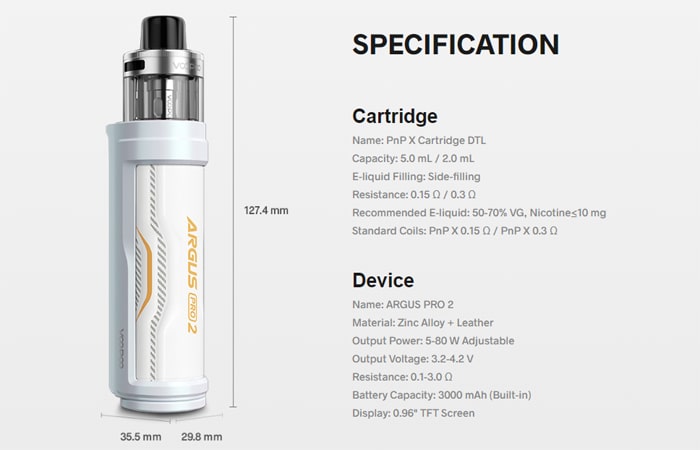
- Size: 127.4×35.5×29.8mm
- Battery: 3000mAh (internal)
- Display: 0.96in Colour TFT Screen
- Output: 5-80W (3.2-4.2V)
- modes: Variable Wattage (RBA), Turbo Mode, Smart Mode
- Type C USB charging – 2A charge rate
- Resistance range: 0.1-3ohm
- Capacity: 5ml (Standard) / 2ml (TPD)
- Coils: PNP X platform
- Top adjustable airflow
- Top fill
- Draw activation
- Locking toggle switch
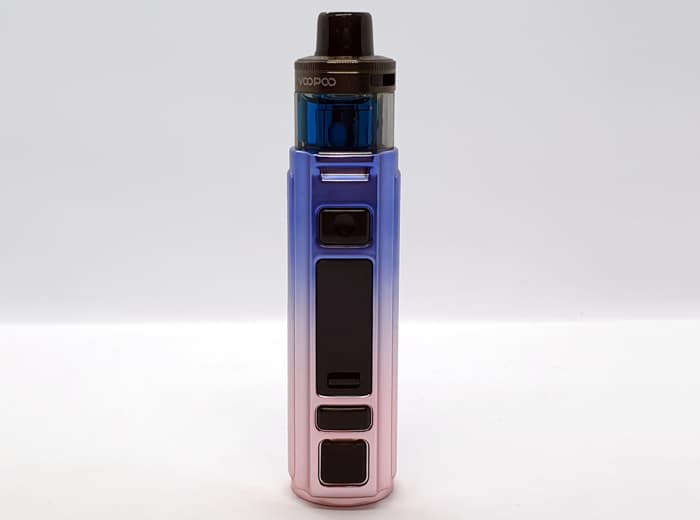
Voopoo Argus Pro 2 Design and Build Quality
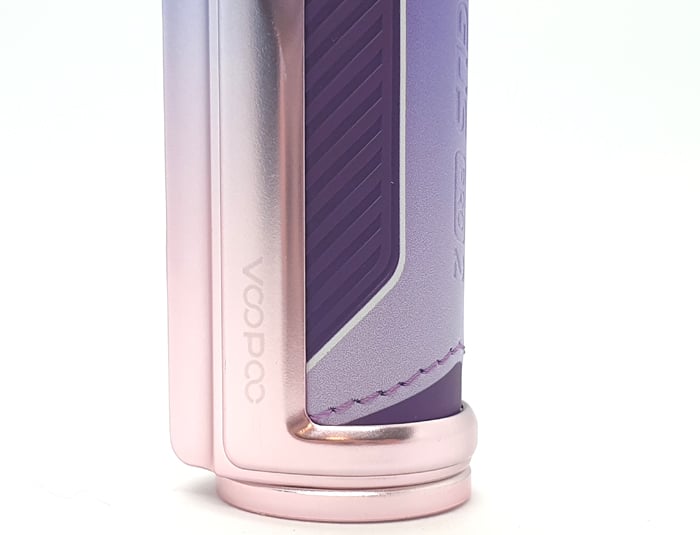
I received this in the Sky Purple 5ml version.
The packaging is pretty good but there is a huge chemically plastic smell emanating when you slide out the insert.
A neat box is the first thing you will see which contains the spare coil, good quality USB C cable and instructions.
I found the instructions to be pretty good and there is also a PnP X platform card which advises you about the coil range. It would be helpful to see suggested power levels for each coil here – but if you are unsure just set the mod to “Smart” mode and it will automatically select the correct output.

Sadly the instructions are not available for download at time of writing. There is a designated area on the Voopoo website where you should find them – they have just not been added yet.
Also don’t forget to do the authenticity check using the panel located on the side of the box. More details in our Guide here.
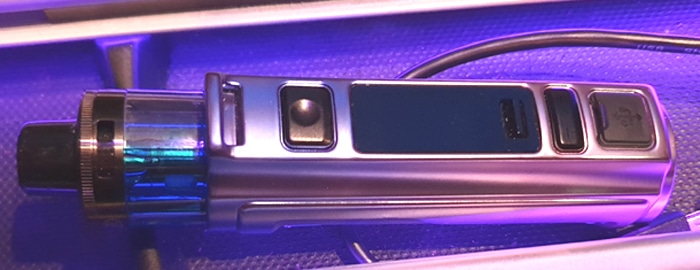
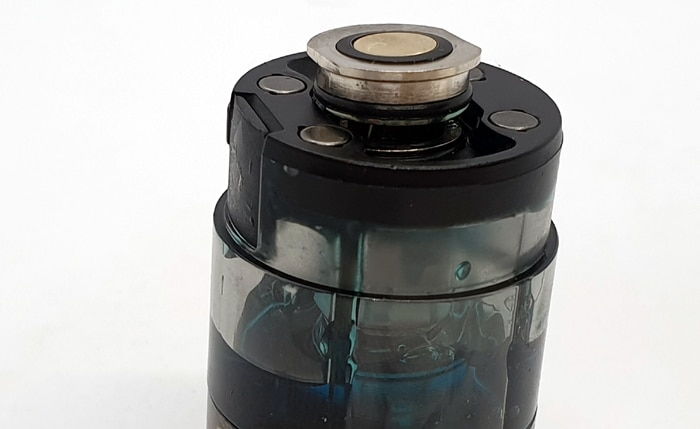
Voopoo Argus Pro 2 Mod
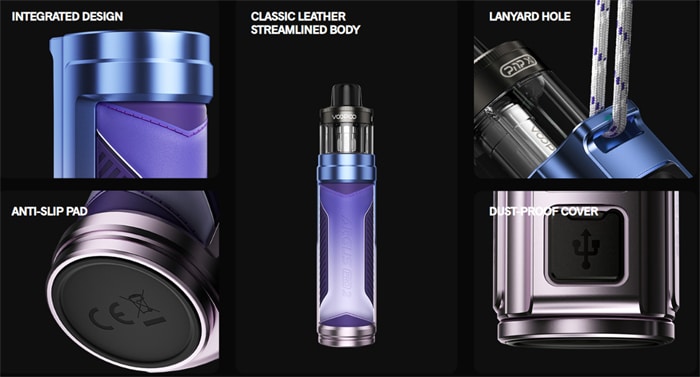
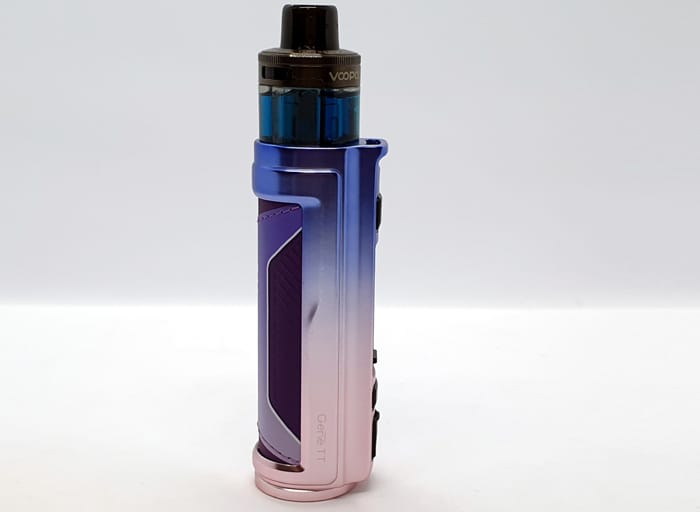
This is a stunning looking device in the two tone version I have. The top of the mod is a metallic Purple colour which fades down into a Rose Gold / Pink colour at the base.
There are some nice design touches, such as the loop for attaching a lanyard (such a shame there was not one included in the kit) and the rubber base means it stands up firmly without slipping or damaging the surface it comes into contact with.
On the rear is a leather panel which is in the same colour combo as the metal body and this has the “Argus Pro 2” stamped in.
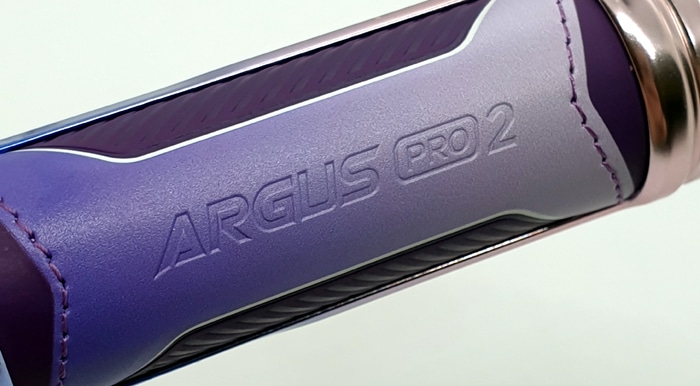
Surrounding the leather area are some embossed panels which help to add grip.
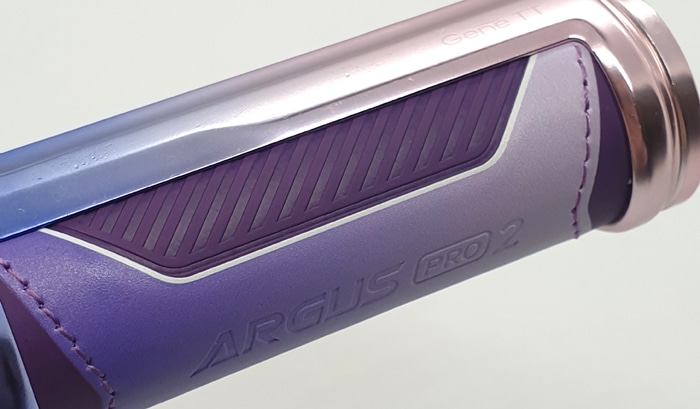
The finish and stitching of the panels is immaculate.
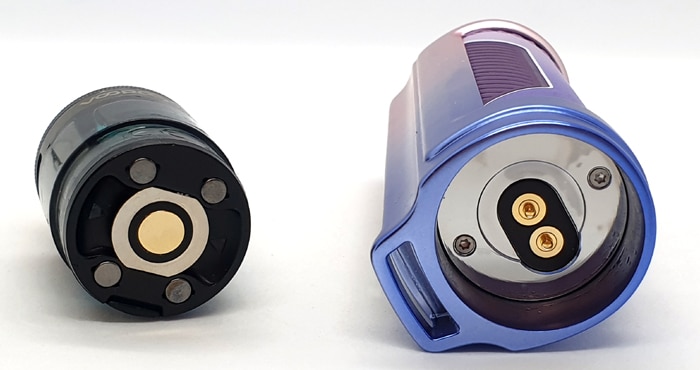
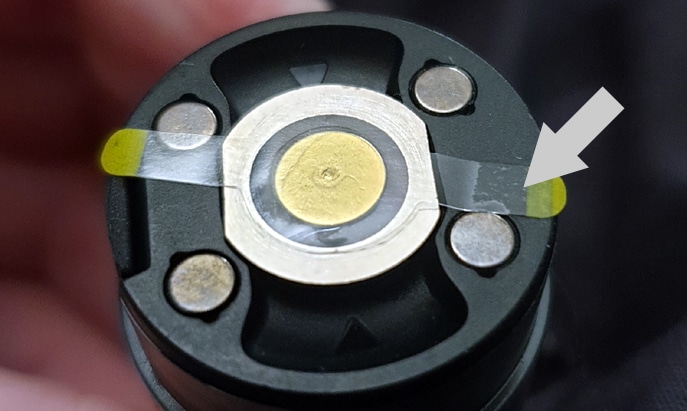
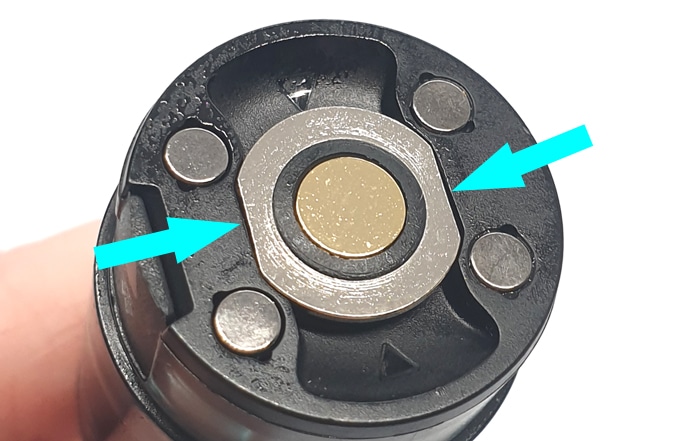
Looking in the pod compartment as this is mainly metal with 2 spring loaded contacts in the centre. Due to the layout of the pod base, this means you can put the pod in any way around and it will make contact. This is not suitable for use with tanks that have a 510 base. It is only designed for the PnP X pods.

On the opposite side to the leather is the control panel.
Control Panel
This panel features at the top the rectangle shaped fire button. This is roughly 13mm by 8mm in size with a slight indent in the centre to help located it with your thumb. It is nice and clicky and responsive.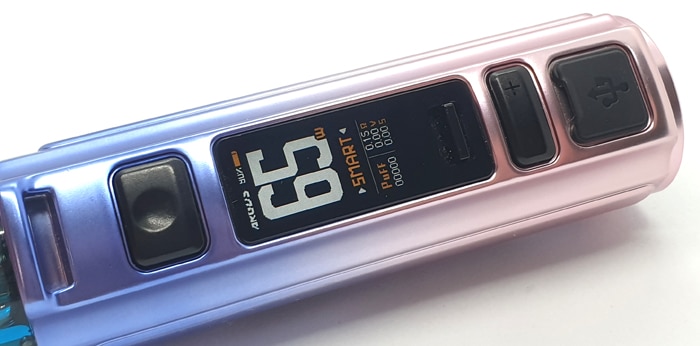
Below that is a Black plastic area which houses the beautiful colour display and the lock switch.
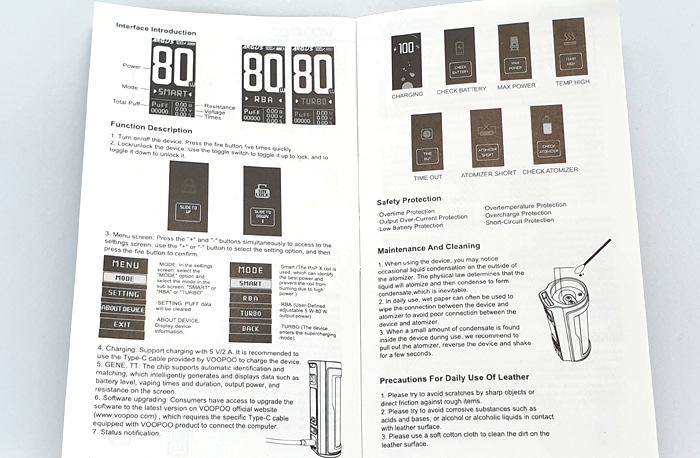
The screen is super clear, bright and the information is laid out well. The graphic below shows you what all the data displayed means…
To lock the device you slide the lock switch up and to unlock you slide it down. When locked none of the buttons will work – even the fire button.
Next you have the adjustment buttons – with the “-” on the left and the “+” on the right. These are very small but easy enough to use.
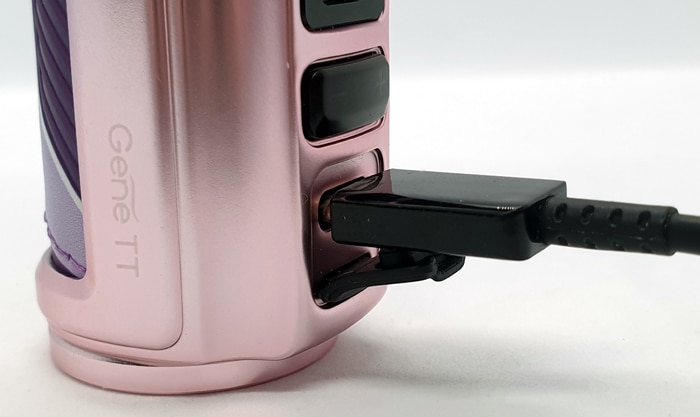
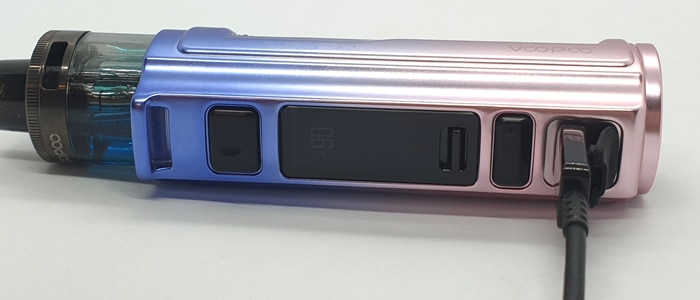
At the base is the USB port which has a dustproof cover that you prise open for charging.
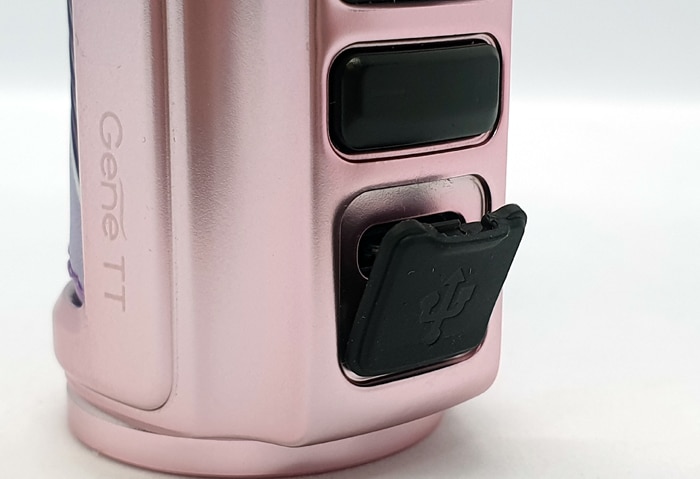
In real life though this does not open far and when a USB cable is connected it does press against it. In long term use this could damage the cable and / or USB port.
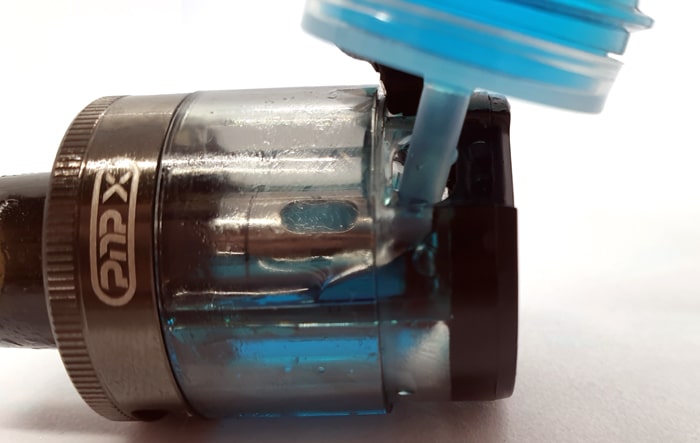
PnP X Pod Cartridge
The pod is a one piece construction and the only component that can be removed is the coil.

The coil is pulled out and pushed in easily for replacement, make sure to align the straight edges correctly when replacing.
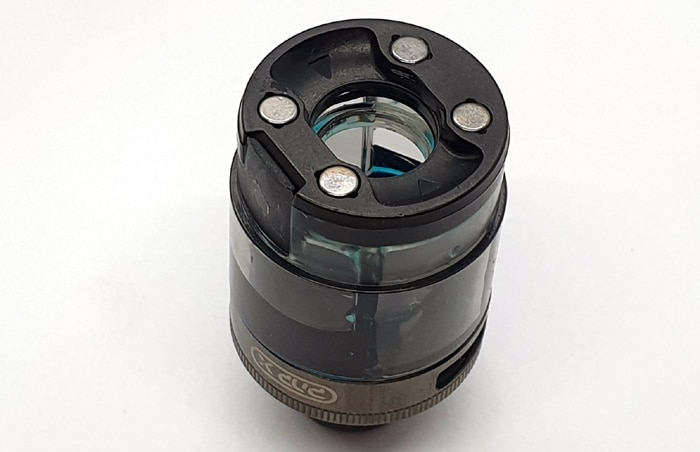
On the top of the pod is a plastic Black drip tip but this is not removable. It is however very comfortable to use. It is roughly the same size as a large bore 810 drip tip as this is the DTL pod. There is an MTL pod with a smaller removable mouthpiece available.
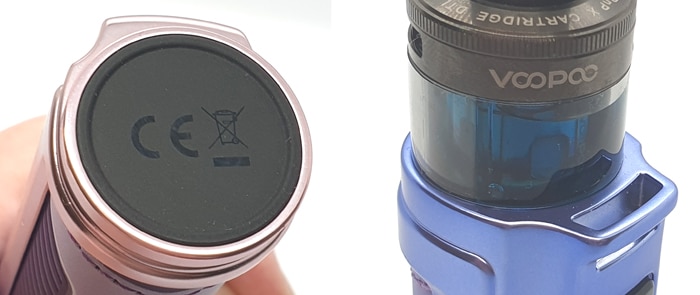
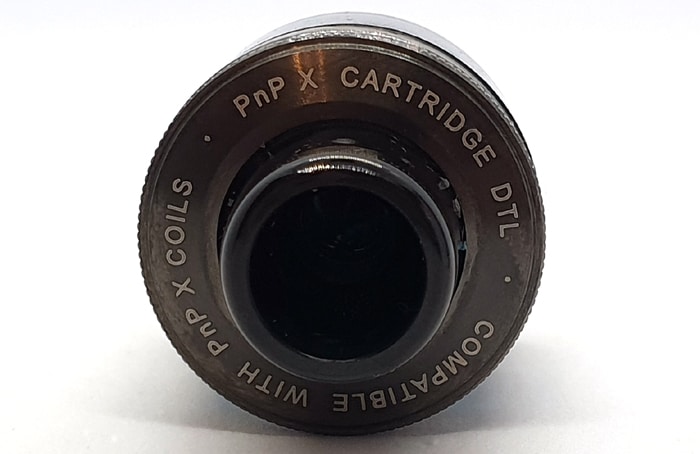
The pod top cap is in a Gunmetal colour on my kit and has the text “PnP X Cartridge DTL, Compatible with PnP X Coils” etched in.
You also rotate the top cap to adjust the incoming airflow. You do have to hold the glass section whilst rotating the top cap. As you rotate you will see the airflow inlet opening and closing.
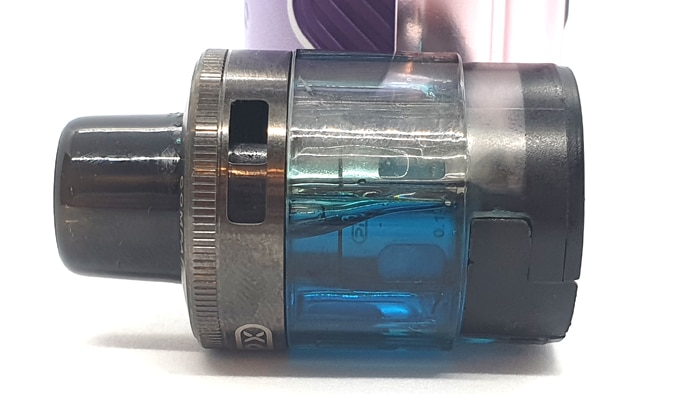
The side of the pod gives an excellent view of e-liquid level.
On the base of the pod are 4 magnets which keep the pod firmly attached to the metal in the pod compartment of the mod.
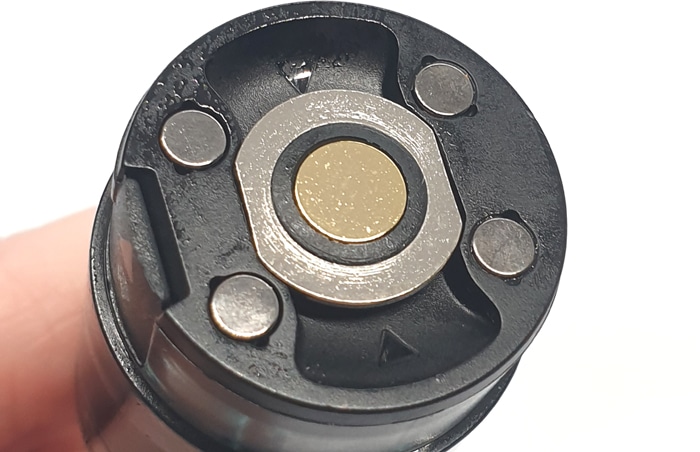
As the coil has a circular base the pod can be installed any way around in the mod.
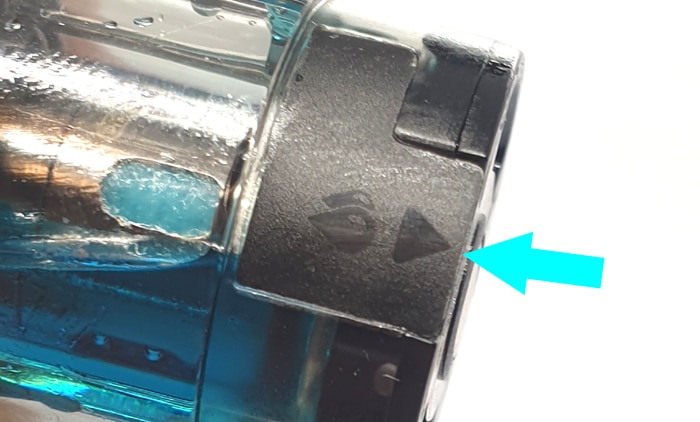
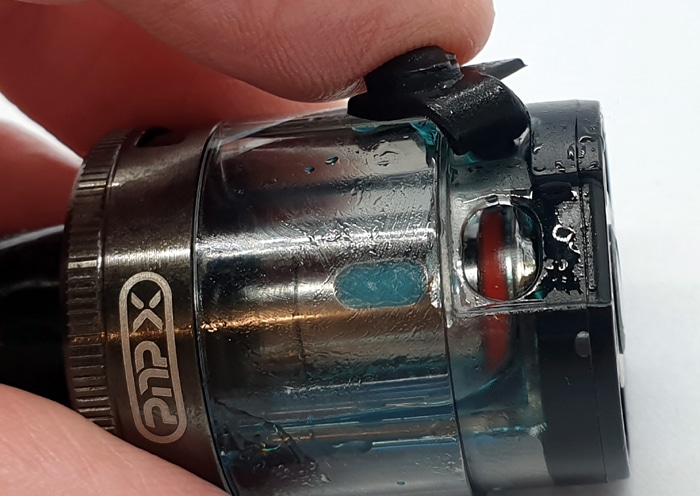
Access to the fill port is provided by a Silicone cover. Lift this up where the arrow shows. Sadly it doesn’t swing out of the way for easier access.
The fill port is around 7x4mm and I had no airlocks or issues using my big Gorilla e-liquid bottles.
Apart from a tiny amount of condensation (really minimal) this has been totally leak free.
Quick Start Guide
The 0.15ohm coil is already installed, you will need to remove the isolator sticker from the base of the pod.
Fill the pod, charge up the device and away you go!
Never fear I will guide you through everything in this section!
Basic Operation
- Power On/Off = Press the fire button 5 times quickly
- Vaping = Hold down the fire button to vape
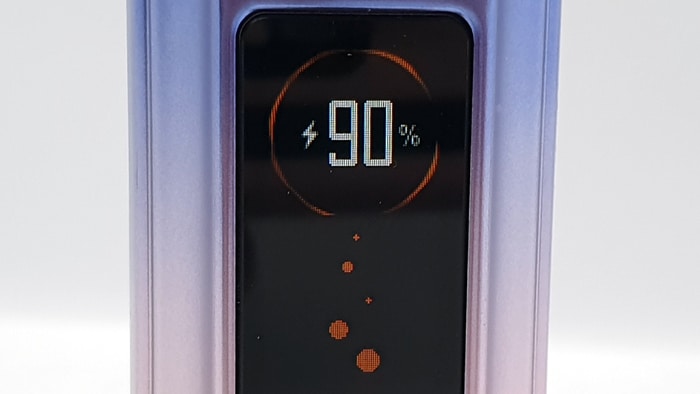
- Battery indicator = The screen will display the charge remaining
- Battery indicator when charging = The screen will display the charging progress. If the screen turns off just quickly press the fire button to check the status.

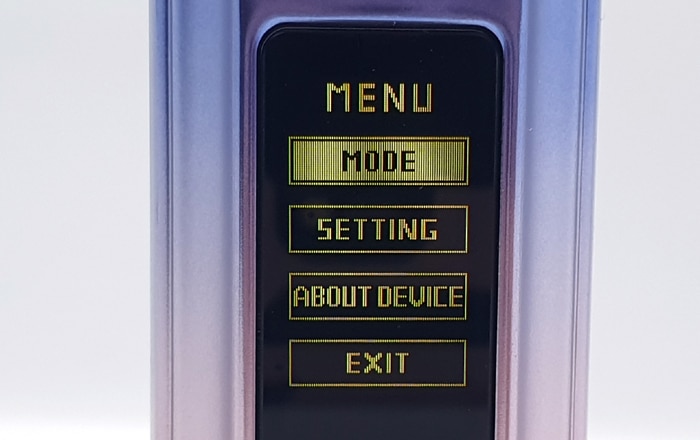
- Enter the menu = Press the “+” and “-” adjustment buttons at the same time to enter the menu screen. Scroll through the options using the adjustment buttons and enter the option by clicking the fire button.

- Select mode = Enter the menu and select “Mode”. Then scroll through Smart, RBA or Turbo mode and press fire when the desired mode is selected.

- Lock / Unlock fire button = Push the manual switch up to lock and down to unlock. The screen will display the Red padlock symbol when the device is locked.

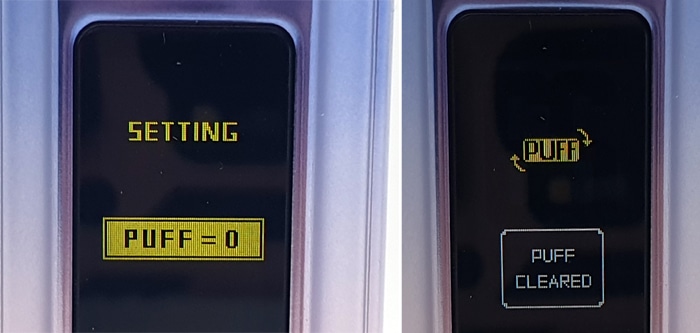
- Clear puff counter = Enter the menu and select “Setting”. It will ask if you want to clear puff count. Press the fire button to confirm.

- Exit menus = Just wait a few seconds and the device will return to the home screen.
- Adjust the output = Make sure the buttons are unlocked and use the adjustment buttons to increase or decrease the selected output.
- Adjust airflow = Hold the glass section of the pod and turn the top section. The airflow inlet will open and close up as you rotate.

Protections
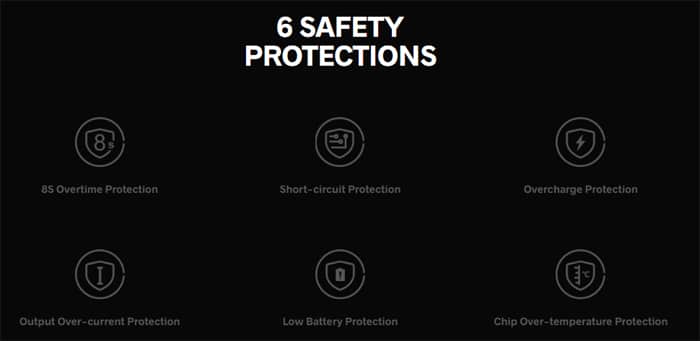
- Low battery – The device will display “Check Battery” and will stop working until charged.
- Short circuit – The device will display “Atomiser Short”. Check the connections on the pod and mod are clean and dry. Try a new coil. If this fails the device may be faulty.
- High temperature – The device will display “Temp High” and stop working until it has cooled down.
- Time Out – The device will display “Time Out” and stop firing if the fire button has been held down too long. The instructions do not specify the period of time before this alert is displayed. Anyway simply press the fire button again and continue vaping. In practice I found this time to be around 10 seconds of firing before it would cut out.
- No Pod – The device will display “Check Atomiser”. Make sure there is a pod and coil installed correctly. If the error persists clean all the pod and mod contacts. If it continues change the coil. The device may be faulty if this warning still displays after doing the above actions.
How To Charge The Battery
The charging rate is specified as 2A – which can be achieved using a compliant USB outlet or plug adapter.
- Using the included USB type C cable, connect the small end into the USB port on the mod.

- Connect the large end of the cable into a suitable USB outlet.
- The screen will display the charging progress and some pretty bubbly graphics. But the screen will turn off after a while. Just press the fire button briefly to wake the screen up to check the progress.
- When fully charged the screen will turn off, which is not much use as it switches off anyway during charging. So don’t assume it is charged just because the screen has turned off. Just press the fire button briefly to check the display says “100%” before you disconnect the charging cable.
I found charging took around 1 hour 44 mins each time. I am not 100% sure my 2A charging plug is working properly, so it may be that you get a faster charging time.
How To Fill The Pod
- Remove the pod from the mod.
- Turn the pod upside down and lift up the fill port cover.
- Add e-liquid to the fill port whilst watching the level through the side of the pod.

- If this is the first fill allow the pod to stand for 10-15 mins to allow the e-liquid to soak into the coil. This is called Priming and is a very important step. If not fully primed you could burn the coil out and your throat lining in the process!
How To Replace The Coil
Unusually I found that when the pod was tipped upside down and the coil removed none of the e-liquid leaked out! So it is a very clean coil change! I would suggest having a bit of tissue as the coil will be dripping e-liquid when removed.
- Remove the pod from the mod.
- Tip the pod upside and pull out the existing coil. If hard to remove you may need a fingernail or similar to prise it out. The sealing O-rings on the coil do a good job, so they can provide resistance when removing the coil.

- Insert a new coil making sure the straight edges on the coil base align with the straight edges on the pod base.

- Fill the pod as described above and leave to stand for 5-10 minutes.
How Does The Voopoo Argus Pro 2 Perform?
As this is a higher power device I used it with the Choppa Vapes Choppa Collection Blue Slush e-liquid.
This has a mix ratio of 64%VG / 36%PG. Voopoo recommend ratios of between 50 and 70% VG for this kit. I do feel 50% VG will be a bit too thin and could be harsh when vaping at higher power. If you prefer this e-liquid you could perhaps look into purchasing the 0.6ohm PnP X coil or even the PnP X MTL pod.
I have not added any nicotine as I like the full flavour and being a mainly low power MTL vaper I need no added excuses for a bit of a cough!
If any of these terms are over your head – have a read of our handy guides below!
- MTL V DTL – A Guide To Vape Styles
- VG and PG in E-liquid – all you need to know
- Beginners guide to E-liquid
- Nic Salt E-liquid
PnP X 0.15ohm Coil
The recommended power limits for this coil are 60-80W.
Sadly for the first 2ml of e-liquid the horrible plasticky chemical smell from the packaging seemed to be present. This thankfully did wear off to give an amazing flavour.
The device in Smart mode suggested 65W and I did not stray from that. It was perfect.
The amount of vapour is epic and the flavour was just so clear and pure (once the chemical packaging aroma had worn off).
Surprisingly I also found this to be quite efficient on e-liquid. Requiring only around 7ml for one full battery charge (181 puffs). I do have the 5ml pod though, so it might feel like you are filling more with the 2ml version.
All was going well for around 3 refills (15ml) / 356 puffs. Until the dreaded dry hits started to creep in. It was not a full on throat explosion dry hit, but was enough to make each vape unpleasant and make my throat and chest hurt.
So the coil life was pretty poor.
PnP X 0.3ohm Coil
The recommended power limits for this coil are 32-40W.
The mod decided that 35W was the ideal output and I totally agreed!
This coil made my e-liquid really shine! It was better than I have ever tasted it! Not to mention way more vapour than I was expecting at such a low output!
With the 0.3ohm coil the mod really shines. The battery charge life has been excellent – 307 puffs to one charge (3 refills at 5ml).
I would prefer that Voopoo supplied 2 of the 0.3ohm coils instead of one of the 0.15ohm. The 0.3ohm just really suits the mod and shows it in its best light.
Turbo Mode
I do like the sound of this – anything “Turbo” always catches my eye!
Sadly due to the premature death of the 0.15ohm coil I could only test this using the 0.3ohm – which is probably not in the “turbo” department!
In this setting the screen theme is Red but the same power level was selected – 35W.
Switching between Smart and Turbo modes I honestly could not tell the difference I am afraid. But it may be that you need the lower resistance coil and higher output before the “Turbo” kicks in!
Airflow
To rate how restricted the airflow is, I use a scale – where 0 = fully closed, no airflow – up to 10 = breathing fresh air.
For the 0.15ohm coil fully closed is around 4 and fully open is 9.5. Fully open there is barely any restriction at all. So should suit RDL and DTL vapers!
With the 0.3ohm coil I would rate fully closed around 3.5 and fully open is around 8.5. So again plenty of adjustment – but this really shines as an RDL coil and I used it with around 1/3 of the airflow open.
Mod Performance
There have been a few niggles in this department.
Firstly at 65W with the 0.15ohm coil – when the battery charge was down to 20% the output dropped significantly – it was registering around 2.1V. Then at 14% it was pretty much un-vapeable – the voltage dropped to 1.7V and the vape was spitting as the e-liquid was not heated sufficiently to vaporise. Usually vapes will cut out before this point as the chip will know it cannot output to the specified power. When fully charged, the 0.15ohm coil is getting around 3.1V so it is a significant drop.
The specifications state this will output 3.2 to 4.2V – but it is way below this as the battery charge drops. It should be regulated to cut out below this. Why is the chip not cutting the power before this point?
But I must say none of this was a problem with the 0.3ohm coil. At 35W when fully charged the device was outputting 3.29V. This was consistent until around 5% charge where it dropped to 2.9V. Then at 4% the battery low warning was displayed on the screen. So the regulation was spot on here.
I just believe that this device is not suitable for the 0.15ohm coil and the power it requires, it copes perfectly with the 0.3ohm coil which seems to be the perfect fit.
Also the lock switch has an accompanying graphic. When you slide it up – the graphic tells you to “Slide Up To Lock”. Which is odd as you have already performed the action it is telling you to do? When you slide the switch down it says “Slide Down To Unlock” – after you have already done it? Surely this should be the opposite way around telling you how to unlock it / lock it?
You cannot change the screen theme colour, it does change depending on mode. I used this mainly in Smart Mode and the horrible Orangey graphics were a bit annoying. Obviously this is just my opinion – it is not a deal breaker.
The USB port cover only flips open slightly. Therefore it does put pressure on the charging cable. This could result in wear to the charging port and cable.
When charging the screen stays on for a while, but then goes blank. You might wrongly think this means it has fully charged – but it hasn’t. Press the fire button to wake the screen up to see the progress.
Leaks
Nope not a dribble from either coil!
Battery Life
This will vary according to the coil, power setting and your own vaping habits. But as a guide…
With the 0.15ohm coil I got 181 puffs and around 4 hours. This was the only timing I could do as on the second run the coil burnt out!
With the 0.3ohm coil I got 301 puffs and a whopping 8.5 hours of vaping! Perfect!
Pros
- Absolutely stunning looking kit
- No leaks at all
- Excellent flavour and vapour from the 0.15ohm coil
- Great airflow adjustment for RDL and DTL vapers
- Really shines as a RDL device with the 0.3ohm coil – Voopoo should ditch the 0.15ohm and just have 2 of the 0.3ohm!
- Excellent battery life with the 0.3ohm coil of 8.5 hours!
Cons
- The output drops significantly when 20% battery remaining, at 14% it is barely firing (at 65W with 0.15ohm coil)
- Lock display prompt is the wrong way around
- Charging port cover is awkward
- Not compatible with standard PnP coils – only use the PnP X
- Bad chemically plastic smell from the packaging does impact the flavour for the first 2ml of e-liquid using the 0.15ohm coil
- Only 356 puffs from 0.15ohm coil before it started tasting burnt
- Device is quite noisy – even using the 0.3ohm coil at 35W
Voopoo Argus Pro 2 Final Review Verdict
So for me the Voopoo Argus Pro 2 kit was a tale of 2 halves.
The good bits include the stunning appearance, ease of use and flavour.
I would suggest that Voopoo ditch the 0.15ohm coil from this kit. The device is not able to deliver a constant output for this coil – as you will see below. However with the 0.3ohm it really shines, a perfect harmony of mod and coil. In this set up it all makes sense.
Unfortunately the list of bad things is quite big…
One big issue for me was how much the output dropped using the 0.15ohm coil at 65W when the battery charge was down to 20%. I am used to devices dropping power slightly when the battery charge is low. But regulated devices usually cut out before this point or they drop the output to what the battery can provide.
So I am a bit puzzled why this is happening? My kit does have “Sample” printed on the box so it may be an early model, plus there may be firmware updates on the way to fix this.
I have tried to install the Voopoo configuration tool on my PC but there are no updates available.
Sadly the coil life for the 0.15ohm PnP X coil was pretty rubbish too. 356 puffs or approximately 15ml use before it started tasting burnt.
Considering one of the big marketing boasts was that the new PnP X coils were able to last for around 100ml of e-liquid – this does not look good Voopoo.

I did not exceed the output provided automatically by the Smart mode and I did not let the pod run dry. Perhaps using a sweeter e-liquid might have impacted the coil life slightly – but even so I have had other sub ohm coils last over a week with this e-liquid.
So in conclusion, use the 0.3ohm coil for an excellent RDL performance. The 0.15ohm coil performs well for a short while, after which the battery cannot support the output or the coil burns out!
Have you tried the Voopoo Argus Pro 2? Let us know your thoughts in the comments below!


Hi, thank you Michelle for your review and answer to my previous reply. I bought the Argus Pro 2 and it’s the greatest vape i’ve ever had. You are right about poor life of 0,15ohm coil. Mine started tasting burned after 475 puffs / 10ml on 65W (Smart decided it is the best watt). Im now trying 0,30ohm coil with 3mg 60/40 Aloe Grape Premix, let’s hope it will work. And about charging, my Argus took over four hours to get from 20% to 100%, is it normal? I plugged it via PC and used USB cable provided by producer. TYSM
Hi there, thank you!
Yes sadly USB ports on PCs and some older laptops only output 0.5A so they are very slow charging – the Argus Pro 2 will accept up to 2A charge rate (the higher the A (amp) the quicker the charge).
If you want to take advantage of the 2A fast charge rate you will need to use a 2A outlet or a simple mains plug adaptor with a 2A output. Make sure to purchase a good quality one from a reputable store. You will find this will speed the charging up a lot! I got it to around 1 hour 45 minutes using a 2A outlet. Some extension plug units have a 2A USB too.
What will happen if i’ll use 50/50 Nic Salts E-Juice for PnP X 0,15ohm coil installed in device? I don’t really like nics or 0 nics e-juices.
To use that ratio e-liquid you would need a different coil – there is a 0.6ohm which should be suitable.
The issue is that this is a high power kit when used with the 0.15ohm coil, so higher PG in the e-liquid will be mega harsh on your throat – especially with nicotine in, plus the low resistance coils are designed for thicker e-liquid and the heat will make the e-liquid spit and burn and risk damaging your coil.
For the 0.15ohm coil I recommend at least 60% VG e-liquid really.
Some people use 50/50 and just turn the power down – it is recommended at 60-80W for the 0.15ohm coil so a lot of people will run it lower than that. The problem is that the e-liquid will not get properly vaporised at lower outputs causing spitting, flooding and a poor vape experience.
Just grab a pack of the 0.6ohm PnP X coils and you will be fine!
Hello, im thinking about buying Argus Pro 2 but im worried about refilling. I was using Sonder Q most of the time and it had rubber opening under mouthpiece that allowed filling e-juice. In Argus Pro 2 the process seem to be more advanced, because in order to fill the juice i would need to lift up the cartridge and then fill it when the cartridge is laying on the side. Should i really be scared of overfilling it, or filling the cart completely wrong? Cheers mate
Hi there, do not worry the worst that will happen is some spillage, so for the first few times make sure to have some tissue to hand.
Will you be changing your e-liquid for the Argus Pro 2 as it is designed for different e-liquid to what you would be used to in your Sonder Q.
The Sonder Q is a MTL device designed for around 50/50 VG/PG e-liquids with higher nicotine. Whereas the Argus Pro 2 is designed for thicker e-liquids (70/80% VG) and low nicotine strengths as it is a higher power device.
These guides might help…
MTL, RDL and DTL vaping styles.
VG and PG in e-liquid.
nice review Michelle, informative. I purchased this couple days ago, can’t wait.
I usually RDL so your review was inspiring. I wonder how the .02 coil will fair, I usually use .02 – .03 coils in my other pods. Thanks.
Sadly I didn’t have any of the other coils to try in it.
If you love RDL the 0.3ohm is perfect and suits the mod!
Thank you for your kind words too – I hope you enjoy your kit!