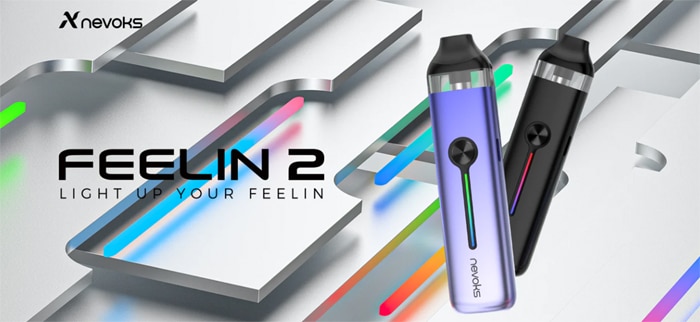
In for review is the Nevoks Feelin 2 pod kit!
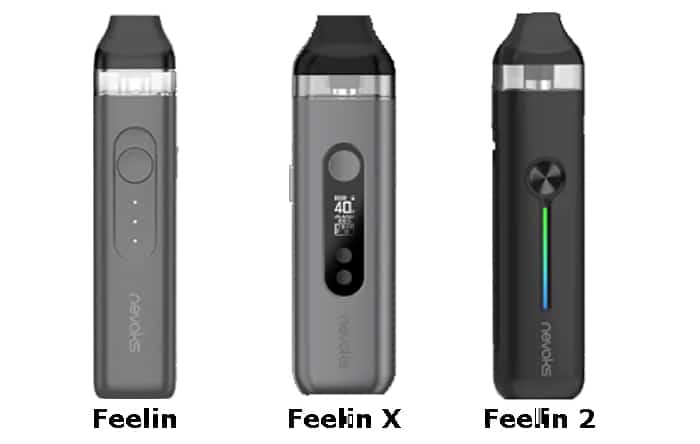
I recently reviewed the Nevoks Feelin A1 kit and we have previously reviewed the Nevoks Feelin X pod kit.
Created in 2019 in Shenzhen China, Nevoks made it their mission to…
“build a non-tobacco and healthy world. To achieve this, we offer innovative stylish products, exceptional user experience, and reliable pre-sales and after-sales service.”
![]()
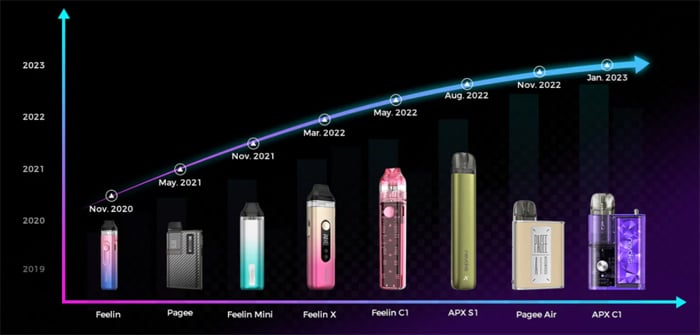
The Feelin range began in 2020 with the original Feelin Pod Kit, then the Feelin Mini in 2021 and the Feelin X and Feelin C1 were the next in the series. The Feelin A1 was released in 2023. They also created the Pagee and APX ranges.
Thank you to Nevoks for sending the Feelin 2 plus the full coil range over for review! I will report back honestly on the devices in my possession.
What To Expect From The Nevoks Feelin 2 Pod Kit…
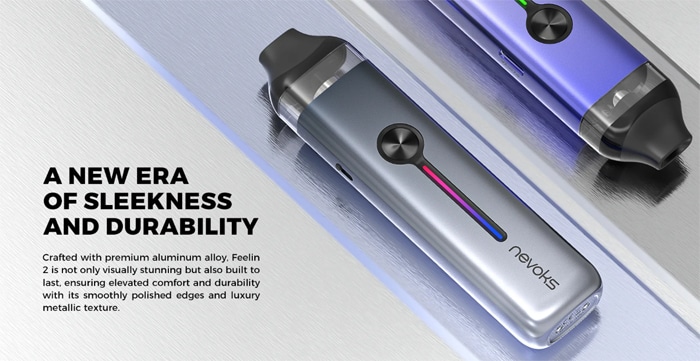
As the name suggests this is an update to the original Feelin kit.
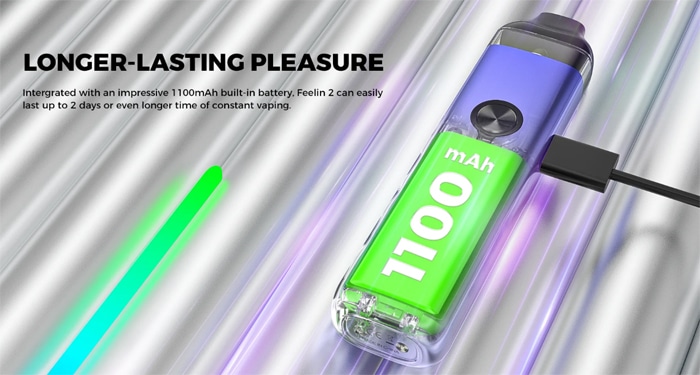
The first update is to the battery capacity, it is now 1100mAh compared to the original which only had 1000mAh. When it comes to charging it is now 2A compared to the slightly slower 1.5A of the first version. Both are USB Type C though!
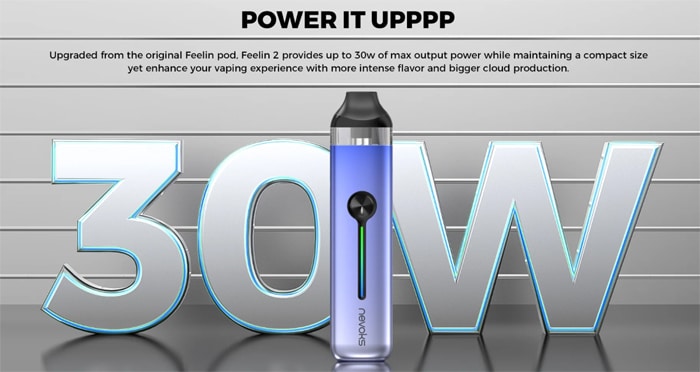
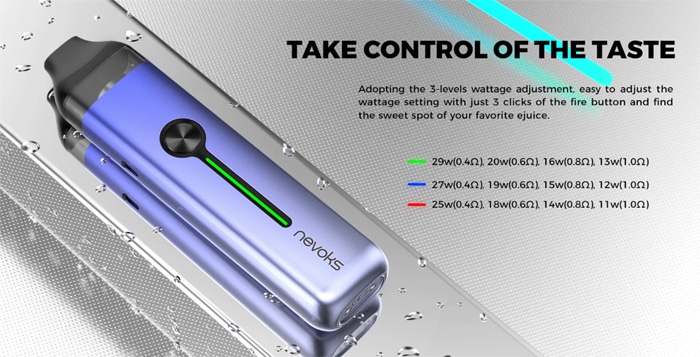
The output has been increased from 22W (max) to 30W (max) for the V2. You have 3 power levels to choose from and the actual output for each level will depend on the coil installed.
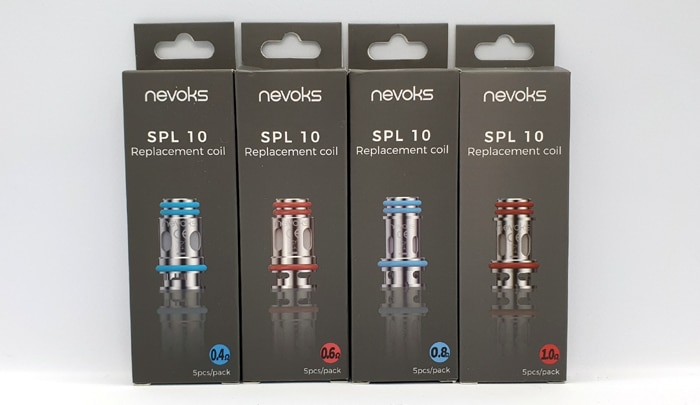
Talking of coils, this uses the same coils as the original – the SP10 mesh coils. They are also compatible with the Feelin X, Pagee, Feelin C1 and the Feelin Mini.
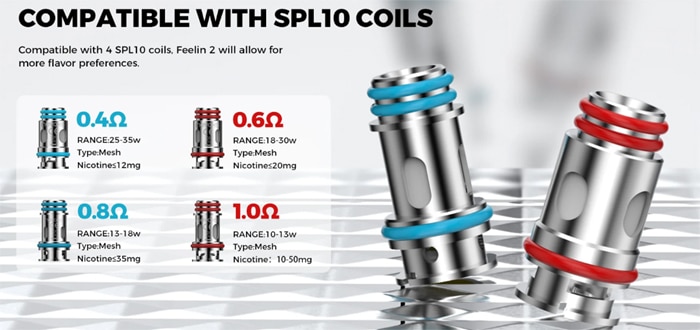
You get the 0.8ohm and 0.6ohm coils included in the kit, but you can also purchase the 0.4ohm or 1ohm coils separately.
Featuring a side fill port the pod will hold up to 3ml of your own e-liquid. There is a 2ml version mentioned for TPD regulated areas too.
You also get an airflow adjustment slider plus this will operate as a button fire (manual) or auto draw firing device.

To view your power levels, charge status and any fault conditions a multi-colour RGB LED is provided.
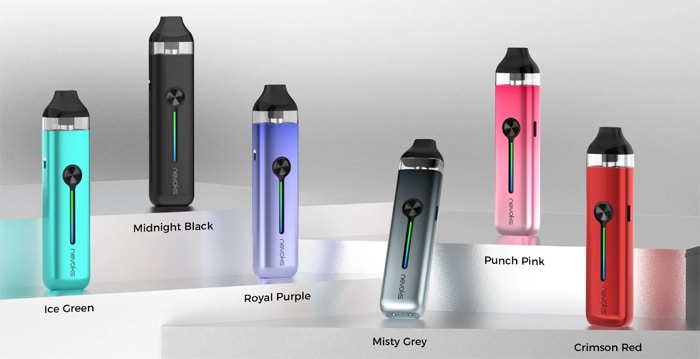
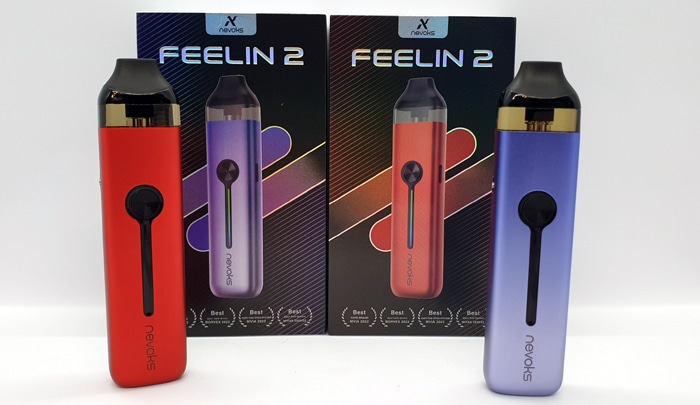
There are 6 colour options to choose from: Ice Green, Midnight Black, Royal Purple, Misty Grey, Punch Pink and Crimson Red.
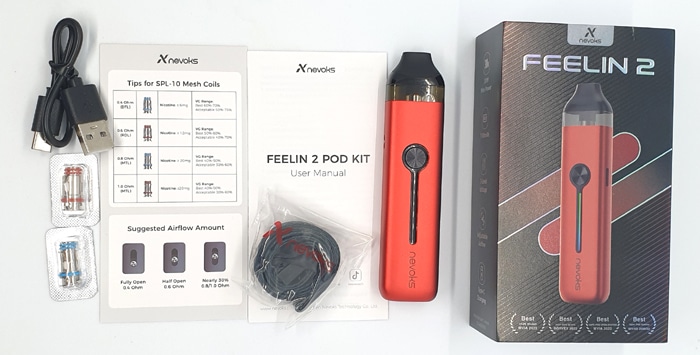
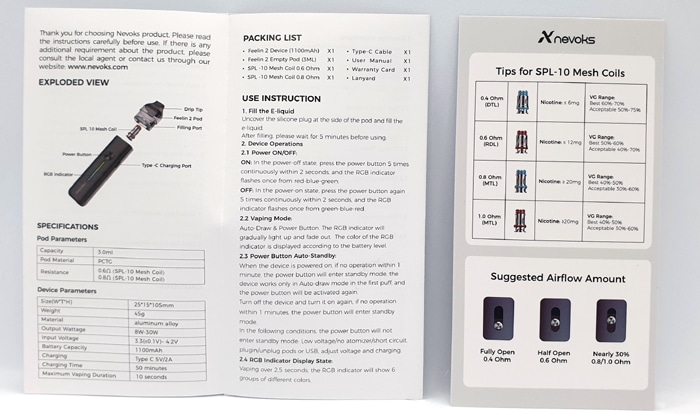
Kit Includes
- Nevoks Feelin 2 device
- Feelin 2 empty pod
- 0.6ohm SP-10 mesh coil
- 0.8ohm SP-10 mesh coil
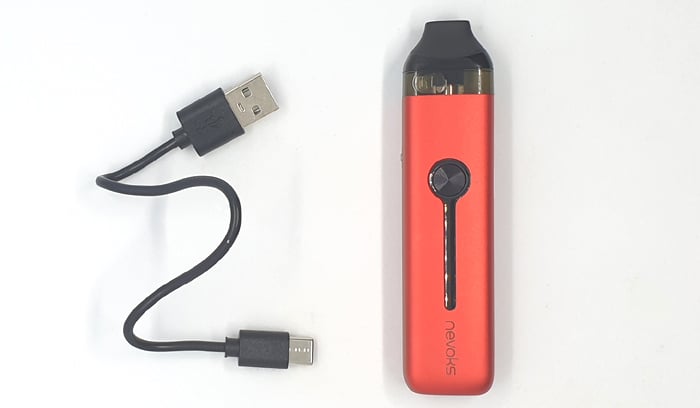
- USB Type C cable
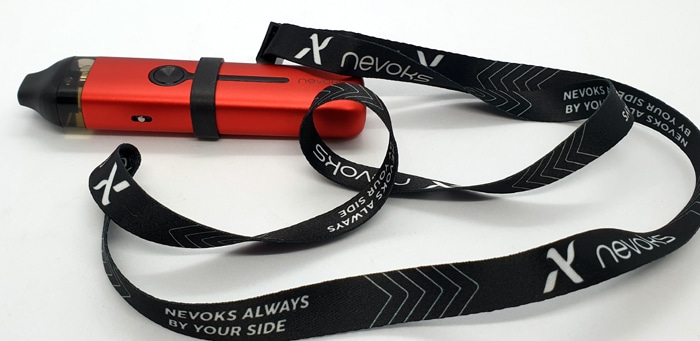
- Lanyard
- User manual
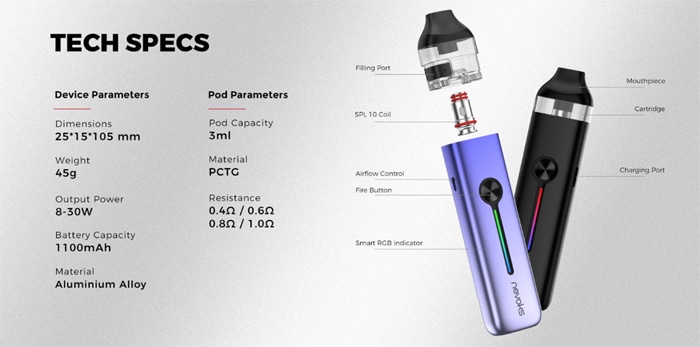
Nevoks Feelin 2 Specs
- Size: 25x15x105mm
- Output: 8-30W – 3 power levels
- Battery: 1100mAh (internal)
- Display: Smart RGB LED Indicator
- Resistance range: 0.25-3.5ohm
- Material: Aluminium Alloy
- E-liquid capacity: 3ml (standard) / 2ml (TPD / CRC)
- USB Type C port – 2A charge rate – 50 minute charge time
- Coil: SP10 Mesh coil compatible
- Side fill port
- Adjustable airflow
- Draw and button activation
Nevoks Feelin 2 Design and Build Quality
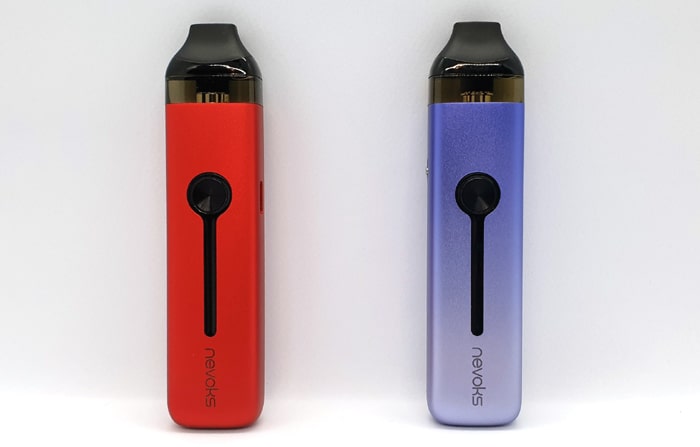
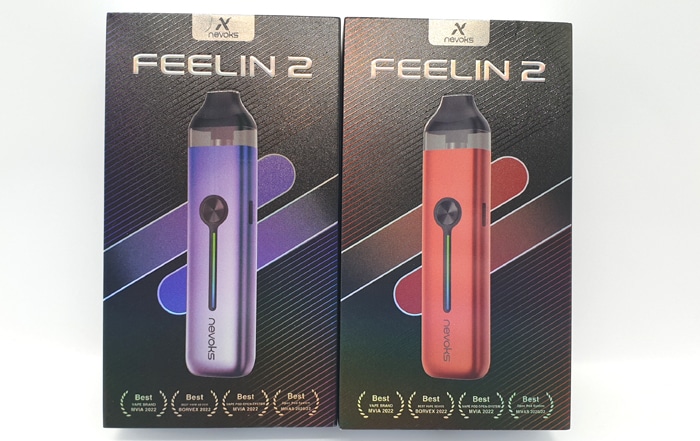
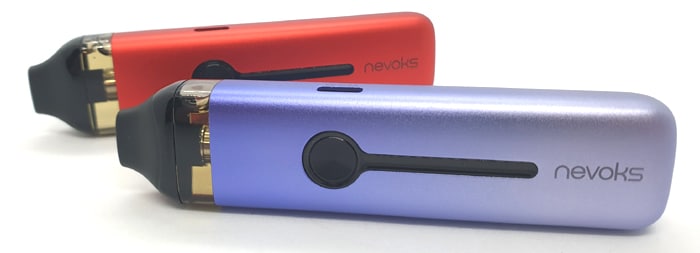
I received the Crimson Red and Royal Purple kits in the 3ml versions.
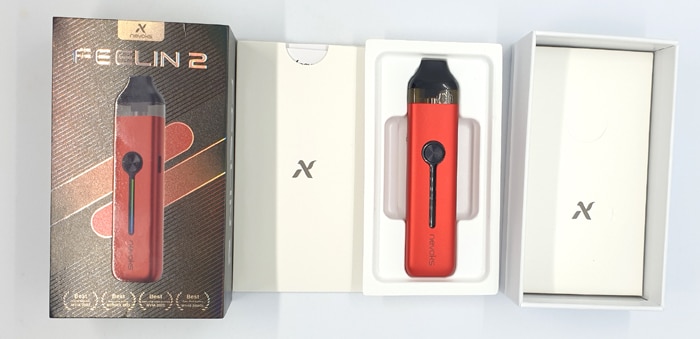
To unbox you will need something to cut the shrink wrap plastic, there is no pull tab to open it. The outer box sleeve is a lovely design with a textured holographic stripey finish.
Then you slide the inner box from the outer sleeve. On the top you get a small envelope which holds the great instructions and a really handy card which guides you on coil types and airflow settings.
The device sits in a plastic tray which you lift up to reveal another box.
Inside this box you will find both coils, the Lanyard and a USB cable which really isn’t long enough to be of much use.
On the box there is a scratch off verification panel. You input the code that is revealed into the box on the bottom of the page on the Nevoks website here. This will tell you if you have an authentic version of the kit.
The Lanyard is great, but it is a bit of a puzzle as to where to position the band on the mod. Wherever you position it, it is covering something! Obviously you want to avoid the fire button and airflow inlet!
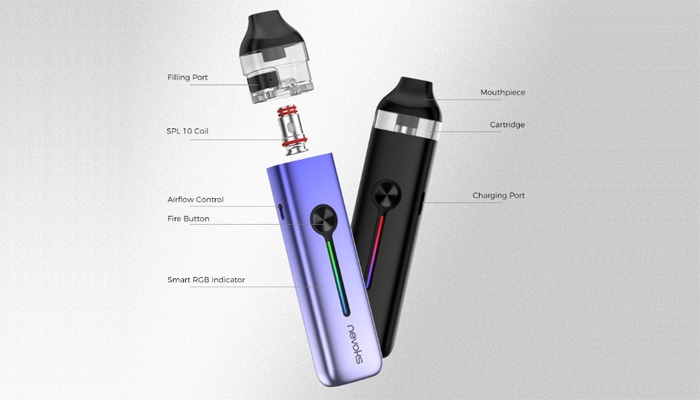
Nevoks Feelin 2 Mod
The device design is a kind of hybrid between the original Feelin and the Feelin X.
This is a bar shaped mod with a beautiful matte metallic spray finish which catches the light in a very pretty way.
The Royal Purple kit has a lovely fading paint effect, starting with a light Lilac colour at the base and increasing in intensity to a darker Purple at the top of the mod.
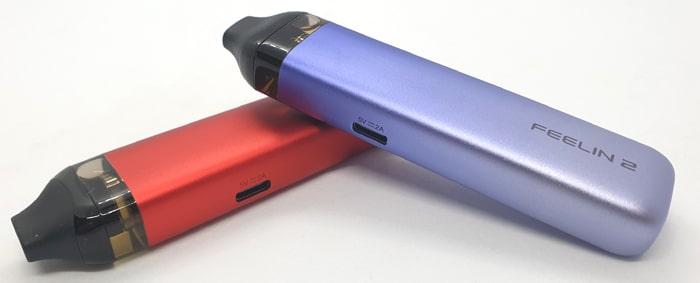
The Crimson Red version is just one solid colour but still has the lovely metallic spray effect.
On the front of the mod you will find the fire button which is slightly concave and has a “Record Groove” style texture. It is nice and clicky and because it does not protrude from the body of the device it should be difficult to accidentally activate in a bag or pocket etc.
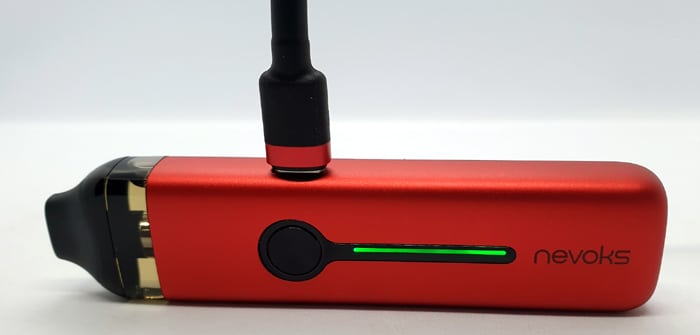
Below that is a vertical strip RGB LED indicator. This is split in half – although you won’t see this until it lights up.
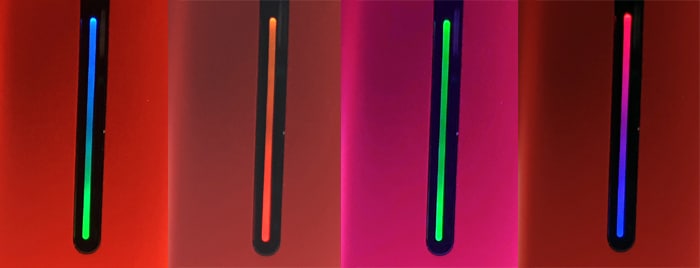
The top half displays the charge status and the bottom half displays the power level selected. I really like this! It is not immediately obvious for instance when you have a full battery and the high power level selected as both halves are Green. But if you change the power level or the charge drops you will see both colours blend into each other which is a lovely effect.
Below the indicator the Nevoks text is printed in a dark Grey colour.
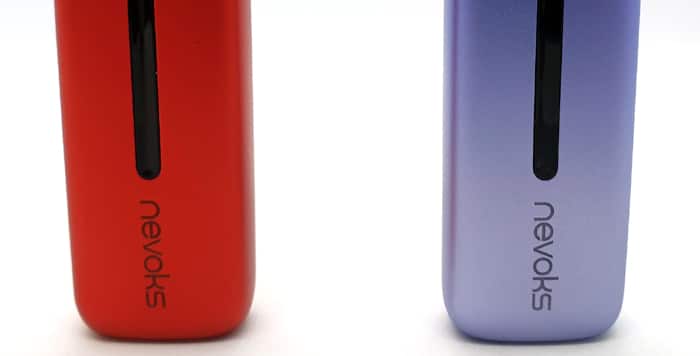
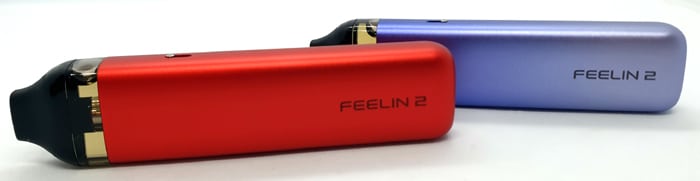
The rear is completely plain apart from the “Feelin 2” text printed in the same colour as the Nevoks logo on the front.
On the base are 2 screw heads, “Made in China” and the required legal logos. All the printing is crisp and clear.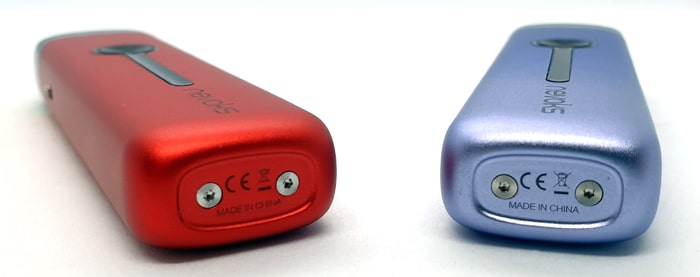
Looking at the left side of the device you will find the airflow adjustment slider. This only protrudes around 1mm from the device body so should not catch on bags or pockets.
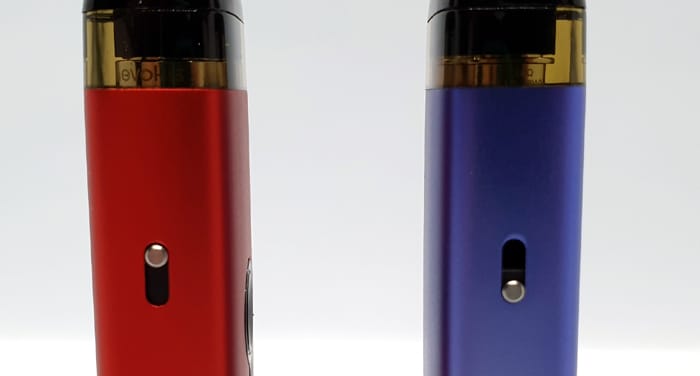
The first slide of this is very stiff, but after that it moves smoothly but there is quite a bit of restriction, which should prevent accidental adjustment.
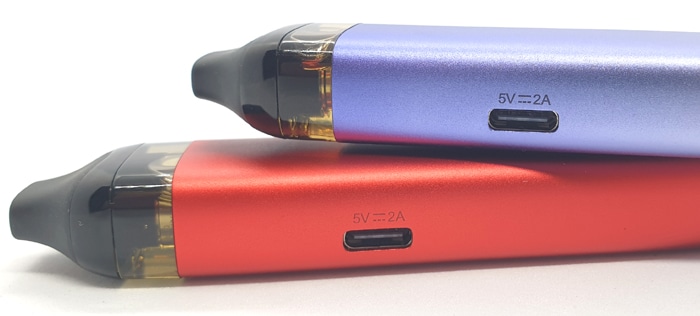
On the opposite side is the USB Type C port, above this is the text “5V 2A” to let you know the charging specifications. The port is nicely recessed which should help prevent it getting damaged.
It will stand up vertically easily, but you may find it is wobbly when charging as the USB port is quite high up.
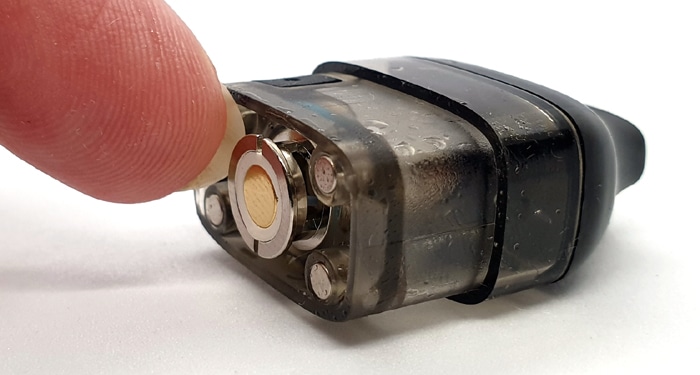
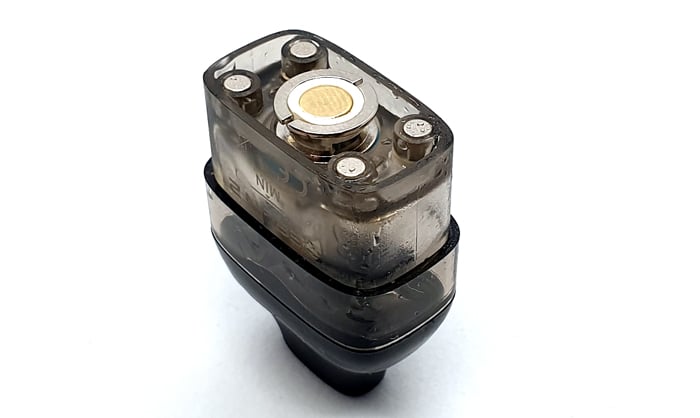
Inside the pod compartment you will find 4 – yes 4 – magnets, this ensures the pod stays connected firmly and you only need to insert it around half of the way into the mod before the magnets snap it into position. Even with 4 magnets it is still easy to pull out.
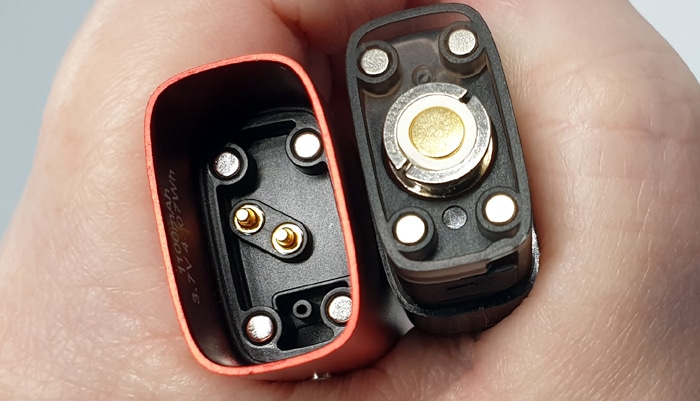
You will also see 2 spring loaded Gold coloured electrical connectors and the airflow sensor tube.
It is an excellent design and I think the two tone paintwork version looks really amazing.
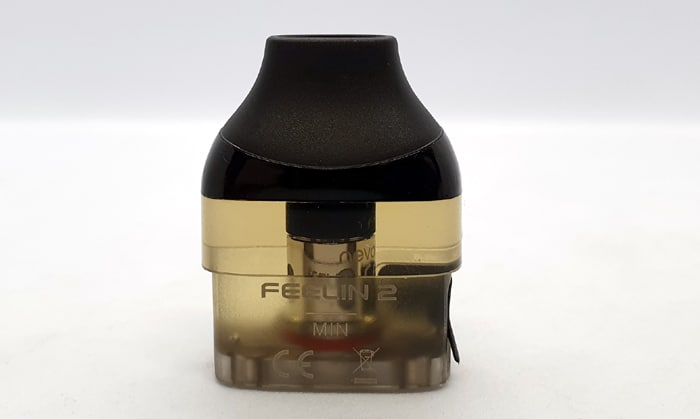
Nevoks Feelin 2 Pod
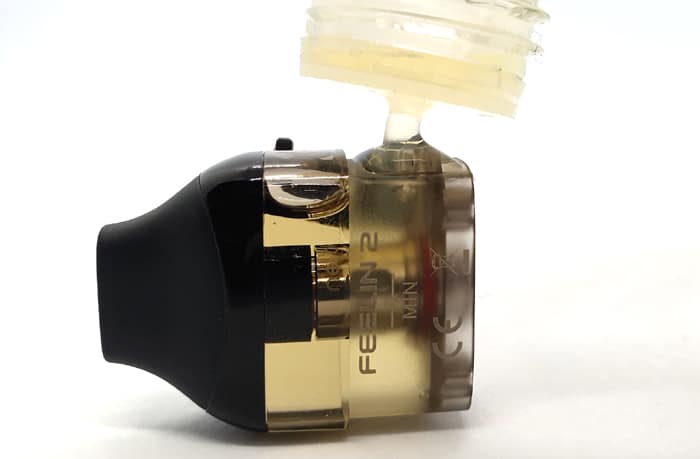
The most noticeable thing about this pod is the mouthpiece, it is actually made from a Rubber like material, which does feel strange. But because this material is wrapped around a hard plastic it does not collapse or squash.
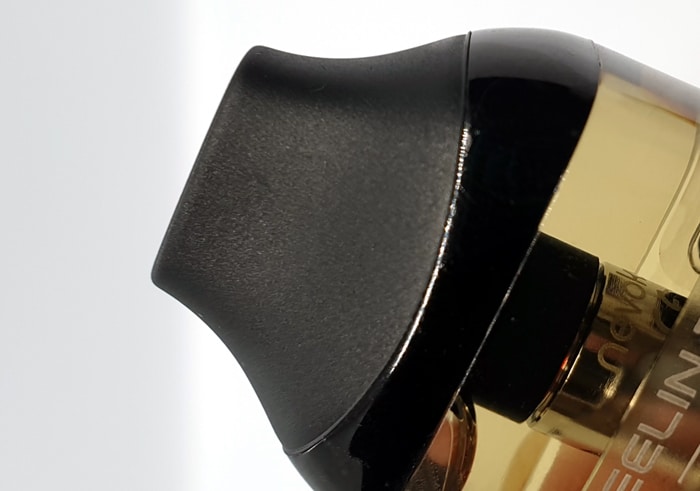
It does feel strange on the lips at first but is still miles better than a metal mouthpiece (one of my pet hates)! You get used to it quickly and I sometimes wonder if all pods should have this feature!
The mouthpiece covers around a third of the pod, with the top section in Rubbery stuff and the lower part just plain gloss Black plastic. This does mean you cannot see the e-liquid level in the mouthpiece area.
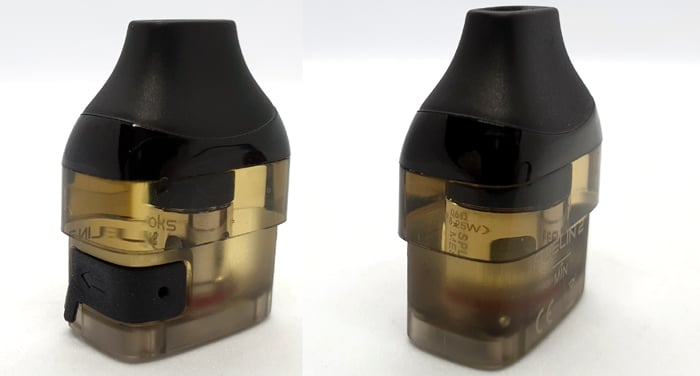
The other 2/3rds of the pod are clear, but the bottom third is a frosted finish.
A small portion of the clear section of the pod is visible when it is in the mod which works OK, but at lower e-liquid levels you might need to move or tip the device to see the level.
On the one side of the frosted area the pod details are printed on in a kind of Beige text. It has the “Feelin 2” logo, minimum e-liquid level marking and the required legal logos.
Inside the base of the pod is where the coil lives. It is a push in and pull out coil design and the coil seals well. There is a bit of resistance to pulling the coil out due to the O-ring, but this shows the O-ring is doing its job.
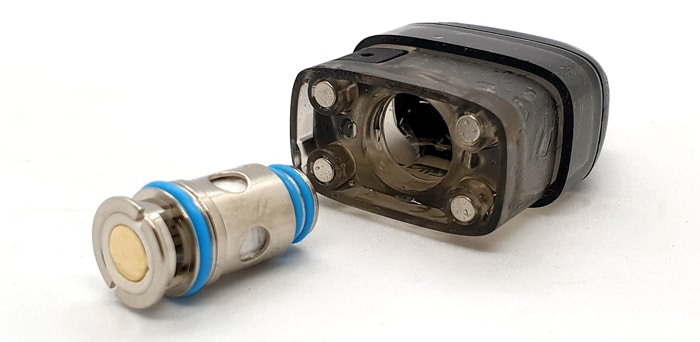
Also on the base are 4 magnets which mate with the ones in the mod.
A side fill port is provided and you get a chunky fill port cover. There is a slight cut out to help you wedge a nail under the edge with the arrow and small tab to open it.
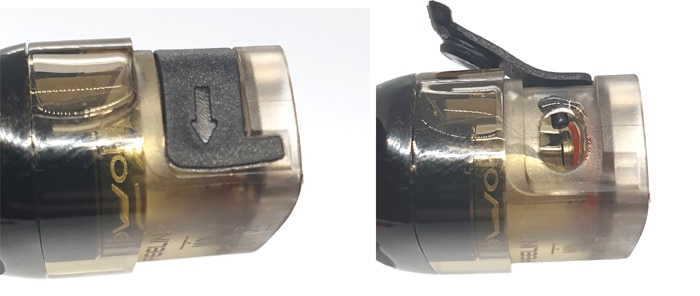
Once open you will see the 5×3.5mm oval fill port. This works well – there is plenty of space around the e-liquid bottle nozzle to allow air to escape.
Unfortunately it is so difficult to identify the coils. The writing on the tiny coils is so small you can hardly see it. Yes there is a colour coding to the O-rings (Red = 0.6ohm or 1ohm and Blue = 0.4ohm or 0.8ohm). This is not too much of an issue if you only have the included kit coils as there is one of each colour. But if you purchase any of the other coil options you could end up confused. It would be good if Nevoks could print or etch the resistance on to the coil base?
Quick Start Guide
The device arrives with no coil installed. So you can choose your coil, fill with e-liquid and get vaping! Never fear I will guide you through the process below!
Basic Operation
The LED is split in half – the top section shows the battery charge remaining and the bottom half displays the power level selected.

- Power On/Off = Press the fire button 5 times to turn on and off.
- Vaping = Hold down the fire button to vape or simply inhale on the mouthpiece to trigger the auto draw activation.
- Battery indicator (top half of LED) = The LED will show Green for 60-100% charge remaining, Blue for 30-60% and Red for 0-30%. If you vape for longer than 2.5 seconds the LED will enter the multi-colour display sequence.
- Battery indicator when charging = The LED will cycle through the above colours and turn off when fully charged.
- Airflow = Slide the airflow slider up and down.
- Adjust output = Press the fire button 3 times. Every time you press the fire button 3 times the bottom half of the LED will change colour to indicate the mode selected – Green (high – 3.5-3.6V), Blue (medium 3.4V) and Red (low 3.2V). When you are satisfied with the level displayed leave the device and it will go back into standby mode. The video below shows me adjusting the output.
- Auto Button lock = if the device is not used for 1 minute the button lock will automatically kick in. To continue vaping simply inhale on the mouthpiece. This will unlock the fire button. When the lock is on you can still use the auto-draw inhale.
Protections
- No Atomiser / Resistance too high: If the resistance is over 3.5ohm or there is an open circuit the LED will flash White for 15 seconds. Check the pod is installed correctly, clean contacts or replace with a new pod.
- Low Battery: If the battery voltage is below 3.3V the Red LED will flash 15 times and the device will stop working until it is recharged.
- Short circuit: If the resistance is less than 0.25ohm or there is a short circuit, the LED indicator will light up White for 5 seconds. Check the pod is installed correctly, clean contacts or replace with a new pod.
- Over time protection: If vaping for longer than 10 seconds the fire will cut out and the White LED will flash 5 times. Restart vaping as usual.
- Overheat protection: If the circuit board is hotter than 85°C the White LED will flash 3 times and the device will not work until it has cooled down.
- Pod installed: White LED will flash.
How To Charge The Battery
The charging rate is specified as 2A.
This does have “pass through” charging – meaning you can vape on it whilst charging.
- Using a USB type C cable, connect the small end into the USB port on the mod.

- Connect the large end of the cable into a suitable USB outlet.
- The LED will cycle through the colours and turn off when fully charged.
I found this to take around 45 to 50 minutes to charge from empty.
How To Fill the Pod
If using a new pod leave to stand for 5-10 minutes after first fill to allow the coil to saturate with e-liquid.
- Remove the pod from the mod.
- Tip the pod on its side and lift up the fill port cover in the direction of the arrow.

- Rotate the cover out of the way if needed.
- Add e-liquid to the fill port watching the level through the side of the pod.

- Replace the fill port cover firmly.
How To Install / Replace Coil
I would recommend emptying the pod before changing the coil. If this is not possible make sure to have plenty of absorbent material around to soak up the e-liquid which will escape when you remove the coil.
- Remove the pod from the mod.
- Tip the pod upside down.
- If a coil is already installed, use a fingernail to prise it out from the pod base. There will be a slight resistance – do not worry – this is the sealing O-rings doing their job!

- Pull the coil out from the pod.

- Push a new coil into the pod base and make sure to push it firmly so it is fully sealed.

- Fill the pod and leave to stand for 5-10 minutes.
How Does the Nevoks Feelin 2 Perform?
As there are different styles of pod included in the kit, I will choose different types of e-liquid to suit.
The power settings for each coil resistance are different, I will include the power level options with each coil – they are also summarised on the graphic below.
If any of these terms used in the review are over your head – have a read of our handy guides below!
- MTL V DTL V RDL – A Guide To Vape Styles
- VG and PG in E-liquid – all you need to know
- Beginners guide to E-liquid
- Nic Salt E-liquid
0.8ohm Nevoks SP-10 Coil
The power outputs for this coil are..
- Low = 14W
- Medium = 15W
- High = 16W
Take 1
This was the first coil I tried – and it didn’t go well.
I found even in the highest power setting the flavour was poor and there was a very “cottony” taste. I decided to persevere as sometimes flavour improves during the first pod fill.
Anyway it actually deteriorated to the point of dry hits before I even emptied the pod and I could not carry on testing that coil. It is weird as I am using 50/50 e-liquid which should be plenty thin enough and I left the pod filled for several days before I started vaping.
Take 2
I have plenty of spare 0.8ohm coils so I tried another and this time only set it to the medium power level.
This time within about 4 or 5 vapes the vapour was much tastier and I got the sweetness from my Bubblegum. This coil was from a pack that were supplied separately to the device. The faulty coil that burnt out was one that came with the kit – so is there a quality issue with the kit coil?
The vapour production is immense, thicker clouds than you would expect for this power output, coil resistance and 50/50 e-liquid!
I found I used this coil with the airflow set in the mid position for the best flavour.
I am very impressed indeed!
After 7 refills (3ml each) there is still no drop in performance.
0.6ohm Nevoks SP-10 Coil
The power outputs for this coil are..
- Low = 18W
- Medium = 19W
- High = 20W
On the low power level this was a bit “meh” but upping the power to the medium setting did wake up the flavour a bit.
I did find the highest power setting still felt under-powered, I believe another Watt or two would make this coil shine.
The Nevoks website recommends between 18 and 25W for this coil and our Neil C enjoyed this in the Feelin X kit at 22W.
Sadly the highest output in the Feelin 2 for this coil is only 20W – hence why it feels so under-powered. Therefore the power limits are preventing this coil from reaching its optimum which is a huge shame. Considering the kit can output up to 30W this really should be easily fixed by Nevoks.
This means that the performance is really only average, it is not terrible, but it is lacking flavour and warmth. You do get plenty of vapour though!
I did only manage 4 refills of this (3ml each) and the flavour did not improve during this time unfortunately.
Additional Coils
As I was also sent the 0.4ohm and 1ohm coils I thought I would add how they performed.
I will not be adding these to the scores at the end as these are just optional extras!
0.4ohm Nevoks SP-10 Coil
The power outputs for this coil are..
- Low = 25W
- Medium = 27W
- High = 29W
I used a different e-liquid for this coil as it is a lower resistance than you would usually use for MTL vaping. Therefore I decided the Ruthless Energy Drank Shortfill which is 70% VG and 30% PG with no nicotine added would be worth a bash.
These coils are very small so I have been a bit concerned as to whether this thicker e-liquid will be able to wick properly. There is only 1 way to find out!
I would suggest leaving this to stand for a good 5-10 minutes after filling before vaping as this e-liquid is thicker and will need longer to absorb into the cotton in the coil.
This coil is a very nice surprise, even at the lowest power level the flavour is banging!
At the medium power level the warmth ramps up and so does the amount of vapour!
On the highest power level the sweetness really starts to sing and this kicks out more clouds than you would expect.
I would give this coil 10/10 and the power settings of the mod match it perfectly.
1ohm Nevoks SP-10 Coil
The power outputs for this coil are..
- Low = 11W
- Medium = 12W
- High = 13W
I used my normal 50/50 Bubblegum e-liquid with this coil (same as the 0.6ohm and 0.8ohm).
If you use higher nicotine strengths (10mg+) and find the 0.8ohm coil is still a bit harsh then the 1ohm coil should be the answer.
This will be quite a low output but it is designed to allow for stronger nicotine e-liquid without making your throat hurt!
On the lowest power setting, there is a bit of vapour, the vape is very cool and not much flavour. Moving up to medium power means things get slightly warmer and a bit more vapour.
On the highest power setting things have improved and this is a very mellow and smooth vape. It is not punchy enough in flavour for me, but it is ideal for higher nicotine vapers.
This performs better with the airflow more restricted.
Airflow
To rate how restricted the airflow is, I use a scale – where 0 = fully closed, no airflow – up to 10 = breathing fresh air.
For the 0.8ohm coil – with the airflow adjustment fully closed it is around 1, it’s virtually shut off but there is just enough to get the device to auto draw fire. With the airflow adjustment fully open this is very airy indeed – I would rate it around a 5.5. So this should be suitable for MTL and RDL vapers. However the auto draw is not very reliable with the airflow fully open.
Using the 0.6ohm coil with the airflow fully closed it was around 1 on the airflow scale again. But the fully open airflow setting was slightly less restricted at about a 6.5. So this coil is still great for MTL vapers and should also keep RDL vapers happy too!
Mod Performance
The auto draw can be very stuttery with the airflow open above half way – it can stop and start whilst inhaling.
Plus with the airflow fully open the device does not always fire, or it is a bit unreliable. This was more of an issue with the 0.8ohm coil than the 0.6ohm. I tried both coils in both devices and the auto draw was the same.
When the battery indicator turns Red I have found the vape to be quite weak, but this is pretty common on most kits.
Leaks
No leaks at all, but there was a slight misting of condensation around the sides of the pod. Nothing serious though!
Battery Life
This is always a variable and will depend on the pod installed, output level selected and your own vaping habits.
With the 0.8ohm coil on the medium power level (Blue) I got 5.5 to 7.5 hours of vaping.
I used the 0.6ohm coil on the high power level (Green) and I got around 5 to 6 hours.
Pros
- Love the LED indicator – very clever!
- The Rubbery mouthpiece is weird at first but it is so comfortable when you get used to it
- Device feels sturdy
- Great looking mod, the two tone paintwork is stunning
- Auto lock function on fire button prevents accidental firing when in bag or pocket
- Included coils are suitable for MTL and RDL vapers due to the wide range of airflow adjustment
- Comfortable in the hand
- Different power levels to tailor the output to your preference
- 4 coil resistances to choose from and they are compatible with other Nevoks kits
- Auto draw and button fire – button fire ideal as a back-up if auto draw fails
- Very efficient on e-liquid usage
- 0.4ohm coil (available separately) and 0.8ohm coil (included in kit) are brilliant
Cons
- Stuttery auto draw activation when airflow fully open
- 1st 0.8ohm coil burnt out before I even got through 3ml of e-liquid
- Slightly overpriced in comparison with other quality pod kits
- The power settings for the 0.6ohm coil are too low and prevent it excelling
- Auto lock function might annoy some, if the device has been resting you will need to inhale to wake it up again, the fire button will lock until you do.
- Hard to see the coil resistance as the coils are so small with tiny writing.
Nevoks Feelin 2 Final Review Verdict
There are plenty of things to like about this kit, look at the long list of “Pros” above!
In general the design is ace, the LED indicator is clever, plenty of coil options, auto draw and button firing and 3 power levels.
I am not sure if there is a quality issue with the coils supplied in the kit? One 0.8ohm coil failed before I had even vaped 3ml of e-liquid. However I replaced it with one that came in a box of 5 coils supplied separately from the device and that was very impressive.
The maximum output for the 0.6ohm coil is only 20W, which is too low in my opinion and results in a lacklustre performance from this coil. This has impacted the score for the 0.6ohm coil even though the device was the problem – not the coil.
The airflow has a great range of adjustment to suit MTL and RDL vapers, but when the airflow is fully open this can result in an unreliable auto draw which can be overcome by using the button to fire.
This is more expensive than some of the Uwell Caliburn A and G kits and a similar price to the OXVA Xlim Pro – which is my favourite kit ever. So in this instance I think it is slightly overpriced. If I had to spend £25 of my own money on a pod kit, I would buy the Uwell or OXVA to be honest.
Saying that, it is still a great kit which is super easy to use with a lot of features. If you bought it you would not be disappointed but there are slightly better options out there in the same or lower price bracket.
Have you tried the Nevoks Feelin 2 Kit? Let me know in the comments below!


 The Limits?")

