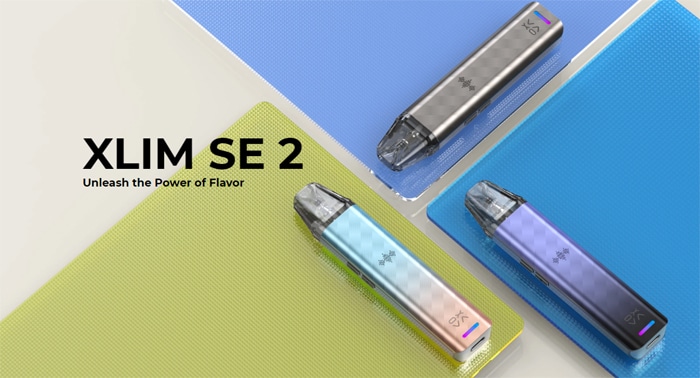
Time to get my hands on a pod kit from my favourite brand – meet the new OXVA Xlim SE 2!
I own every model in the Xlim range and I love them. I use 3 of the Xlim Pro / Xlim SQ Pro daily with the 0.8ohm V2 pods.
The Xlim range have also given us some other iconic pod kits right from the Xlim V1/V2, Xlim SQ and Xlim C.
The Xlim SE 2 is based on the original Xlim SE but with some added features…
Thank you to OXVA for sending two of the Xlim SE 2 devices for me to review! I will report back honestly on the devices in my possession.
What To Expect From The OXVA Xlim SE 2…
As the name suggests this version is an update to the Xlim SE – which was designed to be a very simple to use pod kit.
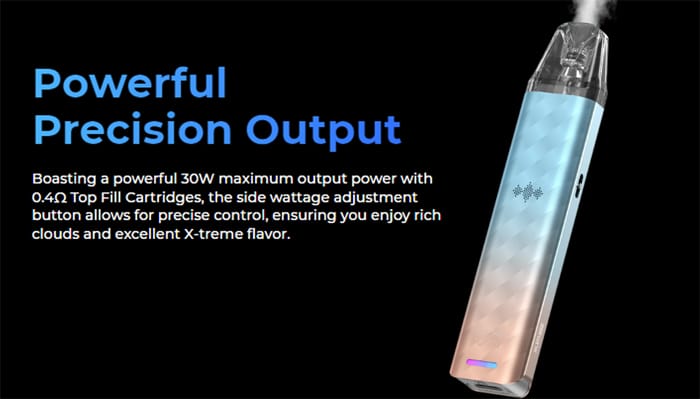
There have been a lot of updates – the maximum power output for instance is now 30W – compared to the 25W max of the original SE.
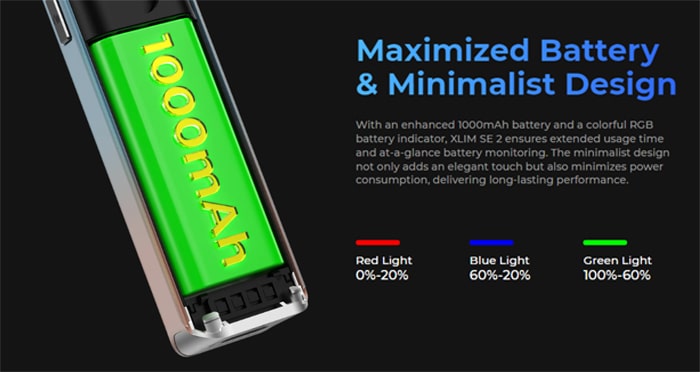
Plus the battery has a 1000mAh capacity, which is an increase of 100mAh to the original.
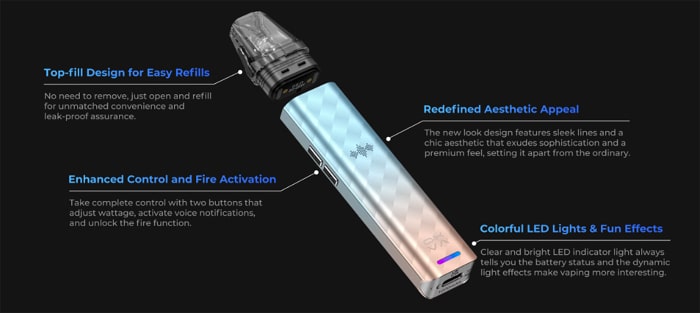
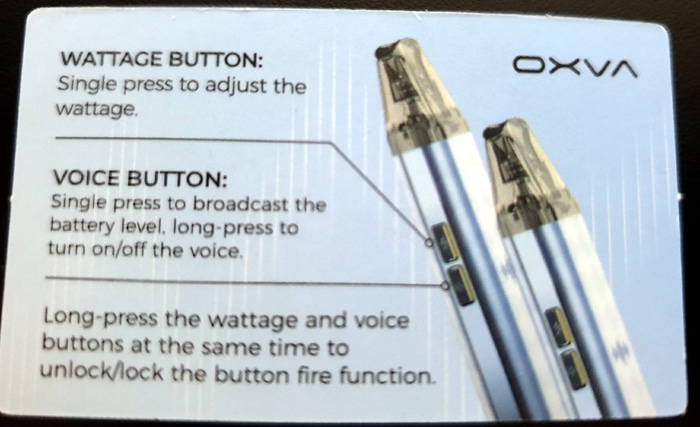
Another massive change is the fact that the SE 2 has voice broadcasting technology. Ideal for those with sight issues. You can turn this feature on and off as desired.
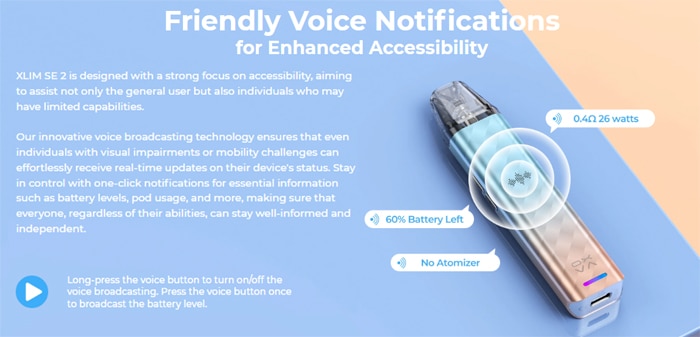
The voice broadcasts will tell you information on battery levels, power settings, faults and coil resistance. A press of the voice button will prompt the device to tell you the current battery level.
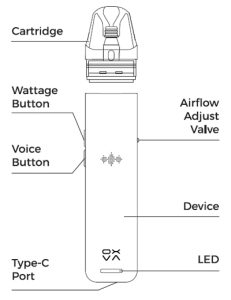
You can also adjust the output using the wattage control button.
The RGB LED indicator will keep you informed of the battery and device status.
An airflow adjustment slider is provided to help you to tailor the incoming airflow to your preference.
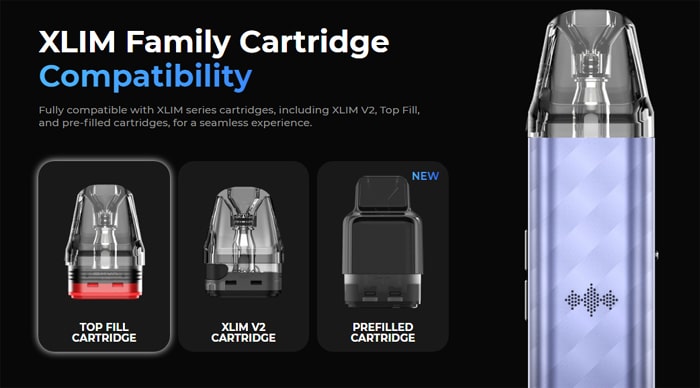
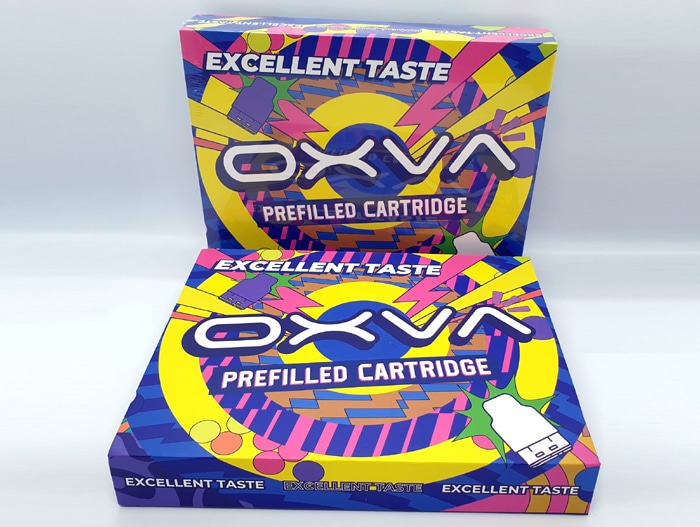
This is compatible with all previous Xlim fixed coil refillable pods – V2 and new top fill V3. Plus there are pre-filled pods on the way for the ultimate in simplicity.
Included in the kit are the V3 top fill pods in the 0.6ohm and 0.8ohm versions. You can also purchase 0.4ohm and 1.2ohm pods separately.
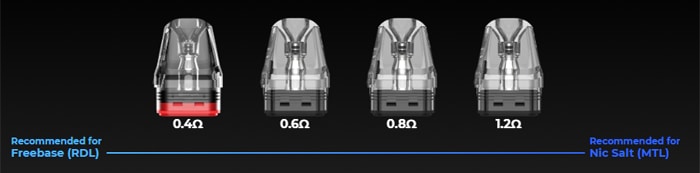
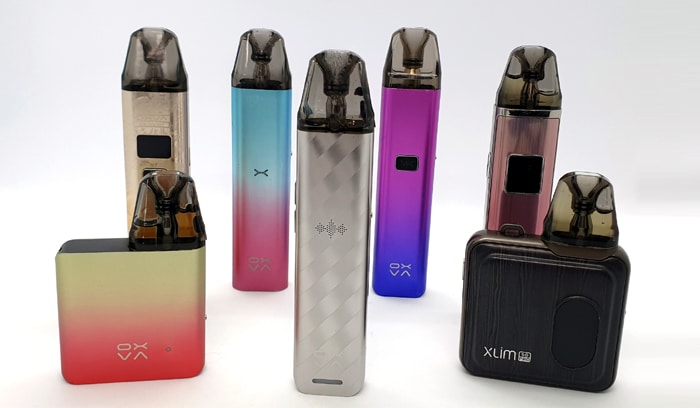
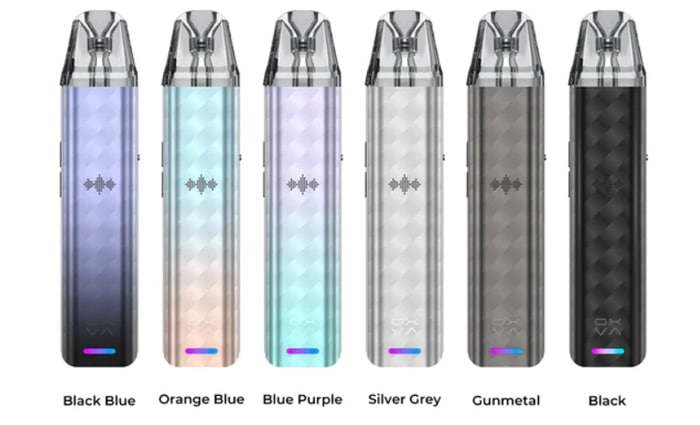
There are 6 colours to choose from: Black Blue, Orange Blue, Blue Purple, Silver Grey, Gunmetal and Black.
Kit Includes
- OXVA Xlim SE 2 device
- 0.6ohm top fill Xlim V3 pod
- 0.8ohm top fill Xlim V3 pod
- Lanyard
- USB Type C cable
- User manual

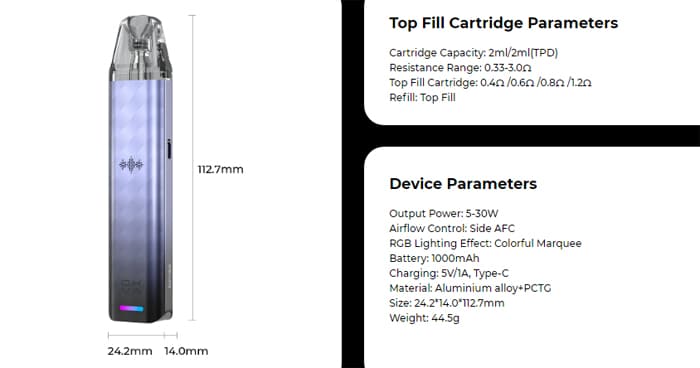
OXVA Xlim SE 2 Specs
- Size: 112.7×24.2x14mm
- Battery: 1000mAh (internal)
- Display: RGB LED indicator and Voice announcements
- Output: 5-30W
- Adjustable output
- Type C USB charging – 1A charge rate
- Resistance range: 0.33-3ohm
- Capacity: 2ml
- Pods: OXVA Xlim V1, V2 & V3 pods plus pre-filled pods
- Adjustable airflow
- Top fill
- Draw activation or manual fire
- Voice broadcasting
OXVA Xlim SE 2 Design and Build Quality
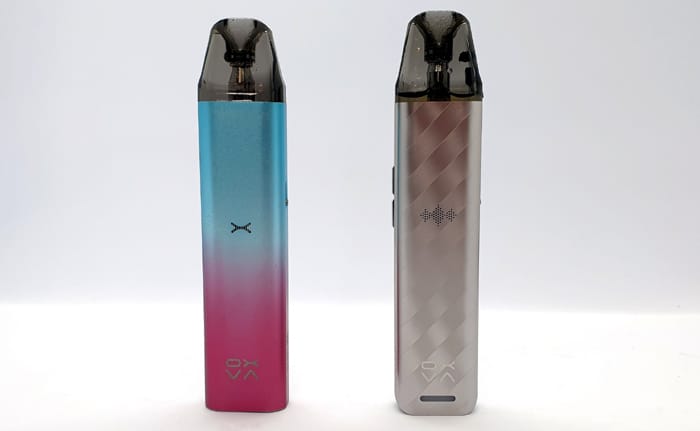
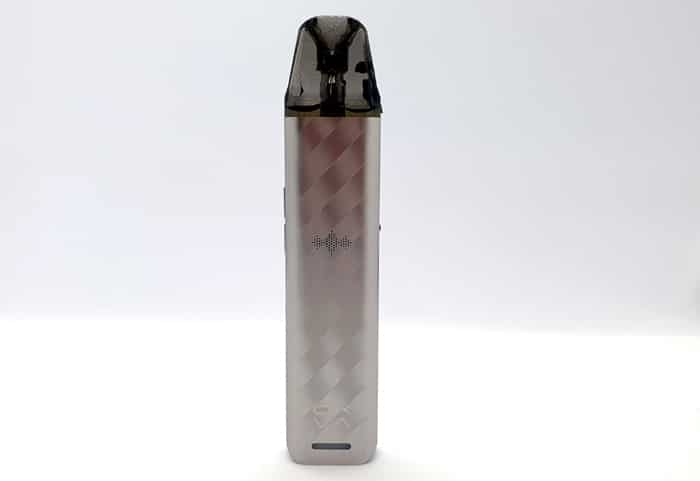
I received two of these kits both in the Silver Grey colour.
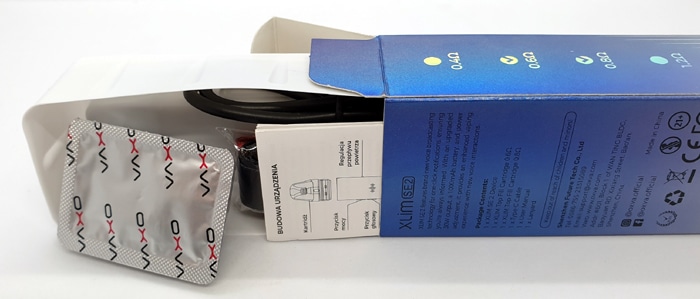
The packaging is similar to the original Xlim SE. A very narrow box with a plastic tray inside. Be careful as you pull out the plastic tray as all the accessories are tucked in underneath it and will fall out. Also this means trying to get everything back in the box is trickier than it should be!
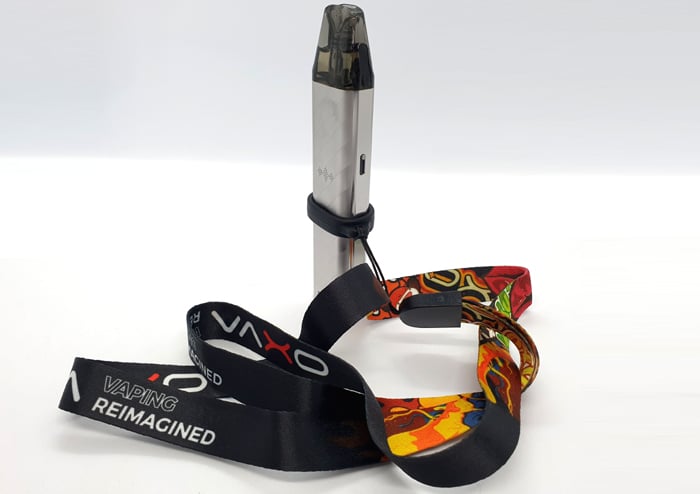
A good quality (but quite “loud”) lanyard is included in the kit.
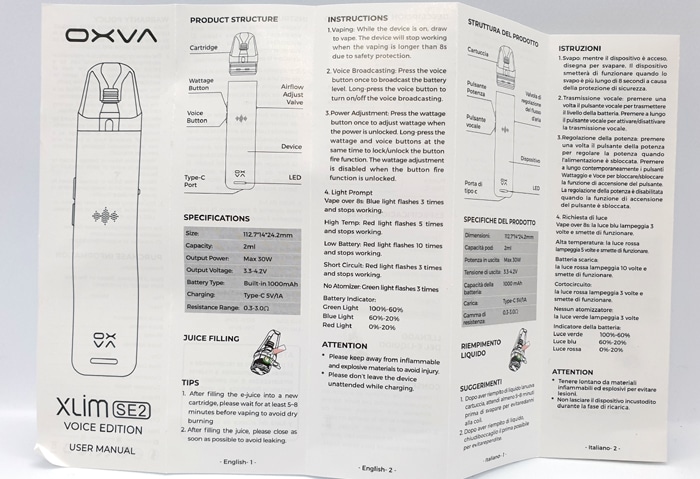
Instructions
The instructions have left me a bit perplexed.
This does not have a screen, so I am very confused as to how you will know what output you have selected.
The instructions tell you how to adjust the power. But there is no display. I watched a video from OXVA where the voice broadcasting will tell you what output level you are selecting. But you can also turn the voice broadcasting off – which means I would not have a flipping clue what output it was set to?
Also there is no mention of the function of the indicator light when charging.
On top of that, the description of locking the wattage button and adjusting wattage is pretty confusing. If you read the passage below from the user manual you will see what I mean.
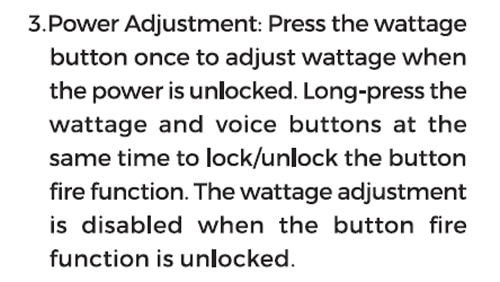
Anyway I did work this all out so see the Quick Start Guide section below for some clarity!
Inside the box is a small card which tries to help clarify this information and says that long pressing both buttons will turn the manual fire button on or off. When it is turned off the device is auto draw firing only.
Needless to say I think the instructions are pretty pants – which is a shame as this kit is targeted to people who want an easy to use and accessible vape kit? In my previous work as a Technical Author I would write user and service manuals. Our aim was to make sure that it would be easily understood by the people the document was targeted to. In this instance, OXVA need to review this.
If you would like to zoom in, change colour / contrast or use with a screen reader – you can download a PDF of the instructions here.
OXVA Xlim SE 2 Mod
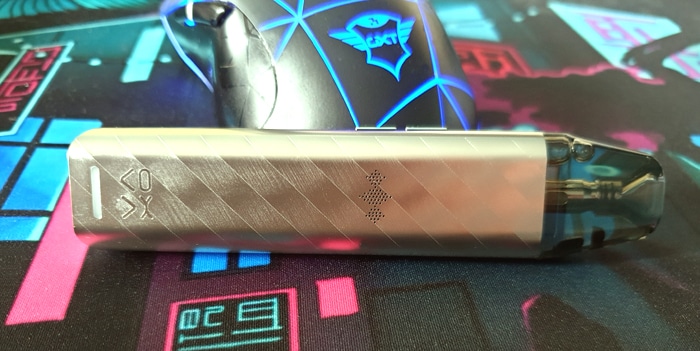
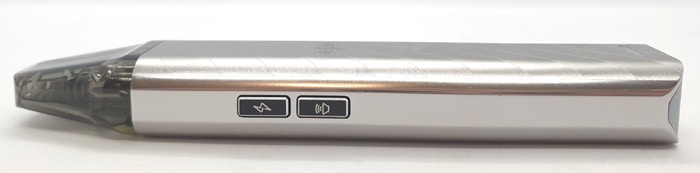
This is a very pretty device with an intricate pattern etched into the Aluminium Alloy body.
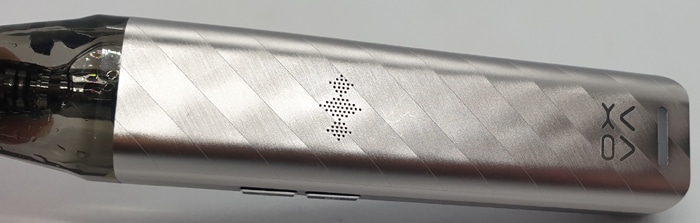
The front and rear have a brushed effect which is etched to make it look like it is wrapped in a ribbon.
On each side is a slightly more shiny edge.
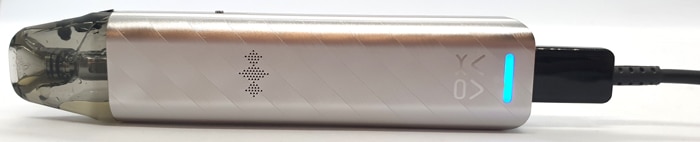
On the front you will see a pattern made from small holes, which is the speaker for the voice broadcasting. Further down the front is the OXVA logo etched in.
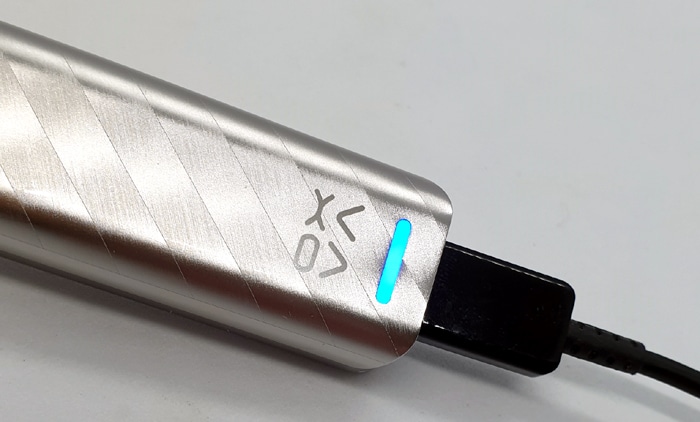
Beneath that you will see the LED indicator. This is a RGB dynamic type which changes colour to show the device status and battery charge remaining in different tones.
The rear is plain.
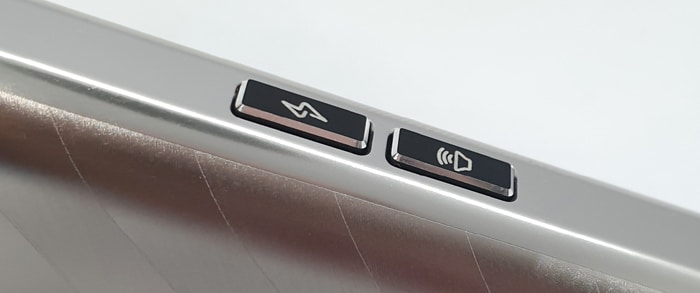
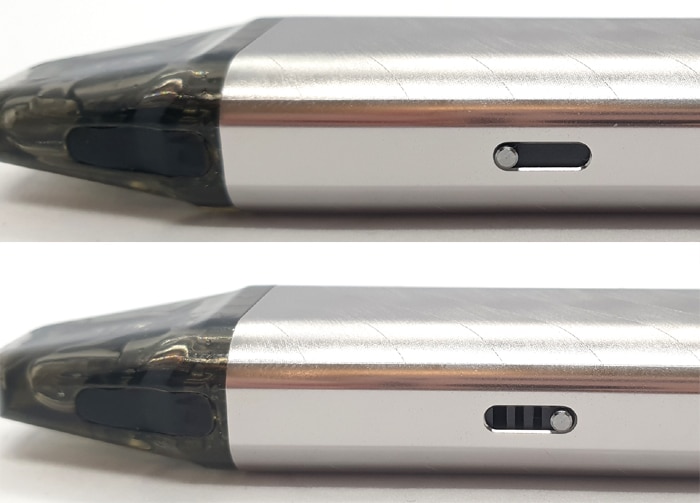
On the left side are two buttons which are rectangular and measure around 8x3mm. Not ideal if you have chunky sausage fingers as they are pretty small.
However they do only protrude around 0.5mm from the side of the device so less chance of them being accidentally knocked or caught when in pockets or bags. Plus they have a lovely Black and shiny finish!
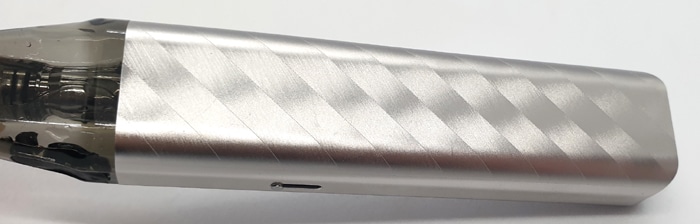
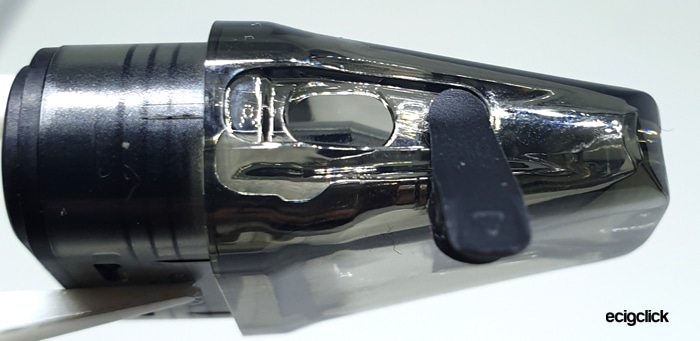
On the opposite side you will find the airflow adjustment slider and the “Xlim SE 2” branding. Again the knob protrudes less than a millimetre from the edge of the mod. It has a very smooth sliding action but is not loose enough to move on its own.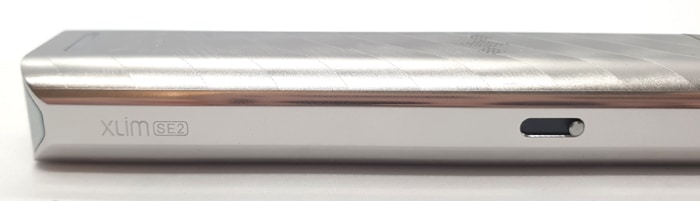
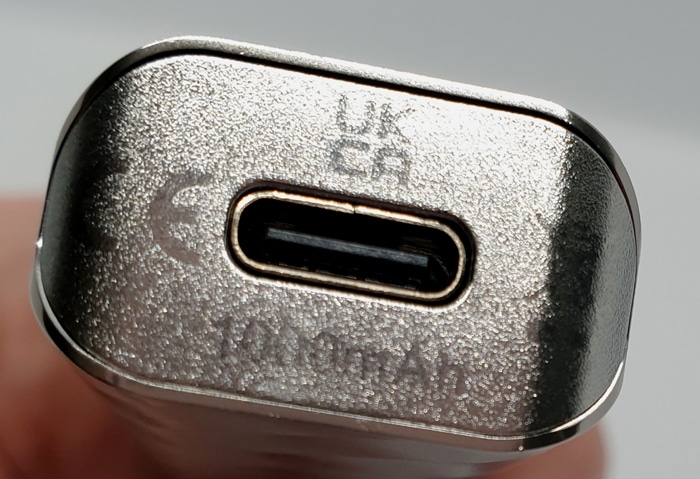
Looking at the base of the device, the etching is quite feint – hence hard to capture with a photo. You get the required legal logos and the battery capacity. Also this is where the USB Type C port lives, which seems to be fine – no issues at all.
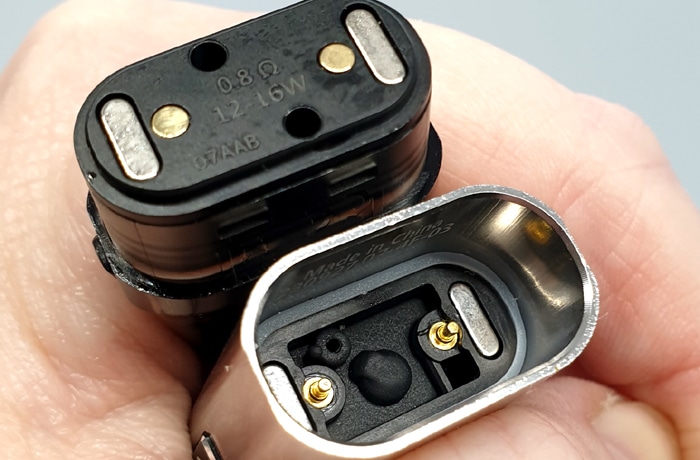
The pod compartment is nothing new compared to previous Xlim devices. There are 2 magnets and 2 spring loaded electrical contacts. The pod is pulled in instantly by the magnets and is held in firmly with no wobble. It is not difficult to remove either, OXVA have struck the perfect balance between a secure connection and the ease of removal.
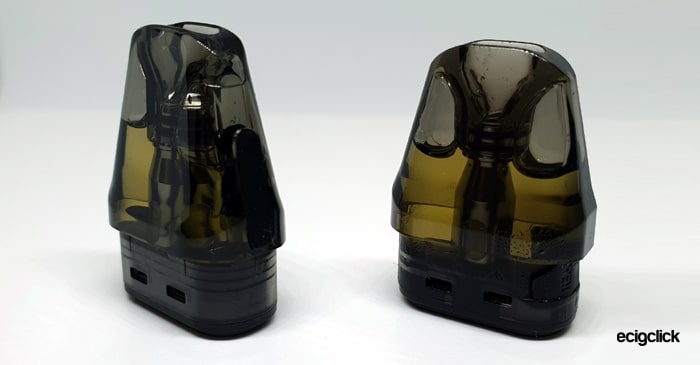
OXVA Xlim V3 Pod
This is the same as you would get with the OXVA Xlim Pro kit – so I have blatantly copied and pasted the details here.
Apart from the fill port location the pod is exactly the same as the V2 pod used on other Xlim kits.
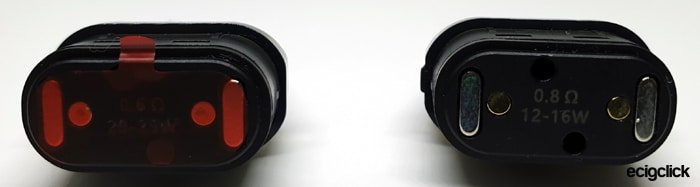
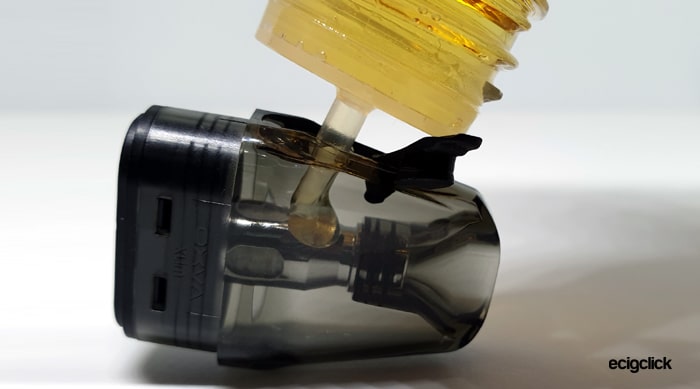
The base is exactly the same with 2 magnets and 2 contact areas. There are also 2 airflow holes which means the pod can be installed either way around. The pod resistance and recommended power levels are printed on the base too.

Although darkly tinted, the e-liquid level is always visible, in fact even when installed in the mod as the coil base sits level with the top of the mod.
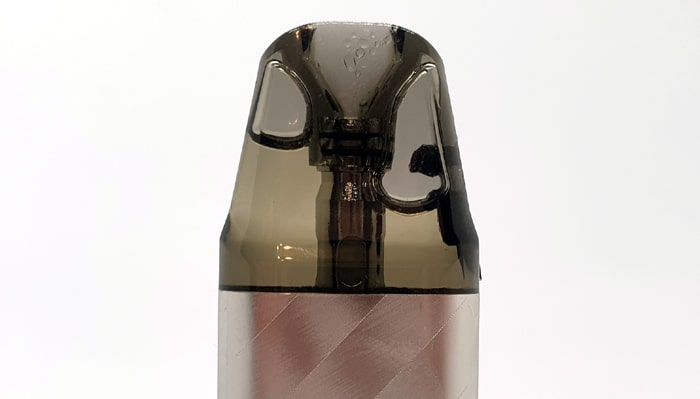
You get the same comfortable “Duck Bill” style mouthpiece which is always a pleasure to use.
The fill port cover is located on the side of the pod and when you do your first fill it can be a bit of a puzzle as to how to access the port.
Simply lift up the bottom edge of the port cover and it will lift up to reveal the port. You can also swing the cover out of the way too.
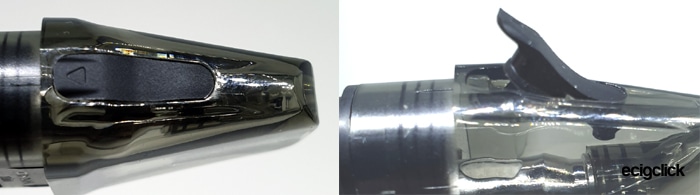
It might be a bit fiddly to open if you have short fingernails as it is one you will need to prise up. But it is far easier to close than the V2 pods which I found sometimes leaked if you couldn’t push the cover fully in.
The fill port size is generous at 5mmx3mm and I had no issues with small bottle nozzles when filling.
Quick Start Guide
The device arrives with the 0.6ohm pod installed.
However you will need to fill the pod and then remove the isolator sticker from the pod base. This is there to protect the coil so the device does not fire before there is e-liquid in the pod. Also this prevents accidental firing in transit.
I will guide you through the steps you need to get started below!
Basic Operation
- Power On/Off = you cannot turn this on or off.
- Vaping = Inhale on the mouthpiece to vape or if you have unlocked the fire button you can fire it manually.
- Battery indicator = Whilst vaping this will display a pretty coloured pattern, When you stop vaping it will display the charge remaining. Green light = 60-100% charge remaining. Blue light = 20-60% remaining and Red = 0-20%.

- Battery indicator when charging = The light will cycle through the normal battery status colours and turn off when fully charged.
- Lock / Unlock fire button = Long press the wattage button and voice button together. When the wattage button is set for manual firing (unlocked) you cannot adjust the output and vice versa. The voice will tell you if the button is locked (cannot use it to fire) or unlocked (can use it to fire).
- Adjust the output = Unlock the wattage button and press it to adjust and the power level will be announced. It will rise in steps within the recommended limits of the pod resistance with each press. Once it has reached the maximum it will return to the minimum and cycle through again. Just remember even pressing it once will increase the power and if you have done this accidentally you will have to cycle through to return to your preferred setting.
- Voice broadcasting = Press the voice button once for it to inform you of the battery level. Press the fire button (if locked) to hear the power level – but it will increase each time you press it. Long press the voice button to turn the announcements on and off.
- Adjust airflow = move the slide switch on the side of the mod to increase / decrease the incoming airflow to your preference.

Top = fully closed, Bottom = fully open - Replacing the pod = When you install or replace the pod the voice will announce the pod resistance and power level.
Protections
- Low battery – The Red light flashes 10 times and the device will not work until charged. It will also announce “Battery Low Please Charge”.
- Short circuit – The Red light flashes 3 times and the device will stop working. You will need to clean all the contacts on the pod and device. If the fault persists try a new pod. If this is still not rectified the device may be faulty.
- High temperature – The Red light flashes 5 times and it will stop working until the device has cooled down.
- Time Out – if you vape for longer than 8 seconds the Blue light will flash 3 times and the fire will cut out. You can continue vaping by inhaling or pressing the fire button again.
- No Pod – If the device does not recognise the pod or there is no pod installed, the Green light will flash 3 times. Insert a pod. If pod still not recognised clean all the contacts on the pod and device. If the fault persists try a new pod. If this is still not rectified the device may be faulty.
How To Charge The Battery
The charging rate is specified as 1A, which is a bit slow compared to previous Xlim kits with 2A charging.
- Using the included USB type C cable, connect the small end into the USB port on the mod.

- Connect the large end of the cable into a suitable USB outlet.
- The LED indicator will cycle through the normal battery status colours and turn off when fully charged. Alternatively you can press the voice button and it will announce the charge level.
- When you disconnect the charging cable the voice will announce the charge level.
I found this to take around 1 hour 5 minutes to charge from empty.
How To Fill the Pod
- You don’t need to remove the pod to refill. I removed it to make it easier to take a photo!
- Lift up the cover of the fill port and add e-liquid through the port.

- Watch the e-liquid level through the clear side of the pod.

- Replace the fill port cover firmly.
- If this is the first fill allow the pod to stand for 10-15 mins to allow the e-liquid to soak into the coil. This is called Priming and is a very important step. If not fully primed you could burn the coil out and your throat lining in the process!
How Does The OXVA Xlim SE 2 Perform?
I used my own e-liquid mix which is 50/50 PG/VG made from IVG Bubblegum Concentrate at 20% ratio. This is quite high a flavour ratio as I prefer plenty of flavour, but sadly this means it can be a coil killer sometimes. But the OXVA Xlim pods usually have no issues at all with it.
I add nic salt to approx 6mg strength.
Both of these pods have been covered in multiple reviews – take a look at the Xlim Pro and Xlim SQ Pro for more detailed performance information.
In this review I will just be concentrating how they perform when used with the Xlim SE 2 mod.
If any of these terms are over your head – have a read of our handy guides below!
- MTL V DTL – A Guide To Vape Styles
- VG and PG in E-liquid – all you need to know
- Beginners guide to E-liquid
- Nic Salt E-liquid
Xlim V3 0.8ohm Pod
The recommended power limits for this pod are 12-16W.
I usually enjoy this pod on other OXVA kits at 16W.
So I set the Xlim SE 2 at 16W and it performs just as spectacularly as it does in the other Xlim kits.
This is my favourite pod in ANY pod kit I have ever reviewed. It always delivers on flavour and pod life.
In previous reviews I have counted the puffs for the V3 0.8ohm pod and have regularly got over 5000 puffs! Which is epic.
Sadly as this device does not have a puff counter I cannot do the same.
Another important thing is that this time I have not experienced the leaks I was getting from previous V3 0.8ohm pods.
This was the only down side with them in the past – yet I haven’t had this issue at all with this kit!
Excellent news!
Xlim V3 0.6ohm Pod
The recommended power limits for this pod are 20-25W.
As other OXVA kits have set the power to 22W for this pod, I have stuck with that setting.
The flavour is perfection, as is the vapour. At 22W it also gets quite warm too. But if it is too warm you can always knock the power down slightly.
For me I enjoyed it more at 20W as I could get a longer inhale before it got a bit too warm!
This pod performs just as well in this kit as it does in other OXVA kits and earns itself a well deserved 10/10!
Airflow
To rate how restricted the airflow is, I use a scale – where 0 = fully closed, no airflow – up to 10 = breathing fresh air.
For the 0.8ohm pod – you can get it to fire with the airflow fully closed but it does feel slightly tighter than with the same pod on the Xlim Pro. So I would rate it around 0.75 closed and 4.5 fully open.
The 0.6ohm pod – it is possible to get it to fire with the airflow fully closed so I would rate it around 1. However when fully open this is comparable with the 0.8ohm at around 5.
Pre-Filled Pods
This kit is also compatible with the OXVA Xlim range of pre-filled pods.
I will cover these in a separate review as they are universal for the Xlim fixed coil kits (apart from the Xlim C).
For those who want the simplest vape experience these would be ideal as no faffing about with refilling. Just replace the pod when it is empty.
These would make a perfect partner to the Xlim SE 2 for those with sight or dexterity issues.
Mod Performance
When it comes to output and battery life I am very happy. I found the auto draw to be just as quick as pressing the fire button manually.
Plus the power output is pretty consistent and you only start to detect a drop in power when it reaches 10% charge. After that point with the 0.6ohm pod especially, it is quite weak and you need to take longer inhales. But it will announce when the power is low and tell you to charge.
Unfortunately the 1A slow charging rate does mean you will be waiting 1 hour 5 minutes for it to charge. When you consider its sibling the Xlim Pro has the same capacity battery but charges in 35 minutes – as it has a 2A charge rate.
Sadly there is no way of locking both buttons and no way of turning the device off either which is a worry when carrying in a pocket or bag. You could either keep triggering the voice, changing the power level or pressing fire by accident. Also accidentally pressing the fire button when it is locked will adjust the output and you will have to then cycle through the output levels to return to your favourite.
If you turn off the voice system, you have no way of knowing what power output you have selected? I think even an LED showing different colours to display this would be useful.
Voice Technology – Thumbs Up Or Thumbs Down?
In practice the voice technology needs some tweaks. The voice is clear and is a female voice with an American accent. It tells you the power level, battery level, pod resistance and when the battery needs charging. As I didn’t encounter any faults I am not sure if it will broadcast them?
There is no volume adjustment so you cannot turn in up in noisy areas and down in quiet environments.
Also basics such as informing when the battery has fully charged are not covered.
When carrying the device I heard it yakking away to itself in my pocket. And there is no way of fully locking all the buttons when in a bag or pocket.
Anyway if you would like to hear what it sounds like – see the video below! I suggest turning the volume up.
Leaks
The 0.6ohm pod was perfect – not a single dribble!
I have reported in previous reviews how the V3 0.8ohm pod was always leaking – just after filling. I assumed it was down to air pressure when filling the pod.
However with the Xlim SE 2 I have not experienced this at all! I am so happy as this is what put me off the V3 pods. So fingers crossed OXVA have dealt with this issue.
Battery Life
This will vary according to the pod, power level and your own vaping habits. But as a guide…
With the 0.8ohm pod at 16W I got 7 hours – around 4 refills.
With the 0.6ohm pod at 22W, I got around 5-6 hours (4 refills).
In my opinion the voice technology is not a big drain on the battery as I got longer battery charge life than I did on the Xlim Pro which has a screen.
Pros
- A quality pod kit which performs excellently
- The flavour, vapour and warmth is just epic from the best fixed coil pods you can buy!
- Excellent pod life (I have got over 5000 puffs in previous reviews from the same pods)
- Compatible with all previous fixed coil Xlim pods with plenty of resistance options
- Can purchase pre-filled pods for those transitioning from disposables or who struggle with filling
- Good idea to have voice announcements for those with sight issues
- Xlim kits are always excellent value for money
- Lovely LED indicator with a dynamic colour changing effect
- Stunning finish with the intricate etched design
- Great MTL to RDL airflow adjustment
- No leaks from either pod
Cons
- Instructions are poor. Info missing and some of the included info is bloody confusing.
- 1A charge rate. Previous Xlim kits have a much faster 2A charge rate
- When carrying the device in pocket or bag it often just talks to itself
- Cannot lock all the buttons fully for carrying
- It does not announce when fully charged – you have to press the button to check if you are unable to see the LED indicator
- No volume control – I struggled to hear it in a noisy area and it was too loud in quiet areas
- If you turn off the voice – how do you know the output power level selected?
- When the manual fire is turned off, accidentally pressing the fire button increases the power. You will have to cycle back through the power levels.
OXVA Xlim SE 2 Final Review Verdict
This is definitely a step in the right direction for accessible technology – but is it practical in real life?
The voice technology is not perfect. It does work OK and tells you nearly all the information you need to know. But it doesn’t announce when charging is complete and you cannot adjust the volume.
I think there should be more mechanical switches to turn the voice on/off and lock the buttons. These would be easier for those with sight issues to feel and they would be able to easily check the setting.
An area which needs massive improvement is the instruction manual. Confusing information is bad enough, coupled with the fact there is information missing – such as charging. This kit is designed to be simple and targeted towards those who need something more accessible. Providing poor instructions does hinder this goal and has impacted the “Ease of use” score.
If someone with sight issues was using a screen reader app to dictate the instructions it would be even more confusing.
I find the 1A charge rate to be a bit slow taking over an hour to charge.
Performance wise though I have no issues at all. It performs as well as the rest of the Xlim devices.
Summary
In a nutshell – if you would find the voice technology helpful – it is worth buying as the Xlim pods are the best on the market right now and it is value for money. But it does not tick all the boxes in terms of being easy to use or informative.
If you do not need the voice technology I would recommend the original Xlim SE as the simplest device in the range. Or if you are not afraid of a bit of tech consider the Xlim Pro or SQ Pro.
If someone you know has bought this kit and is struggling, please direct them to this review which hopefully will help them get started. You can also add any questions to the comments section and we will answer.
One massive plus point is the fact that the 0.8ohm V3 pod did not leak for me this time! It always has in the past on other devices – this makes me very happy!
Let me know what you think of the OXVA Xlim SE 2 in the comments below!


